

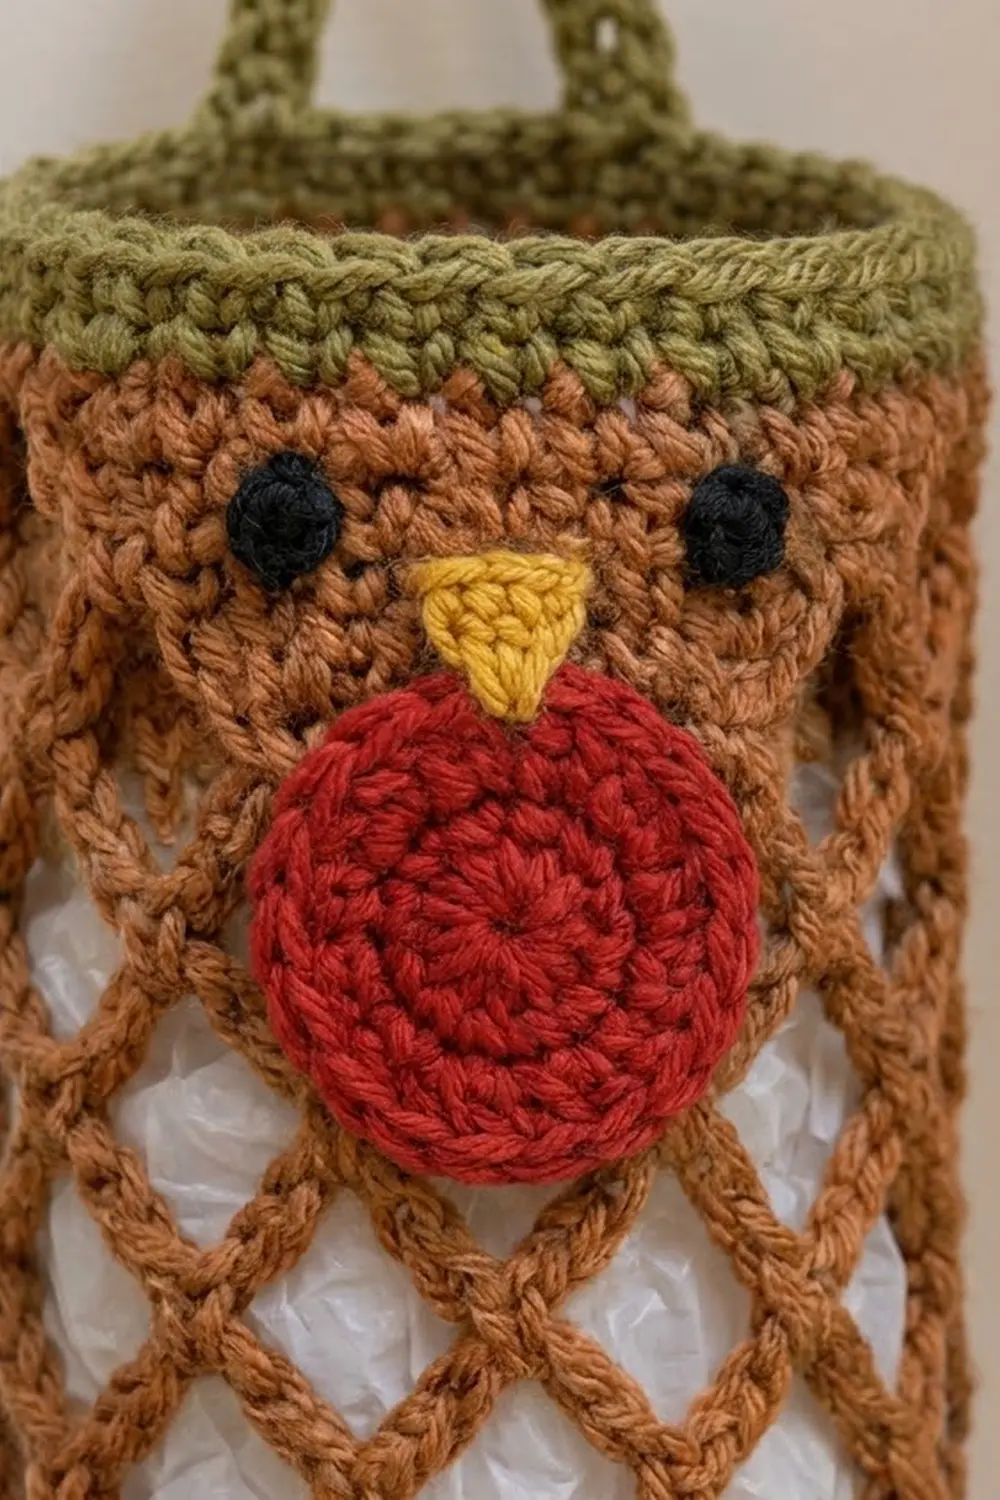
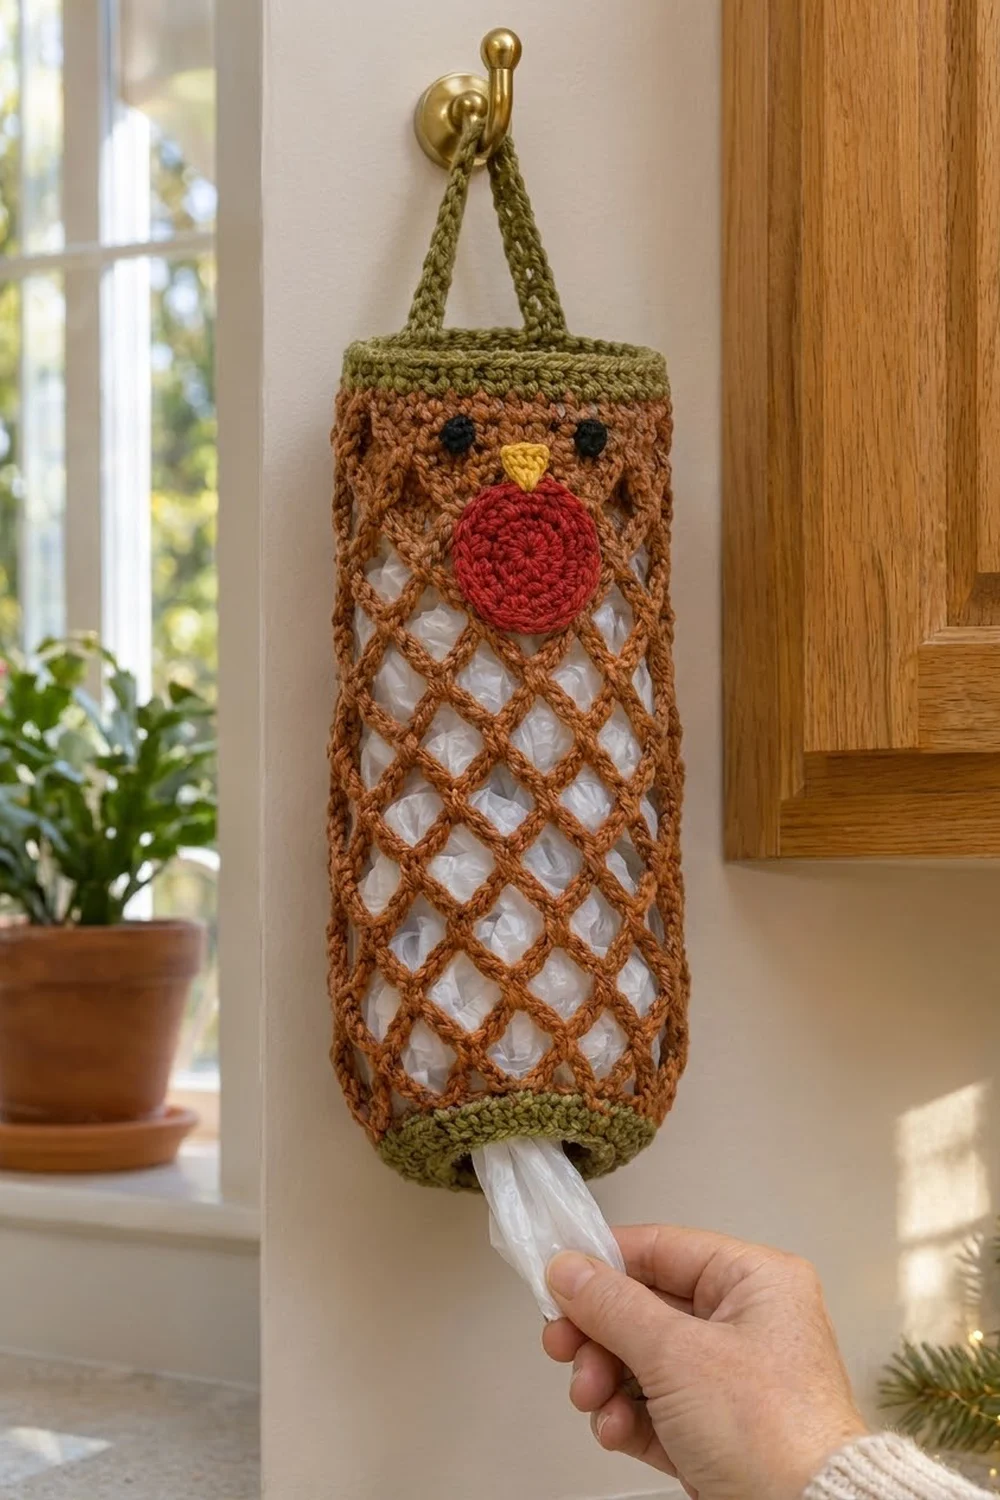
This cheerful robin keeps your plastic bags tidy and adds a little holiday charm to the kitchen. The body is a tall tube. Most of it is an open diamond mesh, so you can see how many bags are left. Solid bands sit at the top and bottom.
The colors are classic robin: rust/copper brown for the body, olive green for the trim and strap, a bright red breast, a mustard-yellow beak, and black eyes. The style is cozy and simple, and it suits a farmhouse or holiday kitchen.
This pattern uses US crochet terms. The finished holder is about 16 in (40.6 cm) long and 15 in (38.1 cm) around, not counting the strap. The strap adds a hanging loop of about 4 in (10.2 cm) above the rim.
Construction overview: You work the body bottom-up in joined rounds. It starts with a solid band, moves into a 10-loop diamond mesh, then changes back to solid single crochet for the face section. Green borders are added to both ends, and the bottom border is drawn in to make the dispensing opening. Finally, you make the strap, breast, beak and eyes, then sew them on.
Finished Size and Construction
- Finished size: 16 in (40.6 cm) tall × 15 in (38.1 cm) around, about 4.8 in (12.2 cm) across when filled
- Skill level: Easy+ (basic stitches, working in rounds, simple mesh)
- Terminology: US
- Yarn weight: Worsted (#4)
- Hook: 5.0 mm (H-8)
- Number of pieces: 1 body (tube), plus 1 strap, 1 breast circle, 1 beak and 2 eyes, all sewn on
- Layout: single vertical tube; face on the front, strap ends on the sides
- Body size before borders: 14 in (35.6 cm) tall × 15 in (38.1 cm) around
- Border depth: 1 in (2.5 cm) at each end
Materials
Use a smooth worsted-weight yarn. Acrylic or a cotton blend both work well. Acrylic springs back after it stretches, and cotton holds the mesh shape firmly. Avoid fuzzy yarns, because they hide the diamond pattern.
- Rust/copper brown (A): about 90 g / 180 m
- Olive green (B): about 25 g / 50 m
- Red (C): about 10 g / 20 m
- Mustard yellow (D): about 2 g / 4 m
- Black (E): about 2 g / 4 m
Tools:
- 5.0 mm (H-8) crochet hook
- Tapestry needle
- 4 locking stitch markers
- Scissors
- Measuring tape
- Rust-proof pins (for placing the appliqués and for blocking)
These quantities include a margin of about 15% for your gauge swatch and small differences in tension.
Abbreviations (US Terms)
- ch – chain
- sl st – slip stitch
- sc – single crochet
- dc – double crochet
- sc2tog – single crochet 2 together
- sc3tog – single crochet 3 together
- BLO – back loop only
- sk – skip
- st(s) – stitch(es)
- rnd(s) – round(s)
- MR – magic ring
Special stitch – reverse sc (crab stitch): Work from left to right (right to left if you crochet left-handed). Insert the hook into the next stitch to the right, yarn over, pull up a loop, then yarn over and pull through both loops. This makes a firm, rolled, cord-like edge.
Gauge and Checkpoints
Gauge: 16 sc and 16 rnds = 4 in (10.2 cm) in sc worked in the round.
Mesh gauge: 4 mesh rnds = 3 in (7.6 cm) tall, measured flat and unstretched.
Test the body first. Work the foundation and Rnds 1–2, then lay the tube flat and measure all the way around. It should be 15 in (38.1 cm).
- Too big? Go down a hook size, to 4.5 mm (7).
- Too small? Go up a hook size, to 5.5 mm (I-9).
Don’t change the stitch count. All the border and appliqué math depends on 60 stitches.
Checkpoints:
- After Rnd 2: 15 in (38.1 cm) around, about 0.5 in (1.3 cm) tall
- After Rnd 16: about 11 in (27.9 cm) tall
- After Rnd 28: 14 in (35.6 cm) tall
- After both borders: 16 in (40.6 cm) tall
Measure the mesh lying flat, not hanging. Once the holder is filled, the mesh stretches a little lengthwise.
Body
Join each round with a sl st to the first stitch. Ch 1 at the start of each rnd does not count as a stitch. Place a marker in the first stitch of every rnd.
Foundation: With A, ch 60. Join with a sl st to the first ch to form a ring. Check that the chain isn’t twisted.
Rnd 1: Ch 1, sc in each ch around, join. (60 sc)
Rnd 2: Ch 1, sc in each st around, join. (60 sc)
Diamond Mesh
Rnd 3 (mesh setup): Ch 1, sc in the same st as the join. Ch 5, sk 5 sts, sc in next st; repeat from * 8 more times. Ch 2, sk the last 5 sts, then dc in the first sc. (10 loops: 9 ch-5 loops + 1 closing ch-2/dc loop)
The ch-2/dc closing loop is the same length as a ch-5. It also leaves your hook in the middle of the loop, ready for the next round.
Rnds 4–15: Ch 1, sc around the post of the dc just made. Ch 5, sc in next ch-5 loop; repeat from * 8 more times. Ch 2, dc in the first sc. (10 loops each rnd)
Because each sc lands in the center of a loop below, the loops shift half a loop every round. That shift is what creates the diamonds.
Rnd 16 (closing mesh rnd): Ch 1, sc around the post of the dc just made. Ch 5, sc in next ch-5 loop; repeat from * 8 more times. Ch 5, sl st in the first sc. (10 ch-5 loops)
Checkpoint: The mesh (Rnds 3–16, 14 rnds) is about 10.5 in (26.7 cm) tall. The total body is about 11 in (27.9 cm).
Solid Face Section
Rnd 17 (conversion rnd): Sl st into the first ch-5 loop. Ch 1, 6 sc in the ch-5 loop, then move to the next loop; repeat around, join. (60 sc = 50 sc worked one per chain + 10 extra sc, one per loop)
The extra stitch in each loop brings the count back to 60, so the tube doesn’t pull in above the mesh.
Rnds 18–28: Ch 1, sc in each st around, join. (60 sc each rnd) Fasten off.
Checkpoint: Rnds 17–28 (12 rnds) form a 3 in (7.6 cm) solid band. The body now measures 14 in (35.6 cm).
Appliqués and Strap
Red Breast (make 1)
With C:
- Rnd 1: MR, ch 1, 6 sc in ring, join. (6)
- Rnd 2: Ch 1, 2 sc in each st, join. (12)
- Rnd 3: Ch 1, sc, 2 sc in next st around, join. (18)
- Rnd 4: Ch 1, sc in next 2 sts, 2 sc in next st around, join. (24)
- Rnd 5: Ch 1, sc in next 3 sts, 2 sc in next st around, join. (30)
- Rnd 6: Ch 1, sc in next 4 sts, 2 sc in next st around, join. (36)
Fasten off and leave a 12 in (30.5 cm) tail. The circle should measure 3 in (7.6 cm) across.
Beak (make 1)
With D:
- Row 1: Ch 4, sc in 2nd ch from hook and in the next 2 ch. (3 sc)
- Row 2: Ch 1, turn, sc3tog. (1)
Fasten off and leave a tail. The beak is a triangle about 0.75 in (1.9 cm) wide at the top and 0.5 in (1.3 cm) tall.
Eyes (make 2)
With E: MR, ch 1, 6 sc in ring. Pull the ring fully closed and join. (6) Fasten off and leave a tail. Each eye is about 0.4 in (1.0 cm) across.
Strap (make 1)
With B:
- Row 1: Ch 41, sc in 2nd ch from hook and in each ch across. (40 sc)
Fasten off and leave long tails at both ends. The strap is 10 in (25.4 cm) long.
Border
The borders are worked with B directly onto the body. Border gauge is the same as the body: 16 sts = 4 in (10.2 cm). The tube is round, so the counts below are given for the whole round and for each flattened side (front and back).
Top Border
Join B in any st of Rnd 28. This st becomes st 1, so mark it.
- Border Rnd 1: Ch 1, sc in BLO of each st around, join. (60 sc: 30 front / 30 back)
- Border Rnds 2–3: Ch 1, sc in BLO of each st around, join. (60 sc each rnd)
- Border Rnd 4: Ch 1, reverse sc in each st around, join. (60)
Fasten off. The border is 1 in (2.5 cm) deep.
Bottom Border
Turn the body upside down and join B in the free loop of any foundation ch.
- Border Rnd 1: Ch 1, sc in each free loop around, join. (60 sc: 30 front / 30 back)
- Border Rnd 2 (trim rnd): Ch 1, sc in next 3 sts, sc2tog; repeat 12 times, join. (48 sts = 36 sc worked one per stitch + 12 sc2tog, which use 24 stitches; 24 front / 24 back)
- Border Rnd 3: Ch 1, sc in BLO of each st around, join. (48)
- Border Rnd 4: Ch 1, reverse sc in each st around, join. (48)
Fasten off. The bottom opening is now 12 in (30.5 cm) around, about 3.8 in (9.7 cm) across.
Why the math works: The top border uses exactly one sc per body stitch (60 into 60), so it sits flat with no ruffling or pulling. The bottom border starts the same way, then removes exactly 12 stitches in one evenly spaced round. That narrows the opening by 3 in (7.6 cm) of circumference, enough to hold the bags in while still letting you pull one out. The BLO rounds make the ridges, and the reverse sc gives the rolled edge.
Attaching the Strap and Face
- Find the sides. With st 1 of the top border at the left side, count to st 31 for the right side. St 16 is the front center.
- Strap: Overlap each strap end 0.5 in (1.3 cm) inside the top border, one at st 1 and one at st 31. Sew securely through all border rounds.
- Eyes: Center them 0.75 in (1.9 cm) below the top border, 1.5 in (3.8 cm) apart center to center, one on each side of st 16.
- Beak: Place the wide edge on top, centered on st 16, 1 in (2.5 cm) below the border, with the point facing down.
- Breast: Place the top edge of the circle 1.5 in (3.8 cm) below the border, centered on st 16. The circle covers the lower solid section and reaches 1.5 in (3.8 cm) onto the mesh.
- Pin everything first. Then whipstitch around each appliqué edge. Where the breast lies over the mesh, sew it to the mesh chains only.
Final Blocking
- Weave in all ends. Run each tail through at least 2 in (5.1 cm) of matching stitches.
- Lightly mist the holder with water, or steam it from above without touching (acrylic only, with the iron held above the yarn).
- Slide in a rolled towel or a 4.8 in (12.2 cm) wide cylinder, such as a large oatmeal canister.
- Gently pull the mesh lengthwise until the tube measures 16 in (40.6 cm) and the diamonds look even.
- Flatten the red circle with your fingers and pin the edges if they curl.
- Let it dry completely before you remove the form.
Final Quality-Control Checklist
- The tube measures 15 in (38.1 cm) around and 16 in (40.6 cm) long.
- There are 10 diamonds around in every mesh round, with no doubled or missing loops.
- The top border has 60 stitches and lies flat. The bottom border has 48 stitches and is evenly gathered.
- The strap ends sit directly opposite each other at st 1 and st 31.
- The face is centered on st 16, with the eyes level and the beak centered between them.
- The breast circle is flat, 3 in (7.6 cm) across, and sewn all the way around.
- All ends are woven in and secure.
Troubleshooting
- The mesh is spiraling or leaning: You probably skipped a dc closing loop or worked into the wrong loop. Count 10 loops at the end of every round.
- The top section flares or pulls in: Check that Rnd 17 has exactly 60 sc (6 per loop).
- Bags fall out of the bottom: Work Border Rnd 2 tighter, or repeat the decrease as sc 2, sc2tog for a 45-stitch opening.
- Bags won’t come out: Leave out Border Rnd 2 and keep the bottom at 60 stitches.
- The breast circle cups: Your tension is too tight. Go up a hook size for the circle only.
- The breast circle ruffles: Your tension is too loose. Go down a hook size, or block it flat with pins.
- The strap stretches too much: Add a second row of sc along it, or line it with a length of matching yarn.
Care
Hand-wash in cool water, press out the water in a towel, and lay flat to dry, reshaping the mesh. Don’t wring it, because that can distort the diamonds.
Final Notes
Everything starts from one number: 60 stitches = 15 in (38.1 cm) around.
- The body grows from a 0.5 in (1.3 cm) solid base.
- Then comes 10.5 in (26.7 cm) of 10-loop mesh.
- Then a 3 in (7.6 cm) solid face band, for 14 in (35.6 cm) in all.
- The two 1 in (2.5 cm) borders bring it to 16 in (40.6 cm).
- The bottom border narrows the opening to 48 stitches.
- The 3 in (7.6 cm) red breast, small beak and eyes turn the tube into a robin.
Check your size at each stage and the finished holder will come out right.
Happy crocheting!