

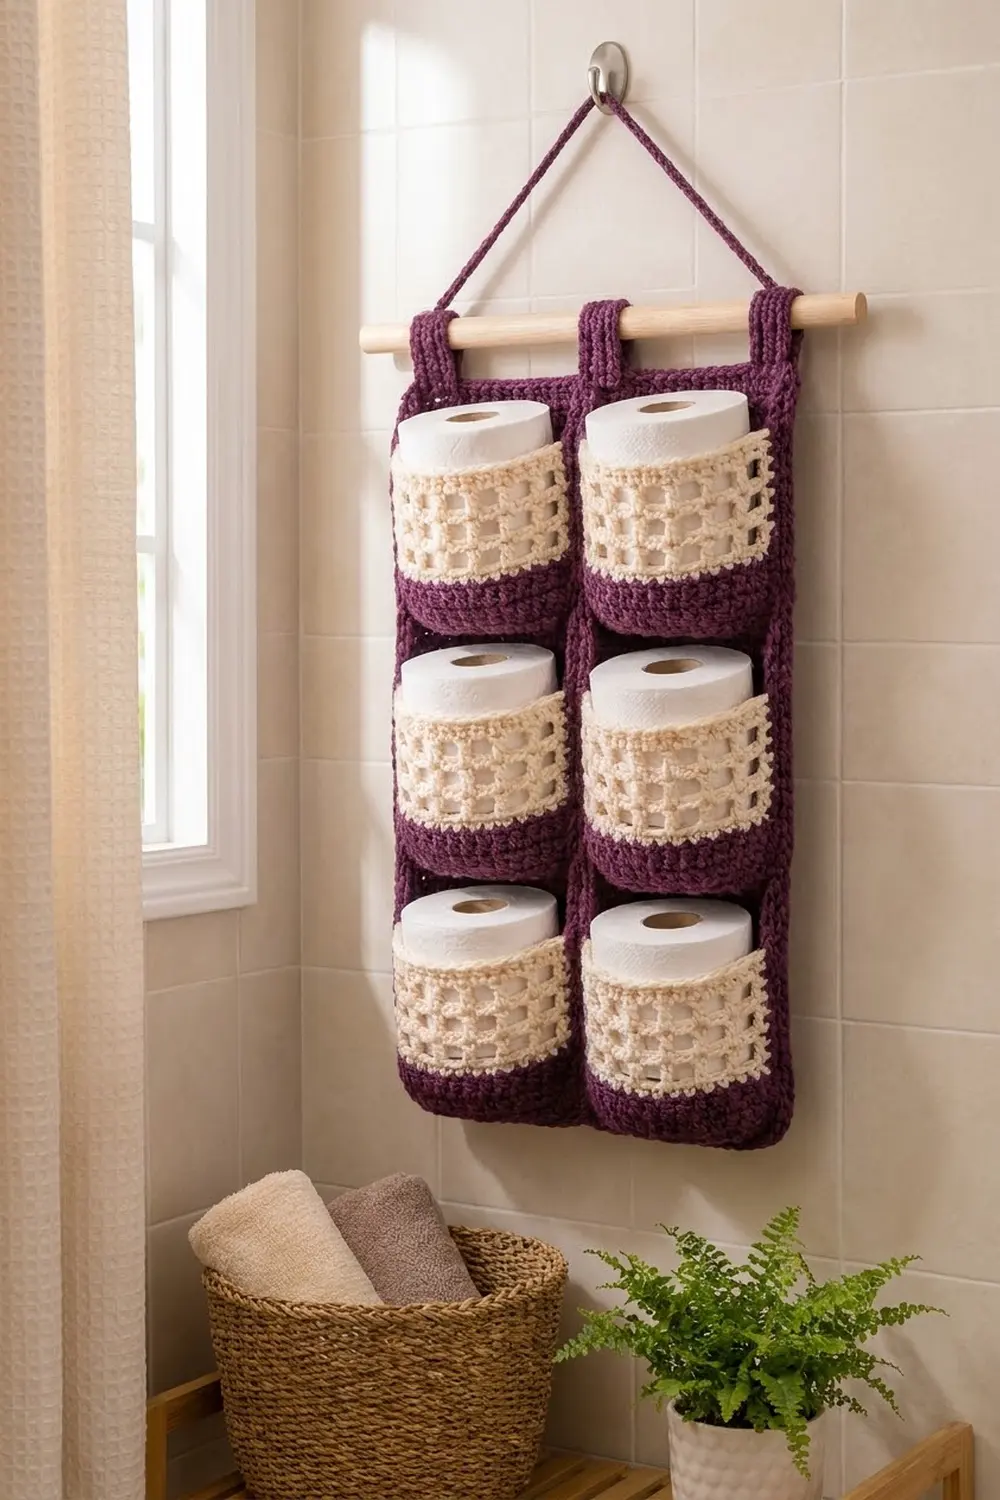
The Plum Lattice holder keeps six spare rolls tidy and in easy reach. It hangs on the wall from a wooden dowel. The six round pockets sit on a sturdy plum back panel in two rows of three.
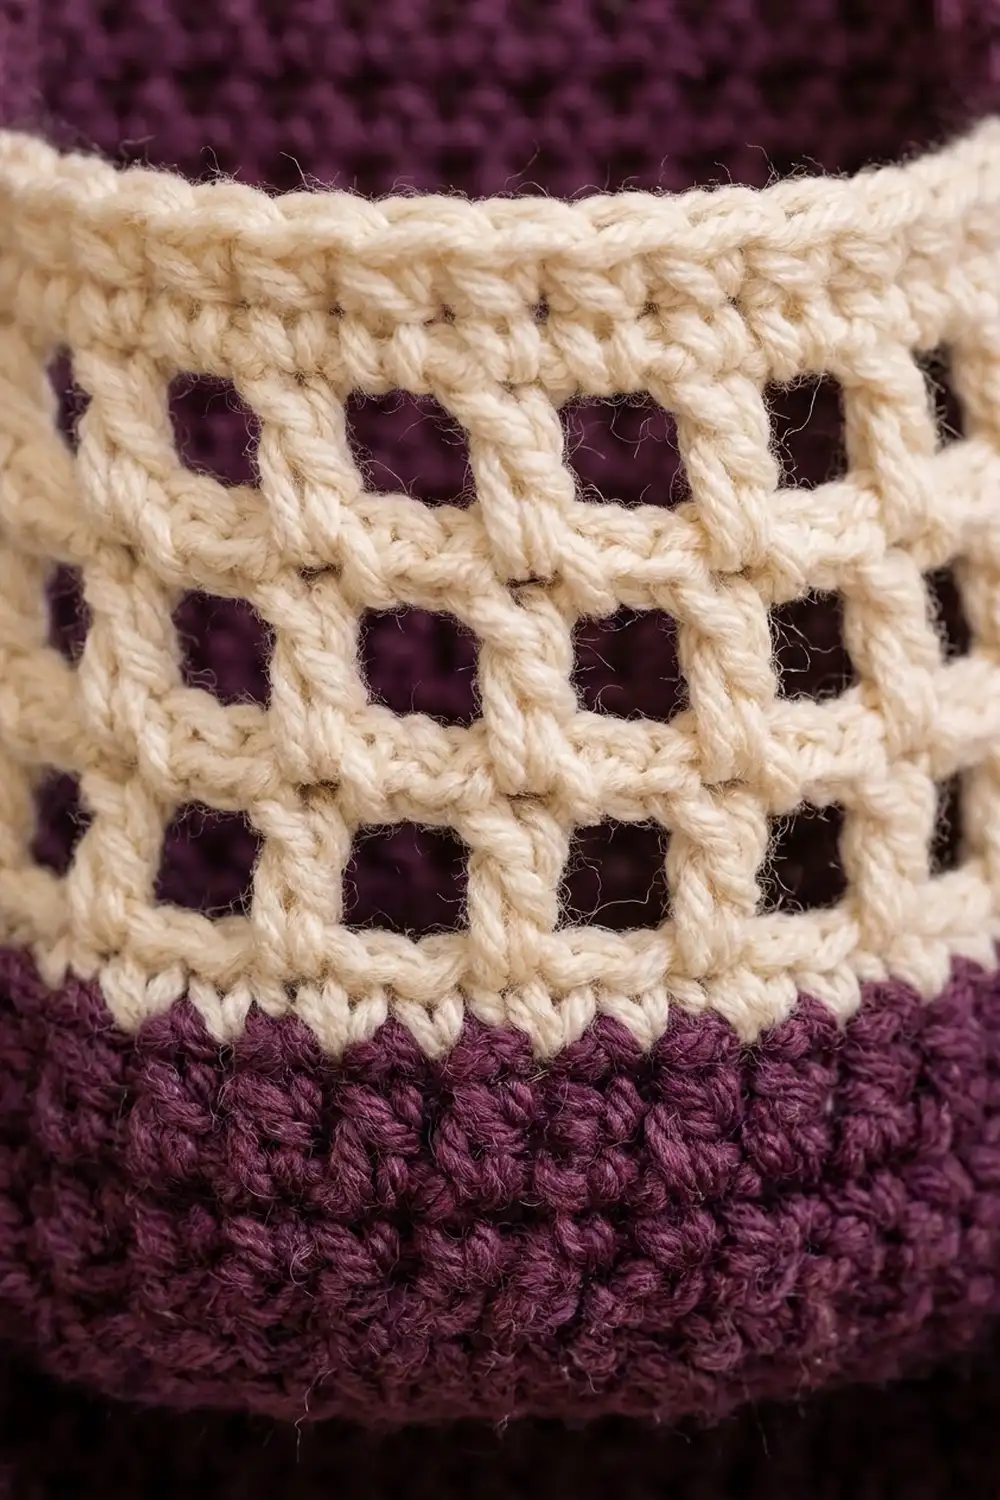
Each pocket starts with a solid plum base and lower wall. It then switches to cream for an open filet mesh band and a solid cream rim. The open grid shows a little of each roll, and the solid plum keeps the bottom strong.
This pattern uses US crochet terms. The finished holder measures 20¼ in wide x 13¼ in tall (51.4 x 33.7 cm), not counting the tabs and cord. Each pocket is about 5 in (12.7 cm) across and 4½ in (11.4 cm) tall.
How it’s built: you crochet six pockets in joined rounds, plus one back panel in rows, four tabs and one cord. You sew the pockets to the panel, add a two-round border, then fold the tabs over the dowel and sew them in place.
Finished Size and Construction
- Finished size: 20¼ x 13¼ in (51.4 x 33.7 cm)
- Skill level: Easy to Intermediate
- Terminology: US
- Yarn weight: Bulky (#5)
- Hook: 6.0 mm (US J-10)
- Number of pieces: 12 (1 panel, 6 pockets, 4 tabs, 1 cord)
- Layout: 3 pockets across x 2 rows
- Pocket size: 5 in (12.7 cm) base diameter x 4½ in (11.4 cm) wall height
- Panel size before border: 19 x 12 in (48.3 x 30.5 cm)
- Border depth: ⅝ in (1.6 cm), 2 rounds
Materials
Use a smooth bulky yarn: cotton blend, acrylic, or a cotton-acrylic mix. The panel needs to hold its shape when loaded with rolls, so avoid very fuzzy or very stretchy yarns. These estimates assume about 1.4 m per gram.
- Plum (Color A): 260 g (about 364 m)
- Cream (Color B): 80 g (about 112 m)
Both quantities include a margin of roughly 20% for your gauge swatch and seaming.
Tools:
– 6.0 mm (US J-10) crochet hook
– Tapestry needle
– 8–10 locking stitch markers
– Wooden dowel, 24 in (61.0 cm) long and ¾ in (1.9 cm) in diameter
– Rust-proof pins
– Measuring tape
– Scissors
– Wall hook
Abbreviations (US Terms)
- ch – chain
- sl st – slip stitch
- sc – single crochet
- dc – double crochet
- st(s) – stitch(es)
- sp – space
- BLO – back loop only
- inc – 2 sc in the same st
- MR – magic ring
- RS – right side
Special stitch – Mesh: (dc, ch 1). One mesh uses 2 stitches of the round below: a dc in one stitch, then a ch 1 that skips the next stitch. On mesh-over-mesh rounds, work each dc into a dc and each ch 1 over a ch-1 space.
Gauge and Checkpoints
Gauge: 12 sc and 13 rows = 4 in (10.2 cm) in sc. For the mesh, 5 rounds = 3 in (7.6 cm) tall, and 1 mesh = ⅔ in (1.7 cm) wide.
Make one complete pocket before anything else. It works as your gauge swatch.
Pocket checkpoints:
– After Rnd 8: the base is 5 in (12.7 cm) across.
– After Rnd 15: the wall is about 2.15 in (5.5 cm) tall.
– After Rnd 18: the wall is about 4 in (10.2 cm) tall.
– After Rnd 20: the wall is about 4½ in (11.4 cm) tall.
Panel checkpoints:
– After Row 13: 4 in (10.2 cm) tall.
– Width: 19 in (48.3 cm) at every row.
– After Row 39: 12 in (30.5 cm) tall.
If your piece is too big, go down 0.5 mm in hook size. If it’s too small, go up 0.5 mm. Fix gauge on the pocket first. A pocket that’s too small won’t fit a standard roll, and a pocket that’s too big will sag.
Pocket (Make 6)
Work in joined rounds with RS facing. Don’t turn. Each join is the pocket’s center back, and it will end up hidden against the panel.
Base (Color A, plum):
Rnd 1: In MR, ch 1, 6 sc. Join with sl st to first sc. (6 sts)
Rnd 2: Ch 1, inc in each st around, join. (12)
Rnd 3: Ch 1, [sc 1, inc] 6 times, join. (18)
Rnd 4: Ch 1, [sc 2, inc] 6 times, join. (24)
Rnd 5: Ch 1, [sc 3, inc] 6 times, join. (30)
Rnd 6: Ch 1, [sc 4, inc] 6 times, join. (36)
Rnd 7: Ch 1, [sc 5, inc] 6 times, join. (42)
Rnd 8: Ch 1, [sc 6, inc] 6 times, join. (48)
The base should be a flat circle 5 in (12.7 cm) across. Its 48 sts give a circumference of 16 in (40.6 cm), which leaves room for a roll.
Wall (plum):
Rnd 9: Ch 1, sc in BLO of each st around, join. (48) The unused front loops form the ridge where the base turns up into the wall.
Rnds 10–14: Ch 1, sc in each st around, join. (48 each round)
Fasten off plum on the last join, leaving a 6 in (15.2 cm) tail to weave in.
Wall (Color B, cream):
Rnd 15: Join cream in the joining st. Ch 1, sc in each st around, join. (48)
Rnd 16: Ch 4 (counts as dc + ch 1), skip next st, [dc in next st, ch 1, skip next st] 23 times. Join with sl st in 3rd ch of beginning ch-4. (24 dc + 24 ch-1 sps = 24 mesh)
Rnds 17–18: Sl st in first ch-1 sp, sl st in next dc. Ch 4 (counts as dc + ch 1), [dc in next dc, ch 1] 23 times, join in 3rd ch of beginning ch-4. (24 mesh each round)
On Rnds 17–18, the sl sts only move you to the first dc. The beginning ch-4 stands on that dc, so every round has exactly 24 dc stacked in columns.
Rnd 19 (conversion round): Ch 1, sc in each dc and in each ch-1 sp around, join. (24 sc in dc + 24 sc in sps = 48)
Rnd 20: Ch 1, sc in each st around, join. (48)
Fasten off, leaving an 18 in (45.7 cm) cream tail.
Wall height: 9 rounds of sc (Rnds 9–15 and 19–20) measure 2.77 in, and 3 mesh rounds measure 1.8 in. That’s about 4½ in (11.4 cm) in total.
Back Panel (Make 1)
Work in rows in plum.
Row 1: Ch 58, sc in 2nd ch from hook and in each ch across. (57 sts)
Rows 2–39: Ch 1, turn, sc in each st across. (57 sts each row)
Fasten off. The panel measures 19 x 12 in (48.3 x 30.5 cm). Row 1 is the bottom edge.
Tabs (Make 4)
Row 1: With plum, ch 7, sc in 2nd ch from hook and in each ch across. (6 sts)
Rows 2–16: Ch 1, turn, sc across. (6 sts each row)
Fasten off, leaving a 15 in (38.1 cm) tail. Each tab measures 2 x 4.9 in (5.1 x 12.4 cm).
Hanging Cord (Make 1)
With plum, ch 100. Sl st in the back bump of the 2nd ch from hook and in each ch across. (99 sl sts) The cord is about 32 in (81.3 cm) long.
Make All Pieces
- Plum only: 1 panel, 4 tabs, 1 cord
- Plum + cream: 6 pockets
Layout (front view, P = pocket):
[ P ][ P ][ P ]   top row
[ P ][ P ][ P ]   bottom row
Column map (panel sts, counted from the left edge):
– Margin: sts 1–3
– Pocket 1: sts 4–18
– Gap: sts 19–21
– Pocket 2: sts 22–36
– Gap: sts 37–39
– Pocket 3: sts 40–54
– Margin: sts 55–57
That adds up to 3 + 15 + 3 + 15 + 3 + 15 + 3 = 57 sts.
Row map (counted from the bottom):
– Bottom margin: Rows 1–2
– Bottom pockets: Rows 3–17
– Gap: Rows 18–20
– Top pockets: Rows 21–35
– Top margin: Rows 36–39
That adds up to 2 + 15 + 3 + 15 + 4 = 39 rows.
Joining
Method: Whipstitch with plum yarn and a tapestry needle. Sew each pocket on before you work the border.
Mark the back of each pocket: Find the joining st at center back. Count 7 sts to each side of it and mark both ends. Those 15 back sts, 7 + 1 + 7, sit flat against the panel.
Stitch-to-stitch logic:
– Horizontal: The pocket and panel both have 3 sts per inch, so you sew 1 pocket st to 1 panel st. The 15 back sts cover 15 panel columns, which is 5 in (12.7 cm).
– Vertical: The wall has 12 rounds over 15 panel rows. Work 1 whipstitch per sc round (9) and 2 per mesh round (6). That gives 15 stitches, one for each panel row.
Sewing order for each pocket:
1. Pin the back of the pocket over its rectangle on the map.
2. Sew the 15 free front loops of Rnd 8 to the bottom row of the pocket’s rectangle.
3. Sew up both side edges of the 15-st back section, 15 whipstitches per side.
4. Sew the 15 sts of Rnd 20 to the top row of the rectangle.
Tension: Make each whipstitch snug enough to close the gap, but don’t let it dimple the panel. Catch both loops of the panel st every time.
Checkpoint: After all six pockets are on, the panel should still lie flat at 19 x 12 in (48.3 x 30.5 cm). Gaps between columns should be 1 in (2.5 cm), and the gap between rows about 0.9 in (2.3 cm).
Border
Border gauge: Same as the panel, 3 sc per inch. Each round adds about 0.31 in (0.8 cm) per side, so 2 rounds give ⅝ in (1.6 cm).
On both rounds, a corner is worked as 3 sc in one st. The middle sc of each group is the corner st. The other two belong to the sides on either side of it.
Rnd 1: With RS facing, join plum in the first st of Row 39.
1. Ch 1. Work 3 sc in the same st, sc in the next 55 sts, then 3 sc in the last st.
2. Working down the side, sc in each row end, but skip every 13th row end, so you skip 3 of the 39 (36 sc).
3. Working along the foundation chain, 3 sc in the first ch, sc in the next 55 ch, then 3 sc in the last ch.
4. Work 36 sc up the second side the same way. Join.
Count per side, not counting corner sts: top 57, bottom 57, each side 38. Plus 4 corner sts = 194.
Rnd 2: Ch 1, sc in each st around, working 3 sc in each corner st, join. (Top 59, bottom 59, each side 40, plus 4 corner sts = 202)
Fasten off and weave in the ends.
Why the math works:
– Along the top and bottom, the border has 1 sc per panel st, so there’s no extra ease.
– On the sides, 36 sc ÷ 3 sc per inch = 12 in (30.5 cm). That matches the panel height, which was worked at 13 rows per 4 in. Skipping 1 row end in 13 keeps the side from rippling.
– Each 3-sc corner adds the 2 sts a corner needs to turn flat: 4 corners x 2 = 8, and 194 + 8 = 202.
– Finished size: 19 + 1¼ = 20¼ in (51.4 cm) wide, and 12 + 1¼ = 13¼ in (33.7 cm) tall.
Tabs and hanger:
1. Place the tabs over panel sts 1–6, 17–22, 36–41 and 52–57.
2. Fold each tab over the dowel. Overlap the panel by 3 rows in front and 3 rows in back, covering the border and the top rows.
3. Whipstitch all edges of both ends through the panel.
4. Tie one end of the cord around each end of the dowel, outside the outer tabs. Leave about 1 in (2.5 cm) of dowel showing at each end.
Final Blocking
- Take out the dowel.
- Mist the whole piece with water until it’s damp but not soaked.
- Lay it face up on a blocking mat and pin the panel to 20¼ x 13¼ in (51.4 x 33.7 cm).
- Line up the mesh so the vertical dc columns are straight and the holes are square.
- Stuff each pocket with a rolled hand towel, or a roll in a plastic bag, so the pockets dry round.
- Let it dry completely, then put the dowel back in.
Final Quality-Control Checklist
- [ ] Every pocket has 48 sts at Rnd 8 and Rnd 20.
- [ ] Every mesh round has 24 dc, stacked in straight columns.
- [ ] The base-to-wall ridge is visible all the way around each pocket.
- [ ] Panel is 57 sts x 39 rows.
- [ ] Pockets match the column and row maps.
- [ ] Border Rnd 2 count is 202.
- [ ] Finished size is 20¼ x 13¼ in (51.4 x 33.7 cm).
- [ ] Tabs are evenly spaced, and the dowel hangs level.
- [ ] All ends are woven in on the back.
Troubleshooting
- The base cups before Rnd 9: Your tension is too tight. Go up one hook size for the base only.
- The base ruffles: Your increases may be stacking. Check that every round has exactly 6 increases.
- The mesh slants: Make sure each beginning ch-4 stands on a dc, not in a ch-1 space.
- The pocket is too tight for a roll: Check the Rnd 8 diameter. Below 5 in (12.7 cm), go up a hook size.
- The panel side edges wave: Skip 1 more row end per side on border Rnd 1, then recount.
- The pocket pulls the panel: Remove the seam and resew it with looser whipstitches, keeping 1 st to 1 st.
- The holder sags in the middle: Use a stiffer dowel, or move the middle tabs closer to the gaps.
Care
Spot clean, or hand wash in cool water and lay flat to dry. Take out the dowel first, and reshape the pockets while they’re damp.
Final Notes
The measurement chain goes like this:
– Gauge is 12 sc and 13 rows = 4 in (10.2 cm).
– Each pocket base is 5 in (12.7 cm) across, and each wall is 4½ in (11.4 cm) tall.
– The panel is 19 x 12 in (48.3 x 30.5 cm), with each pocket filling 15 sts x 15 rows.
– The ⅝ in (1.6 cm) border brings the finished holder to 20¼ x 13¼ in (51.4 x 33.7 cm).
If the first pocket measures right, the rest of the holder will fit together.
Happy crocheting!