

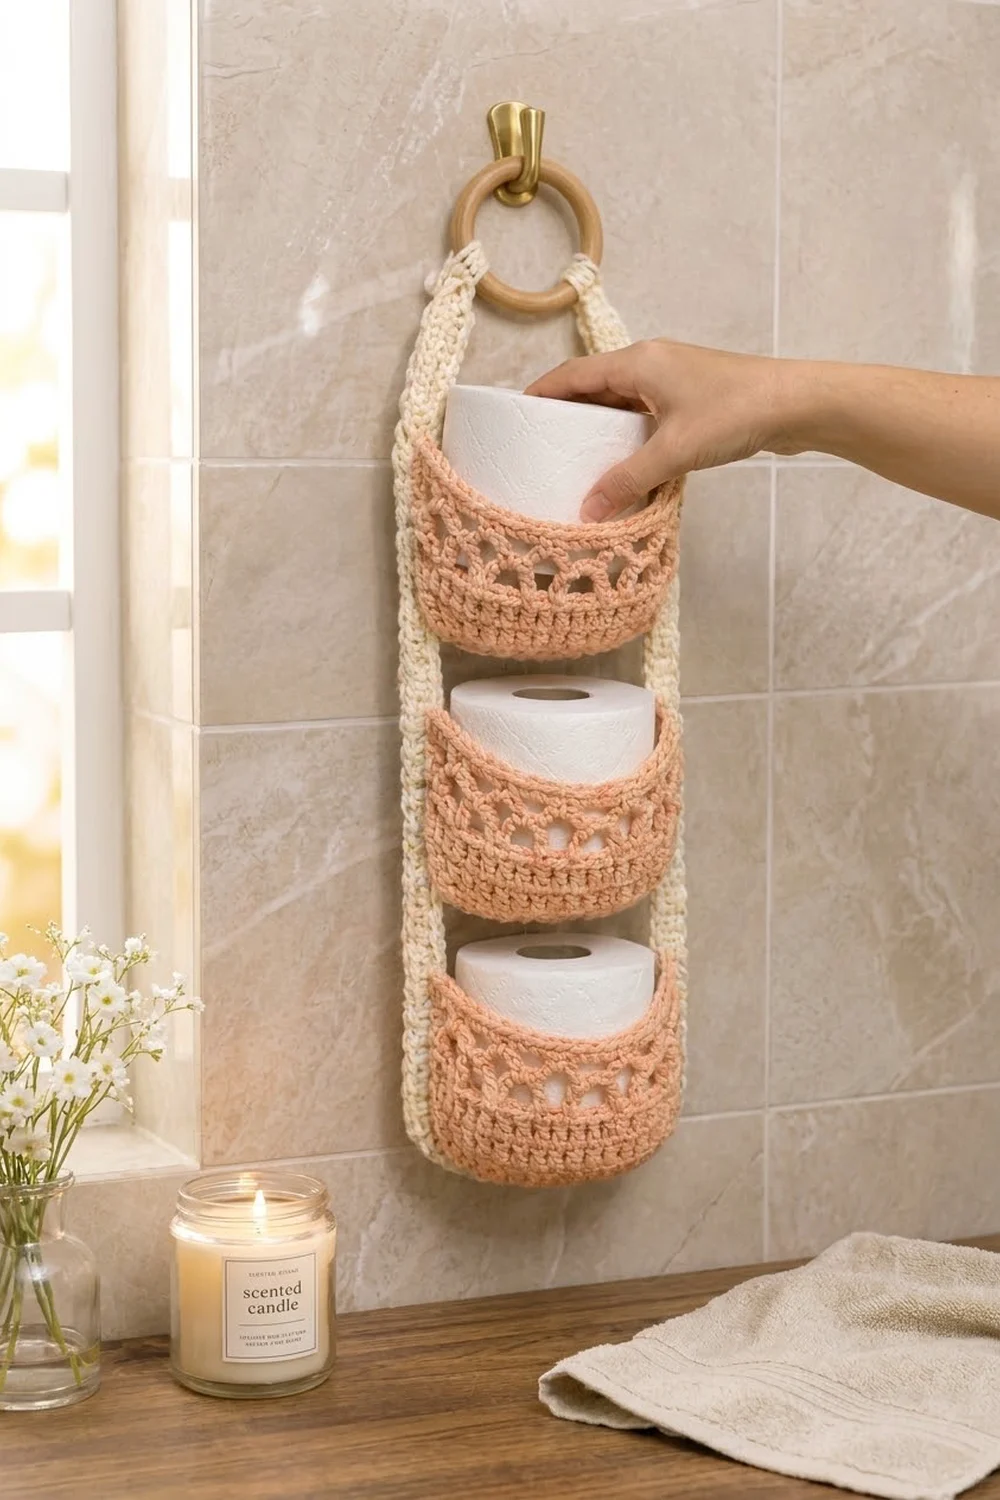
This hanging holder stores three standard toilet paper rolls in a slim column on the wall. Three soft peach pockets sit one above the other on a cream strap. The strap loops over a natural wooden ring, so the whole piece can hang from a towel hook or a door knob.
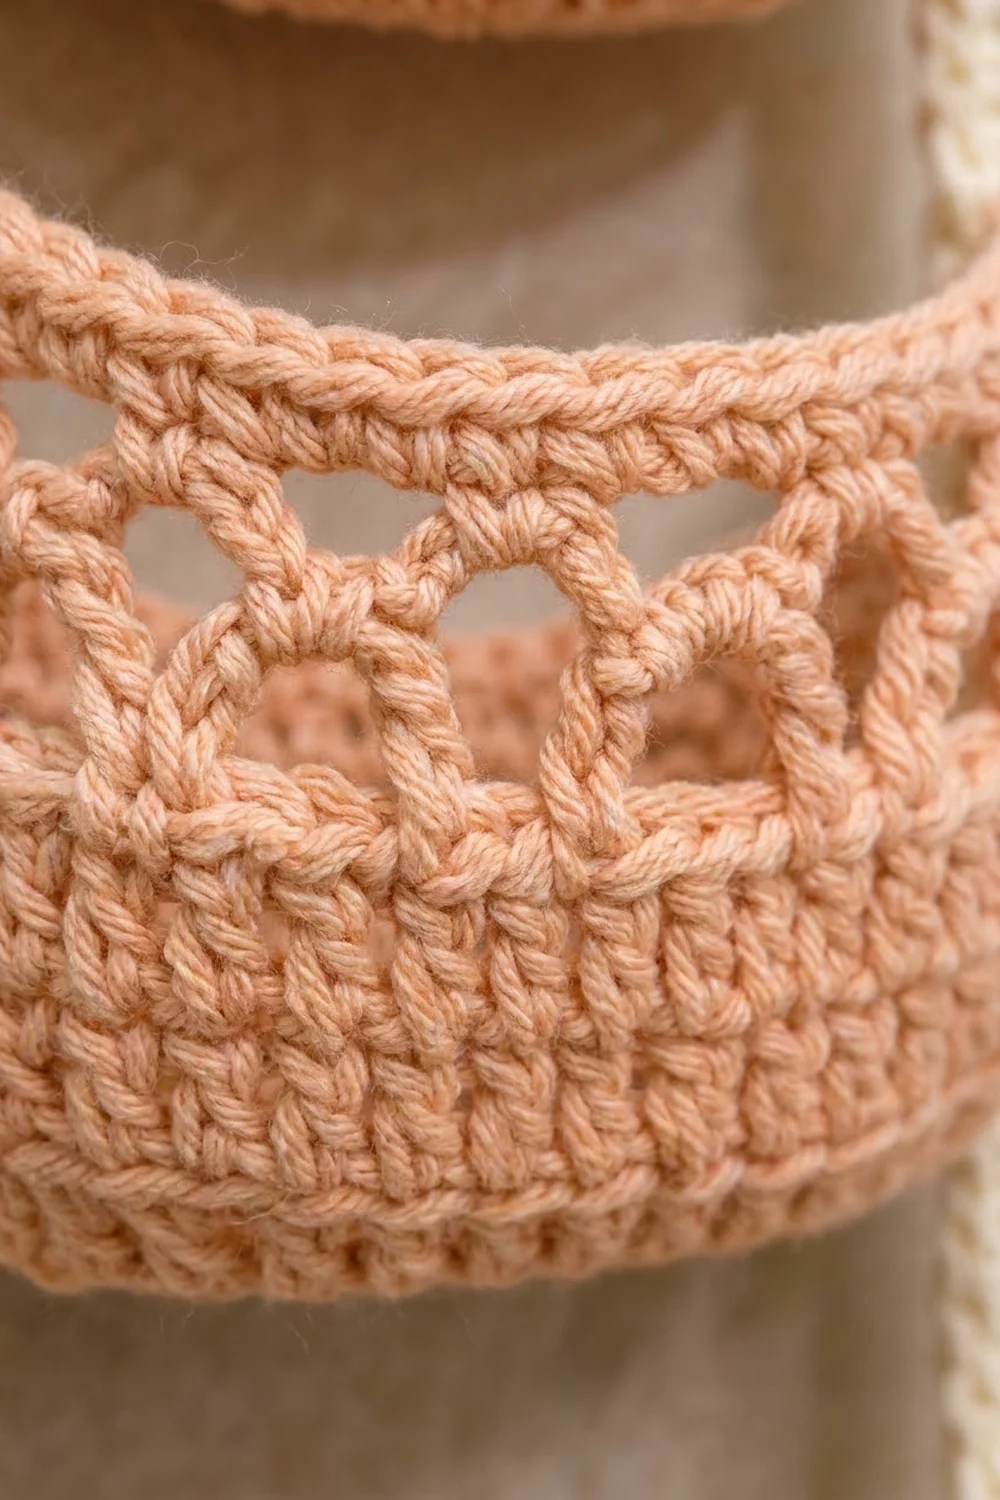
Each pocket starts as a flat round base and rises in solid double crochet. It then opens into a band of little windows topped with arches, and closes again with a firm single crochet rim. The arches let the roll show through and keep the pockets light and airy. The peach and cream pair is warm and calm and suits a neutral bathroom.
The pattern uses US crochet terms. The finished holder measures 22.75 in (57.8 cm) from the top of the ring to the strap tails and 6 in (15.2 cm) wide. Each pocket has a 5.25 in (13.3 cm) base and a wall height of 3.75 in (9.5 cm).
Construction is simple. You make one long strap in rows of single crochet and edge it with one round of single crochet. Then you crochet three identical pockets in the round, fold the strap over the ring, and sew the pockets onto the two strap legs.
Finished Size and Construction
- Finished size: 22.75 in (57.8 cm) long from ring top x 6 in (15.2 cm) wide
- Skill level: Easy
- Terminology: US crochet terms
- Yarn weight: Worsted weight (#4), cotton or cotton blend
- Hook: 5 mm (US H-8)
- Number of pieces: 5 parts in total: 1 strap, 3 pockets, 1 wooden ring
- Layout: 1 column of 3 pockets, one above the other
- Pocket size: 5.25 in (13.3 cm) base diameter, 3.75 in (9.5 cm) wall height
- Strap size before border: 40 in (101.6 cm) x 1 in (2.5 cm)
- Strap border depth: 0.25 in (0.6 cm) on every edge, giving 40.5 in (102.9 cm) x 1.5 in (3.8 cm)
Materials
Choose a smooth worsted weight cotton. Cotton holds its shape under the weight of a roll and doesn’t get fuzzy in a damp bathroom. Acrylic also works, but the pockets will be softer and may sag a little more.
- Peach (pockets): 110 g, about 187 m
- Cream (strap and edging): 35 g, about 60 m
These amounts include a margin of roughly 20% for gauge checks and sewing tails.
Tools:
- 5 mm (US H-8) crochet hook
- 1 wooden ring, 3 in (7.6 cm) outer diameter
- Tapestry needle
- 4 locking stitch markers
- Measuring tape
- Scissors
- Rust-proof pins and a blocking mat or folded towel
Abbreviations (US Terms)
- ch chain
- sl st slip stitch
- sc single crochet
- dc double crochet
- BLO back loop only
- st(s) stitch(es)
- sp space
- sk skip
- rep repeat
- RS right side
Special technique: magic ring. Wrap the yarn around two fingers to make a loop. Insert the hook, pull up a loop, and work the first round into the ring. Pull the tail to close the center tightly.
Turning chains: In this pattern, ch 3 at the start of a dc round counts as the first dc. Ch 1 at the start of a sc round or row doesn’t count as a stitch.
Gauge and Checkpoints
Gauge:
- 14 dc x 8 rounds = 4 in (10.2 cm)
- 15 sc x 16 rows = 4 in (10.2 cm)
Make one complete pocket before anything else. It works as your gauge swatch and shows you right away whether a roll will fit.
Pocket checkpoints:
- After Round 1: 1.25 in (3.2 cm) across
- After Round 3: 3.25 in (8.3 cm) across
- After Round 5: 5.25 in (13.3 cm) across, lying flat
- After Round 9: wall height 1.75 in (4.4 cm) above the fold line
- After Round 14: wall height 3.75 in (9.5 cm), rim circumference 17.1 in (43.4 cm)
Strap checkpoints:
- After Row 1: 40 in (101.6 cm) long
- After Row 4: 1 in (2.5 cm) wide
- After the border: 40.5 in (102.9 cm) x 1.5 in (3.8 cm)
If your base is too big, go down to a 4.5 mm hook. If it’s too small, go up to a 5.5 mm hook. Don’t add or remove rounds: a base under 5 in (12.7 cm) may not hold a standard roll 4.5 in (11.4 cm) wide. If the base cups instead of lying flat, your increases are too tight. Loosen your tension or go up a hook size.
Pocket (Make 3)
Use peach. Work in joined rounds with the RS facing you throughout. Don’t turn.
Base
Round 1: Make a magic ring. Ch 3, 11 dc in ring, join with sl st to top of ch-3. (12 dc)
Round 2: Ch 3, dc in same st, 2 dc in each st around, join. (24 dc)
Round 3: Ch 3, 2 dc in next st, *dc in next st, 2 dc in next st; rep from * 11 times, join. (36 dc)
Round 4: Ch 3, dc in next st, 2 dc in next st, *dc in next 2 sts, 2 dc in next st; rep from * 11 times, join. (48 dc)
Round 5: Ch 3, dc in next 2 sts, 2 dc in next st, *dc in next 3 sts, 2 dc in next st; rep from * 11 times, join. (60 dc)
Check the base: it should lie flat and measure 5.25 in (13.3 cm) across.
Walls
Round 6 (conversion round): Ch 1, sc BLO in each st around, join to first sc. (60 sc: 60 worked 1 per existing st + 0 added)
The unused front loops form a crisp ridge where the base turns up into the wall.
Rounds 7–9: Ch 3, dc in each st around, join. (60 dc per round)
Round 10 (window round): Ch 6 (counts as dc and ch-3), sk 3 sts, *dc in next st, ch 3, sk 3 sts; rep from * 14 times, join to 3rd ch of beginning ch-6. (15 dc and 15 ch-3 sps)
Each repeat uses 4 sts, and 15 repeats x 4 sts = 60 sts, so the round closes evenly.
Round 11 (arch round): Sl st into first ch-3 sp, ch 1, *sc in ch-3 sp, ch 4; rep from * in each ch-3 sp around, join to first sc. (15 sc and 15 ch-4 loops)
Each ch-4 loop crosses over one dc post from Round 10, which makes the row of rounded arches.
Round 12 (closing round): Sl st into first ch-4 loop, ch 3, 3 dc in same loop, 4 dc in each remaining ch-4 loop around, join. Don’t work into the sc. (60 dc: 15 loops x 4 dc)
Rounds 13–14: Ch 1, sc in each st around, join. (60 sc per round)
Fasten off, leaving a 24 in (61.0 cm) tail for sewing.
The wall now stands 3.75 in (9.5 cm) tall. Make 3 pockets in total and compare them side by side. Their bases should match within 0.25 in (0.6 cm).
Strap (Make 1)
Use cream. The strap is worked lengthwise, so each row runs the full length.
Row 1: Ch 151, sc in 2nd ch from hook and in each ch across. (150 sc)
Rows 2–4: Ch 1, turn, sc in each st across. (150 sc per row)
Don’t fasten off. Go straight on to the border below.
Make All Pieces
- Peach: 3 pockets
- Cream: 1 strap
- Wood: 1 ring, 3 in (7.6 cm)
Layout (front view, strap folded over the ring):
          ( RING )
           /    \
          /      \
         |        |
     [ POCKET 1 ]   rim at 4 in (10.2 cm)
         |        |
     [ POCKET 2 ]   rim at 9.5 in (24.1 cm)
         |        |
     [ POCKET 3 ]   rim at 15 in (38.1 cm)
         |        |
       tail      tail  ends at 19.75 in (50.2 cm)
All positions are measured down each strap leg from the bottom of the ring.
Border (Strap Edging)
Border gauge: 15 sc = 4 in (10.2 cm). Work 1 sc per stitch along the long sides and 1 sc per row end on the short ends.
The ch-1 corners below are corner spaces only. They aren’t counted in any side count.
Border Round (RS): Ch 1, turn so the RS faces you.
- Long side 1: sc in each st across Row 4. (150 sc)
- Ch 1 for the corner.
- Short end 1: sc in the end of each row. (4 sc)
- Ch 1 for the corner.
- Long side 2: sc in the free loop of each foundation ch. (150 sc)
- Ch 1 for the corner.
- Short end 2: sc in the end of each row. (4 sc)
- Ch 1 for the corner, join with sl st to first sc.
Total: 308 sc (150 + 4 + 150 + 4) plus 4 ch-1 corner spaces.
Fasten off and weave in ends.
Why the math works: Each long side takes exactly 1 sc per stitch, so it keeps 150 sts and stays 40 in (101.6 cm) long. The border adds one sc height at each short end, 0.25 in (0.6 cm) each, so the strap becomes 40.5 in (102.9 cm) long. Across the width, the 4 rows plus one border sc on each long edge give 6 sc rows. At 16 rows per 4 in, 6 rows = 1.5 in (3.8 cm). The ch-1 corners let the edge turn without pulling or rippling.
Joining
Step 1: Fold the strap over the ring. Fold the strap in half, push the fold through the ring from front to back, and let both legs hang. Each leg measures 19.75 in (50.2 cm) below the ring, and the fold around the ring uses the remaining 1 in (2.5 cm).
Step 2: Lock the ring. With cream yarn, whipstitch the inner edges of the two legs together for 1 in (2.5 cm) directly below the ring. Below that, let the legs spread apart into a narrow triangle.
Step 3: Set the leg spacing. Lay the holder flat. From 4 in (10.2 cm) below the ring all the way down, the inner edges of the legs sit 3 in (7.6 cm) apart. The outer edges then measure 1.5 + 3 + 1.5 = 6 in (15.2 cm). Pin the legs at this spacing.
Step 4: Mark the pocket back. On each pocket, put a marker in any rim st (call it st 1) and a second marker 15 sts further along (st 16). Sts 1 to 16 form the back panel: 16 of the 60 rim sts, or about 4.6 in (11.7 cm) of rim.
Step 5: Sew each pocket. Lay the back panel against the legs so st 1 touches the inner edge of the left leg and st 16 touches the inner edge of the right leg. The back panel is about 1.6 in (4.1 cm) longer than the 3 in (7.6 cm) gap. That extra slack lets the back curve around the roll instead of stretching flat.
Using the peach tail, sew from the rim straight down to the base fold line along each leg’s inner edge. Make one stitch into each pocket round and one into the strap edge beside it, keeping both seams vertical. Then tack the base fold line to each leg with 2 or 3 small stitches.
Place the rims at 4 in (10.2 cm), 9.5 in (24.1 cm), and 15 in (38.1 cm) below the ring. This leaves a 1.75 in (4.4 cm) gap between one pocket’s base fold line and the next pocket’s rim.
Tension advice: Pull each sewing stitch snug but not tight. Each sewn seam should stay as long as the pocket wall, 3.75 in (9.5 cm). If a seam puckers, take it out and sew it again more loosely.
Size checkpoint: The bottom pocket’s fold line sits 18.75 in (47.6 cm) below the ring, leaving 1 in (2.5 cm) strap tails. The total length is 3 in (7.6 cm) of ring plus 19.75 in (50.2 cm) of legs = 22.75 in (57.8 cm).
Final Blocking
- Weave in all remaining ends, splitting the yarn so they stay put.
- Lightly mist the whole holder with water until it’s damp but not soaked.
- Lay it flat, RS up, on a blocking mat or towel.
- Pin the strap legs straight and parallel, with inner edges 3 in (7.6 cm) apart.
- Push a roll, or a rolled towel 4.5 in (11.4 cm) across, into each pocket so the walls dry in shape.
- Gently open each arch with your fingertips so all 15 look even.
- Let it dry completely, for at least 12 hours.
- Remove the pins and hang the holder from the ring.
Final Quality-Control Checklist
- Each pocket base measures 5.25 in (13.3 cm) and lies flat.
- Each pocket has 60 sts in every solid wall round and 15 matching arches.
- All three walls measure 3.75 in (9.5 cm) tall.
- The strap border has 150 sc on each long side and 4 sc on each short end.
- The strap measures 1.5 in (3.8 cm) wide along its whole length.
- The legs are 3 in (7.6 cm) apart at every pocket.
- The rims sit 4 in, 9.5 in, and 15 in (10.2 cm, 24.1 cm, 38.1 cm) below the ring.
- All three pockets hang level, not tilted.
- The ring is locked in and can’t slide out.
- All ends are woven in and can’t be seen from the front.
Troubleshooting
The base ruffles. Your dc is too loose for the increases. Go down a hook size and make the base again.
The base cups up. Your increases are too tight. Go up a hook size or relax your tension.
The arches look crooked. Check that Round 10 has exactly 15 dc posts and 15 ch-3 sps. One missed skip shifts every arch after it.
A roll won’t fit. Measure the base. If it’s under 5 in (12.7 cm), make the pocket again with a larger hook.
The pockets sag forward. Add another tack stitch at the base fold line on each leg, and use cotton rather than acrylic.
The strap edge waves. You worked more than 1 sc per stitch on a long side. Count back to 150 sc and correct it.
The holder twists on the hook. The legs are uneven. Make sure each leg hangs 19.75 in (50.2 cm) before you lock the ring.
Care
Take out the rolls and hand wash the holder in cool water with mild detergent. If you can, slide the wooden ring out first, then reshape the holder and dry it flat.
Final Notes
The measurement chain is short and easy to follow. Each pocket base reaches 5.25 in (13.3 cm) at 60 dc, and the walls keep that 60-stitch count up to a rim 3.75 in (9.5 cm) high. The strap holds 150 sts at 40 in (101.6 cm) and edges out to 40.5 in (102.9 cm) x 1.5 in (3.8 cm). Folded over the 3 in (7.6 cm) ring, it gives two legs of 19.75 in (50.2 cm) set 3 in (7.6 cm) apart. The finished holder is 22.75 in (57.8 cm) long and 6 in (15.2 cm) wide.
Check gauge on the first pocket and count at every checkpoint, and the rest falls into place.
Happy crocheting!