

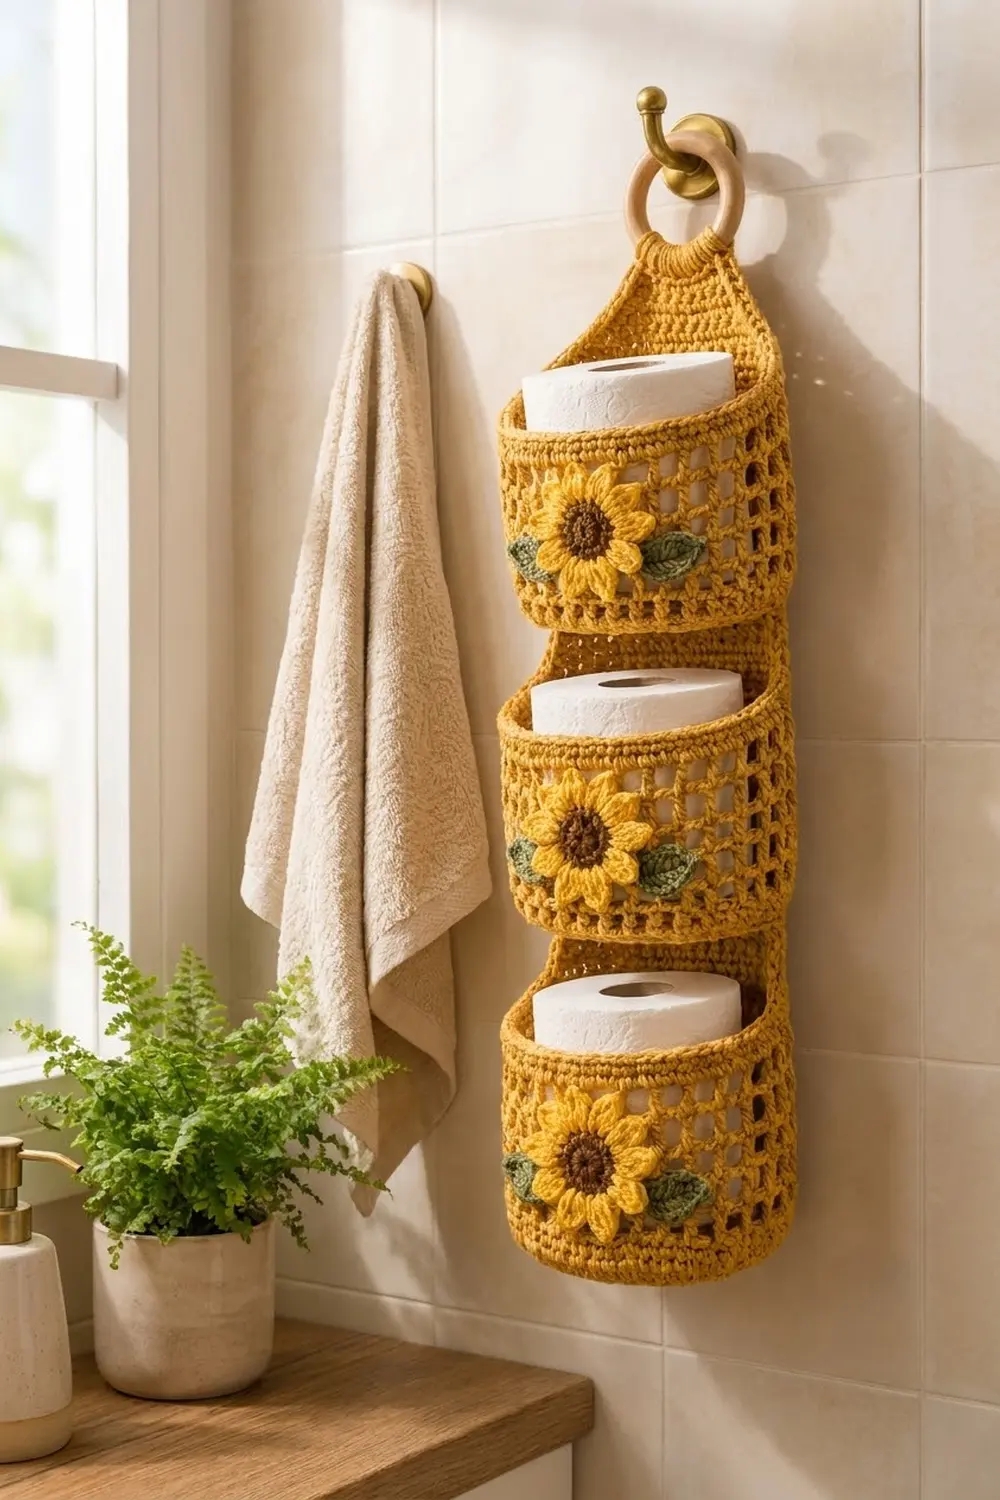
Bring a little sunshine into the bathroom with this hanging toilet paper holder. It has three roomy mesh pockets stacked on one solid back panel. The panel hangs from a wooden ring, and each pocket has a cheerful sunflower appliqué on the front.
The main fabric is warm mustard-gold cotton. The sunflowers use a brighter sunflower yellow, a dark brown center and two sage-green leaves. The open mesh shows a peek of white roll, and the solid rims and back panel keep the shape firm.
This pattern uses US crochet terms. The finished holder measures about 5.8 in (14.7 cm) wide across the panel and 15.5 in (39.4 cm) long before the strap and ring. With the ring it hangs about 19 in (48.3 cm) long, and each pocket holds one standard roll.
Construction is simple. You crochet one flat back panel in rows, with the tab and strap built in. You crochet three pockets in the round: a flat circle base, a short solid band, mesh walls and a solid rim. You add the appliqués, sew the pockets to the panel, then work a two-row border around the panel edges.
Finished Size and Construction
- Finished size: 5.8 in × 15.5 in (14.7 cm × 39.4 cm) panel after the border; about 19 in (48.3 cm) total with the ring
- Skill level: Intermediate
- Terminology: US
- Yarn weight: Worsted (#4) cotton
- Hook: 5 mm (H-8)
- Number of pieces: 1 back panel and 3 pockets, plus 3 sunflowers and 6 leaves
- Layout: 1 column of 3 pockets
- Pocket size: 5.25 in (13.3 cm) base diameter, 3.5 in (8.9 cm) wall height
- Panel size before border: 5 in × 15.1 in (12.7 cm × 38.4 cm), not counting the strap
- Border depth: about 0.4 in (1.0 cm) per edge
Materials
Use a smooth, firm cotton or cotton blend. Cotton holds the pocket shape, survives the humidity of a bathroom and washes well. Avoid very soft acrylics, which let the pockets sag under a roll.
- Mustard gold (MC): 150 g / 255 m
- Sunflower yellow (A): 15 g / 26 m
- Dark brown (B): 5 g / 9 m
- Sage green (C): 10 g / 17 m
Tools:
– 5 mm (H-8) crochet hook
– 3 in (7.6 cm) wooden ring
– Tapestry needle
– 6 locking stitch markers
– Scissors, tape measure, rust-proof pins
All quantities include a safety margin of about 20 percent.
Abbreviations (US Terms)
- ch – chain
- sl st – slip stitch
- sc – single crochet
- hdc – half double crochet
- dc – double crochet
- tr – treble crochet
- sc2tog – single crochet 2 together
- BLO / FLO – back loop only / front loop only
- sp – space
- st(s) – stitch(es)
- rev sc – reverse single crochet
Special stitch – reverse sc (crab stitch): Work from left to right (right-handed). Insert the hook into the next stitch to the right, yarn over, pull up a loop, then yarn over and pull through both loops. This makes a firm, corded edge.
Gauge and Checkpoints
Gauge: 16 sc × 18 rows = 4 in (10.2 cm). Five rounds of dc/ch-1 mesh = 2.25 in (5.7 cm) tall.
Make one complete pocket before you start anything else. It uses every stitch in the main pattern and shows you right away whether a roll will fit.
Checkpoints:
– Pocket base after Rnd 6 (36 sts): about 2.9 in (7.4 cm) across.
– Pocket base after Rnd 11 (66 sts): 5.25 in (13.3 cm) across, lying flat.
– Pocket wall after Rnd 21: 3.5 in (8.9 cm) tall.
– Back panel after Row 18: 4 in (10.2 cm) tall and 5 in (12.7 cm) wide.
If too big: Go down 0.5 mm in hook size. A loose base will ripple and the mesh will stretch out of shape.
If too small: Go up 0.5 mm. If the base cups instead of lying flat, also try going up a size.
Pocket (Make 3)
With MC, work in joined rounds. Do not turn. Join each round with a sl st to the first st.
Base
- Rnd 1: Make a magic ring, ch 1, work 6 sc into the ring, join. (6 sc)
- Rnd 2: Ch 1, 2 sc in each st, join. (12 sc)
- Rnd 3: Ch 1, sc in next st, 2 sc in next st; repeat from * around, join. (18 sc)
- Rnd 4: Ch 1, sc in next 2 sts, 2 sc in next st; repeat around, join. (24 sc)
- Rnd 5: Ch 1, sc in next 3 sts, 2 sc in next st; repeat around, join. (30 sc)
- Rnd 6: Ch 1, sc in next 4 sts, 2 sc in next st; repeat around, join. (36 sc)
- Rnd 7: Ch 1, sc in next 5 sts, 2 sc in next st; repeat around, join. (42 sc)
- Rnd 8: Ch 1, sc in next 6 sts, 2 sc in next st; repeat around, join. (48 sc)
- Rnd 9: Ch 1, sc in next 7 sts, 2 sc in next st; repeat around, join. (54 sc)
- Rnd 10: Ch 1, sc in next 8 sts, 2 sc in next st; repeat around, join. (60 sc)
- Rnd 11: Ch 1, sc in next 9 sts, 2 sc in next st; repeat around, join. (66 sc)
Check the base: 5.25 in (13.3 cm) across, lying flat.
Lower band
- Rnd 12 (conversion round): Ch 1, working in BLO, sc in each st around, join. (66 sc: 66 worked 1-per-stitch + 0 added)
The unused front loops of Rnd 11 leave a ridge where the base turns up into the wall. You will use this ridge for sewing later.
- Rnd 13: Ch 1, sc in each st around, join. (66 sc)
Mesh walls
- Rnd 14 (conversion round): Ch 4 (counts as dc + ch 1), skip next st, dc in next st, ch 1, skip next st; repeat from * 31 more times, join with a sl st to 3rd ch of the beginning ch-4. (33 dc + 33 ch-1 sps)
- Rnds 15–18: Ch 4 (counts as dc + ch 1), dc in next dc, ch 1; repeat from * 31 more times, join to 3rd ch of the beginning ch-4. (33 dc + 33 ch-1 sps in each round)
The dc stitches stack directly on top of each other, so the openings line up in neat vertical columns.
Rim
- Rnd 19 (trim round): Ch 1, sc in the same st as the join, sc in next ch-1 sp, sc in next dc, sc in next ch-1 sp; repeat from * around, join. (66 sc: 33 sc in dc + 33 sc in ch-1 sps)
- Rnds 20–21: Ch 1, sc in each st around, join. (66 sc)
Fasten off, leaving a 24 in (61.0 cm) tail for sewing. Check the wall height: 0.5 in (1.3 cm) of solid band, 2.25 in (5.7 cm) of mesh and 0.75 in (1.9 cm) of rim, for 3.5 in (8.9 cm) in total.
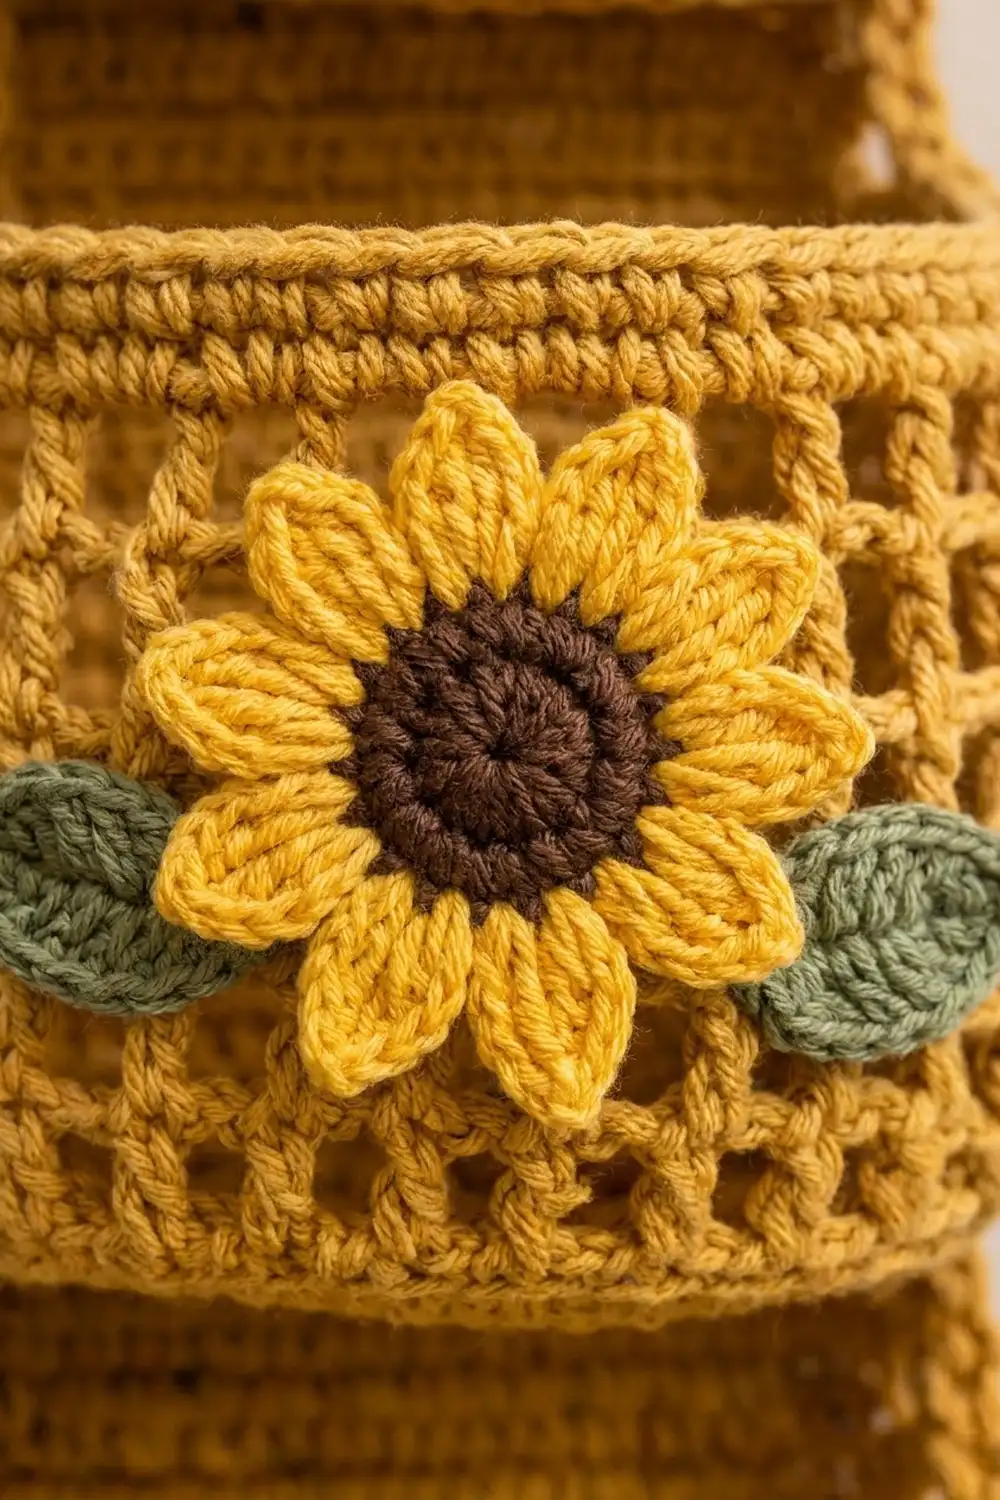
Sunflower Appliqué (Make 3)
- Rnd 1: With B, make a magic ring, ch 1, work 8 sc into the ring, join. (8 sc)
- Rnd 2: Ch 1, 2 sc in each st, join. (16 sc) Fasten off B. The center measures about 1.25 in (3.2 cm).
- Rnd 3 (front petals): Join A in the FLO of any st. Ch 5, sl st in 2nd ch from hook, sc in next ch, hdc in next ch, dc in last ch, sl st in FLO of next 2 sts of Rnd 2; repeat from * 7 more times. (8 petals)
- Rnd 4 (back petals): Working in the BLO of Rnd 2, join A one st to the left of where Rnd 3 started, so these petals sit between the front ones. Ch 6, sl st in 2nd ch from hook, sc in next ch, hdc in next ch, dc in next ch, tr in last ch, sl st in BLO of next 2 sts; repeat from * 7 more times. (8 petals)
Fasten off, leaving a 12 in (30.5 cm) tail. You now have 16 pointed petals in two layers, and the flower measures about 3.5 in (8.9 cm) across.
Leaf (Make 6)
With C, ch 8.
- First side: Sl st in 2nd ch from hook, sc in next ch, hdc in next ch, dc in next 2 ch, hdc in next ch, 3 sc in last ch.
- Second side: Working along the other side of the chain, hdc in next ch, dc in next 2 ch, hdc in next ch, sc in next ch, sl st in last ch.
Fasten off, leaving a 10 in (25.4 cm) tail. Each leaf is about 1.75 in (4.4 cm) long and comes to a point at both ends.
Back Panel (Make 1)
With MC, ch 21.
- Row 1: Sc in 2nd ch from hook and in each ch across. (20 sc)
- Rows 2–54: Ch 1, turn, sc in each st across. (20 sc)
Check the panel at Row 18: 4 in (10.2 cm). At Row 36: 8 in (20.3 cm). At Row 54: 12 in (30.5 cm). It should stay 5 in (12.7 cm) wide throughout.
Tapered tab
- Row 55: Ch 1, turn, sc2tog, sc in next 16 sts, sc2tog. (18 sc)
- Row 56 and every even row through Row 68: Ch 1, turn, sc in each st across. (Same count as the row before)
- Row 57: Sc2tog, sc 14, sc2tog. (16 sc)
- Row 59: Sc2tog, sc 10, sc2tog. (14 sc)
- Row 61: Sc2tog, sc 8, sc2tog. (12 sc)
- Row 63: Sc2tog, sc 6, sc2tog. (10 sc)
- Row 65: Sc2tog, sc 4, sc2tog. (8 sc)
- Row 67: Sc2tog, sc 2, sc2tog. (6 sc)
After Row 68 (6 sc), the tab is about 3.1 in (7.9 cm) tall. The panel now measures 15.1 in (38.4 cm) from the bottom edge.
Strap
- Rows 69–80: Ch 1, turn, sc in each st across. (6 sc)
Fasten off, leaving an 18 in (45.7 cm) tail. The strap is 1.5 in (3.8 cm) wide and about 2.7 in (6.9 cm) long.
Make All Pieces
Quantities:
– MC: 1 back panel, 3 pockets
– A + B: 3 sunflowers
– C: 6 leaves
Appliqués first: Before you join anything, sew the appliqués to the pockets. Center each sunflower on the front of a pocket, directly opposite the round seam, with its center over Rnd 16. Let the outer petals overlap the rim slightly. Sew around the brown center and tack the tip of each petal. Then tuck one leaf under each side of the flower, angled slightly downward, and whipstitch it in place.
Layout (front view):
        ( wooden ring )
           [ strap ]
        /  tab 55-68  \
   [ Pocket 3: rows 38-54 ]
   [ Pocket 2: rows 20-36 ]
   [ Pocket 1: rows 2-18  ]
Joining
Method: Whipstitch with the MC tails, one stitch to one stitch.
- On each pocket, mark the round seam on Rnd 21. Count 10 sts to each side of it and place markers. These 20 sts form the back of the pocket.
- Lay the panel right side up. The rim of Pocket 1 lines up with Row 18, and its base ridge (the front loops left over from Rnd 11) lines up with Row 2.
- Whipstitch the 20 marked rim sts to the 20 sts of Row 18, one to one. The sts match exactly, so the rim sits flat without gathering.
- Whipstitch the 20 back sts of the base ridge to the 20 sts of Row 2. The wall is 3.5 in (8.9 cm) tall and 16 rows of panel measure about 3.6 in, so the wall lies flat against the panel without being pulled.
- Repeat for Pocket 2 (rim to Row 36, base to Row 20) and Pocket 3 (rim to Row 54, base to Row 38).
Tension: Make the stitches snug but not tight. If you pull too hard the panel will pucker, and if you sew too loosely the pockets will tip forward when they’re full.
Checkpoint: The panel still lies 5 in (12.7 cm) wide. Each pocket stands out about 4.5 in (11.4 cm) from the panel and is about 5.5 in (14.0 cm) wide, flattening slightly at the back.
Border
Border gauge: 4 sc per inch along every edge, to match the fabric gauge.
Row 1: With the right side facing, join MC at the right edge of Row 68, right next to the strap.
- Right side: Work down the edge. Sc in each of the 14 row-ends of the tab (Rows 68–55). Along Rows 54–1, sc in 8 row-ends, skip 1, and repeat 6 times for 48 sc. That gives 62 sc.
- Bottom: Work into the free loops of the foundation chain. Work 3 sc in the first ch (corner), sc in the next 18 ch, then 3 sc in the last ch (corner), for 24 sc.
- Left side: Work up the edge, mirroring the right side, for 62 sc. End beside the strap.
Row 1 has 148 sc in total (62 + 24 + 62).
Row 2: Don’t turn. Ch 1, then work 1 rev sc in each sc back along the whole edge. (148 rev sc) Fasten off.
Why the math works: The rectangle has 54 rows over 12 in (30.5 cm). Working 48 sc over 12 in gives exactly 4 sc per inch. One sc per row-end would give 4.5 sc per inch and the edge would ruffle. The tab edge is diagonal, so it’s longer than its 3.1 in (7.9 cm) height: about 3.6 in, which takes 14 sc at gauge. The bottom edge keeps the panel’s 20 sts. The two 3-sc corners each add 2 extra sts, for 18 + 6 = 24. The border adds about 0.4 in (1.0 cm) to each edge, so the panel finishes at 5.8 in × 15.5 in (14.7 cm × 39.4 cm).
Ring: Pass the strap through the wooden ring from front to back. Fold it down behind the tab, and whipstitch Row 80 to the back of Row 68.
Final Blocking
- Spray the whole holder evenly with water until it’s damp but not soaked.
- Lay it flat and pin the panel to 5.8 in × 15.5 in (14.7 cm × 39.4 cm).
- Fill each pocket with a rolled hand towel or a spare roll in a plastic bag so it dries in a rounded shape.
- Gently straighten the mesh columns with your fingers.
- Spread the petals and leaves flat and pin each petal tip.
- Let it dry completely, which takes about 24 hours, before you remove the pins.
Final Quality-Control Checklist
- Each pocket base lies flat at 5.25 in (13.3 cm).
- The mesh has 33 straight columns on every pocket.
- Each rim has 66 sc and doesn’t flare.
- The sunflowers are centered on the front, with both petal layers visible.
- The leaves sit at matching angles on both sides.
- The pockets are evenly spaced 4 in (10.2 cm) apart.
- The border lies flat with no ruffles.
- The ring is sewn on firmly and the strap is not twisted.
Troubleshooting
- The base cups or ripples: Check your increase spacing. Ripples mean the stitches are too loose, so go down a hook size. Cupping means the stitches are too tight, so go up a size.
- The mesh slants: Make sure each dc goes into the dc below it, not into the ch-1 space.
- A roll won’t fit: The walls stretch a little. Block the pocket around a roll, or add 6 stitches to the base with a Rnd 12 increase round (72 sts) and adjust the mesh repeats to match.
- The pockets tip forward: Tack the pocket sides to the panel 1 in (2.5 cm) below the rim.
- The border ruffles: Skip one extra row-end in each section of 9.
- The petals curl: Steam-block them and pin them flat until dry.
Care
Hand wash in cool water with mild soap, press out the water in a towel, and dry flat in shape. Don’t tumble dry, because it can distort the mesh and the appliqués.
Final Notes
The measurement chain is simple. A 5.25 in (13.3 cm) base grows into a pocket with 3.5 in (8.9 cm) walls. The 20-stitch backs of the pockets match the 20-stitch panel. The panel rows give 4 in (10.2 cm) per pocket, and the 148-stitch border finishes the panel at 5.8 in × 15.5 in (14.7 cm × 39.4 cm). Check your gauge on the first pocket and everything else lines up.
Happy crocheting!