

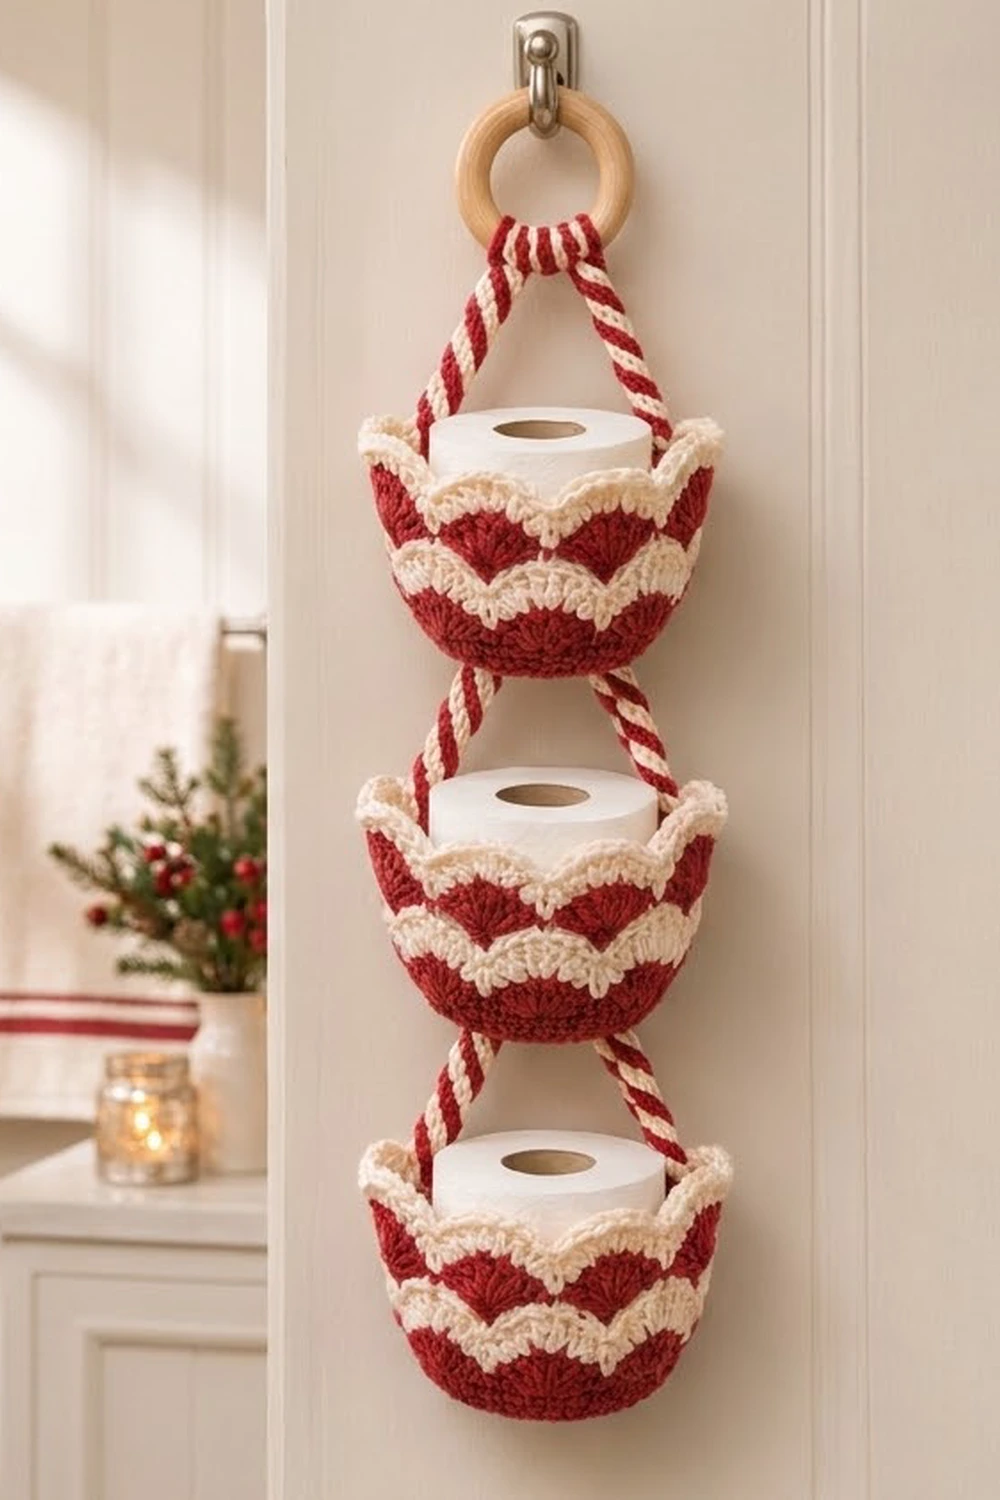
This three-tier hanging holder looks like a peppermint treat. It’s three little scalloped baskets in cranberry red and cream, linked by twisted candy-cane cords and hung from a wooden ring. Each basket holds one standard roll of toilet paper, so it’s a practical and festive way to keep spares in a small bathroom.
The baskets use a classic shell stitch. Red and cream rounds alternate, and each round sits halfway between the shells of the round below. That offset makes the cream arcs look like they’re outlining red fans. A solid red base keeps each cup sturdy, and a wider cream scallop round finishes the top edge.
The pattern uses US crochet terms. The finished holder measures about 4.75 in (12.1 cm) wide and about 21 in (53.3 cm) long from the top of the ring to the bottom of the lowest basket. Each basket is 3.5 in (8.9 cm) tall.
To build it, you’ll work three identical baskets in joined rounds from the base up. Then you’ll make six twisted cords, sew them in place, and hang everything from the ring.
Finished Size and Construction
- Finished size: 4.75 in (12.1 cm) wide × about 21 in (53.3 cm) long
- Skill level: Easy–Intermediate
- Terminology: US crochet terms
- Yarn weight: Worsted (#4)
- Hook: 5.0 mm (H-8)
- Number of pieces: 3 baskets, 6 twisted cords, 1 wooden ring
- Layout: 1 column × 3 baskets, stacked vertically
- Piece size: Each basket is 4.75 in (12.1 cm) across × 3.5 in (8.9 cm) tall
- Size before rim (border): 3.0 in (7.6 cm) total basket height, or 2.75 in (7.0 cm) of side above the base edge
- Rim (border) depth: 0.5 in (1.3 cm) of scallops
Materials
Yarn: Use a worsted-weight acrylic or cotton-acrylic blend. Avoid very soft or loosely plied yarn, because the shells need a little body to hold their cup shape. 100% cotton also works well and makes a firmer basket.
- Color A – Cranberry Red: 85 g / about 170 m (186 yd)
- Color B – Cream: 55 g / about 110 m (120 yd)
These quantities include a margin of about 15% for gauge differences, the cords, and weaving in ends.
Tools:
– 5.0 mm (H-8) crochet hook
– Wooden ring, 3 in (7.6 cm) outer diameter
– Tapestry needle
– Stitch marker
– Scissors
– Tape measure
– A door hook or sturdy doorknob for testing
– A standard toilet roll for fit checks
Abbreviations (US Terms)
- MR – magic ring
- ch – chain
- sl st – slip stitch
- sc – single crochet
- dc – double crochet
- BLO – back loop only
- st(s) – stitch(es)
- sk – skip
- * * – repeat between asterisks
Special stitches:
– Shell: 5 dc in the same stitch.
– Rim scallop: 7 dc in the same stitch.
– Standing sc: With a slip knot on the hook, insert the hook into the stitch and complete a sc as usual. This starts a new color without a chain.
Note: At the start of base rounds, ch 3 counts as a dc.
Gauge and Checkpoints
Gauge: 16 dc and 8 rows = 4 in (10.2 cm) in dc worked flat.
Make one full basket before you start the others. It tells you more than a swatch does, because shells and rounds spread differently from straight rows.
Checkpoints:
– After Round 3: The base measures about 2.9 in (7.4 cm) across.
– After Round 5: The base measures 4.75 in (12.1 cm) across and lies flat.
– After Round 9: The side is 1.75 in (4.4 cm) tall, measured from the base edge.
– After Round 11: The side is 2.75 in (7.0 cm) tall.
– After Round 12: The basket stands 3.5 in (8.9 cm) tall overall, and a roll drops in with a light, snug fit.
If your base is too big (more than 5 in / 12.7 cm), go down to a 4.5 mm hook. If it’s too small (less than 4.5 in / 11.4 cm) or the roll won’t fit, go up to a 5.5 mm hook. A standard roll is about 4.25 in (10.8 cm) across, so you need at least 0.5 in (1.3 cm) of ease.
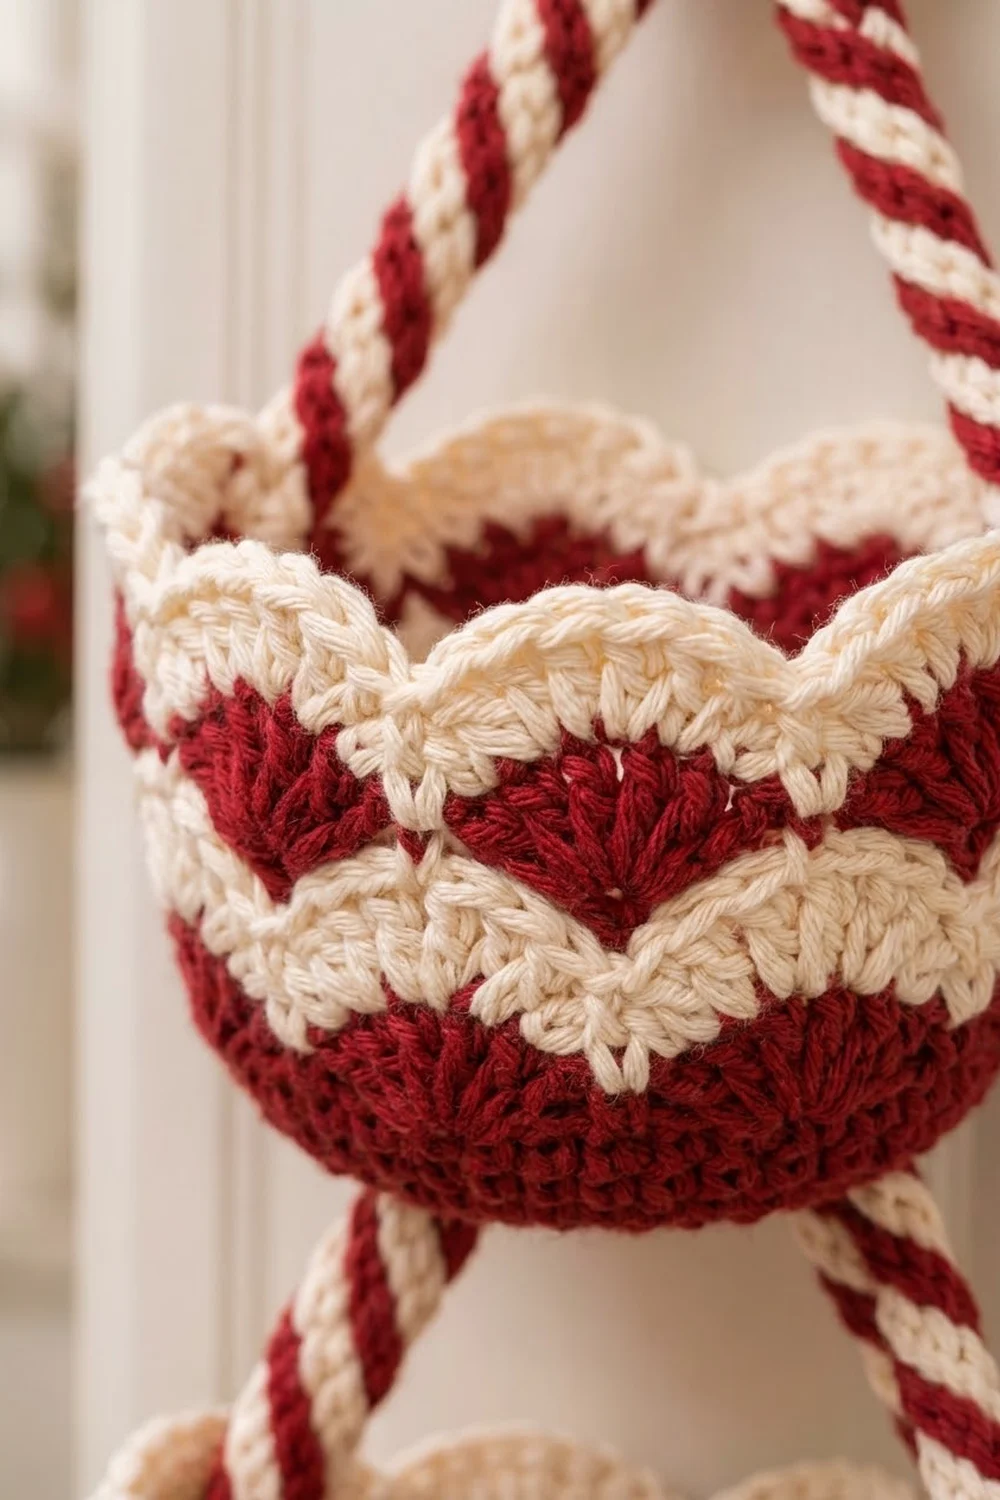
Basket Pattern (Make 3)
Base
Use Color A (red).
Round 1: Make an MR. Ch 3, then work 11 dc into the ring. Pull the ring closed and sl st to the top of the ch-3. (12 sts)
Round 2: Ch 3, dc in the same st, then 2 dc in each st around. Sl st to the top of the ch-3. (24 sts)
Round 3: Ch 3, dc in the same st, dc in the next st, *2 dc in the next st, dc in the next st*. Repeat from * to * around and sl st to join. (36 sts)
Round 4: Ch 3, dc in the same st, dc in the next 2 sts, *2 dc in the next st, dc in the next 2 sts*. Repeat around and sl st to join. (48 sts)
Round 5: Ch 3, dc in the same st, dc in the next 3 sts, *2 dc in the next st, dc in the next 3 sts*. Repeat around and sl st to join. (60 sts)
Checkpoint: the base should be 4.75 in (12.1 cm) across and flat.
Base Edge
Round 6 (Color A): Ch 1, then sc in the BLO of each st around. Sl st to the first sc. (60 sts)
Working in the back loops makes a crisp ridge, and the sides start to rise from here. Keep going with Color A.
Shell Sides
Round 7 (Color A): Ch 1, sc in the first st, *sk 2 sts, shell in the next st, sk 2 sts, sc in the next st*. Repeat from * to * 9 more times, but skip the final sc. Sl st to the first sc instead.
(10 shells + 10 sc = 60 sts)
Fasten off Color A.
Round 8 (Color B): Work a standing sc in the center (3rd) dc of any shell. *Shell in the next sc, sc in the center dc of the next shell*. Repeat around, ending with a shell in the last sc. Sl st to the first sc.
(10 shells + 10 sc = 60 sts)
Fasten off. This round’s shells sit between the red shells, which creates the cream arcs.
Round 9 (Color A): Repeat Round 8 using red. (60 sts)
Round 10 (Color B): Repeat Round 8 using cream. (60 sts)
Round 11 (Color A): Repeat Round 8 using red. (60 sts)
Checkpoint: the side should be 2.75 in (7.0 cm) tall above the Round 6 ridge.
Tip: Start each new round at a different shell so the joins don’t stack into a visible seam. Weave in ends as you go, along the inside of the same color.
Make All Pieces
Baskets: Make 3 baskets. Each uses about 25 g of red and 16 g of cream. That’s about 75 g of red and 48 g of cream for all three.
Twisted cords: Make 6.
– Cord 1 (top cord): 1 cord, 10 in (25.4 cm) finished
– Cords 2–5 (connectors): 4 cords, 5 in (12.7 cm) finished each
– Spare: 1 more connector cord, made as a backup or to replace any cord that twists unevenly
To make each cord, cut 2 strands of red and 2 strands of cream. Each strand should be 3 times the finished length. That’s 30 in (76.2 cm) for the top cord and 15 in (38.1 cm) for a connector.
- Knot the strands together at both ends.
- Anchor one end, then twist the strands in one direction until they kink back on themselves.
- Fold the cord in half and let it twist back on itself.
- Knot the loose end and trim the cord to its finished length.
The finished cord is about 0.4 in (1.0 cm) thick, with a clear candy-cane stripe.
Layout grid:
        [  RING  ]
         /      \
       Cord 1 (both legs)
     [ BASKET 1 ]
       |      |
     C2      C3
     [ BASKET 2 ]
       |      |
     C4      C5
     [ BASKET 3 ]
Joining
Method: Sew the cords in place with matching yarn and a tapestry needle. Whipstitch through the cord plies and the basket stitches, working on the inside of the basket.
Attachment points: Each basket has 10 sc in Round 11. Choose any one of them as point A, then count 5 sc around and mark the opposite one as point B. Point B is 30 sts away (half of 60), so the cords sit exactly opposite each other and the basket hangs level.
Rim joins (all baskets): Lay a cord end against the inside of the basket at point A. It should cover Rounds 10–12, which is about 1.5 in (3.8 cm). Whipstitch down both edges of the cord. Repeat at point B.
Base joins (Baskets 1 and 2): For the bottom end of each connector, find the Round 6 ridge directly below points A and B. Sew 1.5 in (3.8 cm) of cord up the outside of the basket from the ridge, through Rounds 6–8.
Order:
1. Sew the top of Cord 2 to Basket 1 at its Round 6 point A, and the bottom to Basket 2 at its rim point A.
2. Do the same with Cord 3 at the point B positions.
3. Repeat with Cords 4 and 5 between Baskets 2 and 3.
4. Pass Cord 1 through the wooden ring, center the ring, and sew one end to each rim attachment point on Basket 1.
Tension advice: Keep the stitches firm but don’t pull them so tight that the shell rounds pucker. Each connector should leave 2 in (5.1 cm) of visible cord between baskets. If one side ends up longer, the basket will tilt, so measure both sides before you sew the second end.
Size checkpoint: Hang the piece from the ring. You should see about 3.5 in (8.9 cm) of drop from the ring to the Basket 1 rim and 2 in (5.1 cm) between the baskets. The overall length should be about 21 in (53.3 cm):
3 + 3.5 + (3 × 3.5) + (2 × 2) = 21 in (53.3 cm)
Border: Scalloped Rim
Work the rim on each basket before joining. It’s described here because it’s the finishing edge.
Rim gauge: Each 6-stitch repeat in Round 11 spans 1.5 in (3.8 cm), since 15 in (38.1 cm) of circumference divided by 10 repeats is 1.5 in. The rim widens each repeat to 8 sts, so the scallops flare out slightly over the same span.
Round 12 (Color B): Work a standing sc in the center dc of any red shell. *Rim scallop (7 dc) in the next sc, sc in the center dc of the next shell*. Repeat around, ending with a rim scallop in the last sc. Sl st to the first sc.
Count: 60 sts worked one-for-one in the 6-stitch pattern, plus 20 extra sts (2 more dc in each of 10 scallops) = 80 sts (10 scallops of 7 dc + 10 sc).
Per side: Split at the attachment points, each half of the rim (front and back) has 5 scallops + 5 sc = 40 sts. Both halves hold the same number of stitches, so the cords pull evenly.
Why the math works: The base finishes at 60 sts, which is 10 repeats of 6. Every shell round keeps that 6-stitch repeat (1 sc + 5 dc), so the walls stay straight with no increases. The rim keeps 10 repeats but uses 8 sts each (1 sc + 7 dc). That gives a gentle flare and 0.5 in (1.3 cm) deep scallops without ruffling.
Fasten off and weave in ends.
Final Blocking
- Lightly mist each basket with water. If you used cotton, you can use a little spray starch instead.
- Push a toilet roll into each basket so the sides stand straight.
- Pinch each scallop into an even arch with your fingers.
- Check that the Round 6 ridge forms a clean edge and the base sits flat.
- Let the baskets dry completely, with the rolls inside, for at least 6 hours.
- Straighten the cords by hanging the finished holder and letting gravity even out the twist.
Final Quality-Control Checklist
- All 3 baskets have 60 sts in Rounds 6–11 and 80 sts in Round 12.
- Each base measures 4.75 in (12.1 cm) across.
- Each basket is 3.5 in (8.9 cm) tall.
- Red and cream shells offset correctly and look the same on all baskets.
- Attachment points are exactly 30 sts apart on each basket.
- Both connectors in each gap leave 2 in (5.1 cm) of visible cord.
- The ring is centered and all baskets hang level.
- Overall length is about 21 in (53.3 cm).
- All ends are woven in on the inside.
Troubleshooting
The base cups before Round 5. Your tension is too tight. Relax it or go up half a hook size.
The base ruffles. You may have added extra increases. Recount to 12, 24, 36, 48, and 60.
The shells lean or drift. Make sure you start each round in a center dc and put each shell in an sc, never in a dc.
A visible seam forms up the side. Start each round at a different shell.
The roll doesn’t fit. Remake the baskets with a larger hook. A gentle steam won’t add enough room.
A basket tilts. Re-sew the shorter cord until both cords show the same length.
The cords untwist. Tie tighter end knots and stitch through the knot when you attach the cord.
The rim flares too much. Work 6 dc scallops instead. The rim is then 70 sts, or 35 per half.
Care
Hand wash in cool water, press out the water in a towel, and dry flat with a roll inside each basket to keep its shape. Don’t wring or tumble dry.
Final Notes
The measurement chain is short and easy to check:
- Gauge of 16 dc to 4 in (10.2 cm)
- A 60-st base that’s 4.75 in (12.1 cm) across
- 60-st shell walls rising to 2.75 in (7.0 cm)
- An 80-st scalloped rim that brings each basket to 3.5 in (8.9 cm)
- Cords spaced 30 sts apart
- A finished holder about 21 in (53.3 cm) long
Check the first basket against each checkpoint, then make the other two the same way.
Happy crocheting!