

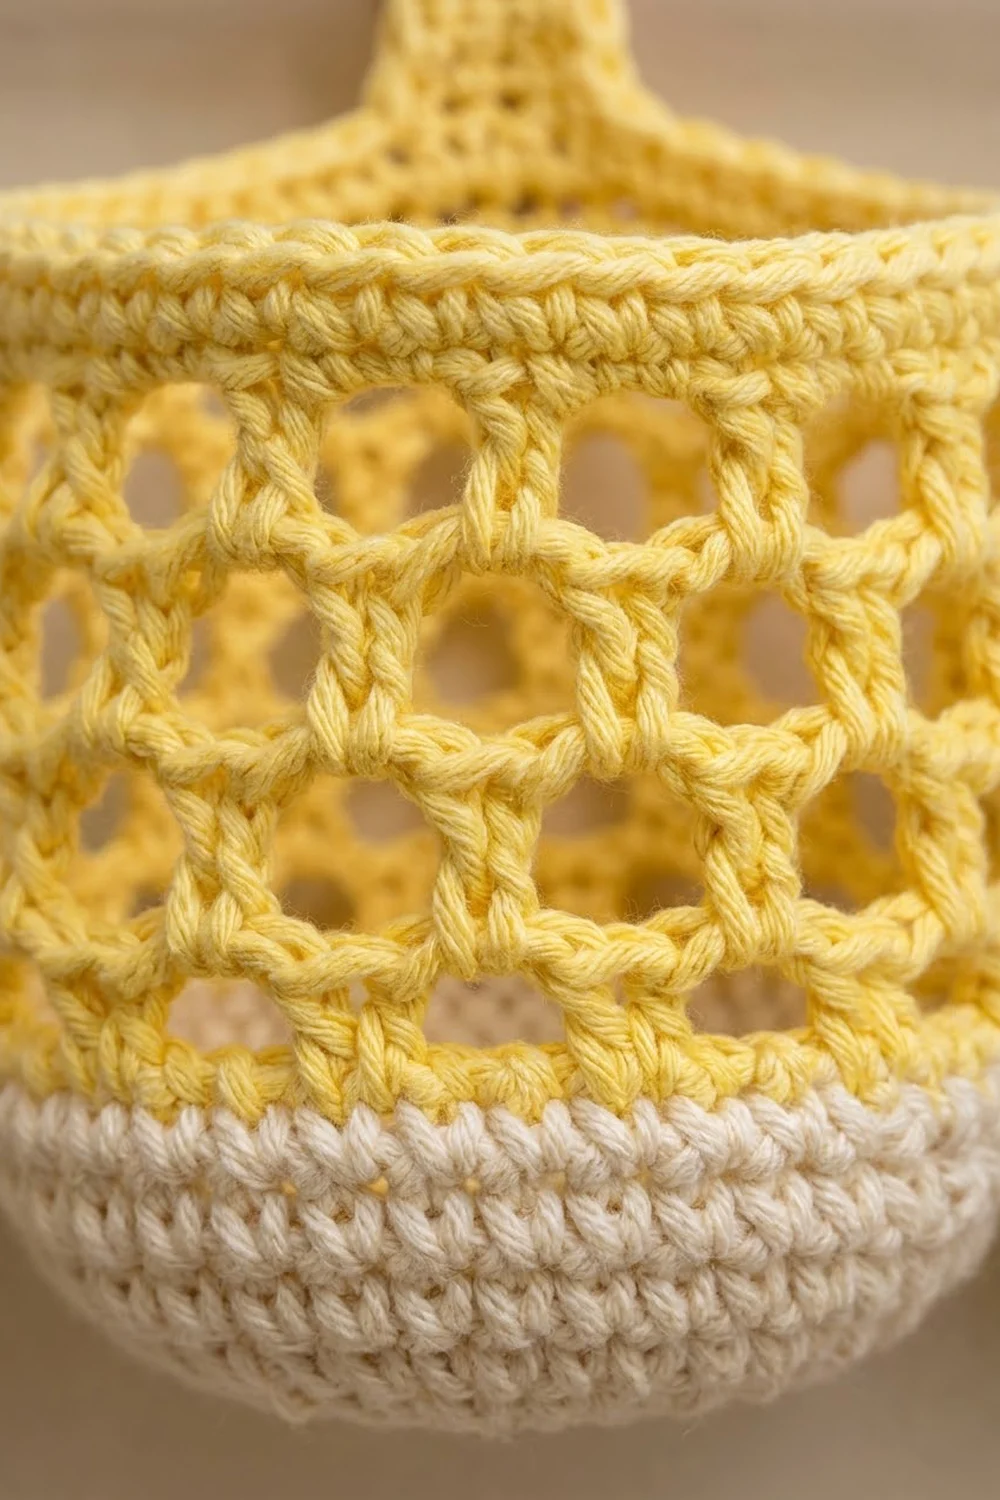
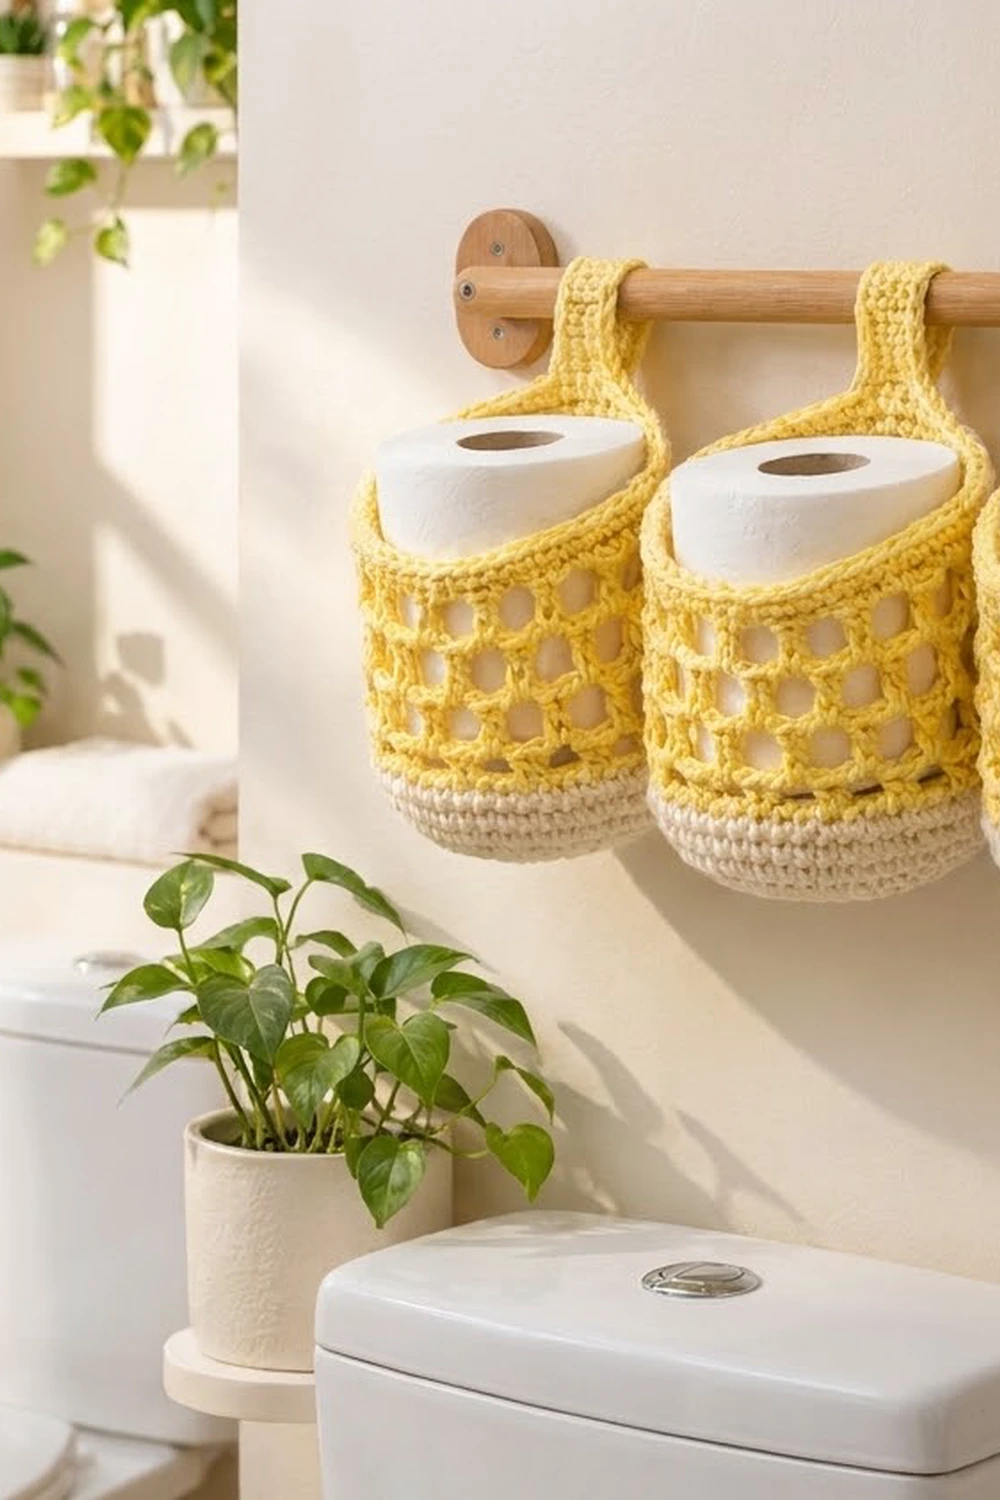
These hanging baskets keep spare toilet paper rolls off the floor and in easy reach. Each basket has a cream base and lower wall, an open butter-yellow honeycomb mesh, and a solid yellow rim. A flat strap loops over a wall-mounted rod.
The colors are soft and fresh, and the open mesh makes the baskets look light even with a full roll inside. Cotton yarn keeps the shape firm and copes well with bathroom humidity.
This pattern uses US crochet terms. Each finished basket is about 5 in (12.7 cm) in diameter and 4.25 in (10.8 cm) tall from the bottom edge to the rim. The loop rises about 3.5 in (8.9 cm) above the rim. One basket holds one standard roll, and you make three to fill a rod.
You work each basket from the bottom up in joined rounds. You make a flat single crochet circle, then the solid cream lower wall, then five rounds of chain-loop mesh in yellow. A conversion round turns the mesh back into solid stitches for the rim band. Last, you work a strap in rows from the back of the rim, fold it over and sew it down to make the loop.
Finished Size and Construction
- Finished size (one basket): 5 in (12.7 cm) diameter × 4.25 in (10.8 cm) tall, plus a loop about 3.5 in (8.9 cm) above the rim
- Skill level: Easy / Advanced beginner
- Terminology: US crochet terms
- Yarn weight: Worsted (#4) cotton
- Hook: 5 mm (H-8)
- Number of pieces: 3 separate baskets (not joined to each other)
- Layout: 3 baskets in a row on one rod, about 0.5 in (1.3 cm) apart
- Piece size: 5 in (12.7 cm) × 4.25 in (10.8 cm)
- Size before border (rim band): 5 in (12.7 cm) diameter × 3.5 in (8.9 cm) tall
- Border depth: 0.75 in (1.9 cm)
Materials
Yarn: Choose a smooth, worsted-weight 100% cotton or cotton blend with about 85 m per 50 g. Cotton holds the basket’s shape and doesn’t stretch out under the weight of a roll. Avoid fluffy or very soft acrylics, because they fill in the mesh holes and sag.
- Color A, Cream: 90 g (about 153 m) for three baskets, roughly 25 g per basket
- Color B, Butter Yellow: 160 g (about 272 m) for three baskets, roughly 45 g per basket
These quantities include a margin for your gauge swatch and small differences in tension.
Tools:
- 5 mm (H-8) crochet hook
- Stitch marker
- Tapestry needle
- Scissors
- Tape measure
- Rust-proof pins and a towel for blocking
- One toilet paper roll, to use as a fit check
- A wall rod at least 18 in (45.7 cm) long and up to 1.25 in (3.2 cm) in diameter
Abbreviations (US Terms)
- ch – chain
- sc – single crochet
- sl st – slip stitch
- st(s) – stitch(es)
- sp – space
- sk – skip
- inc – 2 sc in the same stitch
- MR – magic ring
- Rnd(s) – round(s)
Special stitch – Honeycomb Mesh: Work 1 sc in a ch-3 space, then ch 3. Repeat around. Each round sits half a repeat over from the one below, which gives the staggered rows of rounded holes.
Gauge and Checkpoints
Gauge: 14 sc and 15 rnds = 4 in (10.2 cm) in sc, worked in the round with a 5 mm hook.
Make one full basket before you start the others. It acts as your gauge test, and it shows you how your tension behaves in the mesh.
Checkpoints:
- After Rnd 9 (end of the base): The flat circle measures 5 in (12.7 cm) across.
- After Rnd 13 (cream wall): The wall is 1 in (2.5 cm) tall, measured up from the base edge.
- After Rnd 18 (end of the mesh): The basket is 3.5 in (8.9 cm) tall from the base edge.
- After Rnd 22 (end of the rim): The basket is 4.25 in (10.8 cm) tall.
- Strap: It measures 8 in (20.3 cm) before folding.
If your base is too big: Go down to a 4.5 mm hook. If the basket ends up loose, a roll will tip forward.
If your base is too small: Go up to a 5.5 mm hook. A standard roll is about 4.5 in (11.4 cm) across, and it needs a little room.
If the mesh is too tall: Your chains are loose. Tighten them, or use 2 rounds of a smaller hook just for the mesh.
Pattern: One Basket
Base (Color A, Cream)
Work in continuous rounds, joining each round with a sl st to the first sc. Ch 1 at the start of each round. The ch 1 does not count as a stitch.
Rnd 1: MR, 6 sc in the ring, join. (6 sts)
Rnd 2: inc in each st around, join. (12 sts)
Rnd 3: sc 1, inc 6 times, join. (18 sts)
Rnd 4: sc 2, inc 6 times, join. (24 sts)
Rnd 5: sc 3, inc 6 times, join. (30 sts)
Rnd 6: sc 4, inc 6 times, join. (36 sts)
Rnd 7: sc 5, inc 6 times, join. (42 sts)
Rnd 8: sc 6, inc 6 times, join. (48 sts)
Rnd 9: sc 7, inc 6 times, join. (54 sts)
Checkpoint: the base measures 5 in (12.7 cm) across.
Lower Wall (Color A, Cream)
Rnds 10–13: Ch 1, sc in each st around, join. (54 sts each round)
You work these rounds through both loops and without a turning ridge. That lets the base curve gently up into the wall, which gives the rounded bottom. Fasten off Color A after Rnd 13.
Checkpoint: the cream wall is 1 in (2.5 cm) tall.
Honeycomb Mesh (Color B, Yellow)
Rnd 14 (set-up): Join Color B with a sl st in any st. Ch 1, sc in the same st, ch 3, sk 2. Sc in the next st, ch 3, sk 2 17 times. Join with a sl st to the first sc. (18 sc, 18 ch-3 sps)
Check the math: 18 repeats × 3 sts used = 54, exactly the Rnd 13 count.
Rnd 15: Sl st into the next ch-3 sp. Ch 1, sc in the same sp, ch 3. Sc in the next ch-3 sp, ch 3 17 times. Join to the first sc. (18 sc, 18 ch-3 sps)
Rnds 16–18: Repeat Rnd 15. (18 sc, 18 ch-3 sps each round)
Each sc sits at the center of the loop below, so the holes stagger like honeycomb cells. Pull each sc snug and keep your chains even. The sc stitches form the “frames,” and uneven tension makes lopsided cells.
Checkpoint: the basket is 3.5 in (8.9 cm) tall. Each mesh round adds about 0.5 in (1.3 cm).
Make All Pieces
Repeat the full pattern (base, wall, mesh, rim and strap) to make 3 baskets.
Per basket: Color A about 25 g; Color B about 45 g.
For 3 baskets: Color A about 75 g; Color B about 135 g. The extra yarn in the Materials list is your margin.
Layout on the rod (front view):
|====================== rod 18 in (45.7 cm) ======================|
      [loop]            [loop]            [loop]
   [ Basket 1 ]  gap  [ Basket 2 ]  gap  [ Basket 3 ]
     5 in            5 in             5 in
Three baskets at 5 in (12.7 cm) each, with two 0.5 in (1.3 cm) gaps, take up 16 in (40.6 cm). That leaves room for the rod brackets on an 18 in (45.7 cm) rod.
Border: Rim Band
The rim band is the basket’s border. It turns the open mesh back into solid stitches so the top edge is firm.
Border gauge: Same as the main gauge, 14 sc = 4 in (10.2 cm). That gives 54 sts around a 15.5 in (39.4 cm) circumference, the same as the base.
Rnd 19 (conversion round): Ch 1. Sc in the first sc, 2 sc in the next ch-3 sp. Sc in the next sc, 2 sc in the next ch-3 sp 17 times. Join.
Count: 18 sts (1 per existing sc) + 36 sts (2 per ch-3 sp) = 54 sts
Rnds 20–21: Ch 1, sc in each st around, join. (54 sts each round)
Rnd 22: Sl st loosely in each st around. (54 sl sts) Do not fasten off.
Counts per side: When the basket is flattened, each round has 27 sts on the front and 27 sts on the back. The strap sits on the center 6 sts of the back half.
Why the math works: The base, the wall, the mesh set-up and the rim all equal 54 sts. Because the circumference never changes, the walls rise straight instead of flaring or pulling in. The conversion round puts back exactly the 36 sts the mesh skipped (18 sps × 2) on top of the 18 frame sc.
Checkpoint: the rim band is 0.75 in (1.9 cm) deep and the basket is 4.25 in (10.8 cm) tall.
Strap (Color B)
Flatten the basket with the joining seam at the center back. Find the center 6 sts on the back half. If you’re not there already, sl st along to reach the first of those 6 sts.
Row 1: Ch 1, sc in the back loops of the Rnd 22 sl sts across the 6 center sts. (6 sts)
Rows 2–30: Ch 1, turn, sc in each st across. (6 sts each row)
The strap is 1.7 in (4.3 cm) wide and 8 in (20.3 cm) long. Leave a 12 in (30.5 cm) tail for sewing.
Strap edging: Sl st evenly down one long edge of the strap, 1 sl st per row end (30 sl sts). Repeat on the other long edge (30 sl sts). This firms the edges so the strap doesn’t curl.
Joining: Closing the Strap Loop
The three baskets are not joined to each other. The only joining in this pattern closes each strap into its hanging loop.
Method: Whipstitch with the 12 in (30.5 cm) tail.
- Fold the strap toward the inside of the basket so the Row 30 edge lies against the inside of the rim band.
- Line the 6 sts of Row 30 up with the 6 sts of Rnd 19 directly below the base of the strap.
- Stitch-to-stitch: Whipstitch strap st 1 to rim st 1, strap st 2 to rim st 2, and so on to st 6. That’s one strap stitch to one rim stitch, with no skips and no doubles.
- Make a second pass along the side edges of the overlap so the corners can’t flip up.
Tension: Pull each whipstitch just snug enough to close the gap. If you pull harder, the rim puckers inward at the back.
Checkpoint: The closed loop rises about 3.5 in (8.9 cm) above the rim. It fits over a rod up to 1.25 in (3.2 cm) in diameter.
Weave in all ends on the inside of the cream wall, where they’re least visible.
Final Blocking
- Wet each basket thoroughly in cool water and gently squeeze it out. Don’t wring it.
- Roll it in a towel to remove the extra water.
- Stand a toilet paper roll, wrapped in a plastic bag, inside the basket to act as a form.
- Ease the mesh cells into even, rounded shapes with your fingertips.
- Push the base into a smooth, rounded curve.
- Pin the strap flat on the towel, with the loop open, to dry.
- Measure: 5 in (12.7 cm) wide, 4.25 in (10.8 cm) tall.
- Let it air-dry completely before you hang it.
Final Quality-Control Checklist
- [ ] Each base has 54 sts and measures 5 in (12.7 cm).
- [ ] Each cream wall has 4 rounds and is 1 in (2.5 cm) tall.
- [ ] Each mesh has 5 rounds with 18 cells per round.
- [ ] The conversion round counts 54 sts.
- [ ] The rim band is 0.75 in (1.9 cm) deep.
- [ ] The strap is 6 sts wide with 30 rows.
- [ ] Strap seams are secure, 6 sts to 6 sts.
- [ ] All three baskets match in height within 0.25 in (0.6 cm).
- [ ] All ends are woven in on the inside.
- [ ] A roll drops in and lifts out easily.
Troubleshooting
The basket flares at the top. Your rim stitches are loose. Rework Rnds 19–21 with a hook 0.5 mm smaller.
The mesh cells look like slanted diamonds. You’re starting rounds in different places. Always sl st into the first ch-3 sp before working the next round.
The rim pulls inward. Rnd 22 is too tight. Rework the sl sts loosely, or go up a hook size for that round.
The strap stretches when the basket is loaded. Add a second row of sl st edging, or rework the strap with a smaller hook.
The baskets are different heights. Check the mesh rounds. Chain length makes the most difference there, so count your chains every time.
The base cups too much. Your increases are too tight. Make sure every increase round counts exactly 6 more sts than the last.
Care
Hand wash in cool water and lay flat, shaped over a roll, to dry. Don’t tumble dry, because heat can shrink cotton and distort the mesh.
Final Notes
The measurement chain is simple. The base is 54 sts and 5 in (12.7 cm) across, and the cream wall adds 1 in (2.5 cm). The mesh is 18 cells around and brings the height to 3.5 in (8.9 cm). The rim converts back to 54 sts and finishes at 4.25 in (10.8 cm) tall. The 8 in (20.3 cm) strap folds into a 3.5 in (8.9 cm) loop. Make three matching baskets and hang them across an 18 in (45.7 cm) rod.
Happy crocheting!