

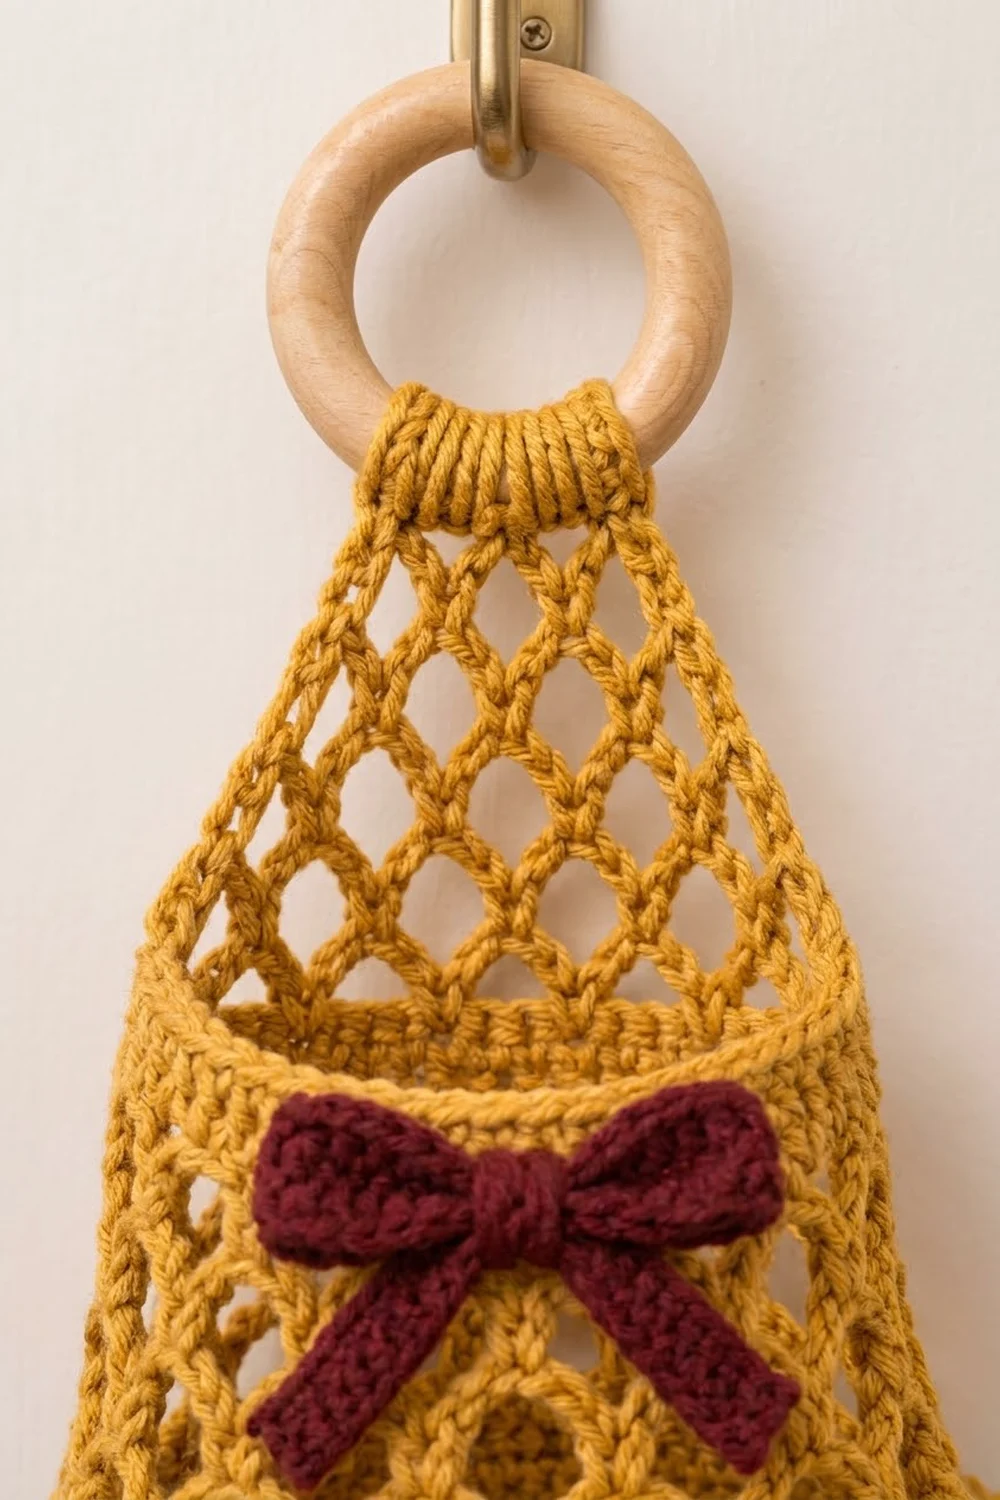
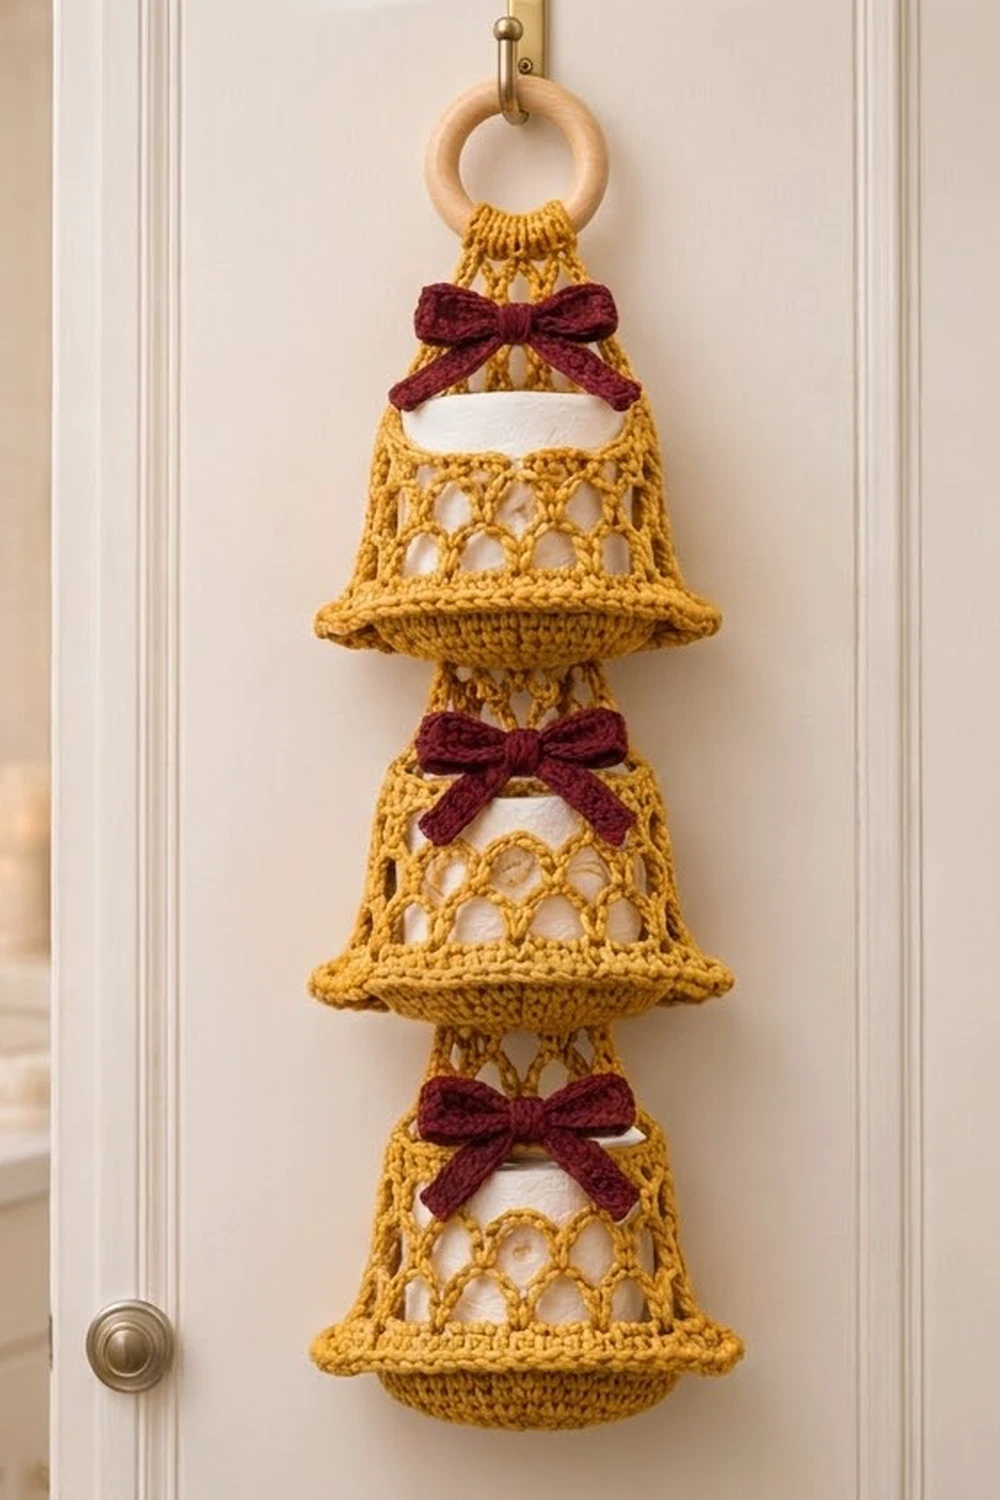
This hanging holder stacks three crocheted bells in a column. Each bell holds one spare roll, and the whole thing hangs from a wooden ring on a door hook or towel hook. The bells are mustard gold, and each one has a small burgundy bow at the front. It looks festive but tidy, so it suits a holiday bathroom and can stay up all winter.
Each bell has a solid round base, a flared rim, a mesh body of staggered chain arches, and a narrower solid band at the top. The white roll shows through the arches, which gives the bell a lantern look. This pattern uses US crochet terms throughout.
The finished holder is about 7 in (17.8 cm) wide at the rims and about 22.5 in (57.2 cm) tall including the ring. Each bell is about 5 in (12.7 cm) tall.
The construction is simple. You crochet three identical bells from the base up, then add a triangular mesh hanger and strap to the top bell only. The bells are sewn together across their back halves, so the fronts stay open for loading rolls. You add the flared rims last, then sew on the bows.
Finished Size and Construction
- Finished size: about 7 in (17.8 cm) wide x 22.5 in (57.2 cm) tall, ring included
- Skill level: Easy-intermediate
- Terminology: US crochet terms
- Yarn weight: Worsted (#4)
- Hook: 5.0 mm (H-8)
- Number of pieces: 3 bells, 1 hanger (worked onto the top bell), 3 bows
- Layout: 3 bells stacked in a single vertical column
- Bell size: base 5.5 in (14.0 cm) across, top band 4.5 in (11.4 cm) across, 5 in (12.7 cm) tall
- Size before rim: 5.5 in (14.0 cm) across at the base
- Rim depth: about 0.75 in (1.9 cm) beyond the base edge on each side, for 7 in (17.8 cm) across
Materials
Choose a smooth worsted yarn with good stitch definition. Cotton or a cotton blend holds the bell shape best and handles bathroom humidity well. Acrylic also works, but the bells will be softer and may need firmer blocking.
- Gold (main color): 150 g, about 270 m (295 yd)
- Burgundy (bows): 25 g, about 45 m (49 yd)
These amounts include a margin of about 10-15% for gauge differences and test fitting.
Tools:
- 5.0 mm (H-8) crochet hook
- Wooden ring, 3 in (7.6 cm) outer diameter
- Tapestry needle
- 4 locking stitch markers
- Scissors
- Measuring tape
- A spare toilet roll for test fitting
Abbreviations (US Terms)
- ch – chain
- sl st – slip stitch
- sc – single crochet
- hdc – half double crochet
- inc – 2 sc in the same stitch
- BLO / FLO – back loop only / front loop only
- MR – magic ring
- sk – skip
- st(s) – stitch(es)
Special stitch – Reverse sc (crab stitch): Work from left to right (if you’re right-handed). Insert the hook in the next stitch to the right, yarn over, pull up a loop, yarn over, and pull through both loops.
Gauge and Checkpoints
Gauge: 14 sc x 16 rounds = 4 in (10.2 cm) in sc worked in the round, or 3.5 sts per inch.
Make one complete bell before you start the others. It is your real gauge swatch, and it shows whether a roll fits. Measure on a flat surface without stretching.
Checkpoints:
- Base Rnd 5 (30 sts): about 2.75 in (7.0 cm) across.
- Base Rnd 10 (60 sts): 5.5 in (14.0 cm) across, about 17 in (43.2 cm) around.
- Body Rnd 6: the wall stands about 3 in (7.6 cm) tall from the base.
- Body Rnd 11 (50 sts): about 14.25 in (36.2 cm) around, 4.5 in (11.4 cm) across.
- Finished bell: about 5 in (12.7 cm) tall.
If your base is too big, change to a 4.5 mm hook. If it is too small, change to a 5.5 mm hook. Keep the stitch counts the same, because the base must stay at 60 sts for the body, joining, and rim math to work. A base under 5 in (12.7 cm) across won’t hold a standard roll.
Bell (Make 3)
Work in joined rounds. Join each round with a sl st to the first sc, then ch 1 (the ch 1 doesn’t count as a stitch). Keep all the joins in a straight line. That line is the center back of the bell.
Base
With gold:
Rnd 1: 6 sc in MR. (6)
Rnd 2: Inc in each st around. (12)
Rnd 3: (Sc 1, inc) 6 times. (18)
Rnd 4: (Sc 2, inc) 6 times. (24)
Rnd 5: (Sc 3, inc) 6 times. (30)
Rnd 6: (Sc 4, inc) 6 times. (36)
Rnd 7: (Sc 5, inc) 6 times. (42)
Rnd 8: (Sc 6, inc) 6 times. (48)
Rnd 9: (Sc 7, inc) 6 times. (54)
Rnd 10: (Sc 8, inc) 6 times. (60)
Check: the base should measure 5.5 in (14.0 cm) across when laid flat.
Body
Rnd 1: Ch 1, sc in BLO of each st around. (60) This turns the wall upward. The unused front loops of base Rnd 10 stay free for the rim.
Rnd 2: Ch 1, sc in each st around. (60)
Rnd 3 (mesh setup): Ch 1, sc in first st, (ch 4, sk 2, sc in next st) 19 times, ch 4, sk 2, join to first sc. (20 ch-4 loops)
Rnd 4: Sl st into first loop, ch 1, sc in same loop, (ch 4, sc in next loop) 19 times, ch 4, join to first sc. (20 ch-4 loops)
Rnds 5-6: Repeat Rnd 4. (20 ch-4 loops each)
Each sc lands in the center of a loop below, so the arches are staggered and lock together.
Rnds 7-9: Sl st into first loop, ch 1, sc in same loop, (ch 3, sc in next loop) 19 times, ch 3, join to first sc. (20 ch-3 loops each)
The shorter loops pull the upper body in and give the bell its taper.
Rnd 10 (band conversion): Sl st into first loop, ch 1, 3 sc in same loop, 2 sc in next loop, (3 sc in next loop, 2 sc in next loop) 9 times, join. Skip the sc between loops. Count: 20 loops x 2 sc (40) + 10 extra sc (10) = 50 sts.
Rnd 11: Ch 1, sc in each st around. (50)
On two of the bells, fasten off and leave a 20 in (50.8 cm) tail for joining. On the third bell (the top bell), fasten off with a short tail and weave it in.
Check: the bell should be 5 in (12.7 cm) tall and 4.5 in (11.4 cm) across the top. A roll should slide in through the band with a gentle stretch.
Hanger (Top Bell Only)
Lay the top bell flat with the join line at center back. Mark the 25 back sts of Rnd 11, centered on the join line. The other 25 sts form the open front.
Row 1: Join gold in the first marked st, ch 1, sc in same st, (ch 4, sk 3, sc in next st) 6 times. (6 loops; 25 sts used)
Row 2: Ch 1, turn, sc in first loop, (ch 4, sc in next loop) 5 times. (5 loops)
Row 3: Ch 1, turn, sc in first loop, (ch 4, sc in next loop) 4 times. (4 loops)
Row 4: Ch 1, turn, sc in first loop, (ch 4, sc in next loop) 3 times. (3 loops)
Row 5: Ch 1, turn, sc in first loop, (ch 4, sc in next loop) 2 times. (2 loops)
Row 6: Ch 1, turn, sc in first loop, ch 4, sc in next loop. (1 loop)
The panel loses one loop per row and forms a triangle about 3.5 in (8.9 cm) tall.
Row 7: Ch 1, turn, 5 sc in the loop. (5)
Rows 8-20: Ch 1, turn, sc in each st across. (5)
The strap (Rows 7-20) is about 3.5 in (8.9 cm) long. Thread it through the wooden ring from front to back, fold it down, and sew Row 20 to the back of Row 7. Weave in the ends. Together, the hanger and the visible strap add about 4.5 in (11.4 cm) above the top bell.
Bow (Make 3)
With burgundy:
Loop piece: Ch 21. Row 1: sc in 2nd ch from hook and in each ch across. (20) Rows 2-4: ch 1, turn, sc across. (20) The strip is about 5.75 in (14.6 cm) long. Fold both short ends to the center so they overlap slightly, and tack them in place.
Tails: Ch 13. Row 1: sc in 2nd ch from hook and in each ch across. (12) Row 2: ch 1, turn, sc across. (12) Fold into an upside-down V.
Center wrap: Ch 7. Row 1: sc in 2nd ch from hook and in each ch across. (6) Row 2: ch 1, turn, sc across. (6)
Lay the loop piece on top of the tails, wrap the center piece around both, and sew its ends together at the back. The bow is about 3 in (7.6 cm) wide, and the tails hang about 1.75 in (4.4 cm).
Make All Pieces
- Gold: 3 bells (one with the hanger)
- Burgundy: 3 bows
Layout (front view):
      ( ring )
       |strap|
      /hanger\
   [ Bell 1 + bow ]   top
   [ Bell 2 + bow ]   middle
   [ Bell 3 + bow ]   bottom
Joining
Join the bells across the back half only. The base of each upper bell sits on the top band of the bell below. Leave the front halves unsewn so you can tip an upper bell back and slide a roll into the bell below.
Method: Whipstitch with the long gold tail of the lower bell.
Stitch-to-stitch logic: The lower bell’s band (Rnd 11) has 50 sts, so its back half is 25 sts. Sew it to base Rnd 9 of the upper bell, just inside the rim line. Rnd 9 has 54 sts, so its back half is 27 sts. Line up the join lines. Sew 1 band st to 1 base st, except at band sts 9 and 17, where you sew 1 band st to 2 base sts. That makes 25 band sts + 2 extra base sts = 27 base sts, so nothing puckers.
- Join Bell 2’s band to Bell 1’s base.
- Join Bell 3’s band to Bell 2’s base.
Tension: Pull each stitch snug but not tight. The seam should lie flat and be no shorter than the fabric around it.
Checkpoint: Before you add the rims, the joined column should measure about 15 in (38.1 cm) from the bottom of Bell 3 to the top band of Bell 1.
Border: Flared Rim
Work the rim into the free front loops of base Rnd 10 on each bell. Hold the bell upside down and work outward, away from the body. If it’s easier to handle, you can add the rims before joining.
Rim gauge: Same as the body, 3.5 sts per inch. The 60 front loops are split into 12 sections of 5 sts each.
Rnd R1: Join gold in a free front loop at center back, ch 1, (sc in next 4 loops, 2 sc in next loop) 12 times, join. Count: 60 sts worked 1 per loop + 12 extra = 72. (6 per section)
Rnd R2: Ch 1, (hdc in next 5 sts, 2 hdc in next st) 12 times, join. Count: 72 sts worked 1 per st + 12 extra = 84. (7 per section)
Rnd R3: Ch 1, reverse sc in each st around, join. (84; 7 per section)
Fasten off and weave in the ends.
Why the math works: A flat circle at this gauge grows by about 6-8 sts per round. Adding 12 sts per round grows the edge faster than that, so the rim flares outward instead of lying flat. Since 60 divides evenly by 12, every increase is evenly spaced and the flare is the same all the way around. The rim adds about 0.75 in (1.9 cm) on each side: 5.5 in + 1.5 in = 7 in (17.8 cm).
Final Blocking
- Sew one bow to the center front of each bell’s top band so it covers Rnds 10-11 and the top row of arches.
- Spray the whole holder lightly with water until it’s damp but not soaked.
- Slide a roll into each bell to hold the body shape.
- Lay the holder flat on a towel and smooth the arches so they stagger evenly.
- Pinch each rim outward and pin it to 7 in (17.8 cm) wide.
- Straighten the hanger triangle and strap.
- Let it dry completely before you hang it.
Final Quality-Control Checklist
- Each base is 5.5 in (14.0 cm) across and lies flat.
- Each bell has 20 loops in every mesh round and 50 sts in the band.
- All join lines run straight up the center back.
- The back seams lie flat, and the fronts open freely.
- The rims measure 7 in (17.8 cm) across and flare evenly.
- The strap is sewn securely around the ring.
- The bows are centered and level on all three bells.
- The total height is about 22.5 in (57.2 cm).
Troubleshooting
Base cups instead of lying flat: Your tension is too tight. Go up a hook size and start again.
Base ripples: Your tension is too loose. Go down a hook size.
Mesh looks slanted: Make sure each sc goes into the loop space, not into a chain stitch.
Roll won’t fit through the band: Rework body Rnds 7-11 with a 5.5 mm hook. Keep the same counts.
Bells tilt forward: The back seam is too tight. Undo it and sew again with looser tension.
Rim curls under: Work Rnd R3 a little more loosely.
Care
Hand wash in cool water, reshape the rims while damp, and lay flat to dry. Don’t tumble dry.
Final Notes
The measurement chain is short and easy to check. Get each base to 60 sts and 5.5 in (14.0 cm), keep 20 loops in every mesh round, and finish the band at 50 sts. Join 25 band sts to 27 base sts across the back of each bell. Then build each rim from 60 to 84 sts for a 7 in (17.8 cm) flare. Three 5 in (12.7 cm) bells, plus 4.5 in (11.4 cm) of hanger and strap and the 3 in (7.6 cm) ring, give a total height of about 22.5 in (57.2 cm).
Happy crocheting!