

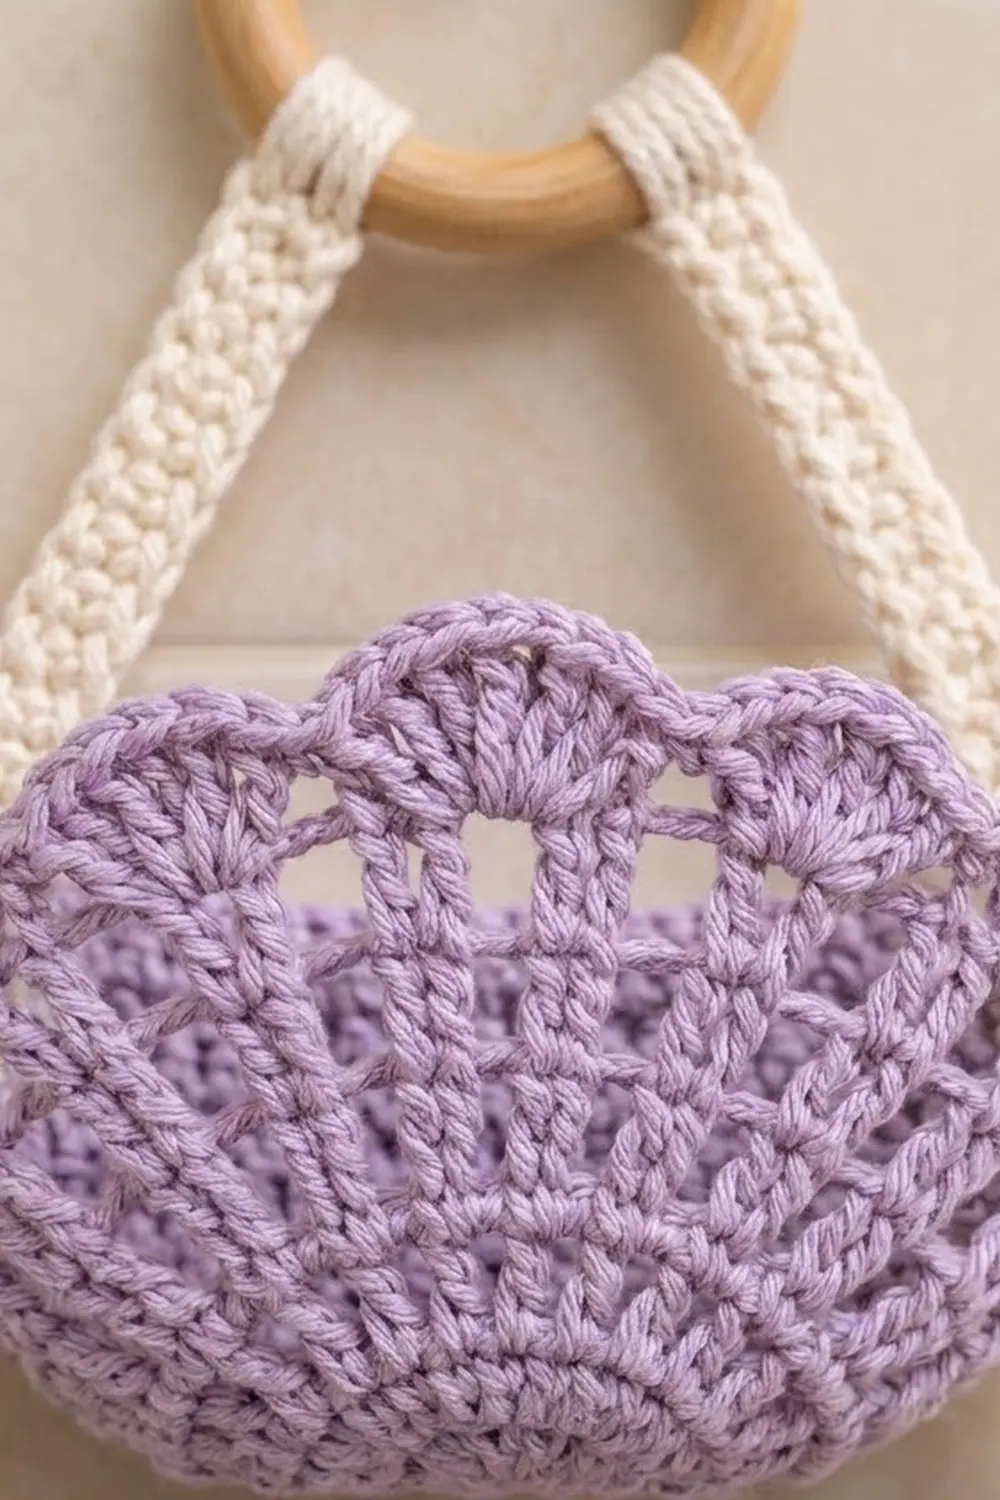
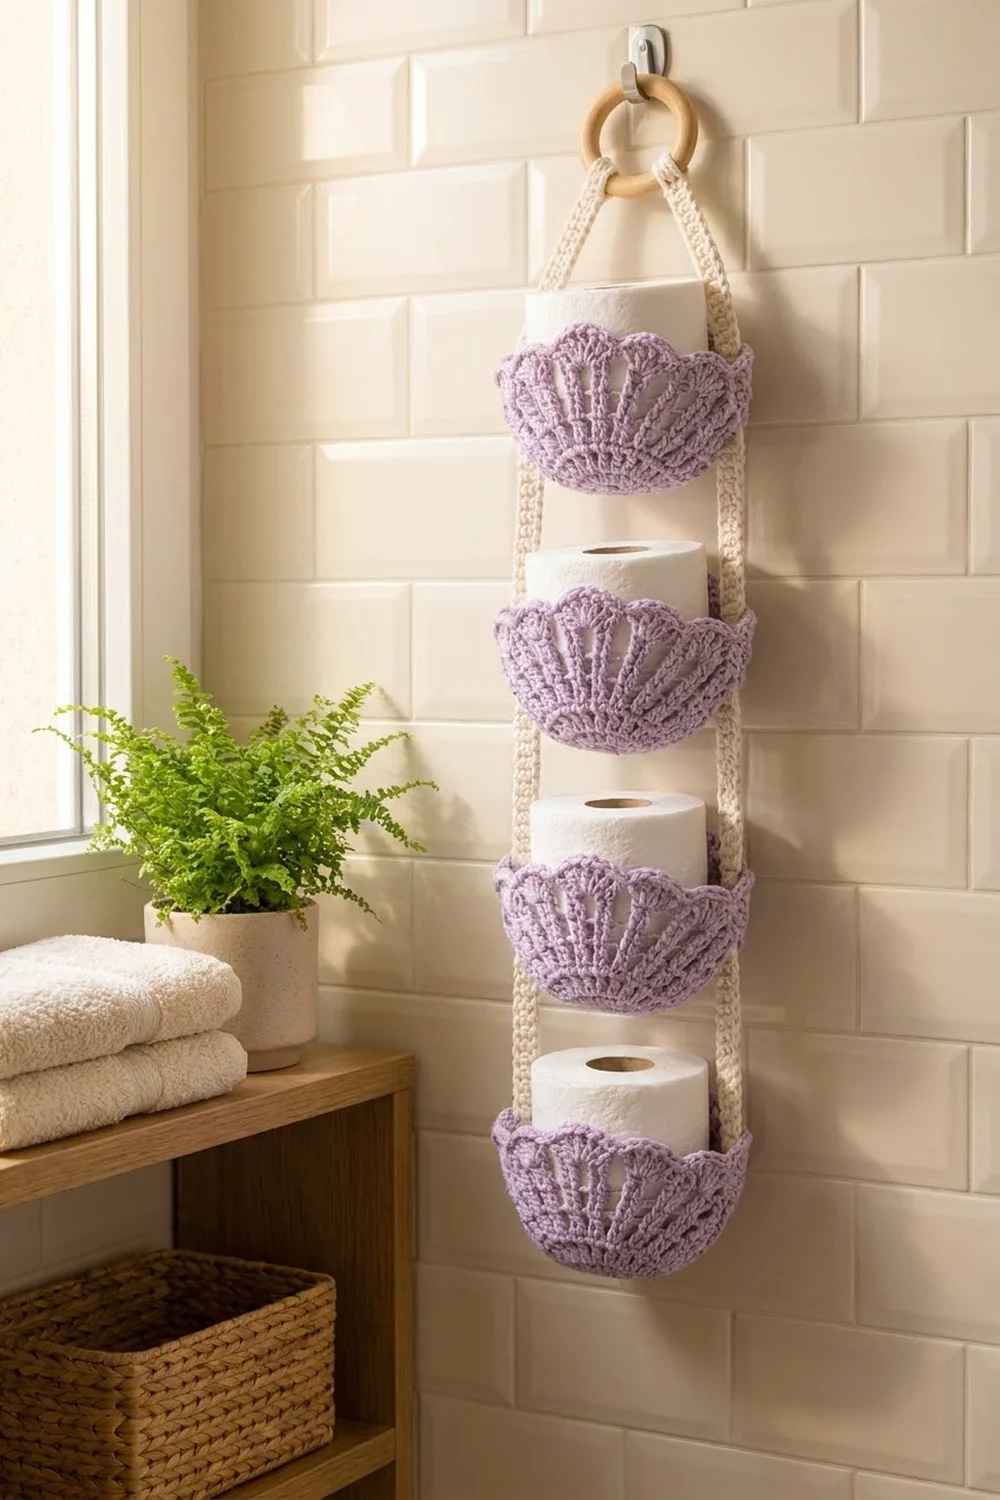
This hanging holder stores four spare toilet paper rolls on the wall. Each roll sits in a lavender pocket shaped like a seashell. A solid base supports the roll, open spokes fan up the sides, and a scalloped rim finishes the top edge. A cream strap holds the pockets in a neat column and hangs from a wooden ring.
The colors are soft lilac for the pockets and warm cream for the strap. They go well with neutral tile, light wood and green plants. Cotton yarn gives clear stitch definition and enough body for the pockets to keep their shape.
This pattern uses US crochet terms. The finished holder is about 6 in (15.2 cm) wide and about 24.5 in (62.2 cm) long from the top of the ring to the bottom of the lowest pocket. Each pocket is 6 in (15.2 cm) across at the rim and 3 in (7.6 cm) deep.
To make it, you crochet four pockets in the round, starting at the base. Next you work one long strap in rows. Then you sew the pockets onto the strap at marked stitches and fold the strap over a wooden ring.
Finished Size and Construction
- Finished size: about 6 in (15.2 cm) wide × 24.5 in (62.2 cm) long
- Skill level: Intermediate
- Terminology: US crochet terms
- Yarn weight: Worsted (#4) cotton
- Hook: 4.0 mm (G-6)
- Number of pieces: 4 pockets + 1 strap
- Layout: 1 column of 4 pockets, sewn between 2 strap rails
- Pocket size: base 4.75 in (12.1 cm) across; rim 6 in (15.2 cm) across; 3 in (7.6 cm) deep
- Pocket depth before border: 2.2 in (5.6 cm)
- Border (scallop) depth: 0.8 in (2.0 cm)
- Strap: 47 in (119.4 cm) long × 0.75 in (1.9 cm) wide
Materials
Use a smooth worsted-weight cotton or cotton blend at about 85 m per 50 g. Cotton keeps the spokes crisp and the pockets firm. Acrylic also works, but the pockets will be softer.
- Lavender (pockets): 150 g / 255 m
- Cream (strap): 50 g / 85 m
These amounts include a safety margin of roughly 20%. Each pocket uses about 30 g.
Tools:
- 4.0 mm (G-6) crochet hook
- 1 wooden ring, 2 in (5.1 cm) across
- Stitch markers (at least 12)
- Tapestry needle
- Scissors
- Measuring tape
- Rustproof pins and a blocking mat
- 1 wall hook
Abbreviations (US Terms)
- ch – chain
- sl st – slip stitch
- sc – single crochet
- dc – double crochet
- tr – treble crochet
- BLO – back loop only
- sp – space
- sk – skip
- st(s) – stitch(es)
- rep – repeat
- RS – right side
Special stitch – Point: (sc, ch 2, sc) all in the same stitch. This makes the small point at the peak of each scallop.
Spoke: 2 stitches worked side by side (2 dc or 2 tr). There are 12 spokes in each round.
Gauge and Checkpoints
Gauge: 16 sc × 18 rounds = 4 in (10.2 cm), worked firmly.
Make one complete pocket and check it before you make the rest. Measure at each checkpoint:
- After Round 10 (base): 4.75 in (12.1 cm) across, lying flat. Up to 0.25 in (0.6 cm) either way is fine.
- After Round 12: the wall stands up, about 0.45 in (1.1 cm) tall.
- After Round 15: the wall is 2.2 in (5.6 cm) tall, measured from the fold line at Round 11.
- After Round 17: the full depth is 3 in (7.6 cm) and the rim is 6 in (15.2 cm) across.
- Strap: 0.75 in (1.9 cm) wide; 4 sts = 1 in (2.5 cm) along its length.
If the base is too big: switch to a 3.75 mm hook. A standard roll is about 4.25 in (10.8 cm) across, so the base should be only slightly wider than that.
If the base is too small: switch to a 4.5 mm hook. If the base ripples, your tension is looser than your hook size suggests. Go down one hook size.
Pocket (Make 4)
Use lavender. Join each round with a sl st in the first st. Do not turn. The beginning ch 3 counts as a dc, and the beginning ch 4 counts as a tr.
Base
Round 1: Make a magic ring, ch 1, 6 sc in the ring. Pull the ring closed. (6 sts)
Round 2: Ch 1, 2 sc in each st. (12 sts)
Round 3: Ch 1, sc in next st, 2 sc in next st; rep from * around. (18 sts)
Round 4: Ch 1, sc in next 2 sts, 2 sc in next st; rep around. (24 sts)
Round 5: Ch 1, sc in next 3 sts, 2 sc in next st; rep around. (30 sts)
Round 6: Ch 1, sc in next 4 sts, 2 sc in next st; rep around. (36 sts)
Round 7: Ch 1, sc in next 5 sts, 2 sc in next st; rep around. (42 sts)
Round 8: Ch 1, sc in next 6 sts, 2 sc in next st; rep around. (48 sts)
Round 9: Ch 1, sc in next 7 sts, 2 sc in next st; rep around. (54 sts)
Round 10: Ch 1, sc in next 8 sts, 2 sc in next st; rep around. (60 sts)
Checkpoint: the base measures 4.75 in (12.1 cm) across.
Solid Band
Round 11: Ch 1, sc BLO in each st around. (60 sts) This round makes a clean fold, so the wall rises straight up from the base.
Round 12: Ch 1, sc in each st around. (60 sts)
Seashell Spokes
Round 13: Ch 3, dc in next st, ch 2, sk 3 sts, dc in next 2 sts, ch 2, sk 3 sts; rep from * 10 more times. Join to the top of the ch 3. (24 dc, 12 ch-2 sps)
Check the math: 12 repeats × 5 sts = 60 sts, which matches Round 12.
Round 14: Ch 3, dc in next dc, ch 3, sk ch-2 sp, dc in next 2 dc, ch 3, sk ch-2 sp; rep from * 10 more times. Join. (24 dc, 12 ch-3 sps)
Round 15: Ch 4, tr in next dc, ch 4, sk ch-3 sp, tr in next 2 dc, ch 4, sk ch-3 sp; rep from * 10 more times. Join to the top of the ch 4. (24 tr, 12 ch-4 sps)
The chain spaces get longer each round, so the wall flares outward and the spokes fan like a shell. Checkpoint: the wall is 2.2 in (5.6 cm) tall.
Mark the strap points: Put a marker on spoke 1 (the beginning ch 4 and the tr beside it). Count around and put a second marker on spoke 7. These two spokes sit exactly opposite each other.
Border: Scalloped Rim
The border is worked directly on each pocket, so there is no assembled-project border. Border gauge: each scallop is 7 dc wide and about 0.6 in (1.5 cm) tall. The trim round adds about 0.2 in (0.5 cm).
Round 16: Sl st into the gap between the two stitches of spoke 1. Ch 1, sc in the same gap, 7 dc in next ch-4 sp, sc in the gap between the 2 tr of the next spoke, 7 dc in next ch-4 sp; rep from * 10 more times. Join to the first sc. (12 sc + 84 dc = 96 sts; 12 scallops)
Round 17 (trim): Sl st in next sc, sc in next 3 dc, Point in next dc, sc in next 3 dc; rep from * 11 more times. Join. Fasten off and weave in the ends.
Round 17 count: 84 sc (1 in each dc) + 12 extra sc (the second sc of each Point) = 96 sc. You also have 12 sl sts and 12 ch-2 points.
Per side: The two markers split the rim into a front half and a back half. Each half has 6 scallops (6 × 7 = 42 dc in Round 16).
Why the math works: Each ch-4 space holds exactly one scallop, so 12 spaces give 12 scallops. The anchor sc for each scallop sits between the two stitches of a spoke, so every scallop lines up with the fan below it. The markers are on spokes, which means the strap attaches between scallops and never covers one. Checkpoint: the pocket is 3 in (7.6 cm) deep and 6 in (15.2 cm) across at the rim.
Strap (Make 1)
Use cream.
Foundation: Ch 189.
Row 1: Sc in the 2nd ch from the hook and in each ch across. (188 sts)
Row 2: Ch 1, turn, sc in each st across. (188 sts)
Row 3: Ch 1, turn, sc in each st across. (188 sts)
Row 4: Ch 1, do not turn. Working from left to right, sl st in each st across. (188 sl sts) This firm edge gives the strap its braided look and stops it from stretching.
Fasten off and weave in the ends. Checkpoint: the strap is 47 in (119.4 cm) long and 0.75 in (1.9 cm) wide.
Mark the strap. Count stitches along Row 1:
- Rail A: sts 1–92
- Ring fold: sts 93–96 (1 in / 2.5 cm)
- Rail B: sts 97–188
Mark Rail A from the ring end downward:
- V section: sts 92–67 (26 sts, 6.5 in / 16.5 cm)
- Pocket 1: sts 66–57 (10 sts, 2.5 in / 6.4 cm)
- Gap: sts 56–49 (8 sts, 2 in / 5.1 cm)
- Pocket 2: sts 48–39
- Gap: sts 38–31
- Pocket 3: sts 30–21
- Gap: sts 20–13
- Pocket 4: sts 12–3
- Tail: sts 2–1 (0.5 in / 1.3 cm)
Mark Rail B as a mirror image:
- V section: sts 97–122
- Pocket 1: sts 123–132
- Gap: sts 133–140
- Pocket 2: sts 141–150
- Gap: sts 151–158
- Pocket 3: sts 159–168
- Gap: sts 169–176
- Pocket 4: sts 177–186
- Tail: sts 187–188
Each rail adds up to 26 + 4 × 10 + 3 × 8 + 2 = 92 sts, or 23 in (58.4 cm).
Make All Pieces
- Lavender: 4 pockets, about 30 g each
- Cream: 1 strap, about 25 g
Layout (front view):
          ( ring )
           /    \
       Rail A   Rail B
         |[ Pocket 1 ]|
         |[ Pocket 2 ]|
         |[ Pocket 3 ]|
         |[ Pocket 4 ]|
Joining
Method: Whipstitch with cream yarn and a tapestry needle.
- Slide the ring onto the strap and center it over sts 93–96. Hold sts 92 and 97 together just below the ring. Tack them with 3–4 stitches so the ring cannot slide.
- Lay the strap flat with the RS facing up and the rails 6 in (15.2 cm) apart.
- Place Pocket 1 between the rails. Line up the strap’s Pocket 1 section with the marked spokes, with the top of the section level with the Round 16 sc at the marker.
- Each 10-stitch section covers Rounds 12–16 of the pocket wall. Sew 1 strap st to Round 12, 2 to Round 13, 2 to Round 14, 3 to Round 15 and 2 to Round 16. That totals 10 sts over about 2.5 in (6.4 cm) of wall.
- Whipstitch both long edges of the strap to the outside of the pocket, centered over the spoke. Repeat on the other side.
- Join Pockets 2–4 the same way. The 8-stitch gaps leave about 1.25 in (3.2 cm) of open space between each pocket’s base and the next pocket’s scallops.
Tension: Sew snugly but do not pull tight. Pulled stitches pinch the spoke and tilt the pocket. Keep the strap flat. It should not ripple or stretch.
Size checkpoint: Hang the holder from the ring. It should measure about 24.5 in (62.2 cm) from the top of the ring to the bottom of Pocket 4, and 6 in (15.2 cm) across at the rims. All four pockets should sit level.
Final Blocking
- Lightly spray each pocket with water until damp.
- Put a toilet paper roll (or a jar the same size) inside each pocket so the base stays flat and round.
- Pin each scallop point outward so the rim is 6 in (15.2 cm) across.
- Straighten the spokes with your fingers so they fan out evenly.
- Lay the strap flat and pin it straight at 0.75 in (1.9 cm) wide.
- Let everything dry completely before you hang it.
Final Quality-Control Checklist
- Each base has 60 sts and measures 4.75 in (12.1 cm) across
- Each pocket has 12 spokes and 12 scallops, with 6 on the front and 6 on the back
- Every scallop has a centered ch-2 point
- All pockets are 3 in (7.6 cm) deep
- Strap is 188 sts and 47 in (119.4 cm) long
- Strap attaches at spokes 1 and 7 on every pocket
- Pockets hang level and are evenly spaced
- Ring is tacked securely
- All ends are woven in
Troubleshooting
- The base cups before Round 11. Your stitches are too tight. Go up a hook size for Rounds 1–10.
- The wall leans outward too early. Make sure Round 11 is worked in BLO.
- The spokes look uneven. Count 3 skipped sts in Round 13 and keep the chain spaces the same size.
- The scallops are crowded. Check that each scallop is exactly 7 dc in a ch-4 sp.
- A pocket tilts. The strap sections are probably sewn at different heights. Unpick and line both up with Round 16.
- The strap stretches. Work Row 4 more firmly, or add a second sl st row.
Care
Hand wash in cool water, then reshape and dry flat. Do not tumble dry, because heat can loosen the scallops.
Final Notes
Here is the measurement chain:
- The 60-stitch base measures 4.75 in (12.1 cm), which fits a 4.25 in (10.8 cm) roll.
- The flared wall reaches 2.2 in (5.6 cm), and the 0.8 in (2.0 cm) scalloped border brings each pocket to 3 in (7.6 cm) deep and 6 in (15.2 cm) across.
- The 188-stitch strap gives two 23 in (58.4 cm) rails. Each rail has 10-stitch pocket sections and 8-stitch gaps, for a finished length of about 24.5 in (62.2 cm).
If every checkpoint matches, the holder will hang straight and hold four rolls securely.
Happy crocheting!