

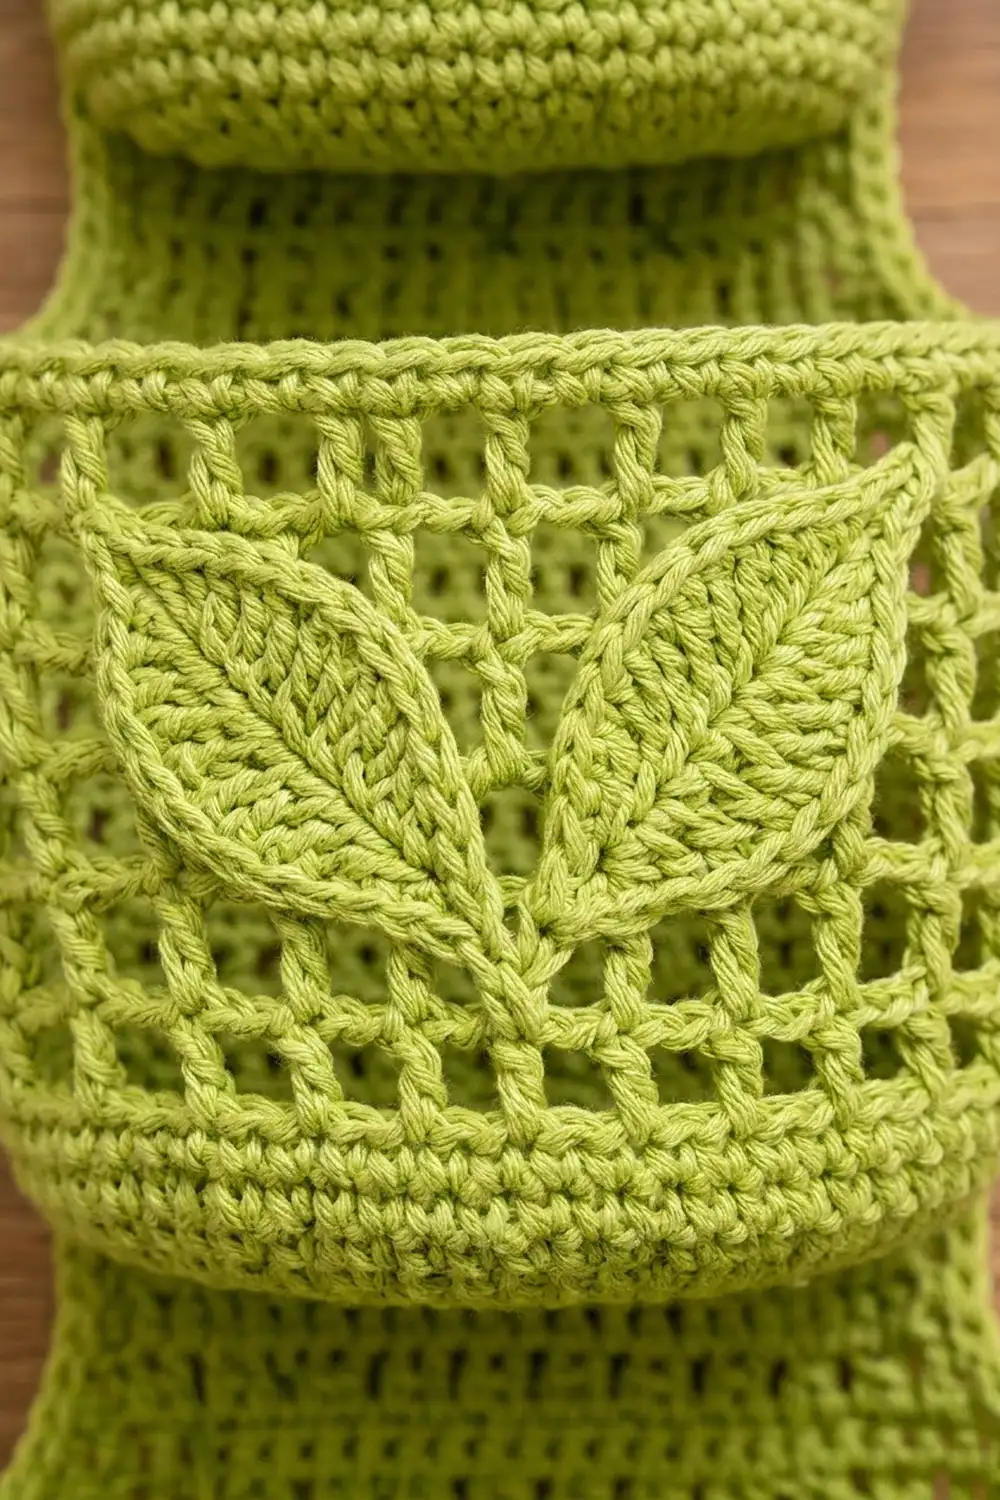
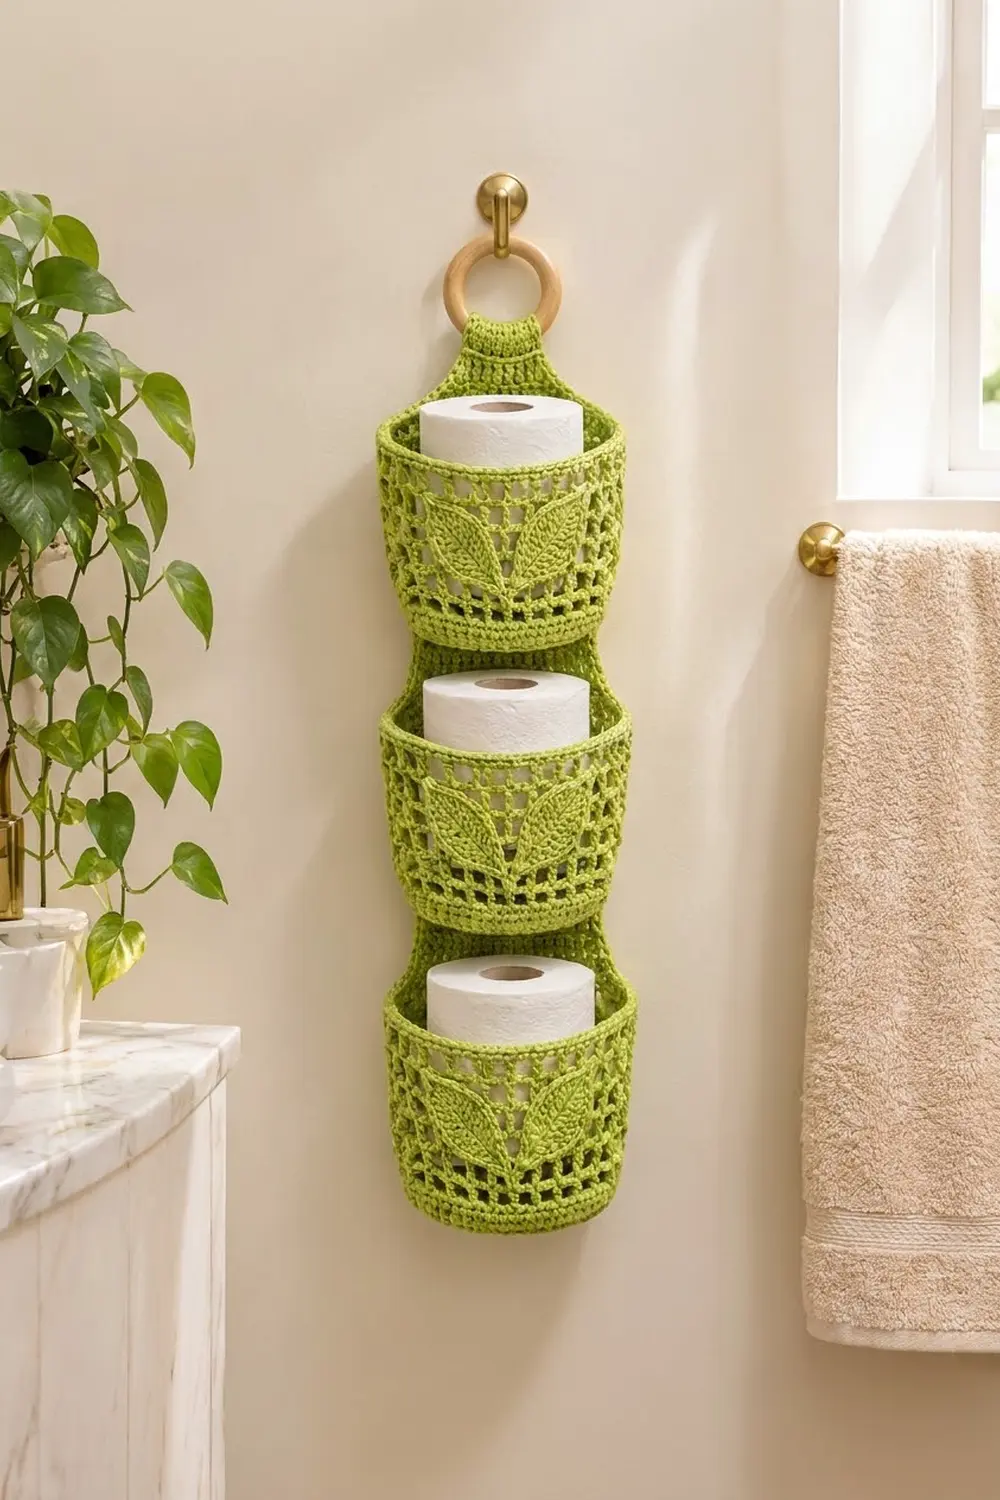
The Leafy Trio is a hanging toilet paper holder with three pockets stacked on a solid back panel. Each pocket holds one standard roll. Open filet mesh keeps it light, and two raised leaves on each pocket give it a fresh, botanical look.
The sample is worked in one bright lime green cotton. That color suits a bathroom with plants and natural wood. A wooden ring at the top hangs from a robe hook or towel knob.
This pattern uses US crochet terms. The finished holder is 5.5 in (14.0 cm) wide and about 22 in (55.9 cm) long when hanging. Each pocket measures 4.75 in (12.1 cm) across and 4.75 in (12.1 cm) tall.
You crochet one back panel in rows, then three pockets in the round from the base up, six leaves and three stem cords. Next you sew the leaves to the pockets and the pockets to the panel. Finally you work a border around the panel and fold the strap over the ring.
Finished Size and Construction
- Finished size: 5.5 in (14.0 cm) x 24 in (61.0 cm) before folding; about 22 in (55.9 cm) hanging
- Skill level: Easy-intermediate
- Terminology: US crochet terms
- Yarn weight: Worsted (#4) cotton
- Hook: 4.5 mm (US 7)
- Number of pieces: 13 (1 panel, 3 pockets, 6 leaves, 3 stem cords) plus a wooden ring
- Layout: 1 column of 3 pockets on 1 panel
- Pocket size: 4.75 in (12.1 cm) diameter x 4.75 in (12.1 cm) tall
- Panel size before border: 5 in (12.7 cm) x 23.5 in (59.7 cm)
- Border depth: 0.25 in (0.6 cm) per side
Materials
Use a smooth worsted cotton or cotton blend. Cotton holds its shape, copes with bathroom humidity and washes well. Very stretchy acrylic tends to let full pockets sag.
- Lime green worsted cotton: 150 g, about 235 m
- 4.5 mm (US 7) crochet hook
- 1 wooden ring, 2.5 in (6.4 cm) outside diameter
- Tapestry needle
- 4–6 locking stitch markers
- Scissors, rustproof pins, blocking mat, measuring tape
The yarn quantity includes a margin of about 25% for swatching and differences in tension.
Abbreviations (US Terms)
- ch – chain
- sl st – slip stitch
- sc – single crochet
- hdc – half double crochet
- dc – double crochet
- tr – treble crochet
- sc2tog – single crochet 2 together
- BLO – back loop only
- MR – magic ring
- sp – space
- st(s) – stitch(es)
- rnd(s) – round(s)
Special stitch – filet mesh square: 1 dc, ch 1, skip 1 stitch or ch-1 space. Each square is 2 stitches wide.
Gauge and Checkpoints
Single crochet gauge: 16 sts x 16 rows = 4 in (10.2 cm).
Mesh gauge: 8 mesh squares = 4 in (10.2 cm) wide; 2 mesh rounds = 1 in (2.5 cm) tall.
Make one pocket first and use it as your gauge piece. Check it at these points:
- After Rnd 10: the base is a flat circle about 4.75 in (12.1 cm) across.
- After Rnd 14: the solid lower band is 1 in (2.5 cm) tall.
- After Rnd 20: the mesh section is 3 in (7.6 cm) tall.
- After Rnd 23: the wall is 4.75 in (12.1 cm) tall and 15 in (38.1 cm) around.
If your pocket is too big, use a hook one size smaller. If it is too small, use a hook one size larger. A standard roll is about 4.25–4.5 in (10.8–11.4 cm) across, so the pocket must measure at least 4.5 in (11.4 cm) across.
Pocket (Make 3)
Join each round to its first stitch with a sl st. Do not turn.
Base
Rnd 1: 6 sc in MR, sl st to first sc. (6 sts)
Rnd 2: Ch 1, 2 sc in each st around. (12 sts)
Rnd 3: Ch 1, sc in next st, 2 sc in next st around. (18 sts)
Rnd 4: Ch 1, sc in next 2 sts, 2 sc in next st around. (24 sts)
Rnd 5: Ch 1, sc in next 3 sts, 2 sc in next st around. (30 sts)
Rnd 6: Ch 1, sc in next 4 sts, 2 sc in next st around. (36 sts)
Rnd 7: Ch 1, sc in next 5 sts, 2 sc in next st around. (42 sts)
Rnd 8: Ch 1, sc in next 6 sts, 2 sc in next st around. (48 sts)
Rnd 9: Ch 1, sc in next 7 sts, 2 sc in next st around. (54 sts)
Rnd 10: Ch 1, sc in next 8 sts, 2 sc in next st around. (60 sts)
Lower Solid Band
Rnd 11: Ch 1, sc in BLO of each st around. (60 sts) This makes a crisp fold where the wall turns up from the base.
Rnds 12–14: Ch 1, sc in each st around. (60 sts)
Filet Mesh Wall
Rnd 15: Ch 4 (counts as dc + ch 1), skip next st, dc in next st, ch 1, skip next st 29 times, sl st to 3rd ch of beginning ch-4. (30 dc + 30 ch-1 sps = 60 sts; 30 mesh squares)
Rnds 16–20: Ch 4 (counts as dc + ch 1), skip ch-1 sp, dc in next dc, ch 1, skip ch-1 sp 29 times, sl st to 3rd ch of beginning ch-4. (60 sts; 30 mesh squares)
The dc posts stack directly on top of each other, so the mesh forms a straight grid of squares.
Upper Solid Band (Rim)
Rnd 21: Ch 1, sc in next dc, sc in next ch-1 sp around. (30 sc in dc + 30 sc in sps = 60 sts)
Rnds 22–23: Ch 1, sc in each st around. (60 sts)
Fasten off and leave a 24 in (61.0 cm) tail for sewing.
Mark the back: The join is the center back. On Rnd 23, place a marker in the 10th st before the join and another in the 10th st after it. The 20 sts between the markers form the back edge. Mesh squares 15 and 16 sit at the center front.
Leaf (Make 6)
Rnd 1: Ch 12. Starting in the 2nd ch from hook, work: sc, hdc, dc in next 2 ch, tr in next 2 ch, dc in next 2 ch, hdc, sc (10 sts). Work 3 sc in last ch. Rotate to work along the other side of the chain: sc, hdc, dc in next 2 ch, tr in next 2 ch, dc in next 2 ch, hdc, sc (10 sts). Sl st to first sc. (23 sts)
Rnd 2: Ch 1, working in BLO: sc in next 11 sts, 3 sc in next st (center of the 3-sc group), sc in next 11 sts. Ch 2 for the point and sl st to first sc. (25 sc + ch-2 tip)
Fasten off and leave a 12 in (30.5 cm) tail. The ch-2 end is the pointed tip and the 3-sc end is the rounded base. Working Rnd 2 in BLO leaves a raised ridge that gives the leaf its textured outline. Each leaf is about 2.75 in (7.0 cm) long and 1.25 in (3.2 cm) wide.
Stem Cord (Make 3)
Ch 9. Sl st in 2nd ch from hook and in each ch across. (8 sl sts) Fasten off and leave a 10 in (25.4 cm) tail. The cord is about 2 in (5.1 cm) long.
Back Panel
Turn at the end of each row. The ch-1 does not count as a stitch.
Foundation: Ch 21.
Row 1: Sc in 2nd ch from hook and in each ch across. (20 sts)
Rows 2–72: Ch 1, sc in each st across. (20 sts)
Checkpoint: the panel is 5 in (12.7 cm) wide x 18 in (45.7 cm) long.
Tab Shaping
Row 73: Ch 1, sc2tog, sc in next 14 sts, sc2tog. (16 sts)
Each sc2tog uses 2 sts, so Row 73 works into 2 + 14 + 2 = 18 of the 20 sts. To keep the math exact, work it as written below instead:
Row 73: Ch 1, sc2tog, sc in next 16 sts, sc2tog. (18 sts)
Row 74: Ch 1, sc2tog, sc in next 14 sts, sc2tog. (16 sts)
Row 75: Ch 1, sc2tog, sc in next 12 sts, sc2tog. (14 sts)
Row 76: Ch 1, sc2tog, sc in next 10 sts, sc2tog. (12 sts)
Row 77: Ch 1, sc2tog, sc in next 8 sts, sc2tog. (10 sts)
Row 78: Ch 1, sc2tog, sc in next 6 sts, sc2tog. (8 sts)
The tab tapers over 1.5 in (3.8 cm).
Strap
Rows 79–94: Ch 1, sc in each st across. (8 sts)
Fasten off. Checkpoint: the panel is 23.5 in (59.7 cm) long, and the strap is 2 in (5.1 cm) wide and 4 in (10.2 cm) long.
Make All Pieces
You need 3 pockets (60 sts each), 6 leaves, 3 stem cords and 1 back panel (94 rows). All pieces are lime green, about 150 g in total.
Layout, front view (panel rows shown on the right):
        [ ring ]
         |strap|        rows 79–94
        |  tab  |       rows 73–78
       |  panel  |      rows 70–72
       [ POCKET 3 ]     rows 51–69
       |   gap   |      rows 45–50
       [ POCKET 2 ]     rows 26–44
       |   gap   |      rows 20–25
       [ POCKET 1 ]     rows 1–19
Joining
Leaves first. It is easier to sew the leaves on while the pockets are still separate. Pin a stem cord upright at the center front so it runs from the top of Rnd 14 up into the mesh. Pin two leaves with their rounded bases meeting at the top of the stem and their tips angled up and out at about 45 degrees, forming a V. Whipstitch around each leaf’s outer ridge, catching the dc posts and ch-1 strands behind it. Whipstitch the stem along its full length, then weave the ends in on the inside.
Pockets to panel. Lay the panel right side up with Row 1 at the bottom. Each pocket wall covers 19 panel rows (4.75 in at 4 rows per inch).
- Bottom pocket: Line up its 20 marked back sts on Rnd 23 with the 20 sts of panel Row 19, one stitch to one stitch, and whipstitch across.
- Middle pocket: Sew its 20 back sts to Row 44 the same way.
- Top pocket: Sew its 20 back sts to Row 69 the same way.
Next, sew down both sides of each pocket’s back section, following panel columns 1 and 20. Then tack the back edge of each base to Row 1, 26 or 51.
Tension: Sew firmly, but don’t pull so tight that the panel puckers.
Size checkpoint: The panel still measures 5 in (12.7 cm) x 23.5 in (59.7 cm). There are 1.5 in (3.8 cm) gaps between the pockets, and 0.75 in (1.9 cm) of panel shows above the top pocket.
Border
Border gauge: 4 sc per inch along the stitches and 1 sc per row end, which matches the panel gauge.
With the right side facing, join the yarn in the first st of Row 1.
Rnd 1 (trim round):
– Bottom edge: 3 sc in first st, sc in next 18 sts, 3 sc in last st. (20 worked 1-per-st + 4 extra = 24 sts)
– Left side: 1 sc in each row end, Rows 2–93. (92 sts)
– Strap top: 3 sc in first st, sc in next 6 sts, 3 sc in last st. (8 worked 1-per-st + 4 extra = 12 sts)
– Right side: 1 sc in each row end, Rows 93–2. (92 sts)
Sl st to first sc. Total: 212 worked one per stitch or row end + 8 corner extras = 220 sts.
Rnd 2: Ch 1, sl st loosely in each st around. (220 sts) This firms up the edge without adding width.
Why the math works: The gauge is square, so 16 sts and 16 rows both measure 4 in (10.2 cm). That means 1 sc per row end fits the edge exactly, and the sides neither ruffle nor pull in. The 3-sc corners give the four corners room to turn. A 0.25 in (0.6 cm) border on each side brings the panel to 5.5 in (14.0 cm) x 24 in (61.0 cm) and the strap to 2.5 in (6.4 cm) wide. Along the slanted tab edges, keep the row-end stitches relaxed.
Attach the ring: Fold the top 2 in (5.1 cm) of the strap around the wooden ring to the back. Whipstitch the end to the back of the tab. The holder now hangs about 22 in (55.9 cm) long.
Final Blocking
- Soak the holder in cool water, then press out the water in a towel without wringing.
- Lay it right side up on a blocking mat.
- Pin the panel to 5.5 in (14.0 cm) x 22 in (55.9 cm).
- Put a roll wrapped in a plastic bag into each pocket so the pockets dry round.
- Pin the leaves flat and keep each V even.
- Let it dry completely, which usually takes about 24 hours.
Final Quality-Control Checklist
- Each pocket has 60 rim sts and 30 mesh squares per mesh round.
- Each pocket measures 4.75 in (12.1 cm) across and tall.
- The leaves are centered, with their bases meeting at the top of the stem.
- The pockets are sewn to Rows 19, 44 and 69, one stitch to one stitch.
- The gaps between pockets are an even 1.5 in (3.8 cm).
- Border Rnd 1 has 220 sts and the sides lie flat.
- The ring is secure and the holder hangs straight.
Troubleshooting
- Pocket is too tight for the roll: Use a larger hook, or add an 11th increase round (66 sts) and work 33 mesh squares.
- Base cups: Your tension is tight. Use a larger hook for the base.
- Mesh spirals: Join every round, and work each dc into the dc below it.
- Border edges wave: Recount to exactly 92 sts per side.
- Pockets droop forward: Add a second line of stitching along the base.
- Leaves curl: Steam them flat before sewing.
Care
Hand wash in cool water with mild soap and dry flat with the pockets reshaped. Don’t tumble dry, and keep the wooden ring out of the water.
Final Notes
Everything follows from one gauge: 16 sts x 16 rows = 4 in (10.2 cm). At that gauge, each 60-stitch pocket is 15 in (38.1 cm) around and 4.75 in (12.1 cm) tall, which equals 19 rows on the 20-stitch, 5 in (12.7 cm) panel. The 220-stitch border brings the panel to 5.5 in (14.0 cm) x 24 in (61.0 cm). Folding the strap over the ring gives a 22 in (55.9 cm) hanging length.
Happy crocheting!