

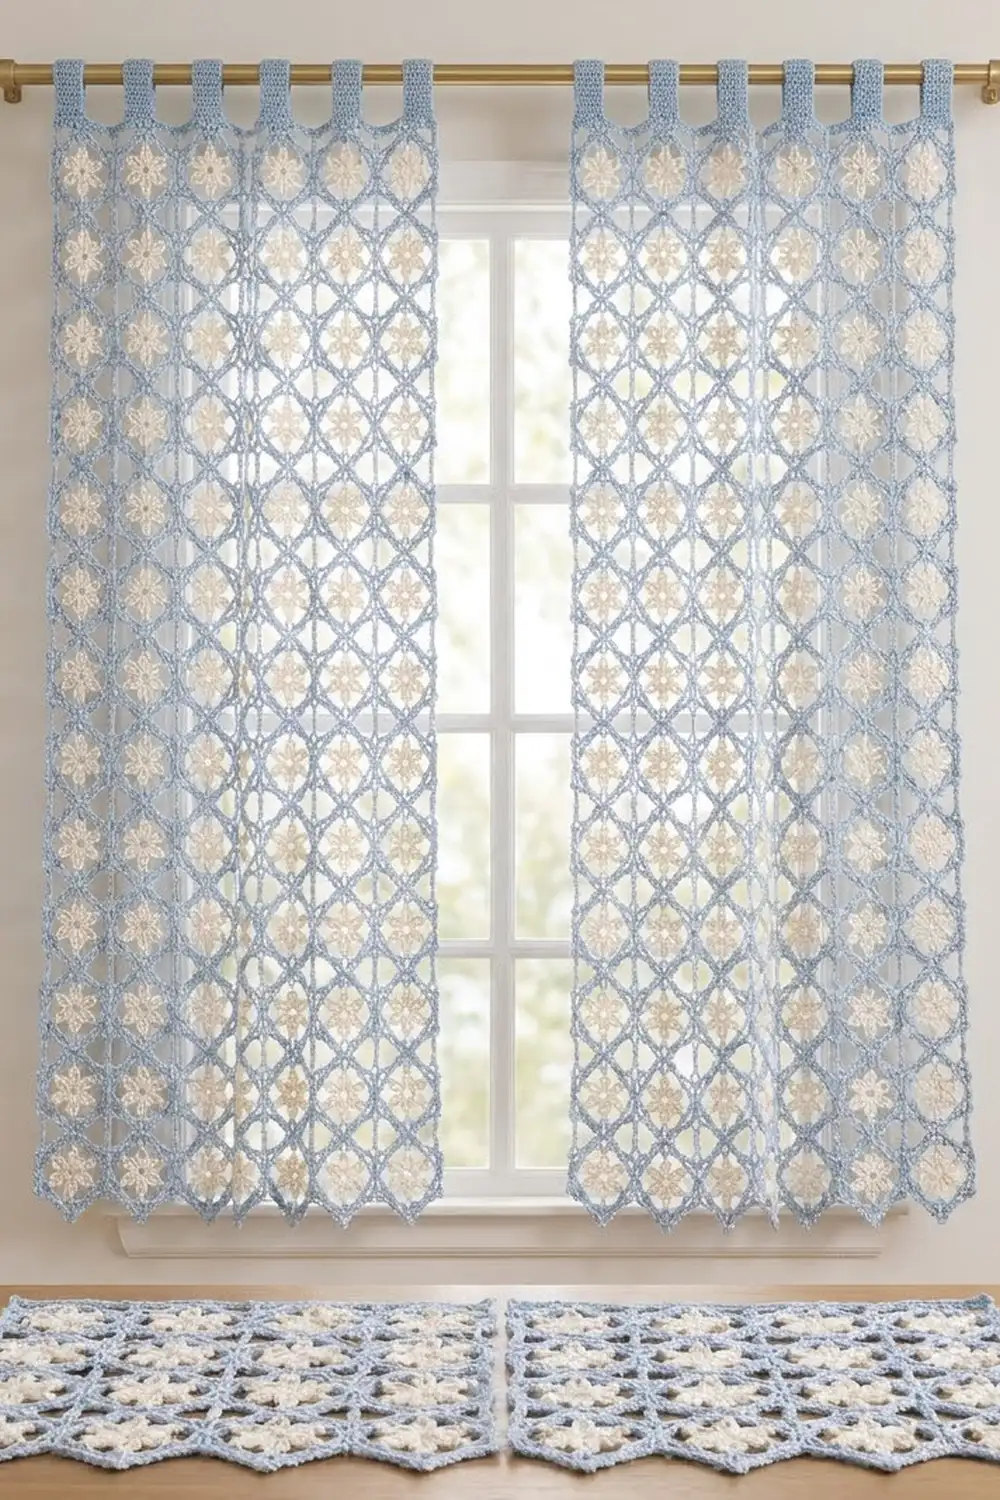
Frosted Lattice is a pair of full-length crochet curtain panels with a soft winter feel. Cream six-petal snowflake flowers sit inside a powder-blue openwork lattice, and the bottom edge finishes in a row of small picot-tipped points. Blue tab loops at the top slide straight onto a curtain rod.
The palette is just two colors: light powder blue for the lattice, border, and tabs, and cream for the flowers. Up close, each cream snowflake has a small open center and six pointed petals. From across the room, the blue frames read as a lacy diamond grid.
This pattern uses US crochet terms. Each finished panel measures 33 in (83.8 cm) wide and 81.75 in (207.6 cm) long from the top edge to the point tips. The tabs add 2 in (5.1 cm), so the drop from the top of the rod is 83.75 in (212.7 cm).
Construction is modular. You work small square motifs in rounds (cream flower first, then the blue frame), join them into an 8 x 20 grid with slip stitches, and add a two-round border with bottom points. Tabs go on last.
Finished Size and Construction
- Finished panel size: 33 in x 81.75 in (83.8 cm x 207.6 cm), plus 2 in (5.1 cm) tabs
- Skill level: Intermediate
- Terminology: US
- Yarn weight: DK (#3 light)
- Hook: 4 mm (G-6)
- Number of pieces: 2 panels, each made from 160 motifs (320 motifs in total)
- Layout per panel: 8 motifs wide x 20 motifs tall
- Motif size: 4 in (10.2 cm) square
- Panel size before border: 32 in x 80 in (81.3 cm x 203.2 cm)
- Border depth: about 0.5 in (1.3 cm) on the top and sides; 1.25 in (3.2 cm) at the bottom, including the points
Materials
Use a smooth DK cotton or cotton blend at about 230 m per 100 g. Cotton drapes well, keeps the lattice crisp, and stands up to sunlight and washing better than most acrylics.
- Color A, powder blue: 2,000 g (4,600 m)
- Color B, cream: 700 g (1,610 m)
- 4 mm (G-6) crochet hook
- Tapestry needle
- Stitch markers
- Measuring tape
- Rust-proof pins and blocking mats or a clean carpet covered with towels
- Spray bottle
The quantities include a margin of roughly 10% for gauge swatches, joins, and weaving in ends. Buy all of each color from a single dye lot.
Abbreviations (US Terms)
- ch – chain
- sl st – slip stitch
- sc – single crochet
- hdc – half double crochet
- dc – double crochet
- tr – treble crochet
- sp – space
- st(s) – stitch(es)
- rep – repeat
Picot: Ch 3, sl st in the 3rd ch from the hook.
Gauge and Checkpoints
Base gauge: 16 sc x 18 rows = 4 in (10.2 cm) in sc worked in rows.
Make one complete motif before you make any others, and measure it at each of these checkpoints:
- After Rnd 2: the flower measures 2.75 in (7.0 cm) from petal tip to opposite petal tip.
- After Rnd 4: the square measures 3.5 in (8.9 cm) from side to side.
- After Rnd 5: the motif measures 4 in (10.2 cm) square and has 16 sc per side.
If the motif is too big, try a 3.75 mm (F-5) hook. If it’s too small, try a 4.5 mm (7) hook. Being off by just 0.125 in (0.3 cm) per motif changes the panel by 1 in (2.5 cm) in width and 2.5 in (6.4 cm) in length, so it’s worth getting this right.
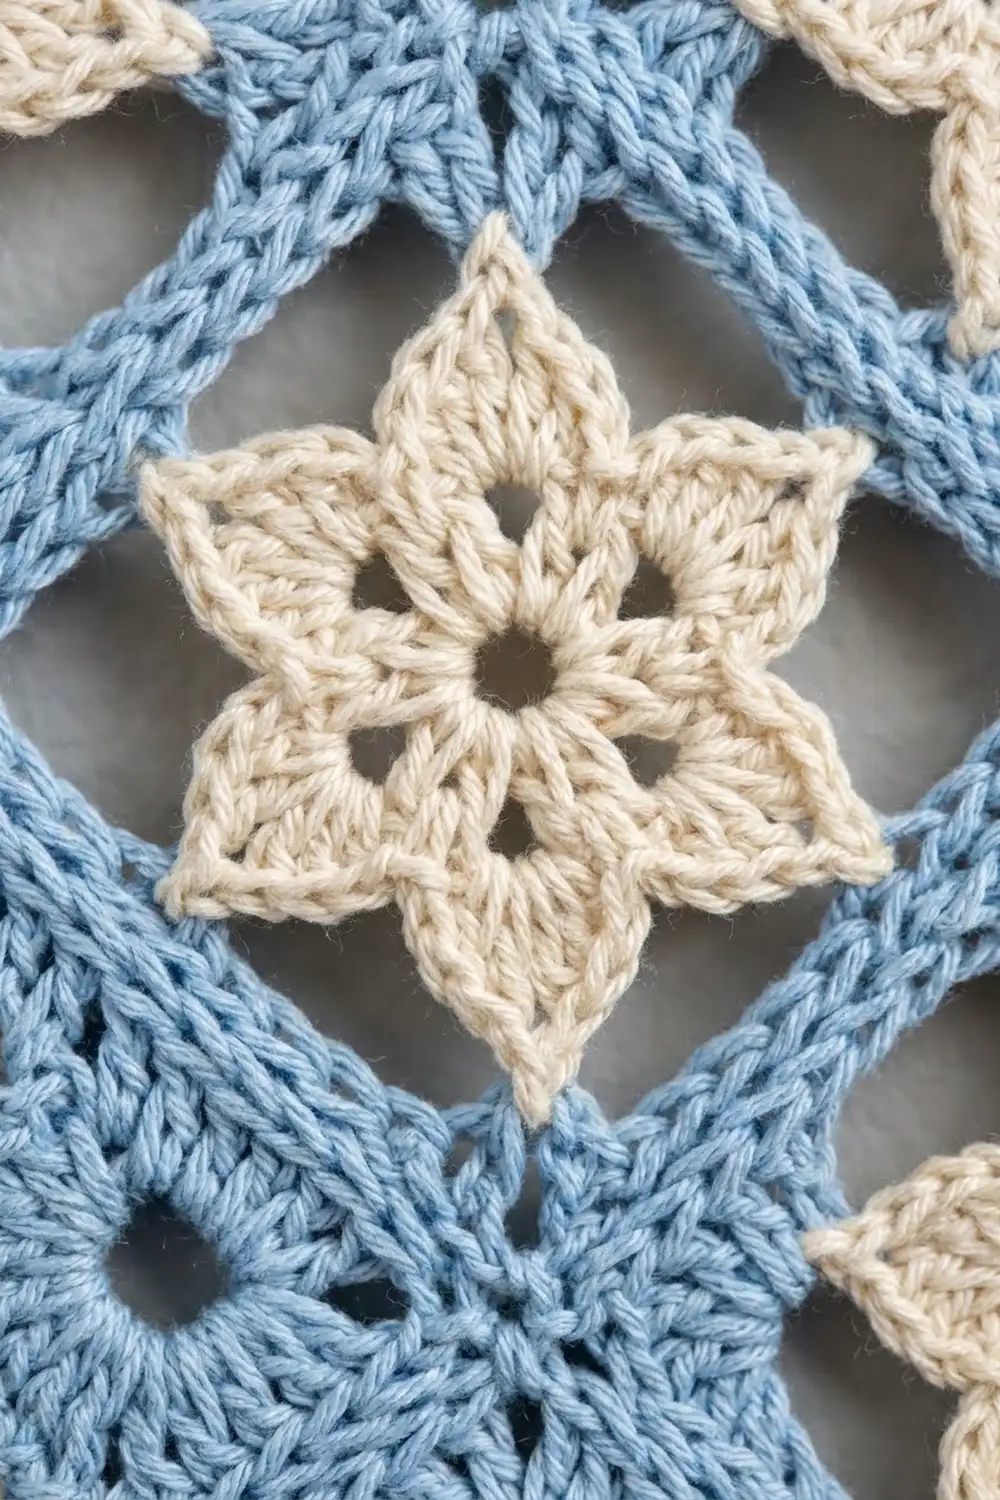
Snowflake Motif (make 320)
Flower (Color B, cream)
Rnd 1: Ch 6 and sl st to the first ch to form a ring. Ch 1, then work 12 sc in the ring. Sl st to the first sc to join. (12 sc)
The ring of 6 ch leaves the small open center.
Rnd 2 (petals): In the next sc, work (sl st, ch 3, 2 tr, picot, 2 tr, ch 3, sl st), then sl st in the next sc. Rep from * 5 more times. (6 petals, made of 24 tr and 6 picots)
Each petal takes up one sc, and the sl st between petals takes up the next, so the 12 sc are used exactly. The picot gives each petal its pointed tip. Fasten off and weave in the ends.
Frame (Color A, blue)
Rnd 3: Join A with a sc in any picot. Ch 5, sc in the sl st between petals, ch 5, sc in the next picot. Rep from * 5 more times, but leave out the last sc. Sl st to the first sc to join. (12 sc, 12 ch-5 sps)
These chain loops make the rounded opening around each flower.
Rnd 4: Number the ch-5 sps 1 to 12. Sps 1, 4, 7, and 10 are the corners.
Sl st into sp 1. Ch 3 (counts as dc), then work (2 dc, ch 2, 3 dc) in the same sp. Work 4 dc in each of the next 2 sps, then (3 dc, ch 2, 3 dc) in the next sp. Rep from * 2 more times. Work 4 dc in each of the last 2 sps, then sl st to the top of the beginning ch 3. (56 dc: 14 per side, 4 corner ch-2 sps)
Per side, that’s 3 + 4 + 4 + 3 = 14 dc.
Rnd 5: Ch 1. Work 1 sc in the same st and in each dc, and work (sc, ch 2, sc) in each corner ch-2 sp. Sl st to the first sc to join. (64 sc: 16 per side, 4 corner ch-2 sps)
The 16 sc on each side are the 14 sc worked into dc plus the 2 corner sc. Those 16 already include both corner stitches. Fasten off, leaving a 6 in (15.2 cm) tail.
Make All Pieces
Each panel needs 160 motifs, so you need 320 for the pair. Every motif uses Color B for Rnds 1–2 and Color A for Rnds 3–5.
Layout for one panel (M = one motif):
Row 1:  M M M M M M M M   <- top (tabs)
Row 2:  M M M M M M M M
 ...    (rows 3-19 the same)
Row 20: M M M M M M M M   <- bottom (points)
        8 across x 20 down = 160 motifs
Weave in the ends as you go. 640 tails are much easier to deal with in batches than all at once at the end.
Joining
Method: flat slip-stitch join through the back loops, using Color A.
- Hold two motifs with their right sides facing up and edge to edge. Line up a corner sc with a corner sc.
- Join A in the first pair of corner sc. Sl st through the back loop of each matched pair of sc, working 1 sl st for each pair. That’s 16 sl st per seam, corner sc to corner sc.
- Don’t work into the corner ch-2 sps. They stay open as small diamond openings where the seams meet, and those openings complete the lattice look.
- Join the motifs into 20 horizontal strips of 8. Then join the strips along their long edges. Each long seam is 8 x 16 = 128 sl st. At every seam junction, ch 1 to cross the open corners without pulling them closed.
Tension: Keep your sl sts as loose as the sc they go into. If a seam is shorter than the motif edge next to it, go up a hook size for joining only.
Checkpoint: The joined panel measures 32 in x 80 in (81.3 cm x 203.2 cm) and lies flat with no ripples along the seams.
Border
The border uses the base gauge of 16 sc = 4 in (10.2 cm). Each motif side gives 16 sts, and 16 sts at this gauge is 4 in. This means the border matches the panel exactly, with no stretching and no ruffling.
Border Rnd 1 (Color A): Join A with a sc in the corner sc at the top right of the panel. Work 1 sc in each sc all the way around. At each of the 4 panel corners, work 1 sc in the outer corner ch-2 sp. At the seam junctions, skip the paired corner ch-2 sps; don’t work any sts into them. Sl st to the first sc to join.
- Top: 8 x 16 = 128 sc
- Bottom: 8 x 16 = 128 sc
- Each long side: 20 x 16 = 320 sc
- Total: 896 sc worked 1 into each existing st + 4 corner sc added = 900 sc
Border Rnd 2: Ch 1.
- Top and long sides: 1 sc in each sc. That’s 128 sc across the top and 320 sc down each side.
- Each corner sc: work 3 sc.
- Bottom edge: make 8 points, one for every 16 sts. Point: sl st in the next st, sc in the next st, hdc in each of the next 2 sts, dc in each of the next 2 sts, tr in each of the next 2 sts, picot, tr in each of the next 2 sts, dc in each of the next 2 sts, hdc in each of the next 2 sts, sc in the next st, sl st in the next st. That’s 16 sts plus 1 picot.
Sl st to the first sc to join. Count: 900 sts worked 1 into each existing st + 8 sts added at the corners (2 extra at each corner) = 908 sts, plus 8 picots.
Why the math works: Each point uses exactly the 16 sts of one motif. The picot falls between st 8 and st 9, which puts it right under the motif’s center, so every point lines up with the flower above it.
Tabs (Color A)
The top edge has 128 sc. Divide them into 8 groups of 16, one group above each motif. For each group, skip 5 sts, work the tab over the next 6 sts, and leave the last 5 sts unworked.
Row 1: Join A in the 6th st of the group. Ch 1, then sc in the same st and in each of the next 5 sts. (6 sc)
Rows 2–18: Ch 1, turn, and sc in each sc across. (6 sc)
The tab is 1.5 in (3.8 cm) wide and 4 in (10.2 cm) long. Fasten off, leaving a 12 in (30.5 cm) tail. Fold the tab to the wrong side and whipstitch Row 18 to the back of the same 6 sts. This makes a 2 in (5.1 cm) loop. Make 8 tabs on each panel, with 10 unworked sts between tabs and 5 sts at each end.
Final Blocking
- Weave in all remaining ends. Leave about 1 in (2.5 cm) of each tail, then trim.
- Soak one panel in cool water with a little wool wash for 15 minutes. Press the water out without wringing.
- Roll the panel in towels to take out most of the moisture.
- Lay it flat and pin the width to 33 in (83.8 cm). Check it every 10 in (25.4 cm) down the length.
- Pin the length to 81.75 in (207.6 cm) to the point tips. Pin each picot so the points are sharp.
- Ease each flower’s petals open so the center ring is round.
- Let it dry completely, then repeat for the second panel.
Final Quality-Control Checklist
- Every motif is 4 in (10.2 cm) square with 16 sc per side.
- The panel is 8 x 20 motifs, 32 in x 80 in (81.3 cm x 203.2 cm) before the border.
- Border Rnd 1 has 900 sc. Border Rnd 2 has 908 sts and 8 picots.
- Each point is centered under a motif.
- 8 tabs per panel, evenly spaced and the same length.
- Both panels are 33 in x 81.75 in (83.8 cm x 207.6 cm).
- No visible ends and no puckered seams.
Troubleshooting
- The petals cup or curl: Your tr sts are too tight. Make the ch 3 at each end of the petal loose, or go up a hook size for Rnd 2.
- The square has rounded corners: Check that you put (3 dc, ch 2, 3 dc) in sps 1, 4, 7, and 10 only.
- A side has 15 or 17 sc: Count the corner sc as part of the side, and recount Rnd 4 (14 dc per side).
- The seams pucker: Join with a larger hook and keep the ch 1 at every junction.
- The points lean: Make sure each point starts on the 1st st of a motif’s 16, not on the seam.
- The panels differ in length: Check your gauge on a motif from each panel, then block the shorter one to match.
Care
Hand wash or machine wash on a cool delicate cycle inside a mesh laundry bag, then lay flat to dry and reshape. Don’t hang the panels while they’re wet, or they’ll stretch.
Final Notes
The whole curtain depends on one number: 16 sc = 4 in (10.2 cm). One motif gives 16 sts per side. Eight motifs give a 32 in (81.3 cm) width with 128 border sts, and twenty motifs give an 80 in (203.2 cm) length with 320 border sts. The border brings the panel to 33 in x 81.75 in (83.8 cm x 207.6 cm), and the tabs add 2 in (5.1 cm). Check the first motif carefully and the rest of the project will follow.
Happy crocheting!