

This curtain is made of rows of small cream angels held in a deep red lattice. Each angel has a round head with a halo point, feathered wings, and an openwork skirt with a shell hem. The red chain lattice frames every angel and leaves the curtain airy, so soft light comes through between the motifs.
The color scheme is classic Christmas: warm cream angels on cranberry red. The look is vintage, a bit like old thread-crochet lace, but this version uses DK cotton so it works up faster and hangs with some weight.
The pattern uses US crochet terms. One finished panel measures 42 in × 82 in (106.7 cm × 208.3 cm) including the border. A pair of panels, as shown, takes 256 angels in total.
To make it, you first crochet each angel separately. Then you join them with a red lattice, one row of angels (a “band”) at a time. Last, you add a four-round red border with a picot edge.
Finished Size and Construction
- Finished panel size: 42 in × 82 in (106.7 cm × 208.3 cm)
- Skill level: Intermediate
- Terminology: US crochet terms
- Yarn weight: DK (#3) cotton
- Hook: 4.0 mm (G-6)
- Number of pieces: 128 angel motifs per panel; 256 for a pair of panels
- Layout: 8 angels across × 16 bands down
- Angel size: 4 in × 4 in (10.2 cm × 10.2 cm)
- Cell size (one angel plus its lattice): 5 in × 5 in (12.7 cm × 12.7 cm)
- Size before border: 40 in × 80 in (101.6 cm × 203.2 cm)
- Border depth: 1 in (2.5 cm) on every side
Materials
Use a smooth mercerized or combed cotton in DK weight. Cotton shows the lattice clearly, keeps its shape when hanging, and stands up to washing. Avoid fuzzy yarns, because they blur the openwork.
The amounts below are for one panel. They assume 50 g balls of about 110 m each. Double them for a pair.
- Cream (angels): 400 g / 880 m (8 balls)
- Deep red (lattice and border): 200 g / 440 m (4 balls)
The quantities include a margin of about 15% for swatching and differences in tension.
Tools:
– 4.0 mm (G-6) crochet hook
– Tapestry needle
– Stitch markers
– Rust-proof pins and blocking mats
– Measuring tape
– Curtain ring clips (about 11 per panel)
Abbreviations (US Terms)
- ch – chain
- sl st – slip stitch
- sc – single crochet
- dc – double crochet
- tr – treble crochet
- sk – skip
- sp – space
- st(s) – stitch(es)
- RS – right side
Picot knot: ch 3, sl st in the 3rd ch from the hook. A picot is never counted as a stitch.
Tip loop: (sc, ch 4, sc) worked into one stitch. The ch-4 loop is a wingtip, and you join the lattice through it.
Gauge and Checkpoints
Gauge: 16 sc and 18 rows = 4 in (10.2 cm) in red, with a 4.0 mm hook.
Make one complete angel before anything else and measure it. Check it at these points:
- After head Rnd 2: 1.25 in (3.2 cm) across
- After skirt Row 4: the skirt is about 3 in (7.6 cm) wide at the bottom
- Finished angel: 4 in (10.2 cm) from wingtip to wingtip and 4 in (10.2 cm) from halo to hem
If your angel is too big, go down to a 3.75 mm hook. If it is too small, go up to a 4.5 mm hook. Your lattice gauge matters just as much, because it sets the 5 in (12.7 cm) cell. Check it with a 20-sc swatch row, which should measure 5 in (12.7 cm).
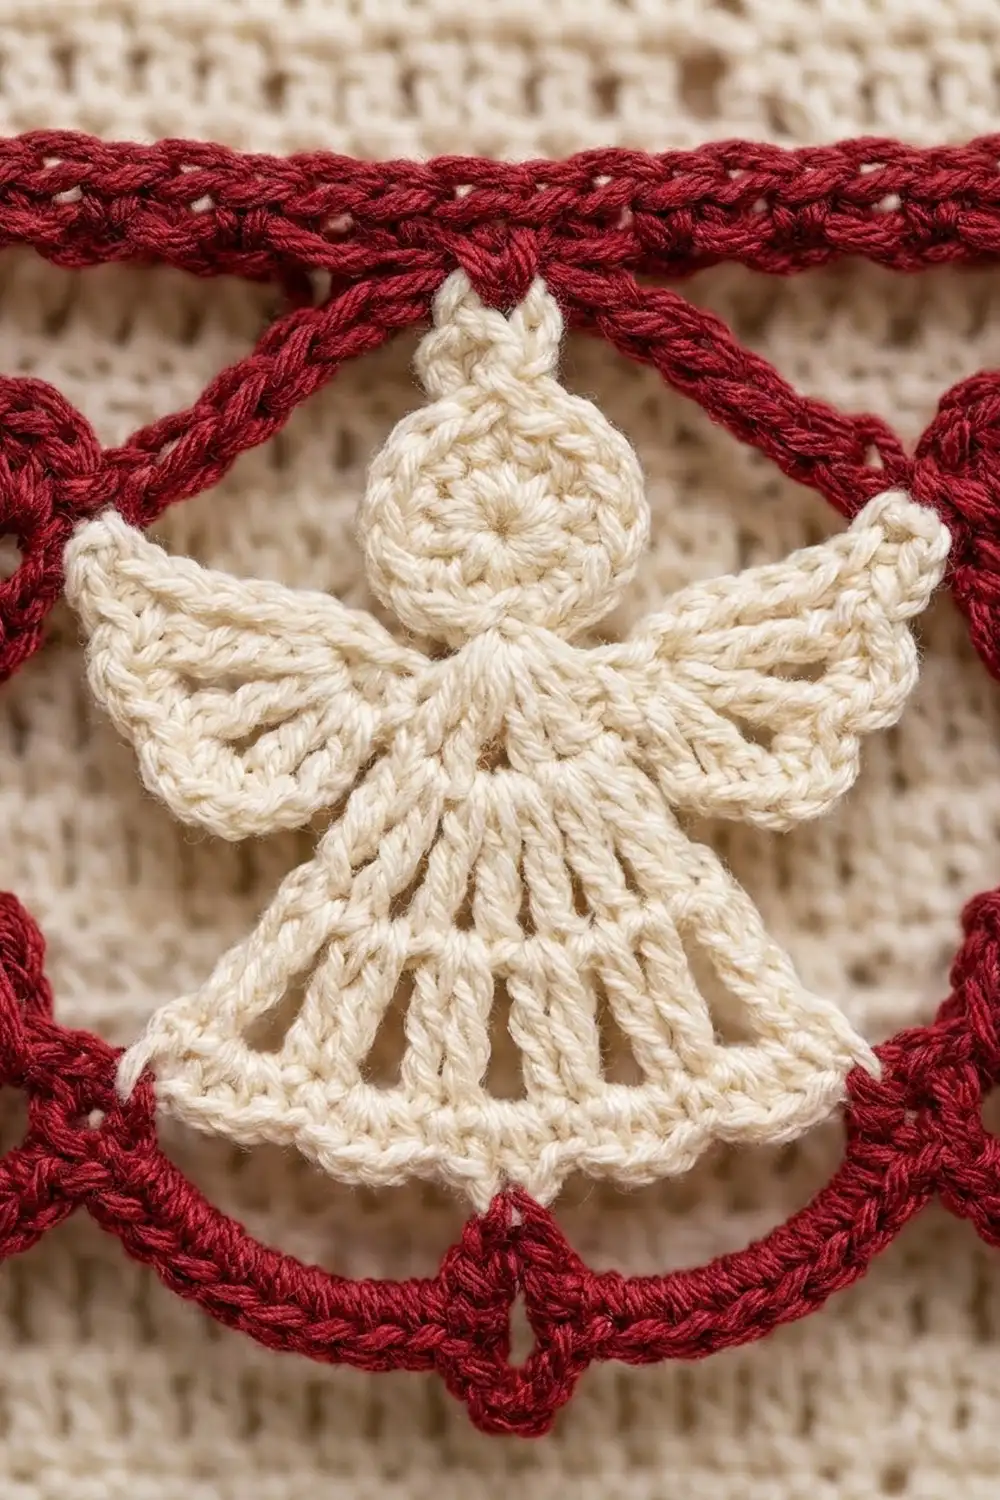
Angel Motif
Use cream for the whole angel.
Head
Rnd 1: Make a magic ring. Ch 3 (counts as dc), work 11 dc in the ring, and sl st in the top of the ch-3 to join. (12 dc)
Rnd 2: Ch 1, work 2 sc in each st around, and sl st in the first sc to join. (24 sc) Call the joining stitch st 1. This is the top of the head.
Halo: Ch 4, then sl st in the same st. Fasten off.
The opposite stitch, st 13, is the bottom center of the head.
Skirt
Row 1 (RS): Join cream in st 11. Ch 3 (counts as dc), then dc in sts 12–15. Turn. (5 dc)
Row 2: Ch 4 (counts as dc + ch 1). [Dc in next dc, ch 1] 3 times, then dc in the top of the turning ch. Turn. (5 dc, 4 ch-1 sps)
Row 3: Ch 5 (counts as dc + ch 2). [Dc in next dc, ch 2] 3 times, then dc in the 3rd ch of the turning ch. Turn. (5 dc, 4 ch-2 sps)
Row 4: Ch 6 (counts as dc + ch 3). [Dc in next dc, ch 3] 3 times, then dc in the 3rd ch of the turning ch. Turn. (5 dc, 4 ch-3 sps)
The spokes stay at 5 dc while the spaces between them grow. That is what makes the triangular skirt flare.
Row 5 (hem): Ch 1, sc in the first dc. [5 dc in next ch-3 sp, sc in next dc] 4 times. Work the last sc in the 3rd ch of the turning ch. Fasten off. (4 shells, 5 sc)
The center (3rd) dc of each shell is a hem join point.
Wings (make 2 per angel)
Row 1: With the RS facing, join cream around the post of the end stitch of skirt Row 1 on one side. Ch 4 (counts as tr), then [ch 1, tr] 5 times around the same post. Turn. (6 tr, 5 ch-1 sps)
Row 2: Ch 1, sc in the first tr. [(Sc, ch 3, sc) in next ch-1 sp, sc in next tr] 4 times. (Sc, ch 3, sc) in the last ch-1 sp, then make a tip loop in the last tr. Fasten off. (17 sc, 5 ch-3 picots, 1 tip loop)
Repeat on the other side of the skirt, working around the post of the stitch at the other end of Row 1.
Weave in all the ends. Lightly steam the angel to 4 in × 4 in (10.2 cm × 10.2 cm).
Make All Pieces
For one panel, make 128 cream angels. For the pair shown, make 256.
Each angel takes about 6 m (about 2.7 g) of cream.
Layout per panel (A = angel, 8 across × 16 bands):
Band 1:   A A A A A A A A
Band 2:   A A A A A A A A
Band 3:   A A A A A A A A
  ...     (repeat)
Band 16:  A A A A A A A A
All the angels face the same way, with the halo up and the hem down.
Joining: The Red Lattice
You join the angels band by band. Each band has three rows of red: a top line, a row that joins the halos and wings, and a scallop row under the hems.
Each cell is 20 stitches of the top line, numbered sts 1–20.
Band 1
Row 1 (top line): Ch 161. Sc in the 2nd ch from the hook and in each ch across. Turn. (160 sc, or 20 per cell)
Row 2 (halo and wing join): Ch 1. Then, for each cell:
- Sc in st 1.
- Ch 6, sl st in the nearer wing’s tip loop, ch 6.
- Sk the next 8 sc and sc in st 10.
- Ch 2, sl st in the halo, ch 2.
- Sc in st 11.
- Ch 6, sl st in the other wing’s tip loop, ch 6.
- Sk the next 8 sc and sc in st 20.
Between cells, make 1 picot knot. Check each cell: 1 + 8 + 1 + 1 + 8 + 1 = 20 sts, so the angel hangs centered in its cell.
At the end of the row, ch 19. This is the side chain.
Row 3 (scallop row): Work across the bottom of the angels:
- Ch 6, sc in the center dc of the first angel’s shell 1.
- [Ch 5, sc in the center dc of the next shell] 3 times.
- Between angels: ch 6, picot knot, ch 6, then sc in shell 1 of the next angel.
After the last angel’s shell 4, ch 6, then ch 19 up the side. Sl st in the end sc of Row 1 and fasten off.
Bands 2–16
Row 1: Join red where the first ch-6 half arc meets the side chain. Ch 1. Work 4 sc around each ch-5 and ch-6 section, leaving the picots free on the front. Turn. (160 sc, or 20 per cell)
Then work Rows 2 and 3 exactly as for Band 1.
Tension: Keep the chains relaxed but even. Arcs that are too tight pull the angels into a curve, and slack arcs make the bands sag.
Size check: Measure after every 4 bands. Each band adds 5 in (12.7 cm), so 4 bands should measure 20 in (50.8 cm). The full panel before the border is 40 in × 80 in (101.6 cm × 203.2 cm).
Border
Border gauge: 4 sc per 1 in (2.5 cm), the same as the lattice.
Rnd 1: Join red at the top right corner. Work the sc in these places:
- Top: 160 sc into the underside of the foundation chain (8 cells × 20).
- Each side: 320 sc (16 bands × 20). For each band, that is 1 sc in the end of Row 1 plus 19 sc along the ch-19 side chain.
- Bottom: 160 sc, working 4 sc around each chain section of the last scallop row (8 cells × 20).
- Corners: ch 2 at each corner.
Sl st to join. (960 sc, 4 corner ch-2 sps)
Rnd 2: Ch 1. Sc in each sc, and work (sc, ch 2, sc) in each corner sp. Join. (162 sc on the top and bottom, 322 sc on each side)
Rnd 3: Repeat Rnd 2. (164 sc on the top and bottom, 324 sc on each side)
Rnd 4 (picot edge):
- Top and bottom: [Sc in next 4 sts, picot knot] 40 times, then sc in the next 4 sts. (164 sc, 40 picots)
- Sides: [Sc in next 4 sts, picot knot] 80 times, then sc in the next 4 sts. (324 sc, 80 picots)
- Corners: (sc, picot knot, sc) in each corner sp.
Join and fasten off.
Why the math works: Rnd 1 matches the cell count exactly: 8 × 20 = 160 and 16 × 20 = 320. Rounds 2 and 3 each add 2 sts per side at the corners. Rnd 4 adds no stitches. Both 164 and 324 divide evenly by 4, so the picot repeats line up with no leftover stitches.
The four rounds add 1 in (2.5 cm) on every side. The finished panel is 42 in × 82 in (106.7 cm × 208.3 cm).
Final Blocking
- Weave in all the ends, splitting the plies so they stay hidden.
- Soak the panel in cool water for 15 minutes, then press the water out gently. Don’t wring it.
- Roll it in towels to remove the extra water.
- Lay it flat on mats or a clean sheet, working one section at a time if you need to.
- Pin it to 42 in × 82 in (106.7 cm × 208.3 cm), and check that every band is level.
- Pin each wingtip and hem shell so the angels sit flat and centered.
- Let it dry completely before you hang it.
Final Quality-Control Checklist
- Every angel measures 4 in × 4 in (10.2 cm × 10.2 cm).
- Each angel is joined at 7 points: the halo, both wingtips, and all 4 hem shells.
- Each band has a 160-sc top line.
- The side counts are 320 sc in Rnd 1.
- Each picot repeat has exactly 4 sc.
- The panel is 42 in × 82 in (106.7 cm × 208.3 cm) and square at the corners.
- All the picot knots face the RS.
Troubleshooting
- Angels tilt: You may have skipped too many or too few stitches in Row 2. Recount until each cell has 20 sts.
- Bands sag: The scallop chains are too loose. Go down half a hook size for Row 3.
- The panel narrows at the bottom: Your lattice tension has tightened as you went. Measure every 4 bands.
- Wavy sides: Work exactly 20 sc per band along the side chains in border Rnd 1.
- Skirts curl: Steam-block each angel before joining it.
Care
Hand wash or machine wash on a gentle cycle in cool water, then lay the panels flat to dry. Reshape them while damp, and never tumble dry.
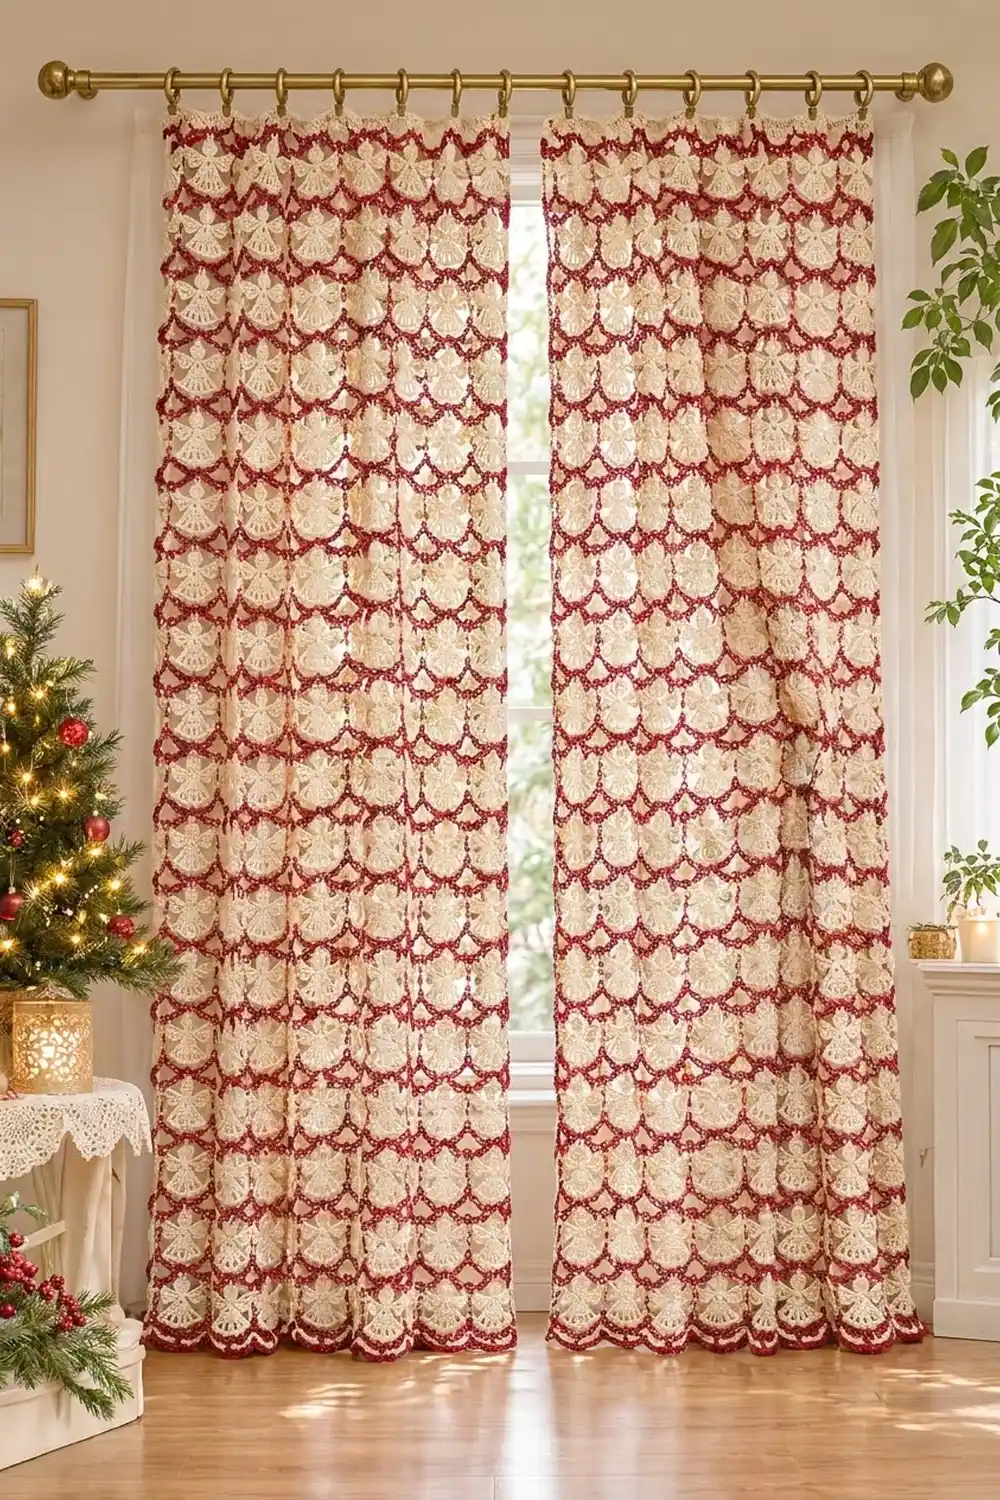
Final Notes
Everything in this curtain builds on one measurement chain. A 4 in (10.2 cm) angel sits in a 5 in (12.7 cm) cell. Eight cells make 40 in (101.6 cm) across, and sixteen bands make 80 in (203.2 cm) down. A 1 in (2.5 cm) border brings the panel to 42 in × 82 in (106.7 cm × 208.3 cm). Check your gauge early and measure often, and your angels will hang straight and even.
Happy crocheting!