

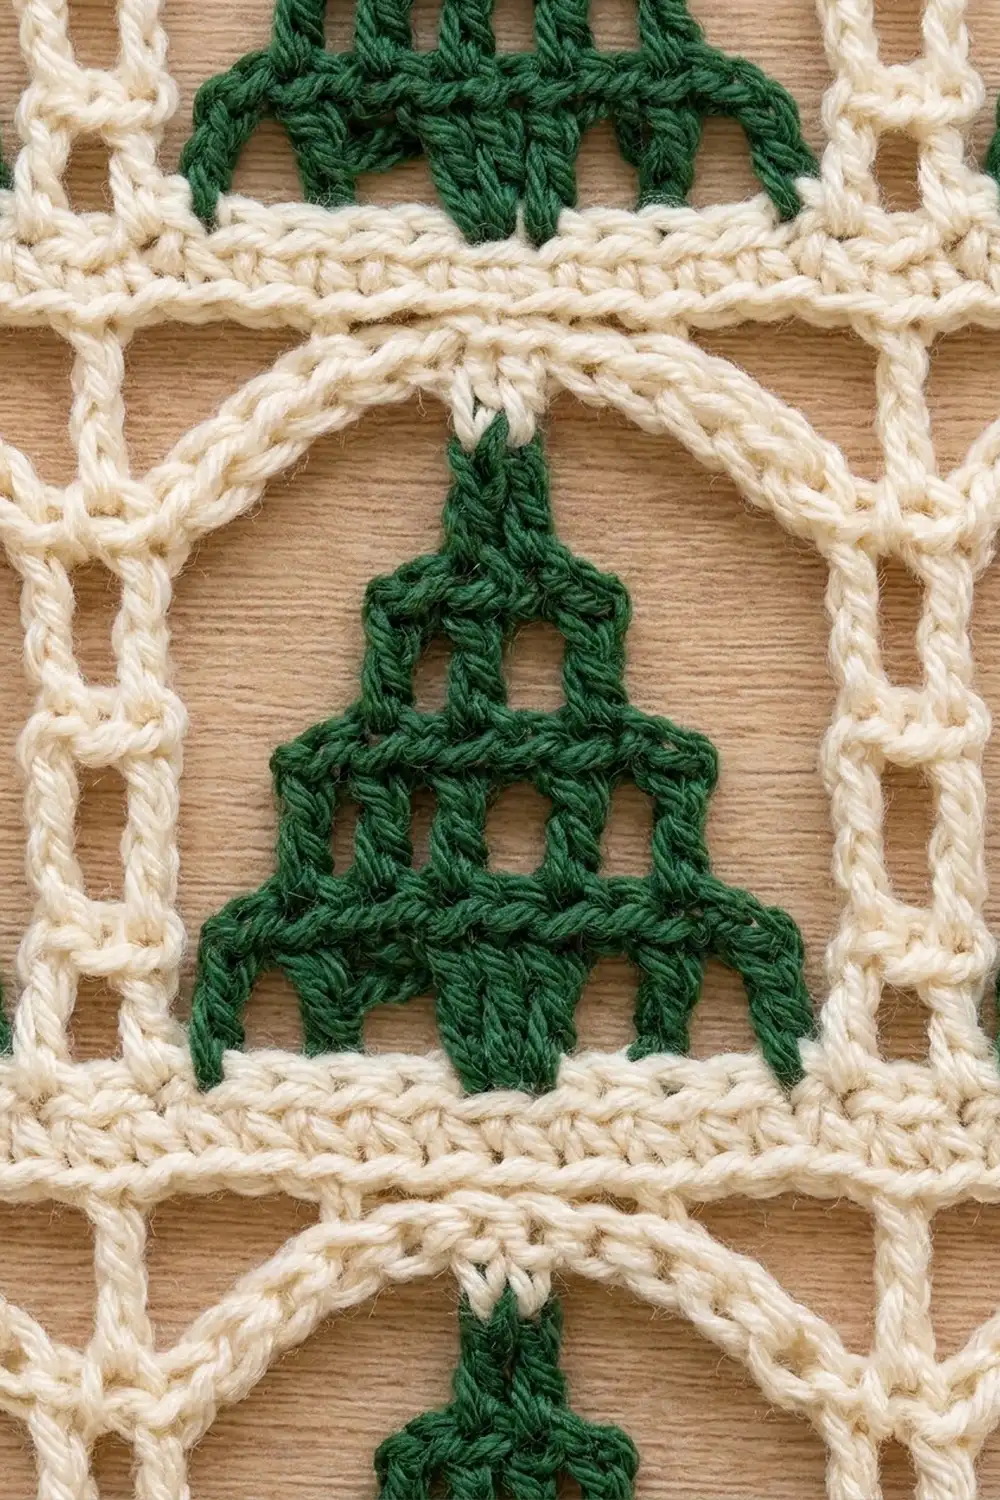
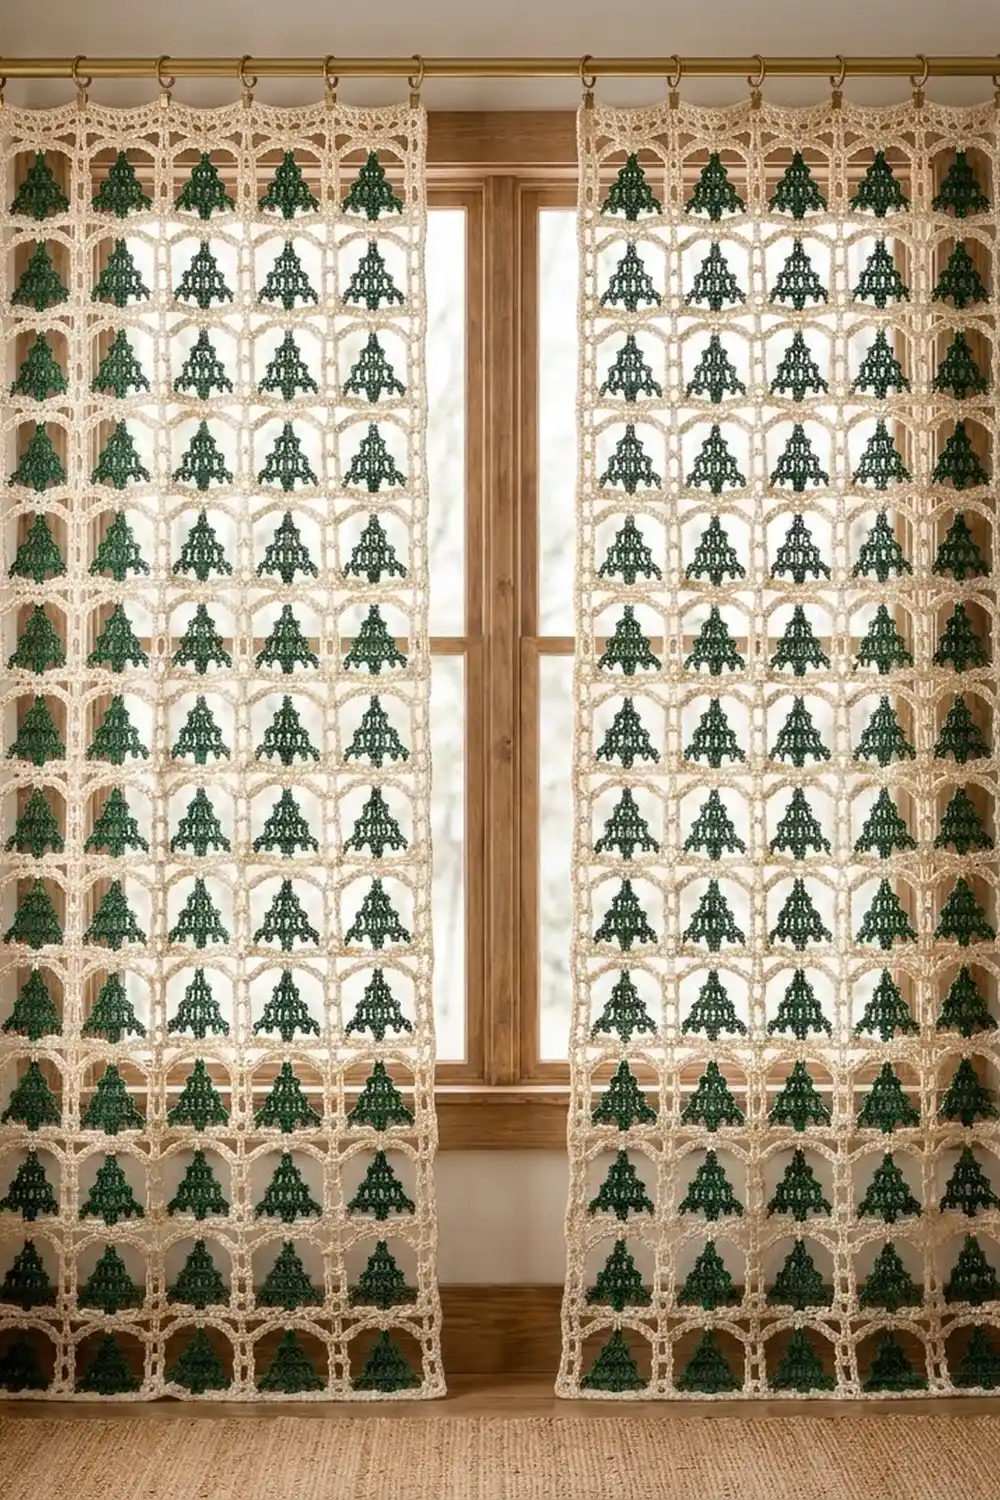
The Evergreen Arches Curtain Panel is a lace panel with rows of small forest-green Christmas trees, each one sitting under its own cream arch. Ladder-like cream columns separate the trees, and the background stays open, so window light comes through between the motifs. Once it’s hung, the panel looks like a quiet, repeating forest.
There are only two colors: deep forest green for the trees and warm cream for the frame. The style is simple and Scandinavian-inspired. It suits a holiday window but is understated enough to leave up through winter. All instructions use US crochet terms.
One finished panel measures 27.5 in wide x 79.25 in long (69.9 cm x 201.3 cm), including the border. The photographed set is a pair of identical panels, so make two for a standard window.
Each panel is a single piece worked in rows. A cream single crochet base row is followed by green tree triangles and cream ladder posts, which are worked directly onto the base row in short rows. A cream arch row then links the post tops to the tree tips, and a new base row is worked over the arches. Repeat this “tier” until the panel is long enough, then add a two-round border. Nothing is sewn or joined.
Finished Size and Construction
- Finished size (one panel): 27.5 in x 79.25 in (69.9 cm x 201.3 cm)
- Skill level: Intermediate
- Terminology: US crochet terms
- Yarn weight: DK (light worsted, category 3) cotton or cotton blend
- Hook: 4.5 mm (US 7)
- Number of pieces: 1 per panel (make 2 for a pair). No joining.
- Layout: 8 tree cells across x 26 tiers tall (208 trees per panel)
- Cell size: 13 sts wide x 1 tier tall = 3.25 in x 3 in (8.3 cm x 7.6 cm)
- Size before border: 26.5 in x 78.25 in (67.3 cm x 198.8 cm)
- Border depth: 2 rounds, 0.5 in (1.3 cm) on each edge
Materials
Yarn: Choose a smooth, firmly plied DK cotton or a cotton blend that is mostly cotton. Cotton gives crisp stitches, keeps the arches defined, and drapes without much stretch. Avoid 100% acrylic for a full-length curtain because it can grow under its own weight.
- Cream (frame, posts, arches, border): 330 g / 760 m per panel; 660 g / 1520 m for a pair
- Forest green (trees): 280 g / 645 m per panel; 560 g / 1290 m for a pair
These quantities assume about 2.3 m per gram, which is typical for DK cotton (50 g = about 115 m). They include roughly a 10% margin for swatching, tails, and slight gauge differences.
Tools:
- 4.5 mm (US 7) crochet hook
- Tapestry needle
- Locking stitch markers (at least 10)
- Scissors and measuring tape
- Rust-proof pins and a large blocking surface (foam mats or a carpeted floor covered with a towel)
- Curtain rod with 10 to 12 clip rings per panel (hardware only, not crocheted)
Abbreviations (US Terms)
- ch – chain
- sl st – slip stitch
- sc – single crochet
- dc – double crochet
- sp – space
- st(s) – stitch(es)
- RS / WS – right side / wrong side
- rep – repeat
Special notes
- Turning chain: A ch-3 at the start of a tree or post row counts as 1 dc.
- Post strip: A 2-st-wide column of 5 dc rows worked in cream on top of the base row. Its row edges form the “ladder” look between the trees.
- Step-in decrease: Turn, sl st in the first 2 sts, then ch 3. The ch-3 counts as a dc worked in the 2nd st. This narrows a tree by 1 st on each side, keeping it centered.
Gauge and Checkpoints
Gauge is 16 sts = 4 in (10.2 cm) in sc, and 5 rows of dc = 2.25 in (5.7 cm). One full tier (5 tree rows + Arch Row + Base Row) measures 3 in (7.6 cm) tall.
Test one piece first. Before starting the full panel, make a 3-cell test strip:
- Ch 42. Work Row 1 as written below (41 sc).
- Work 3 trees, 4 post strips, one Arch Row and one Base Row.
Checkpoints:
- After Row 1: 41 sc measure 10.25 in (26.0 cm).
- After the trees: Each tree is 2.25 in (5.7 cm) wide at the base and about 2.25 in (5.7 cm) tall. Each post strip is the same height as the trees.
- After the Base Row: The test strip measures 10.25 in x 3.25 in (26.0 cm x 8.3 cm).
If your strip is too big, use a hook one size smaller. If it’s too small, go up one size. Even a 0.25 in (0.6 cm) error per cell adds up to 2 in (5.1 cm) across a panel and 6.5 in (16.5 cm) over its length, so match gauge before continuing. Keep the test strip as a reference.
Foundation
With cream, ch 107.
Row 1 (RS): Sc in 2nd ch from hook and in each ch across. Turn. (106 sc)
Place a marker on the RS. Trees and posts are always started with the RS facing.
Row 1 is the base row for Tier 1. Number its stitches from right to left with the RS facing. They divide into 8 cells of 13 sts plus a final post of 2 sts: 8 x 13 + 2 = 106.
Inside each cell the stitches are used like this:
- sts 1–2: post strip
- st 3: open gap
- sts 4–12: tree (9 sts)
- st 13: open gap
The last 2 sts of the row (sts 105–106) hold the closing post strip at the left edge.
Trees (Worked in Every Tier)
With the RS facing, work one tree on the 9 tree sts of each cell. Fasten off after each one.
T1: Join green with a sl st in the first tree st. Ch 3 (counts as dc), dc in the next 8 sts. Turn. (9 dc)
T2: Step-in decrease: sl st in the first 2 sts, ch 3, dc in the next 6 sts. Leave the last st unworked. Turn. (7 dc)
T3: Sl st in the first 2 sts, ch 3, dc in the next 4 sts. Turn. (5 dc)
T4: Sl st in the first 2 sts, ch 3, dc in the next 2 sts. Turn. (3 dc)
T5 (tip): Sl st in the first 2 sts, ch 3. (1 st – the tip) Fasten off with a 4 in (10.2 cm) tail.
Each tree is a stepped triangle, 9 sts wide at the base and narrowing by 2 sts per row to a single-stitch tip. Its height is 5 dc rows, or 2.25 in (5.7 cm). The single open gap stitch on each side of a tree leaves the background clear.
Ladder Post Strips (Worked in Every Tier)
With the RS facing and cream, work a post strip on sts 1–2 of every cell and on the final 2 sts of the row. That’s 9 post strips per tier.
P1: Join cream with a sl st in the first post st. Ch 3 (counts as dc), dc in the next st. Turn. (2 dc)
P2–P5: Ch 3, dc in the top of the turning ch. Turn. (2 dc each row)
Fasten off after P5. Each post strip is 5 rows tall, the same height as a tree. The row edges and turning chains make a ladder pattern of two rails with crossbars.
Tip: After you finish a Base Row, you’re already at the left edge with cream on the hook. Work that edge post straight away without fastening off, and save yourself one join and two tails.
Arch Row
With the RS facing, join cream with a sc in the first st at the top of the right-hand post strip.
Arch Row (RS): Sc in the next st. Ch 6, sl st in the top of the ch-3 tip of the next tree, ch 6, sc in each of the 2 sts at the top of the next post strip. Rep from * to * across. Turn.
Count: 18 sc (2 on each of 9 posts), 16 ch-6 sps, and 8 sl sts.
Each cell’s two ch-6 lengths curve up from the post tops and meet at the tree tip, making the rounded arch. Crochet over the tree and post tails as you go wherever you can.
Base Row
Base Row (WS): Ch 1. Sc in each of the first 2 sc. 5 sc in the next ch-6 sp, sc in the sl st at the tree tip, 5 sc in the next ch-6 sp, sc in each of the next 2 sc. Rep from * to * across. Turn. (106 sc)
Why it works: Each cell gets 5 + 1 + 5 + 2 = 13 sts. 8 cells x 13 = 104, plus the 2 sc of the first post = 106. That is exactly the Row 1 count, so every tier sits directly above the one below it.
Checkpoint: The panel is 26.5 in (67.3 cm) wide, and every tier adds 3 in (7.6 cm).
Repeating the Tiers
One tier is: trees, post strips, Arch Row, Base Row. The Base Row of each tier is the foundation for the next one.
Work 26 tiers in total, finishing with a Base Row. Do not fasten off.
Length checkpoints:
| After tier | Length |
|---|---|
| 5 | 15.25 in (38.7 cm) |
| 10 | 30.25 in (76.8 cm) |
| 20 | 60.25 in (153.0 cm) |
| 26 | 78.25 in (198.8 cm) |
Panel length is 0.25 in (0.6 cm) for Row 1 plus 3 in (7.6 cm) for each tier. To change the length, add or remove whole tiers.
Border
Border gauge is the same as body gauge: 4 sc per inch (per 2.54 cm) on every edge.
Rnd 1: Continuing with cream, do not turn. Ch 1, sc in each of the 106 sts across the top. Ch 2 for the corner.
- Down the side: Work 313 sc along the row edges. For each tier, work 2 sc around each dc row end of the edge post (10 sc), 1 sc in the Arch Row end and 1 sc in the Base Row end. That’s 12 sc per tier x 26 tiers = 312, plus 1 sc in the end of Row 1 = 313.
- Ch 2 for the corner.
- Along the bottom: Work 106 sc in the free loops of the foundation chain.
- Ch 2. Work 313 sc up the second side, then ch 2.
- Join with a sl st to the first sc.
Count: 838 sc (106 + 313 + 106 + 313) and 4 ch-2 corner sps.
Rnd 2: Ch 1. Sc in each sc around, working (sc, ch 2, sc) in each corner sp. Join with a sl st to the first sc. Fasten off.
Count: 846 sc.
- Top and bottom: 108 sc each (106 + 1 corner sc at each end)
- Each side: 315 sc (313 + 1 corner sc at each end)
- Check: 108 + 315 + 108 + 315 = 846
Why the math works: 106 sts at 4 per inch = 26.5 in, and 313 sts at 4 per inch = 78.25 in. Those numbers match the measured body exactly, so the border can’t flare or pull in. Two rounds add 0.5 in (1.3 cm) to every edge, which makes the finished panel 27.5 in x 79.25 in (69.9 cm x 201.3 cm).
Final Blocking
- Weave in any remaining tails along the cream base rows or inside the trees, keeping each color in its own area.
- Soak the panel in cool water with a little wool wash for 15 minutes.
- Press out the water. Don’t wring it. Roll it in towels to remove more moisture.
- Lay it flat on the blocking surface. Pin the corners first to 27.5 in x 79.25 in (69.9 cm x 201.3 cm).
- Pin along each edge every 4 in (10.2 cm), checking that the side edges stay straight.
- Shape each arch into an even curve and pin the tree tips straight up so the triangles sit level.
- Leave it to dry completely, at least 24 hours, before unpinning.
Final Quality-Control Checklist
- Every Base Row has 106 sc.
- Every tree steps 9, 7, 5, 3, 1 and is centered with 1 open stitch on each side.
- All post strips are 5 rows tall and level with the tree tips.
- Every Arch Row has 18 sc, 16 ch-6 sps and 8 sl sts.
- The panel is 26 tiers tall with 208 trees.
- Border Rnd 2 has 108 sc on the top and bottom and 315 sc on each side.
- Blocked size is 27.5 in x 79.25 in (69.9 cm x 201.3 cm).
- Both panels in a pair match within 0.5 in (1.3 cm).
Troubleshooting
- Trees lean to one side: You worked the step-in decrease on only one edge. Each row must start with 2 sl sts and leave 1 st unworked at the end.
- Arches sag: Your chains are too loose. Use ch 5 instead of ch 6 and keep 5 + 1 + 5 sc in the Base Row, so the 13-st count doesn’t change.
- Arches pull the tips down: Your chains are too tight, or the posts are shorter than the trees. Count the post rows; it should be 5.
- Panel gets wider over its length: Recount the Base Row. Extra sts usually come from working 6 sc into a ch-6 sp.
- Side edges ripple: You worked more than 2 sc per dc row end in Rnd 1. Stay at 12 per tier.
- Too many tails: Crochet over them in the Arch and Base Rows as you work, rather than leaving them all for the end.
Care
Hand wash in cool water or machine wash on a gentle cycle in a mesh bag, then dry flat and re-pin to size. Don’t tumble dry or hang it wet, because the weight can stretch the lace lengthwise.
Final Notes
The measurement chain is short. 16 sc = 4 in (10.2 cm) sets the 13-st cell at 3.25 in (8.3 cm). Eight cells plus a closing post give 106 sts, or 26.5 in (67.3 cm). Each tier adds 3 in (7.6 cm), so 26 tiers plus Row 1 give 78.25 in (198.8 cm). The border counts of 106 and 313 match those numbers, and two rounds bring the panel to 27.5 in x 79.25 in (69.9 cm x 201.3 cm).
Check gauge on your test strip, count every Base Row, and your evergreens will line up from top to bottom.
Happy crocheting!