

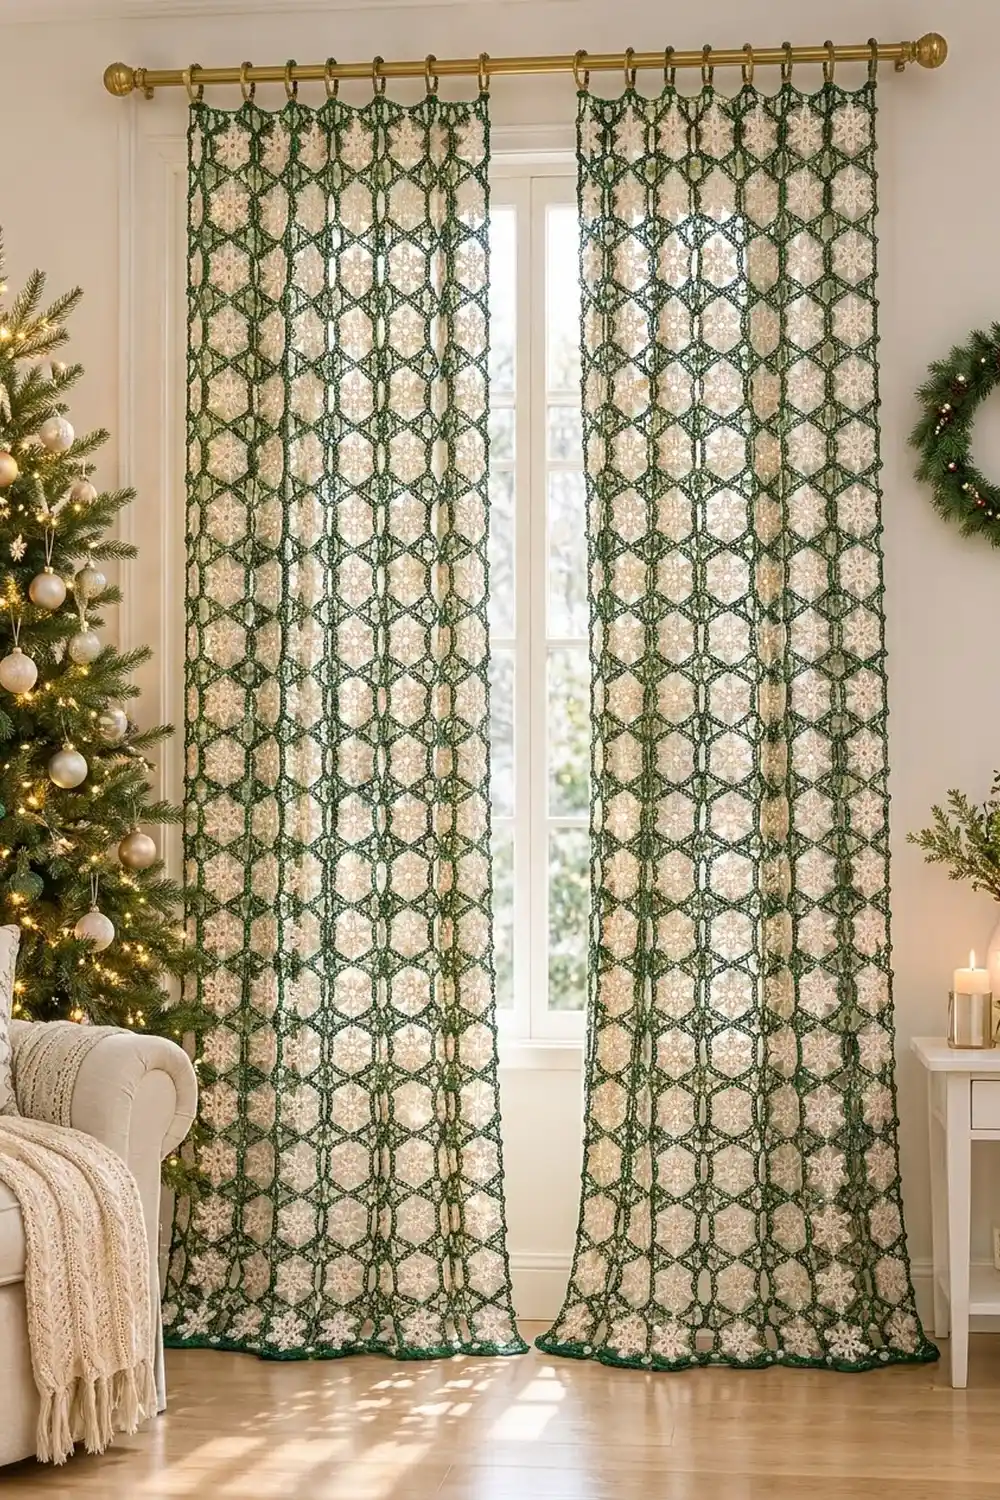
This lace curtain panel sets a cream six-point snowflake inside each pine-green hexagon. The hexagons stand point-up in neat columns, with small diamond windows between the rows, so light comes through in a soft honeycomb pattern. Hung at a window, it feels wintry and cozy without looking heavy.
The palette is two colors only: cream for the snowflakes and deep evergreen for the frames and border. All terms are US crochet terms.
One panel measures about 19.2 x 84.8 in (48.8 x 215.4 cm) after blocking. The hanging loops add about 1.8 in (4.6 cm) above that. Two panels side by side measure 38.4 in (97.5 cm) wide.
The panel is built from motifs. You crochet each snowflake in cream, add two green rounds to make it a hexagon, and join it to its neighbors in the last round as you go. A three-round green border then straightens the zigzag top and bottom edges, bridges the side notches, and adds the rod loops.
Finished Size and Construction
- Finished size (one panel): 19.2 x 84.8 in (48.8 x 215.4 cm), plus 1.8 in (4.6 cm) loops
- Skill level: Intermediate
- Terminology: US
- Yarn weight: Sport (2), cotton or cotton blend
- Hook: 3.25 mm (D/3)
- Number of pieces: 100 hexagon motifs per panel (200 for a pair)
- Layout: 5 motifs across x 20 motifs down
- Motif size: 3.6 in (9.1 cm) flat side to flat side, 4.2 in (10.7 cm) point to point, sides 2.1 in (5.3 cm)
- Size before border: 18.0 x 84.0 in (45.7 x 213.4 cm)
- Border depth: 0.6 in (1.5 cm) on the sides; 0.4 in (1.0 cm) past the leveled top and bottom edges
Materials
Choose a smooth, mercerized sport-weight cotton so the chain lines and picots stay crisp. Wool blends also work, but they relax more after blocking.
Per panel:
– Cream (snowflakes): 150 g / 450 m
– Evergreen (frames and border): 300 g / 900 m
For a pair: 300 g / 900 m of cream and 600 g / 1,800 m of evergreen.
All quantities include about a 10% margin for swatching and joining.
Tools:
– 3.25 mm (D/3) hook
– Tapestry needle
– Stitch markers
– Rustproof pins and a large blocking surface
– Measuring tape
– Spray bottle
Abbreviations (US Terms)
- ch – chain
- sl st – slip stitch
- sc – single crochet
- dc – double crochet
- dtr – double treble crochet: yarn over 3 times, insert hook, pull up a loop, then [yarn over, pull through 2 loops] 4 times
- sp – space
- st(s) – stitch(es)
- RS – right side
Special stitches:
– Picot: ch 3, sl st in 3rd ch from hook.
– Corner join: in place of a corner’s ch 2, work ch 1, sl st in the matching ch-2 sp of the finished neighbor, ch 1.
Gauge and Checkpoints
Make one complete motif first and measure it before you start the panel.
Checkpoints:
– After Round 1: the ring is 1.25 in (3.2 cm) across.
– After Round 2: 1.5 in (3.8 cm) across.
– After Round 3: the snowflake is 3.5 in (8.9 cm) from tip to tip.
– After Round 5, lightly blocked: 3.6 in (9.1 cm) flat to flat and 4.2 in (10.7 cm) point to point.
Border gauge: 11 sc = 2 in (5.1 cm).
If your motif is more than 0.1 in (0.3 cm) too big, go down a hook size. If it is too small, go up one. Small errors add up over 20 rows: a motif that is 0.1 in (0.3 cm) too tall makes the panel 2 in (5.1 cm) too long.
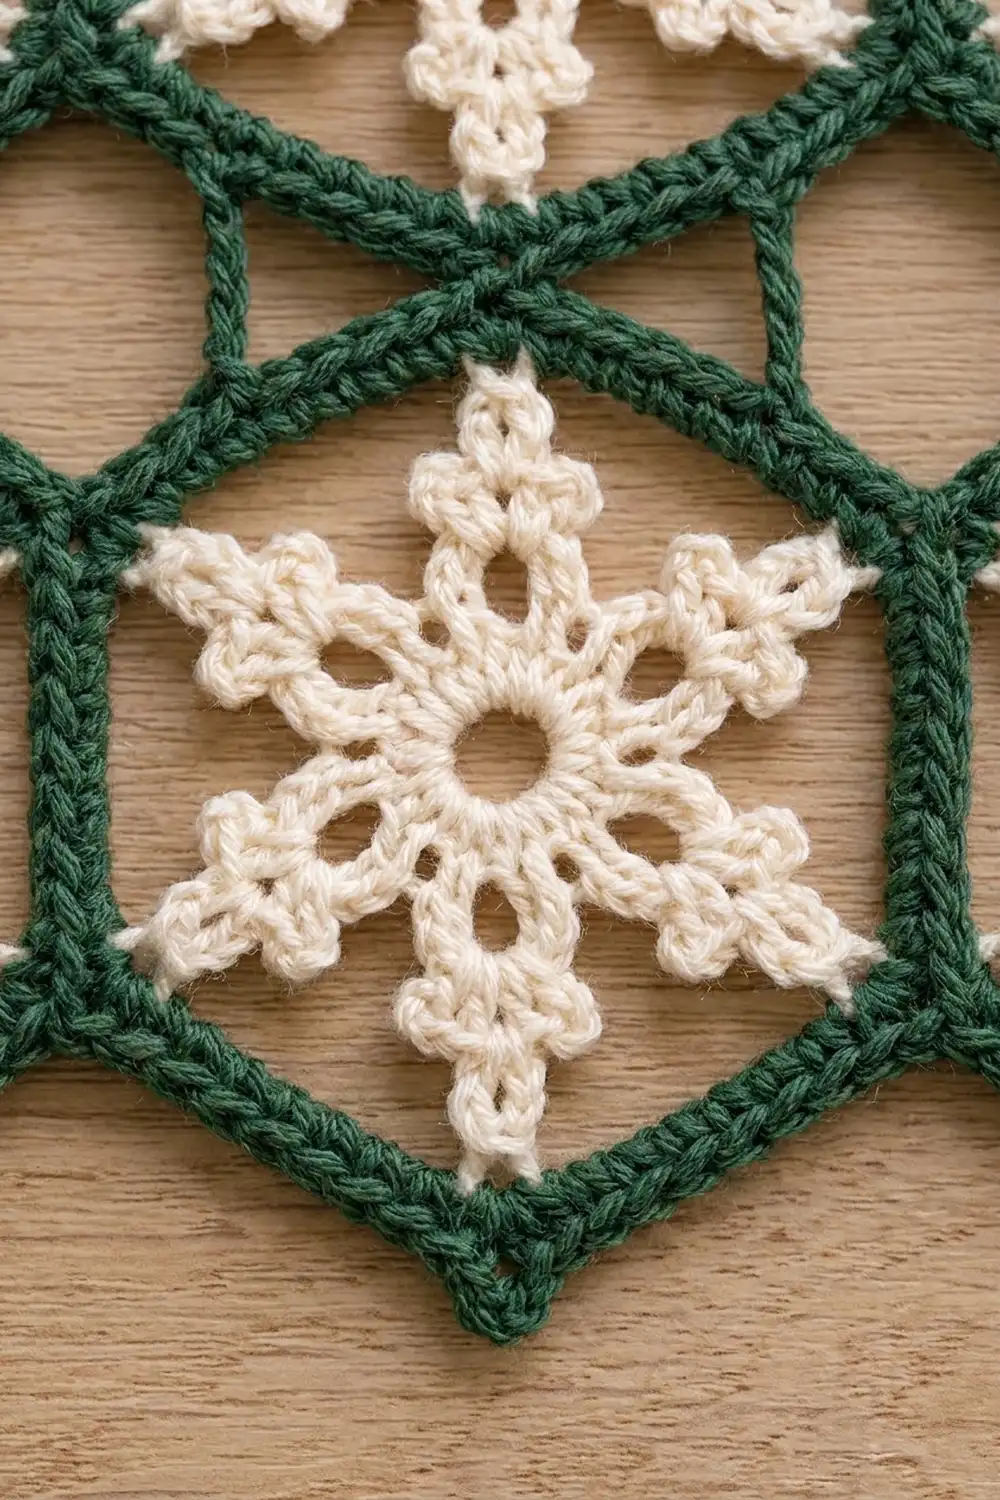
Hexagon Snowflake Motif
The six arms point to the six corners of the hexagon. The arm that points up sets the top point.
Round 1 (cream): Ch 6, sl st to the first ch to form a ring. Ch 3 (counts as dc), 17 dc in ring, sl st to the top of the ch-3. (18 dc)
Round 2: Ch 1, sc in the same st, ch 3, skip 2 dc. Sc in the next dc, ch 3, skip 2 dc; repeat from * 4 more times. Sl st to the first sc. (6 sc, 6 ch-3 sps)
Round 3 (arms): Sl st in the first ch-3 sp, ch 1, 3 sc in the same sp, sc in the next sc, then work an arm:
– Arm: Ch 10, sl st in the 4th ch from hook (tip picot). [Ch 3, sl st in the same ch] twice to make the trefoil tip. Sl st in the next 2 ch, then [ch 3, sl st in the same ch] twice for the two side picots. Sl st in the next 4 ch, then sl st in the base sc.
3 sc in the next ch-3 sp, sc in the next sc, work an arm; repeat from * 4 more times. The last arm rises from the first sc of Round 2. Sl st to the first sc. (24 sc, 6 arms) Fasten off.
Each arm uses all 10 chains: 3 for the tip picot, 1 as its anchor, 2 below the trefoil, and 4 down to the base.
Round 4 (evergreen): With RS facing, join green with a sl st in the center picot of the top arm’s trefoil. Ch 1, sc in the same picot, ch 9. Sc in the center picot of the next arm, ch 9; repeat from * 4 more times. Sl st to the first sc. (6 corner sc, 6 ch-9 sps)
Round 5 (first motif only): Ch 1, (sc, ch 2, sc) in the first sc, 9 sc in the next ch-9 sp. (Sc, ch 2, sc) in the next sc, 9 sc in the next ch-9 sp; repeat from * 4 more times. Sl st to the first sc and fasten off. (66 sc, 6 ch-2 corner sps)
Each side has 11 sc, which includes the corner sc at each end. Working counterclockwise from the top, the corners are Top, Upper Left, Lower Left, Bottom, Lower Right, and Upper Right.
Make All Pieces
- One panel: 100 motifs. A pair: 200 motifs.
- Colors on every motif: Rounds 1–3 in cream, Rounds 4–5 in evergreen.
- Working order: make Rounds 1–4 in batches, and work Round 5 only as you join each motif.
Layout for one panel (each M is a point-up motif):
Row 1:   M  M  M  M  M
Row 2:   M  M  M  M  M
Row 3:   M  M  M  M  M
 ...     (repeat)
Row 19:  M  M  M  M  M
Row 20:  M  M  M  M  M
Joining
Join each motif during its Round 5. Work the panel row by row, and work each row from left to right. Because the round runs counterclockwise from the Top corner, all the joins come early in the round:
- Top corner: if there is a motif above, work a corner join to that motif’s Bottom ch-2 sp.
- Upper Left corner: if there is a motif to the left, work a corner join to its Upper Right ch-2 sp.
- Left side (2nd ch-9 sp): work 5 sc, sl st in the middle (6th) sc of the left neighbor’s right side, then work 4 sc in the same sp.
- Lower Left corner: work a corner join to the left neighbor’s Lower Right ch-2 sp.
Finish the round as written. Each joined motif still has 66 sc. Neighbors share a vertical side, and point-to-point joins leave diamond windows between rows, each with 2.1 in (5.3 cm) sides.
Keep your slip stitches snug but not tight; puckered joins make the corners curl. If you crochet left-handed, build each row from right to left and mirror the joins.
Size checkpoints:
– Width: Row 1 should measure 18.0 in (45.7 cm) wide.
– Height: check every 5 rows. You should reach 21.0 in (53.3 cm), then 42.0 in (106.7 cm), then 63.0 in (160.0 cm), and finally 84.0 in (213.4 cm).
Border
Border gauge: 11 sc = 2 in (5.1 cm), or 5.5 sc per inch. Work every round in evergreen with RS facing.
Round 1 (leveling):
– Top edge:
– Join green in the Upper Left ch-2 sp of the top-left motif. Ch 5 (counts as dtr), ch 8, sc in that motif’s Top ch-2 sp, ch 8.
– Dtr in the next valley join, ch 8, sc in the next Top ch-2 sp, ch 8; repeat from * 3 more times.
– Dtr in the Upper Right ch-2 sp of the last motif.
– Top count: 6 dtr, 5 sc, 10 ch-8 sps.
– Right side:
– Row 1 motif: sc in each of its 11 side sc, then sc in its Lower Right sp, ch 10.
– Rows 2–19: sc in the Upper Right sp, sc in each of the 11 side sc, sc in the Lower Right sp, ch 10.
– Row 20 motif: sc in the Upper Right sp, then sc in each of the 11 side sc.
– Side count: 12 + (18 x 13) + 12 = 258 sc, plus 19 ch-10 bridges.
– Bottom edge: mirror the top edge. Dtr in each corner sp and each valley, and sc in each Bottom point.
– Left side: mirror the right side, working upward.
– Close: sl st to the top of the ch-5.
Round 1 total: 12 dtr, 526 sc, 20 ch-8 sps, and 38 ch-10 bridges.
Each dtr stands about as tall as a valley is deep, so the top and bottom edges become straight at point level. Each ch-10 bridge spans a 2.1 in (5.3 cm) side notch.
Round 2: Ch 1. Work 3 sc in each corner dtr, 1 sc in each sc and in each valley dtr, 9 sc in each ch-8 sp, and 10 sc in each ch-10 bridge. On the sides, also work 5 sc down the post of each corner dtr. Sl st to the first sc.
| Edge | Between corner groups | Including both corner sc |
|---|---|---|
| Top | 90 + 5 + 4 = 99 | 103 |
| Each side | 5 + 258 + 190 + 5 = 458 | 462 |
| Bottom | 99 | 103 |
Round 2 total: 99 + 99 + 458 + 458 + (4 x 3) = 1,126 sc
Round 3 (loops): Ch 1. Work 1 sc in each sc and 3 sc in each corner (middle) sc, except along the top edge:
– Top edge, between the corner groups: Sc in the next sc, ch 18, sl st in the same sc (loop made), sc in the next 9 sc; repeat from * 9 more times. Then sc in the next sc, ch 18, sl st in the same sc.
– That is 10 x 10 + 1 = 101 sc and 11 loops, with one loop beside each corner.
– Sl st to the first sc and fasten off.
| Edge | Between corner groups | Including both corner sc |
|---|---|---|
| Top | 101 | 105 |
| Each side | 460 | 464 |
| Bottom | 101 | 105 |
Round 3 total: 1,126 + 8 = 1,134 sc and 11 loops
Why the math works:
– Top and bottom: each motif adds 20 sc (two ch-8 sps x 9 sc, plus 1 point sc and 1 valley dtr). At 5.5 sc per inch, 20 sc equals 3.6 in (9.1 cm), one motif width.
– Sides: each motif row adds 13 sc plus a 10-sc bridge. Those 23 sc equal 4.2 in (10.7 cm), one motif height.
The border runs at the same rate as the motifs, so the edges neither ruffle nor cup.
Final Blocking
- Weave in all ends along the green chain lines.
- Soak the panel in cool water for 15 minutes, then roll it in towels to press out the water.
- Lay it flat on the blocking surface.
- Pin the corners to 19.2 x 84.8 in (48.8 x 215.4 cm).
- Pin both long edges every 4.2 in (10.7 cm), at each row line.
- Open each diamond window, and pin each snowflake’s trefoil tips and side picots outward.
- Mist any areas that dry early, and let the panel dry completely.
Final Quality-Control Checklist
- Every motif has 66 sc and 6 corner sps.
- Snowflake arms are untwisted and each points to its corner.
- Shared sides lie flat with no gaps.
- The diamond windows line up across the rows.
- The panel measures 19.2 x 84.8 in (48.8 x 215.4 cm), within 0.25 in (0.6 cm).
- The top has 11 evenly spaced loops that fit a rod up to 1 in (2.5 cm) thick.
Troubleshooting
- Snowflake cups: Round 1 is too tight. Make the ring loosely, or use ch 7.
- Arms curl: the slip stitches back down each arm are too tight. Loosen them, then block.
- Hexagon looks round: the ch-9 spaces are too long. Try ch 8 and recheck the 4.2 in (10.7 cm) height.
- Panel is too long: your gauge is loose. Remove a row, or block it shorter while damp.
- Top edge is wavy: the dtr are too short. Loosen your yarn overs.
- Sides ruffle: work 9 sc into each bridge, then adjust the side counts by -19.
Care
Hand wash in cool water and dry flat, reshaping the snowflakes while the panel is damp. Hang it away from strong direct sun so the evergreen doesn’t fade.
Final Notes
Here is the measurement chain:
– Snowflake: 3.5 in (8.9 cm)
– Motif: 3.6 x 4.2 in (9.1 x 10.7 cm)
– 5 x 20 grid: 18.0 x 84.0 in (45.7 x 213.4 cm)
– After border Round 1: 18.4 x 84.0 in (46.7 x 213.4 cm)
– After Round 2: 18.8 x 84.4 in (47.8 x 214.4 cm)
– Finished: 19.2 x 84.8 in (48.8 x 215.4 cm)
If your motif measures correctly, every later step lines up. Make a second panel the same way for a matching pair.
Happy crocheting!