

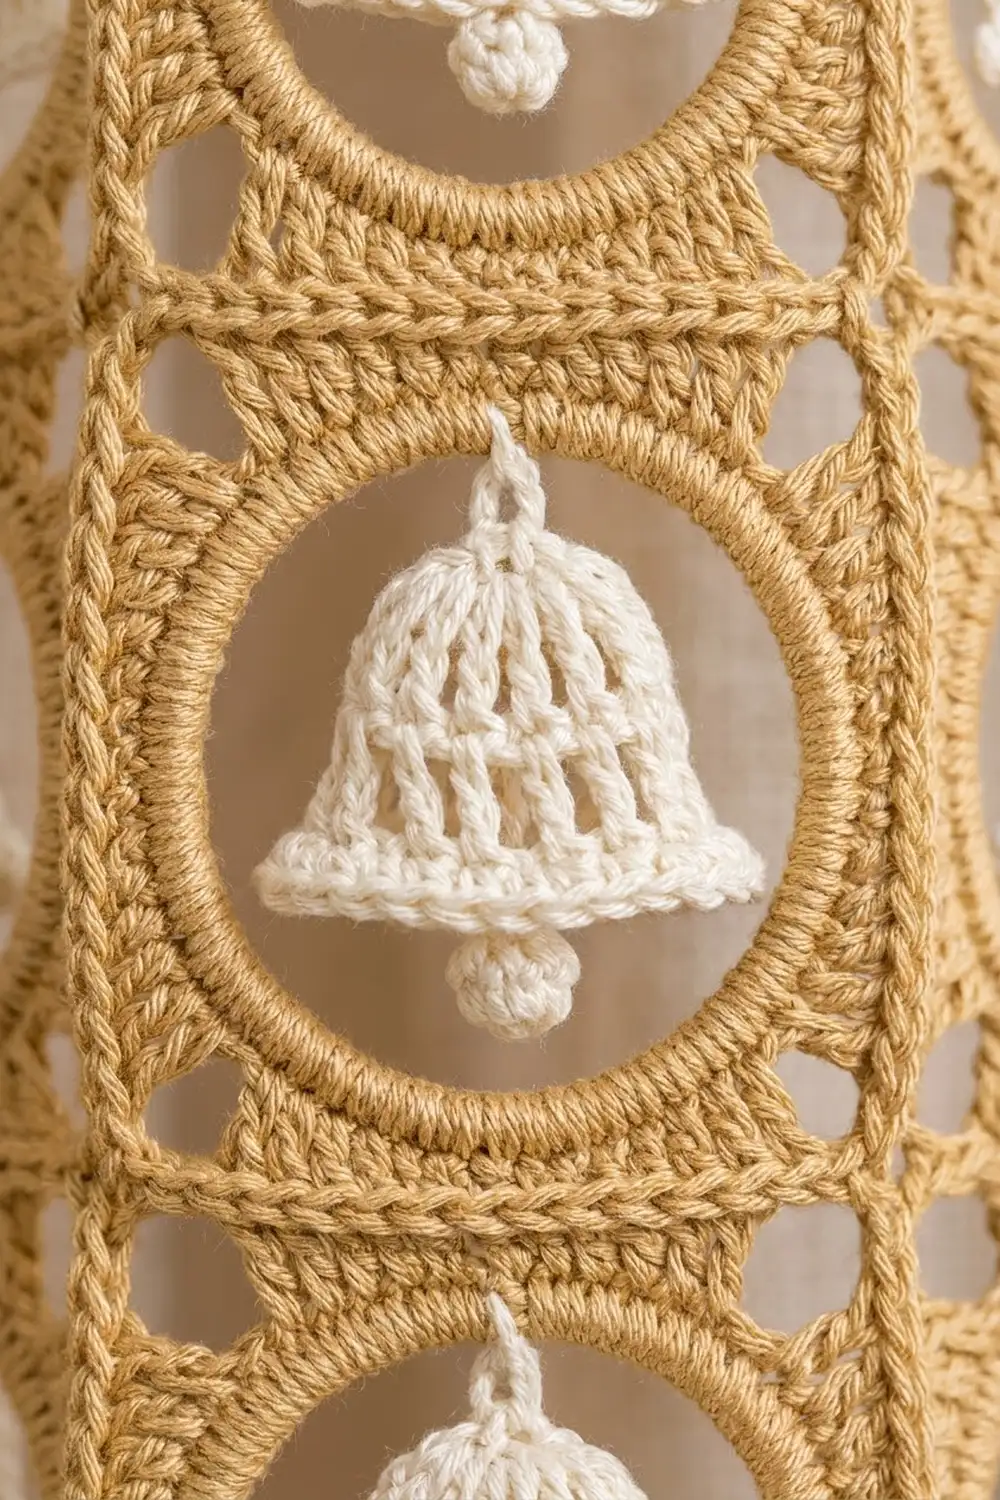
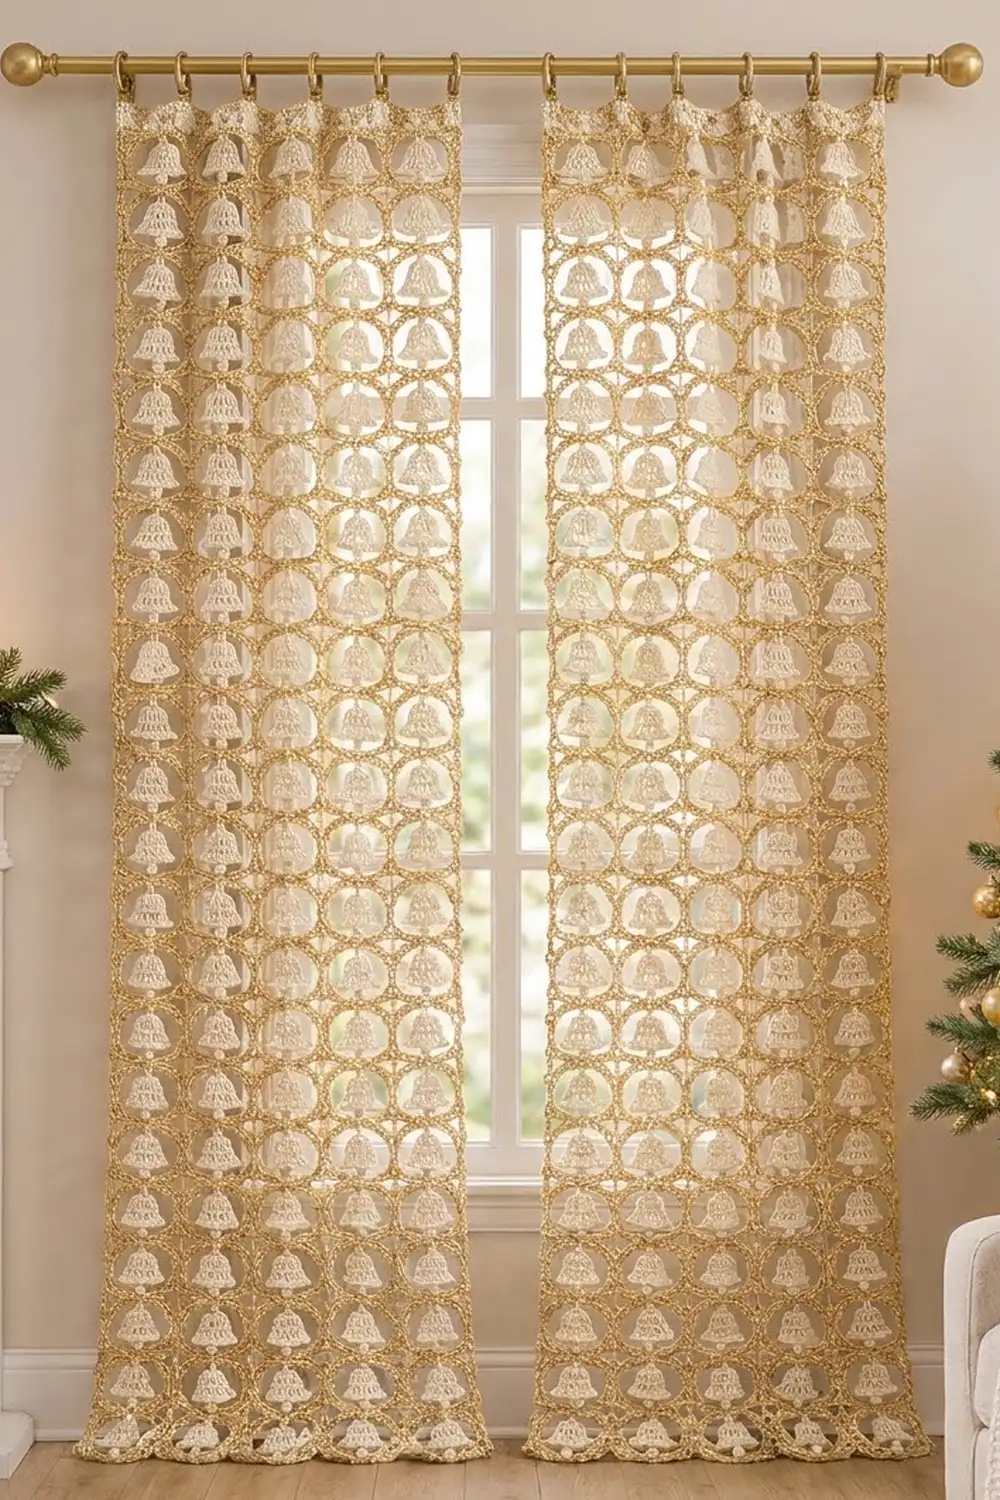
The Golden Bell Window Lace Curtain is a pair of festive crochet curtain panels made from small square motifs. Each motif has a round gold “window” with a cream lace bell hanging from the top of the circle. When the panels hang, the gold frames form a raised grid with one bell in every cell.
The palette has only two colors, warm gold and soft cream. It looks right in a Christmas window and keeps working through the winter. Each bell has open vertical ribs, a flared rim and a small bobble clapper, so light shows through the lace.
This pattern uses US crochet terms. Each finished panel is about 25.5 in wide x 81.5 in long (64.8 cm x 207.0 cm). Each square motif is 4 in (10.2 cm) after blocking.
The construction is modular. For each motif you crochet a cream bell, then a gold ring that is squared off over two rounds, and sew the bell inside the ring. You then join 120 motifs in a 6 x 20 grid with raised slip-stitch seams and add a three-round gold border. Make two panels for the pair.
Finished Size and Construction
- Finished size (one panel): approx. 25.5 in x 81.5 in (64.8 cm x 207.0 cm)
- Skill level: Intermediate
- Terminology: US crochet terms
- Yarn weight: DK / light worsted (#3) cotton
- Hook: 4.0 mm (G-6)
- Number of pieces: 120 motifs per panel, 240 for the pair
- Layout: 6 motifs across x 20 motifs down, per panel
- Motif size: 4 in x 4 in (10.2 cm x 10.2 cm), 18 sts per side
- Size before border: 24 in x 80 in (61.0 cm x 203.2 cm)
- Border depth: approx. 0.75 in (1.9 cm), 3 rounds
Materials
Use a smooth, mercerized DK cotton or cotton blend at about 115 m per 50 g. Mercerized cotton shows the stitches clearly, gives the gold a soft sheen and holds its shape after blocking. Avoid fuzzy yarn, which hides the open bell ribs.
Yarn (for two panels):
- Gold (frames, joining, border): 1,000 g, approx. 2,300 m
- Cream (bells): 550 g, approx. 1,265 m
For one panel, use half these amounts. The quantities include a margin of about 15% for swatching, sewing tails and differences in tension.
Tools:
- 4.0 mm (G-6) crochet hook
- Tapestry needle
- Locking stitch markers
- Measuring tape and scissors
- Blocking mats, rust-proof pins and a spray bottle
- 14 curtain clip rings (7 per panel)
Abbreviations (US Terms)
- ch – chain
- sl st – slip stitch
- sc – single crochet
- hdc – half double crochet
- dc – double crochet
- tr – treble crochet
- dtr – double treble crochet
- sp – space
- st(s) – stitch(es)
- tch – turning chain
- RS / WS – right side / wrong side
Special stitch – Bobble: (Yarn over, insert hook in indicated st, pull up a loop, yarn over, draw through 2 loops) 4 times in the same st, yarn over, draw through all 5 loops on hook.
Gauge and Checkpoints
Gauge: 18 sc and 20 rows = 4 in (10.2 cm) with a 4.0 mm hook.
Before you commit to 240 motifs, make one complete motif (a bell sewn into a frame) and block it. That one motif tests your gauge, how the bell fits and your edge count.
Checkpoints:
- Bell after Row 1: about 0.9 in (2.3 cm) wide.
- Bell after Row 3: about 2 in (5.1 cm) wide at the bottom edge.
- Finished bell: about 2.4 in (6.1 cm) wide at the rim. The body is 1.7 in (4.3 cm) tall, or 2.3 in (5.8 cm) including the loop and clapper.
- Frame after Round 2: the opening inside the ring is about 2.8 in (7.1 cm) across.
- Frame after Round 4: 3.75–4.25 in (9.5–10.8 cm) per side before blocking, 4 in (10.2 cm) after blocking.
If your motif is too big: change to a 3.75 mm hook. If it is too small: change to a 4.5 mm hook. Never change the stitch counts, because the joining and border math depend on exactly 18 sts per side.
Bell (Make 120 per Panel)
Use cream. The bell is worked flat from the top down. Rows 1 and 3 are RS rows.
Row 1 (RS): Ch 6, dc in 4th ch from hook and in each of next 2 ch, turn. (4 dc; the skipped 3 ch count as a dc)
Row 2 (WS): Ch 3 (counts as dc), dc in first st, (ch 1, dc in next dc) 2 times, ch 1, 2 dc in top of tch, turn. (6 dc, 3 ch-1 sps)
This row shapes the rounded shoulders of the bell.
Row 3 (RS): Ch 4 (counts as dc + ch 1), dc in next dc, (ch 1, dc in next dc) 3 times, ch 1, dc in top of tch, turn. (6 dc, 5 ch-1 sps)
Each dc now has a ch-1 on either side, which makes the open vertical ribs.
Row 4 (WS, rim): Ch 2 (does not count), hdc in first dc, hdc in next ch-1 sp, hdc in next dc; repeat from * 4 more times, working the last hdc in top of tch. Fasten off. (11 hdc)
This is a conversion row: 6 hdc (one in each dc) + 5 hdc (one in each ch-1 sp) = 11 hdc. The solid rim is wider than the open body above it, so the lip flares.
Clapper: With RS facing, join cream with sl st in the 6th (center) hdc of Row 4. Ch 3, work a Bobble in 3rd ch from hook, sl st in the same center hdc. Fasten off. The bobble hangs just below the rim.
Hanging loop: With RS facing, join cream with sl st in the foundation chain between the 2nd and 3rd dc of Row 1. Ch 5, sl st in the same place. Fasten off, leaving a 10 in (25.4 cm) tail for sewing.
Frame (Make 120 per Panel)
Use gold. Work in joined rounds with RS facing.
Round 1: Ch 40, sl st in first ch to form a ring. Take care not to twist the chain. (40 ch)
Round 2: Ch 1, sc in each ch around, sl st in first sc. (40 sc)
Round 3 (squaring): Ch 1, sc in next st, hdc in next st, dc in next st, tr in next st, dtr in next st, ch 6, dtr in next st, tr in next st, dc in next st, hdc in next st, sc in next st; repeat from * 3 more times, sl st in first sc. (40 sts and 4 ch-6 corner sps)
Each repeat uses 10 ring stitches and builds one corner. The stitches get taller toward the corner, so the circle is pushed out into a square, and the ch-6 leaves the small open corner gap. Each side now has 10 sts: dtr, tr, dc, hdc, sc, sc, hdc, dc, tr, dtr.
Round 4 (edge): Ch 1, sc in first sc and in each of next 4 sts, 7 sc in next ch-6 sp, sc in each of next 10 sts, 7 sc in next ch-6 sp; repeat from * 2 more times, sc in each of last 5 sts, sl st in first sc. Fasten off. (68 sc)
In each corner group, the 4th sc is the corner st. Per side: 3 sc + 10 sc + 3 sc + 2 corner sts = 18 sts, both corner sts included. Check: 4 sides x 18 = 72, minus 4 shared corners = 68.
Assemble Each Motif
Place a bell inside the ring with both RS facing you. Use the loop tail to sew the hanging loop to the top of Round 2, centered between the two middle sc of the top side. Add one small stitch on the WS through the center of Row 1 so the bell can’t twist. Weave in all ends.
Make All Pieces
Per panel: 120 cream bells and 120 gold frames, assembled into 120 motifs.
For the pair: 240 bells and 240 frames.
Block the motifs in batches to 4 in (10.2 cm) square before joining. Layout per panel (B = bell motif):
Row 1:  B B B B B B
Row 2:  B B B B B B
Row 3:  B B B B B B
 ...    (repeat)
Row 20: B B B B B B
That is 6 across x 20 down = 120 motifs, all facing the same way with the bells upright.
Joining
Method: raised slip-stitch seam in gold.
Hold two motifs WS together with corner sts matched. Work through the outer loop of each piece and sl st once in each matching pair of sts, from corner st to corner st. That is 18 sl sts per seam: one stitch on one motif is joined to one stitch on the other, with nothing skipped or added. The seam stands up as a chain-textured ridge on the RS, which makes the gold grid.
- Join the motifs into 20 horizontal strips of 6, with 5 short seams of 18 sl sts per strip.
- Join the strips with 19 long seams. Each long seam is 6 x 18 = 108 sl sts.
- Where four corners meet, sl st through the paired corner sts in order so the intersection stays flat.
Tension: keep each sl st the same length as an edge sc. If the seams pull tighter than the motifs, the panel puckers, so go up one hook size for joining if needed.
Size checkpoint: each strip measures 24 in (61.0 cm). The joined panel measures 24 in x 80 in (61.0 cm x 203.2 cm).
Border
Border gauge: 18 sc = 4 in (10.2 cm), the same as the motif edge, so 108 sts fill 24 in (61.0 cm) exactly.
Starting counts: top and bottom have 6 motifs x 18 sts = 108 sts. Each long side has 20 motifs x 18 sts = 360 sts. Where two motifs meet at a seam, their two corner sts sit side by side. Each one gets its own stitch, and both are already part of the 18 per motif, so no seam stitches are added.
Round 1: With RS facing, join gold in the top right corner st of the panel. Ch 1, 3 sc in same st, sc in each st to next panel corner st, 3 sc in corner st; repeat around, omitting the last corner group, sl st in first sc. (110 sts across top and bottom, 362 sts down each long side, counting the center corner sc at both ends; 940 sts total)
Round 2: Ch 2 (does not count), hdc in each st, working 3 hdc in each center corner sc, sl st in first hdc. (112 / 364 per side; 948 sts total)
Round 3: Ch 1, sc in each st, working 3 sc in each center corner hdc, sl st in first sc. Fasten off. (114 / 366 per side; 956 sts total)
Why the math works: every round places one stitch in each stitch along the sides, so the border stays the same length as the panel edge and doesn’t ruffle or pull. Only the corners change. Three stitches in each corner add 2 sts to every side per round, which turns the corner flat. Check Round 1: 2 x 110 + 2 x 362 − 4 shared corners = 940.
Final Blocking
- Weave in any remaining ends along the gold seams so they don’t show through the lace.
- Soak the panel in cool water for 15 minutes, then press out the water. Do not wring it.
- Lay it flat on mats, in sections if needed.
- Pin the outer border to 25.5 in x 81.5 in (64.8 cm x 207.0 cm).
- Pin each seam line straight so every cell is 4 in (10.2 cm) square.
- Smooth each bell flat with the rim flared and the clapper centered.
- Let it dry completely before unpinning, then repeat for the second panel.
Final Quality-Control Checklist
- Every frame has 18 sts per side.
- Every bell hangs upright and centered, with the RS facing out.
- The seams are flat and the ridges sit on the RS.
- The four-way intersections lie flat.
- The border counts are 114 / 366 per side.
- Both panels measure the same.
- Clip rings go at both top corners and at each of the 5 top seams, so 7 per panel.
Troubleshooting
- Bell rim curls: check that Row 4 has 11 hdc, then block the bell flat.
- Frame ruffles: your dtr are too loose. Tighten them or go down a hook size.
- Corners cup: recount the 7 sc in each ch-6 sp.
- Seams pucker: your slip stitches are too tight. Use a larger hook for joining.
- Border waves: you added extra stitches at the seams. Recount 108 per short side before you start Round 1.
- Bell swings sideways: add the WS tacking stitch through Row 1.
Care
Hand wash in cool water with mild detergent and dry flat, re-pinning the panel if it needs reshaping. Hang only when completely dry so the panel doesn’t stretch.
Final Notes
The measurement chain is simple. Gauge of 18 sc = 4 in gives 18 sts per motif side and a 4 in (10.2 cm) motif. A 6 x 20 grid of motifs makes a 24 in x 80 in (61.0 cm x 203.2 cm) panel. The 0.75 in (1.9 cm) border then brings each panel to 25.5 in x 81.5 in (64.8 cm x 207.0 cm). If your test motif is right, the rest of the project will be too.
Happy crocheting!