

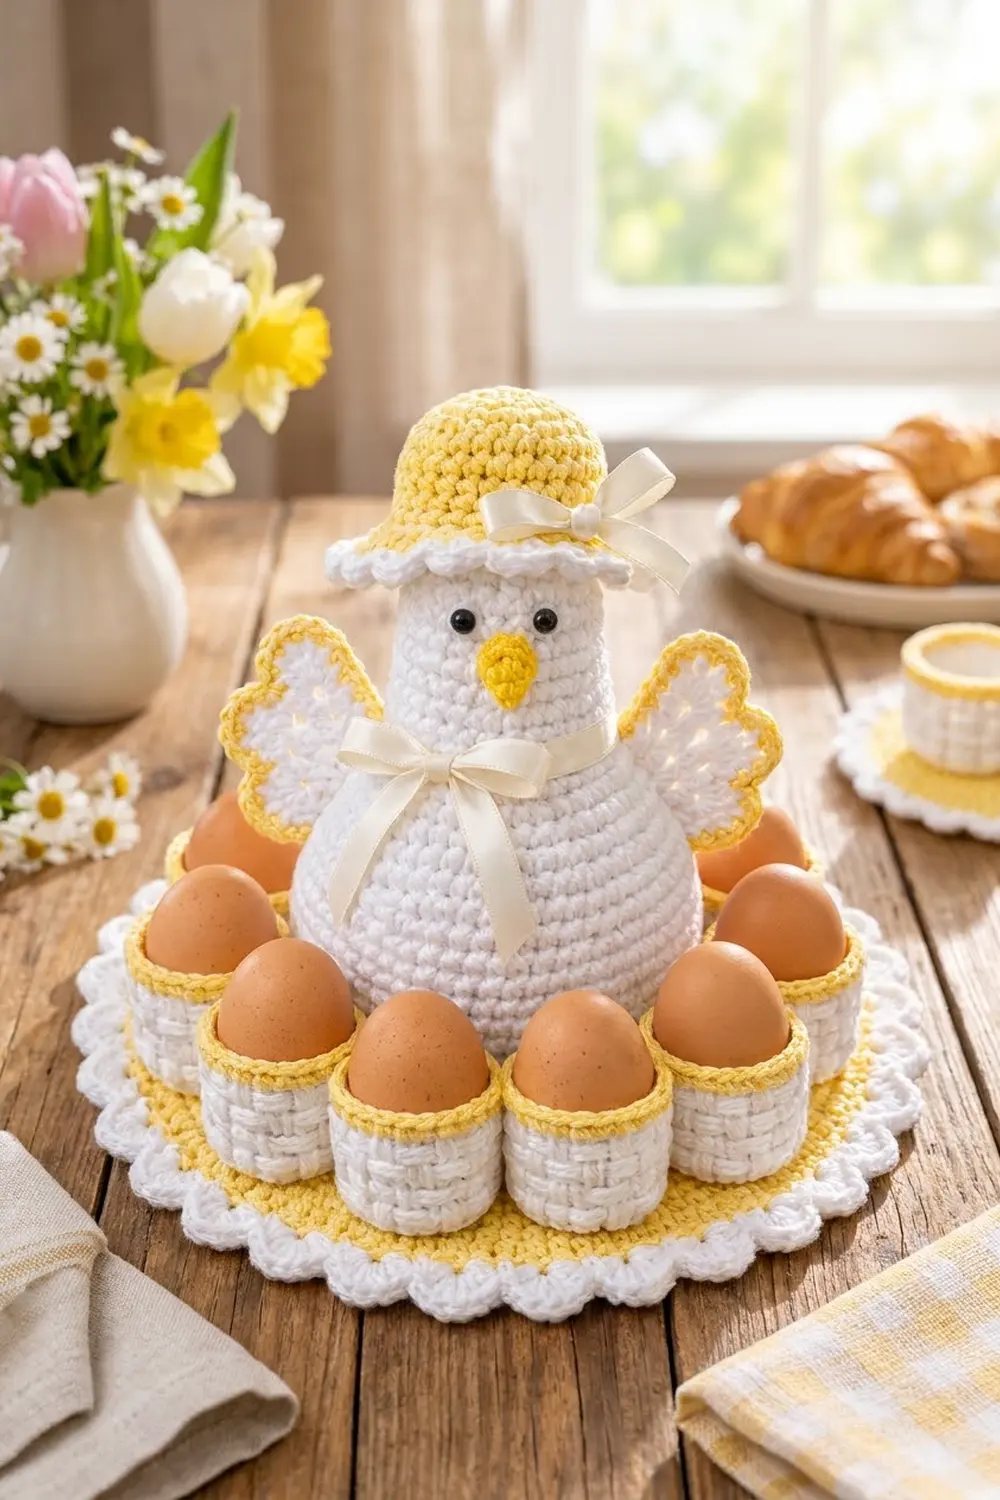
This centerpiece is a white hen in a yellow sun hat. She sits inside a ring of ten basketweave egg cups on a round yellow mat with a white scalloped edge. Use it for Easter brunch, on a spring table, or to keep fresh eggs on the counter.
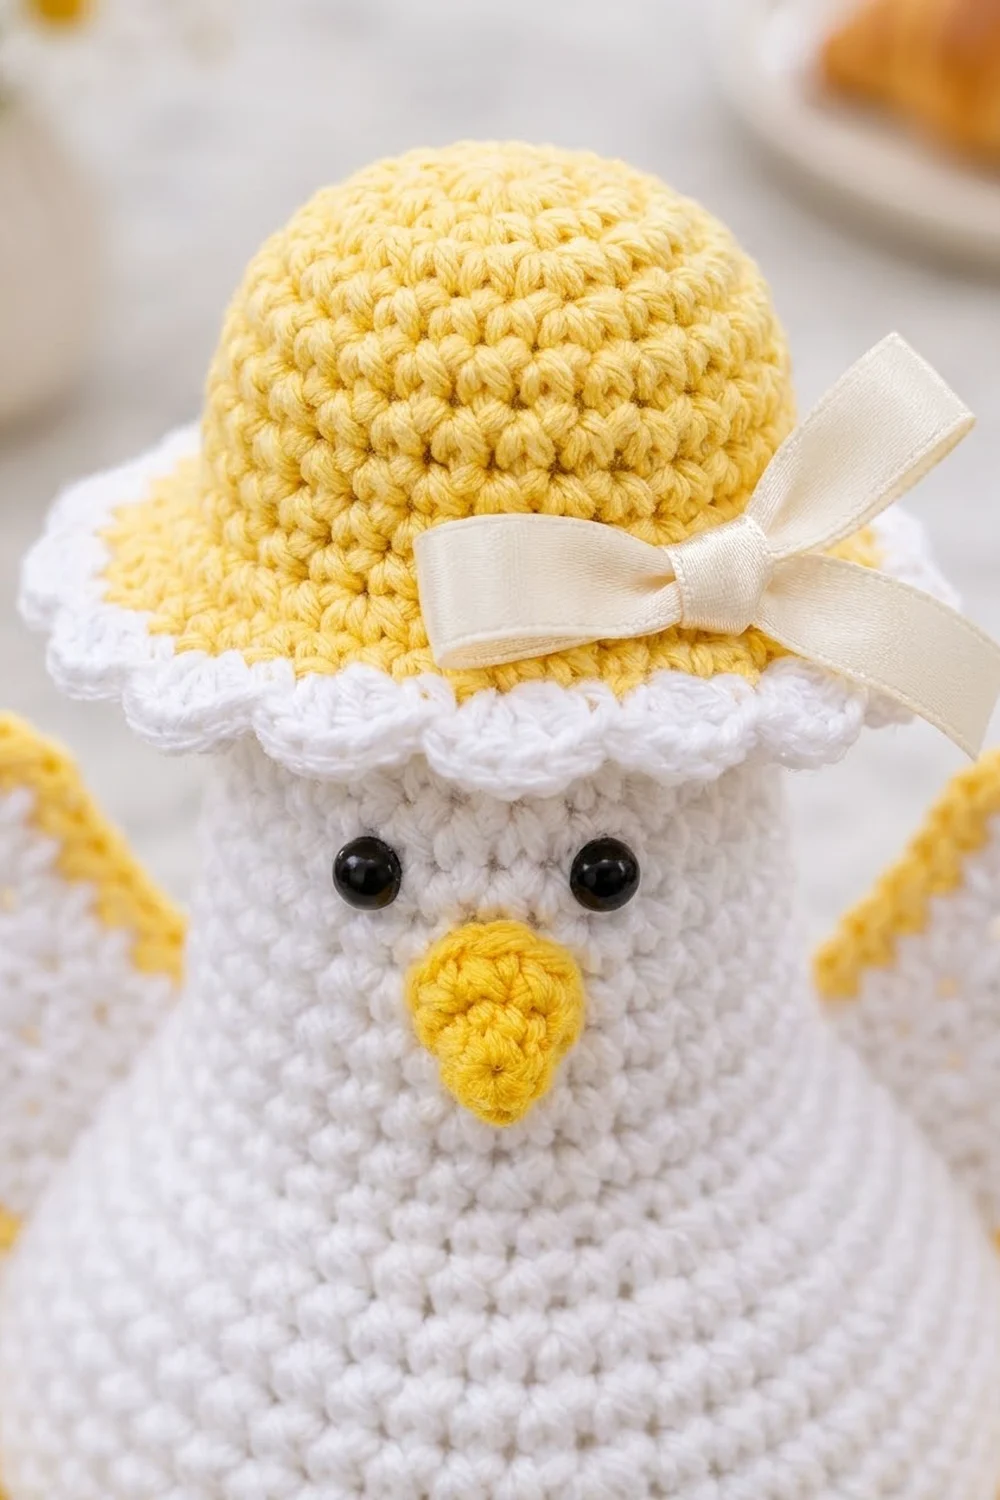
The colors are sunny yellow and clean white, with cream satin ribbon bows. The hen and the cup walls are white. The mat, beak, hat crown and cup rims are yellow. The wings have lacy white centers edged in yellow, and the hat brim ends in small white scallops.
All instructions use US crochet terms. The finished centerpiece measures 11.8 in (30.0 cm) across and about 7.75 in (19.7 cm) tall to the top of the hat. Each cup holds a standard large egg.
You crochet a flat mat, ten egg cups, a hollow hen body, two wings, a beak and a hat. Then you sew the hen to the center of the mat and the cups in a ring around her.
Finished Size and Construction
- Finished size: 11.8 in (30.0 cm) diameter, about 7.75 in (19.7 cm) tall
- Skill level: Intermediate (post stitches, working in the round, sewing)
- Terminology: US crochet terms
- Yarn weight: Worsted (#4) cotton
- Hook: 3.75 mm (F-5)
- Number of pieces: 16 crocheted pieces (1 mat, 10 cups, 1 hen body, 2 wings, 1 beak, 1 hat) plus 2 ribbon bows
- Layout: hen in the center, with 10 cups in one ring around her
- Egg cup size: 2.25 in (5.7 cm) across, 2.1 in (5.3 cm) tall
- Hen body: 4.7 in (11.9 cm) at the widest point, 6.4 in (16.3 cm) tall
- Mat size before border: 10.4 in (26.4 cm) diameter
- Border depth: 0.7 in (1.8 cm) all around
Materials
Use a smooth worsted-weight cotton. Cotton makes crisp post stitches, holds its shape and wipes clean. Acrylic also works, but the cups will be softer.
- Yellow: 110 g, about 172 m (mat, cup rims, hat, beak, wing edging)
- White: 230 g, about 359 m (cups, hen, mat border, wings, hat edging)
These amounts assume about 78 m per 50 g. They include a margin of roughly 15 percent.
Tools and notions:
- 3.75 mm (F-5) crochet hook
- 2 black safety eyes, 9 mm
- About 60 g polyester fiberfill
- 1 cardboard or plastic-canvas disc, 3 in (7.6 cm) diameter
- Cream satin ribbon, 3/8 in (1.0 cm) wide, 14 in (35.6 cm) long
- Cream satin ribbon, 5/8 in (1.6 cm) wide, 24 in (61.0 cm) long
- Stitch markers, tapestry needle, sewing needle and cream thread
Abbreviations (US Terms)
- ch – chain
- sl st – slip stitch
- sc – single crochet
- hdc – half double crochet
- dc – double crochet
- inc – 2 sc in the same stitch
- dec / sc2tog – single crochet 2 together
- BLO / FLO – back loop only / front loop only
- MR – magic ring
- sp – space
- st(s) – stitch(es)
Special stitches:
- FPdc (front post double crochet): Yarn over. Insert the hook from front to back to front around the post of the stitch below, then finish as a dc. The stitch sits forward.
- BPdc (back post double crochet): Yarn over. Insert the hook from back to front to back around the post, then finish as a dc. The stitch sits back.
Gauge and Checkpoints
Gauge: 18 sc and 20 rounds = 4 in (10.2 cm). Each sc round adds about 0.2 in (0.5 cm) of height, so a flat circle grows about 0.4 in (1.0 cm) in diameter per round.
Make one egg cup first, because it uses most of the techniques in this pattern.
- After cup Rnd 5, the base should measure 2 in (5.1 cm) across.
- The finished cup should measure 2.25 in (5.7 cm) across and 2.1 in (5.3 cm) tall.
- A large egg should sit inside with about half of it above the rim.
If the base is too big, switch to a 3.5 mm hook. If it is too small, switch to a 4 mm hook. Being 0.25 in (0.6 cm) off on each cup adds up quickly over ten cups.
Egg Cups (make 10)
Work the base in continuous rounds. Join each wall round with a sl st to the first stitch.
Rnd 1 (white): 6 sc in MR. (6)
Rnd 2: Inc in each st around. (12)
Rnd 3: (Sc 1, inc) 6 times. (18)
Rnd 4: (Sc 2, inc) 6 times. (24)
Rnd 5: (Sc 3, inc) 6 times. (30)
Rnd 6 (yellow): Working in BLO, sc in each st around, then sl st to join. (30) The unused front loops form a yellow ridge at the bottom edge.
Rnd 7 (white): Ch 2 (does not count), dc in each st around. (30)
Rnds 8–9: Ch 2, FPdc in each of the next 3 sts, BPdc in each of the next 3 sts, repeat 5 times. (30)
Rnds 10–11: Ch 2, BPdc in each of the next 3 sts, FPdc in each of the next 3 sts, repeat 5 times. (30)
Swapping the blocks every two rounds creates the woven basket look. Because 30 ÷ 6 = 5, the repeat fits with no leftover stitches.
Rnds 12–13 (yellow): Ch 1, sc in each st around. (30) Fasten off, leaving a 16 in (40.6 cm) tail for sewing.
Base Mat
Work in continuous rounds with yellow, moving a marker up each round.
Rnd 1: 6 sc in MR. (6)
Rnd 2: Inc in each st around. (12)
Rnds 3–26: In each round, make 6 evenly spaced increases. Round n has 6 × n sts. For example, Rnd 3 is (sc 1, inc) 6 times = 18, and Rnd 4 is (sc 2, inc) 6 times = 24. In every even round, start with half of the plain stitches so the increases are staggered. This keeps the circle from turning into a hexagon.
Checkpoints: Rnd 8 = 48 sts, 3.2 in (8.1 cm). Rnd 18 = 108 sts, 7.2 in (18.3 cm). Rnd 24 = 144 sts, 9.6 in (24.4 cm). Rnd 26 = 156 sts, 10.4 in (26.4 cm).
If the mat ruffles, you have too many stitches. If it cups, you have too few. Mark Rnd 8 and Rnd 18 with removable markers so you can find them when placing the pieces later.
Hen Body
Work in continuous rounds with white.
Rnds 1–8: Work as for the mat, Rnds 1–8. (48)
Rnd 9: Working in BLO, sc in each st around. (48)
Rnd 10: (Sc 7, inc) 6 times. (54)
Rnd 11: Sc in each st around. (54)
Rnd 12: (Sc 8, inc) 6 times. (60)
Rnds 13–14: Sc in each st around. (60)
Rnd 15: (Sc 9, inc) 6 times. (66)
Rnds 16–22: Sc in each st around. (66) Checkpoint: 4.7 in (11.9 cm) across.
Rnd 23: (Sc 9, dec) 6 times. (60)
Rnd 24: Sc in each st around. (60)
Rnd 25: (Sc 8, dec) 6 times. (54)
Rnd 26: (Sc 7, dec) 6 times. (48)
Rnd 27: (Sc 6, dec) 6 times. (42)
Rnd 28: (Sc 5, dec) 6 times. (36)
Rnd 29: (Sc 4, dec) 6 times. (30)
Rnds 30–40: Sc in each st around. (30) The head is 2.1 in (5.3 cm) wide and 2.2 in (5.6 cm) tall. Sl st to finish and fasten off. Leave the top open.
Eyes: Fit the safety eyes between Rnds 34 and 35, with 5 sts between them.
Stuffing: Drop the cardboard disc through the neck so it lies flat on the base. Stuff the body firmly into a rounded pear shape, filling up to Rnd 39.
Beak
Row 1 (yellow): Ch 5. Starting in the 2nd ch from the hook, sc in each ch across. Turn. (4)
Row 2: Ch 1, sc2tog twice. Turn. (2)
Row 3: Ch 1, sc2tog. (1)
Edging: Sc evenly around the triangle, working 3 sc in the point. The beak measures 0.75 in (1.9 cm) wide and 0.6 in (1.5 cm) tall. Sew it centered just below the eyes, with the point facing down.
Wings (make 2)
Row 1 (white): In a MR, ch 3 (counts as dc) and work 6 dc. Pull the ring closed and turn. (7 dc)
Row 2: Ch 3 (counts as dc), dc in the same st, 2 dc in each of the next 5 sts, dc in the top of the turning ch. Turn. (13 dc)
Row 3: Ch 4 (counts as dc + ch 1). Dc in the next st, ch 1, repeat across, ending with dc in the top of the turning ch. Turn. (13 dc, 12 ch-1 sps) This row forms the lacy center.
Row 4: Ch 1, sc in the first dc. 2 hdc in the next sp, 3 dc in each of the next 2 sps, 2 hdc in the next sp, sc in the next dc, repeat 3 times. (34 sts: 3 lobes of 10 sts, plus 4 sc) Fasten off.
Edging (yellow): Join with a sc in the first st of Row 4, then sc in each of the next 33 sts. Work 2 sc in each of the 3 row ends down one side, 1 sc at the ring and 2 sc in each of the 3 row ends up the other side. Sl st to join. (47 sc) Each wing is 3 in (7.6 cm) wide and 1.5 in (3.8 cm) tall.
Hat
Rnds 1–6 (yellow): Work as for the mat, Rnds 1–6. (36)
Rnds 7–12: Sc in each st around. (36) The crown measures 2.6 in (6.6 cm) across.
Rnd 13: Working in FLO, (sc 1, inc) 18 times. (54)
Rnd 14: (Sc 2, inc) 18 times. (72) Fasten off.
Rnd 15 (white): Sc in the next st, skip 1, 3 dc in the next st, skip 1, repeat 18 times. Sl st to join. (18 scallops)
The brim is 0.7 in (1.8 cm) wide, and the whole hat is 4 in (10.2 cm) across. Tie the narrow ribbon into a bow and sew it to the side of the crown.
Make All Pieces
- White only: 1 hen body
- Yellow only: 1 beak
- Yellow and white: 10 egg cups, 1 mat, 2 wings, 1 hat
Layout from above:
           C1    C2
      C10             C3
    C9      [ HEN ]      C4
      C8              C5
           C7    C6
Joining
Method: Whipstitch with matching yarn through the free loops of each piece and into the mat. Finish the mat border (below) before you join anything.
Hen to mat: The hen’s free-loop ridge at Rnd 9 has 48 stitches, and Rnd 8 of the mat also has 48. Sew them together one stitch to one stitch, which centers the hen exactly.
Cups to mat: Center each cup on Rnd 18 of the mat (108 sts). Place markers at stitches 1, 12, 23, 34, 45, 55, 66, 77, 88 and 99. That gives eight gaps of 11 sts and two gaps of 10 sts, for 108 in total. Sew the yellow Rnd 6 ridge of each cup to the mat.
Ten cups at 2.25 in (5.7 cm) each take up 22.5 in (57.2 cm). The center line of Rnd 18 is 7.2 in × 3.14 ≈ 22.6 in (57.4 cm) around, so the cups sit side by side. Tack neighboring rims together with 2 stitches.
Finishing: Sew the straight edge of each wing to the body between Rnds 17 and 25, angled up and out. Tie the wide ribbon around Rnd 29 with the bow in front. Sew the free back loops of hat Rnd 12 to head Rnd 38.
Tension: Pull the stitches snug but not tight enough to pucker the mat.
Checkpoint: The ring of cups measures 9.5 in (24.1 cm) across the outside, leaving about 0.5 in (1.3 cm) of yellow showing inside the border.
Border
Work the border on the mat only, at the same gauge of 18 sc = 4 in (10.2 cm).
Rnd 27 (white): Join in any st. Ch 1, sc in each st around, then sl st to join. (156 existing sts + 0 added = 156)
Rnd 28: Sc in the next st, skip 2, 5 dc in the next st, skip 2, repeat 26 times. Sl st to join. (26 scallops)
Why the math works: Each scallop uses 6 stitches (1 + 2 + 1 + 2), and 156 ÷ 6 = 26 exactly. The 5-dc fans flare just enough to lie flat around the curve. The border adds 0.7 in (1.8 cm) on each side, so 10.4 in + 1.4 in = 11.8 in (30.0 cm).
Final Blocking
- Wet the mat and wings, then roll them in a towel to remove extra water.
- Pin the mat into an 11.8 in (30.0 cm) circle, with a pin at each scallop tip.
- Pin the wings flat, opening out each lobe.
- Slip each cup over a small jar and steam it lightly.
- Steam the hat brim flat over a saucer.
- Let everything dry completely before you put the centerpiece together.
Final Quality-Control Checklist
- All 10 cups are within 0.1 in (0.3 cm) of 2.25 in (5.7 cm)
- The basketweave blocks line up straight on every cup
- The mat measures 11.8 in (30.0 cm) and has 26 even scallops
- The eyes are level and the beak is centered
- The cups are evenly spaced and the hen is centered
- No yarn tails are visible
Troubleshooting
- Mat ruffles: You have extra increases or loose tension. Frog back to the last checkpoint.
- Mat cups up: You are missing increases. Every round must add exactly 6.
- Cups look ribbed instead of woven: You didn’t swap the blocks at Rnd 10.
- Eggs don’t fit: Go up 0.25 mm in hook size.
- Hen leans: Re-center the disc and even out the stuffing.
Care
Remove the ribbons. Spot clean or hand wash in cool water, and dry flat.
Final Notes
Gauge sets each cup at 2.25 in (5.7 cm). Ten cups fill Rnd 18 at 7.2 in (18.3 cm), the mat grows to 10.4 in (26.4 cm) and the border brings it to 11.8 in (30.0 cm). If you check each step as you go, your hen will sit neatly among her eggs.
Happy crocheting!