

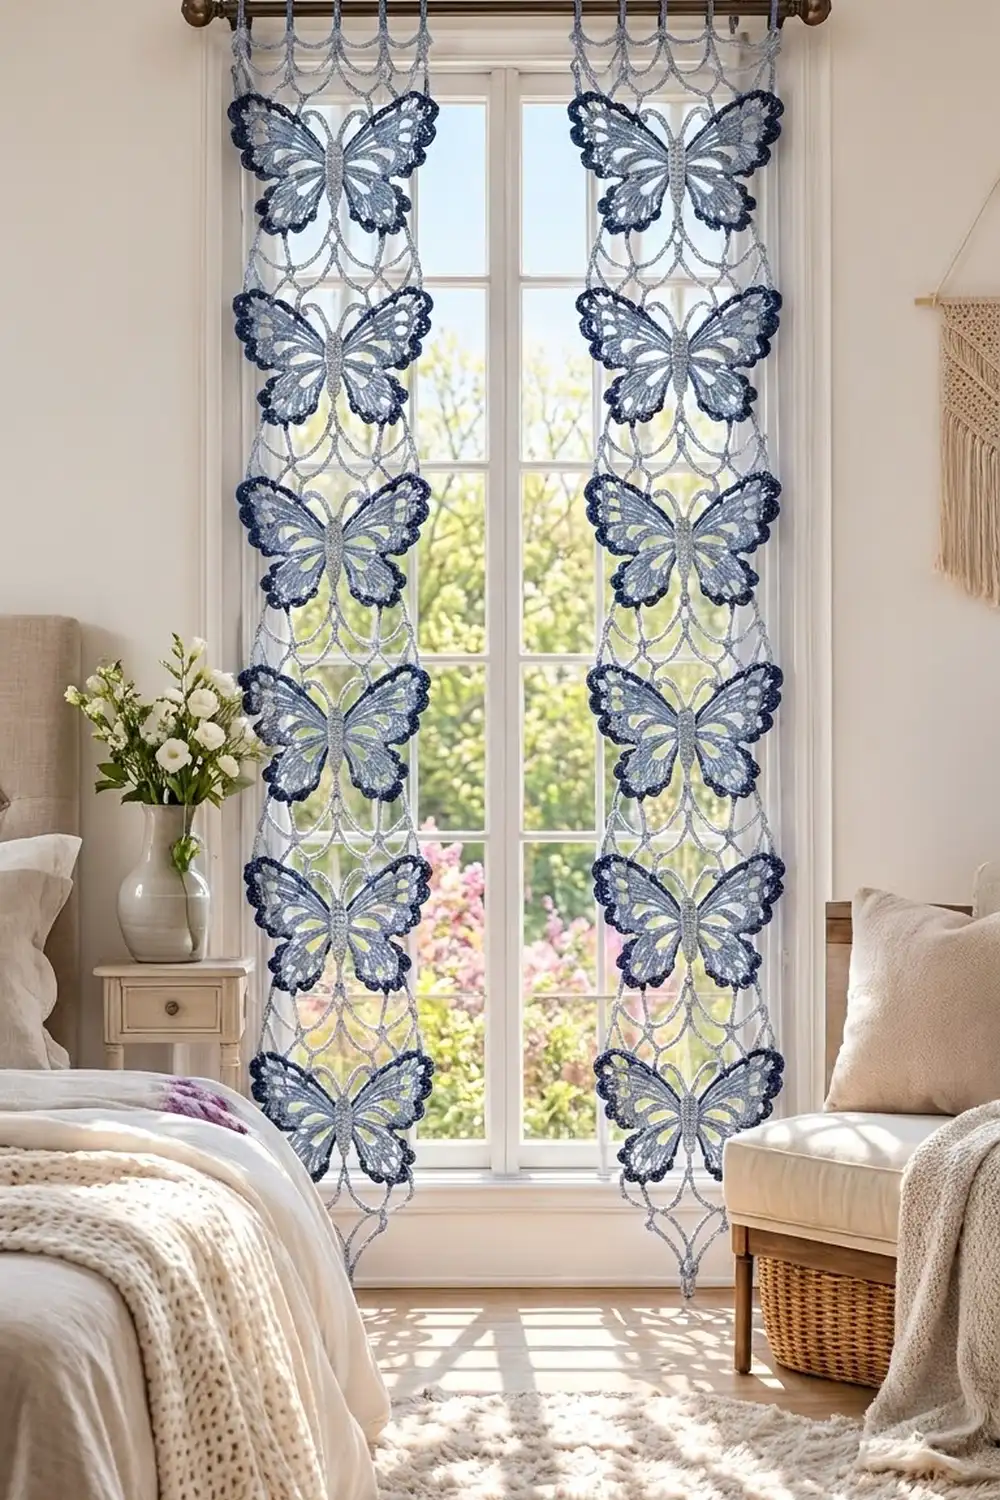
The Bluebell Butterfly panels are airy lace curtains made from a column of butterfly motifs. Each butterfly sits inside a pale chain-lace diamond, so light comes through the open frame while the wings stay crisp.
The colors are three shades of blue: pale silver-blue for the body and lace frame, powder blue for the wings, and deep navy for the scalloped picot edge. The navy edge makes each wing stand out.
This pattern uses US crochet terms. Each finished panel measures 6 in (15.2 cm) wide by 55 in (139.7 cm) long from the header bar to the bottom ring. With the hanging loops it measures 56.5 in (143.5 cm). You make two panels.
You crochet a small body, work the wings directly off its sides, add the navy edging, then build the chain lattice and tip rings. Motifs are joined ring to ring as you go, and a narrow header with hanging loops finishes each panel.
Finished Size and Construction
- Finished panel size: 6 in (15.2 cm) x 55 in (139.7 cm), plus 1.5 in (3.8 cm) loops
- Skill level: Intermediate
- Terminology: US crochet terms
- Yarn weight: Light / DK (#3) cotton
- Hook: 3.5 mm (E-4)
- Number of pieces: 10 butterfly motifs plus 2 headers
- Layout: 2 separate panels, each a single column of 5 motifs
- Single motif size: 6 in (15.2 cm) x 10.5 in (26.7 cm), ring tip to ring tip
- Panel size before border: 6 in (15.2 cm) x 52.5 in (133.4 cm)
- Border (header) depth: 2.5 in (6.4 cm), plus 1.5 in (3.8 cm) loops
Materials
Choose a smooth DK cotton or cotton blend, about 120 m per 50 g. Cotton keeps the open chains straight and sags less than acrylic, which matters for a hanging piece.
- Color A, pale silver-blue (body, antennae, lattice, header): 45 g, about 108 m
- Color B, powder blue (wings): 70 g, about 168 m
- Color C, navy (wing edging): 30 g, about 72 m
These amounts cover both panels and include a margin of about 15 percent for gauge differences and swatching.
Tools:
- 3.5 mm (E-4) crochet hook
- Tapestry needle
- Locking stitch markers
- Scissors
- Blocking mats and rustproof pins
- Spray bottle or light starch
- Tape measure
Abbreviations (US Terms)
- ch – chain
- sl st – slip stitch
- sc – single crochet
- hdc – half double crochet
- dc – double crochet
- tr – treble crochet
- dtr – double treble crochet (yarn over 3 times, insert hook, pull up a loop, [yo, pull through 2 loops] 4 times)
- blo – back loop only
- sp(s) – space(s)
- st(s) – stitch(es)
- RS – right side
Special stitch – picot: ch 3, sl st in 3rd ch from hook.
Gauge and Checkpoints
Gauge: 9 sc = 2 in (5.1 cm) and 9 ch = 2 in (5.1 cm) with a 3.5 mm hook.
Make one complete motif first and use it as your gauge swatch. Check these measurements as you go:
- Body: 1.75 in (4.4 cm) long x 0.5 in (1.3 cm) wide
- Wingspan before navy edging: 5.25 in (13.3 cm)
- Wingspan after navy edging: 6 in (15.2 cm); butterfly height 4 in (10.2 cm)
- Tip rings: 0.6 in (1.5 cm) across
- Finished motif: 6 in (15.2 cm) x 10.5 in (26.7 cm), lightly blocked
If your motif is too large, change to a 3.25 mm hook. If it is too small, change to a 3.75 mm hook. If only the lattice is off, adjust your chain tension and keep the same hook. Loose chains are the most common cause of a long, droopy motif.
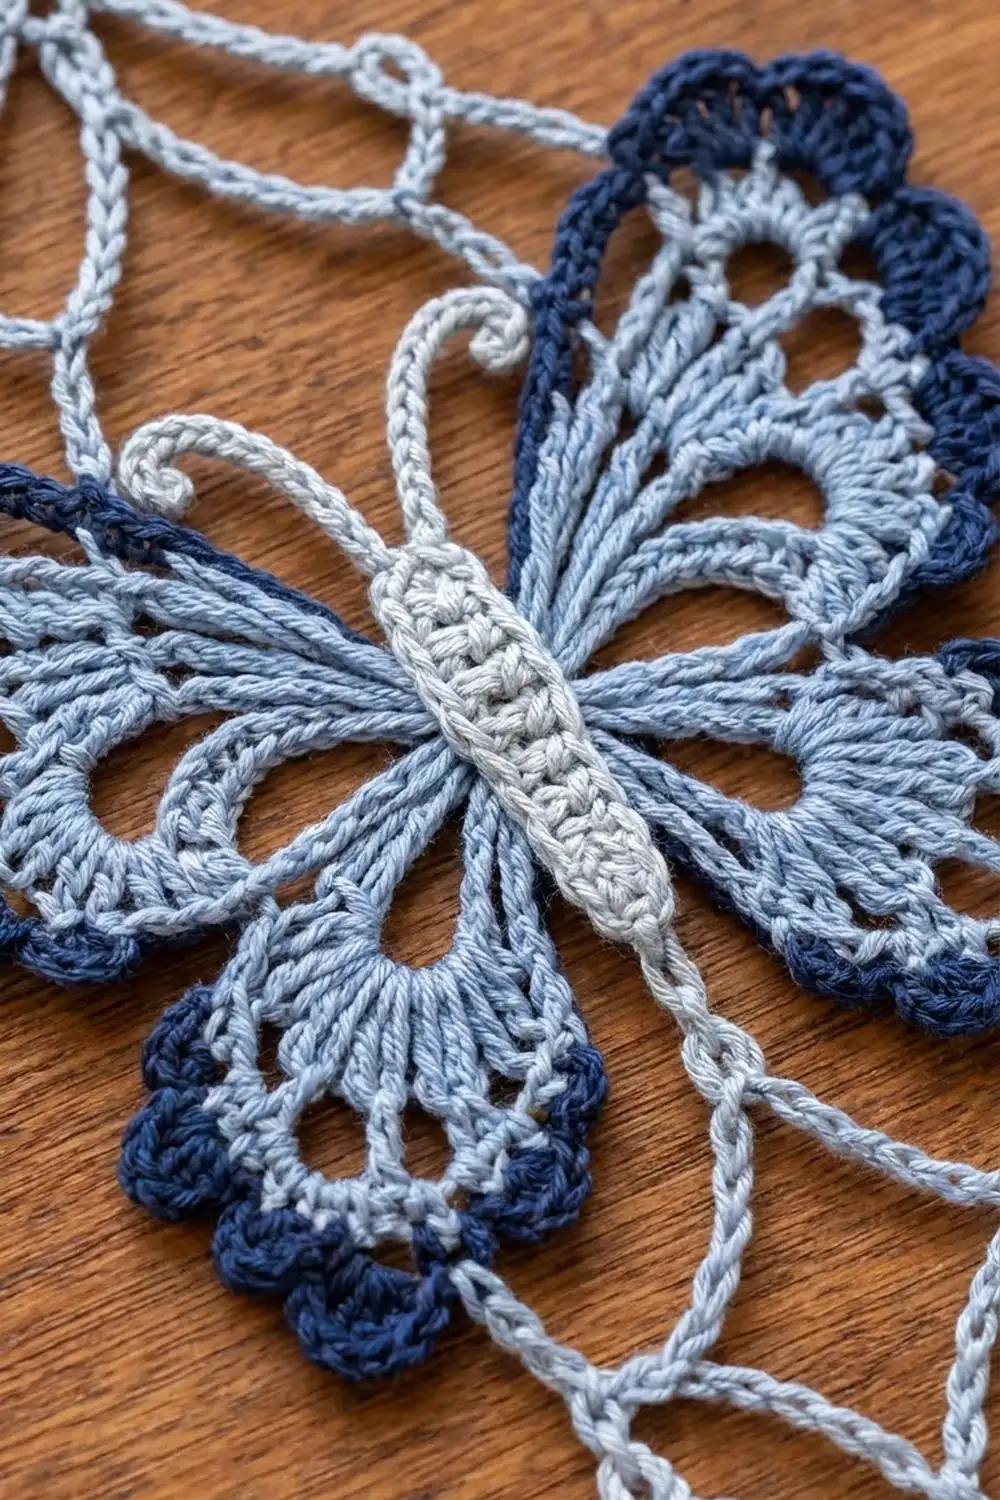
Butterfly Motif (make 10)
Body (Color A)
Ch 10.
Rnd 1: 2 sc in 2nd ch from hook, sc in next 7 ch, 3 sc in last ch. Working along the other side of the foundation, sc in next 7 ch, then sc in the same ch as the first 2 sc. Sl st to first sc. (20 sc: 7 on each long side, 3 at each end)
Rnd 2: Ch 1, sc blo in each st around; sl st to first sc. (20 sc)
Working in the back loops leaves a ridge that gives the body its segmented look. Each long side still has 7 sts and each end has 3. Mark the center st of the top end (head) and the center st of the bottom end (tail).
Antennae (Color A)
Join A with sl st in the first st of the top end.
Ch 13, 3 sc in 2nd ch from hook, 3 sc in each of next 2 ch, sl st in each of remaining 9 ch. The 9 crowded sc twist into a tight curl. Sl st into the same body st and fasten off.
Repeat in the third st of the top end, so one antenna sits on each side of the marked center st.
Upper Wings (Color B)
Number the 7 sts on each long side from the head end, 1 through 7. The upper wings use sts 1–4.
Row 1: Join B in st 1, ch 3 (counts as dc), dc in same st, 2 dc in each of next 3 sts, turn. (8 dc)
Row 2: Ch 4 (counts as tr), ch 2, tr in next dc; rep from * across, turn. (8 tr, 7 ch-2 sps)*
Row 3: Ch 5 (counts as dtr), ch 3, dtr in next tr; rep from * across, working last dtr in top of turning ch, turn. (8 dtr, 7 ch-3 sps)*
Row 4: Ch 1, sc in first dtr, 5 dc in next ch-3 sp, sc in next dtr; rep from * across, working last sc in top of turning ch. (7 shells: 35 dc + 8 sc = 43 sts)* Fasten off.
The tall stitches of Rows 2 and 3 form the wing veins, and the spaces between them stay open as eyelets. Repeat on the other long side, again counting from the head end so the two wings match.
Lower Wings (Color B)
The lower wings use sts 5–7 of each long side.
Row 1: Join B in st 5, ch 3 (counts as dc), dc in same st, 2 dc in each of next 2 sts, turn. (6 dc)
Row 2: Ch 4 (counts as tr), ch 2, tr in next dc; rep from * across, turn. (6 tr, 5 ch-2 sps)*
Row 3: Ch 1, sc in first tr, 5 dc in next ch-2 sp, sc in next tr; rep from * across, working last sc in top of turning ch. (5 shells: 25 dc + 6 sc = 31 sts)* Fasten off.
Repeat on the other side. The lower wing has no dtr row, so it is shorter and angles downward.
Navy Wing Edging (Color C)
Upper wing edge: With RS facing, join C with sc in the first sc of Row 4. *Sc in next dc, hdc in next dc, (dc, picot, dc) in next dc, hdc in next dc, sc in next dc, sc in next sc; rep from * 6 more times. Fasten off.
Count: 43 sts worked 1 per st + 7 extra (the second dc in each shell’s center st) = 50 sts and 7 picots.
Lower wing edge: Work the same way across Row 3 of each lower wing.
Count: 31 sts worked 1 per st + 5 extra = 36 sts and 5 picots.
Weave the C tails into the navy edge. Checkpoint: the wingspan is now 6 in (15.2 cm).
Picot numbering for the lattice: On each upper wing, picot 1 is nearest the head and picot 7 is next to the lower wing. On each lower wing, picot 1 is nearest the upper wing and picot 5 is nearest the tail.
Top Lattice and Tip Ring (Color A)
- With RS facing, join A with sc in picot 2 of the right upper wing.
- Ch 16 for the right outer leg.
- Ch 8, sl st in 8th ch from hook to form the ring. Work 12 sc into the ring; do not join. The 7th sc sits at the very tip; mark it as the tip stitch.
- Ch 16 for the left outer leg, sc in picot 2 of the left upper wing.
- Working back up the left leg, sl st in each of the first 7 ch.
- Ch 10, sc in the marked center st at the head.
- Ch 10, sl st in the 7th ch of the right outer leg, counting from the right wing. Fasten off.
The outer legs form the top of the large diamond. The two 10-ch inner lines meet at the head to make the smaller diamond inside it. Checkpoint: from the top of the wings to the ring tip measures 3.25 in (8.3 cm).
Bottom Lattice and Tip Ring (Color A)
Work the same as the top lattice, with these changes: start in picot 4 of the right lower wing, make each outer leg ch 15, anchor the left leg in picot 4 of the left lower wing, and anchor the inner 10-ch lines in the marked center st at the tail.
Checkpoint: from the bottom of the lower wings to the ring tip measures 3.25 in (8.3 cm). Motif height: 3.25 + 4 + 3.25 = 10.5 in (26.7 cm).
Make All Pieces
Make 10 complete motifs, 5 for each panel.
- Color A: 10 bodies, 20 antennae, 10 top lattices, 10 bottom lattices, 2 headers
- Color B: 20 upper wings, 20 lower wings
- Color C: 20 upper wing edges, 20 lower wing edges
Layout (two separate panels, not joined to each other):
Panel 1     Panel 2
[Header]    [Header]
[ M1 ]      [ M1 ]
[ M2 ]      [ M2 ]
[ M3 ]      [ M3 ]
[ M4 ]      [ M4 ]
[ M5 ]      [ M5 ]
Joining
Join the motifs as you go, at the tip rings only. Finish Motif 1 completely. For Motifs 2–5, follow the top lattice steps but replace step 3 with this:
Ch 8, sl st in 8th ch from hook to form the ring, 6 sc in ring, sl st in the tip stitch (7th sc) of the previous motif’s bottom ring, 6 sc in ring. Continue with step 4.
Stitch-to-stitch logic: Each ring still has 12 sc. One sl st links the two tip stitches, so the rings meet point to point without overlapping. The join does not change the motif’s height.
Tension: Keep the joining sl st snug but not tight. A tight join pulls the rings into ovals; a loose one lets the motifs twist.
Size checkpoint: 5 motifs x 10.5 in (26.7 cm) = 52.5 in (133.4 cm) per panel before the header. The width stays at 6 in (15.2 cm).
Border: Hanging Header
The border is a header across the top of each panel. The sides stay as open lace.
Border gauge: 9 sc = 2 in (5.1 cm), the same as the motif gauge.
Row 1: With A, ch 28. Sc in 2nd ch from hook and in each ch across, turn. (27 sc)
Row 2 (loops): Ch 1, sc in first 2 sts, (sc, ch 14, sc) in next st, sc in next 6 sts, (sc, ch 14, sc) in next st, sc in next 7 sts, (sc, ch 14, sc) in next st, sc in next 6 sts, (sc, ch 14, sc) in next st, sc in last 2 sts. Fasten off.
Count: 27 sts worked 1 per st + 4 extra sc = 31 sc and 4 ch-14 loops.
Row 3 (drop chains): Turn the bar to work along the 27 free loops of the foundation chain, numbered 1 to 27 from right to left. Join A with sc in loop 1. Ch 16, sl st in the tip stitch of Motif 1’s top ring. Ch 9, sc in loop 14. Ch 9, sl st in the same tip stitch. Ch 16, sc in loop 27. Fasten off.
Why the math works: The top edge spans one motif, which is 6 in (15.2 cm) wide. At 4.5 sc per inch, 1 motif x 27 sts = 27 sts = 6 in (15.2 cm), so the bar lines up with the wing tips. Loop 14 is the exact center, with 13 loops on each side, so the center drops hang straight. The 9-ch drops cover the 2 in (5.1 cm) gap under the bar. Each 16-ch side chain covers about 3.6 in (9.1 cm), the diagonal distance from the end of the bar to the ring.
Header depth: 0.5 in (1.3 cm) bar + 2 in (5.1 cm) drop = 2.5 in (6.4 cm). Panel length: 52.5 + 2.5 = 55 in (139.7 cm). The loops add 1.5 in (3.8 cm) and fit rods up to 0.75 in (1.9 cm) in diameter.
Final Blocking
- Weave in all remaining ends, splitting the plies so they stay put.
- Soak one panel in cool water for 10 minutes, then roll it in a towel to remove water. Do not wring.
- Lay the panel on the mats and pin each tip ring along a straight center line.
- Pin the header bar straight and at a right angle to that line.
- Pin the upper wings at picots 1, 4 and 7 and the lower wings at picots 1, 3 and 5, so the wingspan measures 6 in (15.2 cm).
- Pull each lattice chain straight and pin it at the middle of each leg.
- Check that each motif measures 10.5 in (26.7 cm) tip to tip. For crisper chains, mist with light starch.
- Let the panel dry completely, then unpin. Repeat for the second panel.
Final Quality-Control Checklist
- Each body has 20 sc with clear back-loop ridges.
- Each upper wing edge has 7 picots; each lower wing edge has 5.
- The antennae curl evenly on both sides of the head.
- Every ring has 12 sc and is joined at the tip stitch only.
- Each panel has 5 motifs and measures 6 in x 55 in (15.2 cm x 139.7 cm).
- Each header has 31 sc and 4 evenly spaced loops.
- All ends are woven in and hidden on both sides.
Troubleshooting
Wings cup or ruffle: Recount the ch-3 spaces in Row 3 and make sure Row 4 has exactly 5 dc in each space.
Wings don’t match: The side sts were counted from different ends. Recount from the head end on both sides.
Panel is too long: The chains are loose. Block it shorter, or rework the legs with one fewer chain.
Motifs twist when hanging: The ring joins are loose. Redo them more snugly.
Header pulls into a V: The Row 3 chains are too short. Add one chain to each 16-ch side chain.
Care
Hand wash in cool water with mild soap, then dry flat with the tip rings pinned in a straight line. Don’t hang the panels while they are wet, because the chains will stretch.
Final Notes
Here is how the measurements build: a gauge of 9 sc = 2 in (5.1 cm) gives a 6 in (15.2 cm) wingspan and a 10.5 in (26.7 cm) motif. Five motifs joined tip to tip make 52.5 in (133.4 cm). The 2.5 in (6.4 cm) header brings each panel to 55 in (139.7 cm), plus 1.5 in (3.8 cm) loops. If your first motif measures correctly, the rest of the panels will too.
Happy crocheting!