
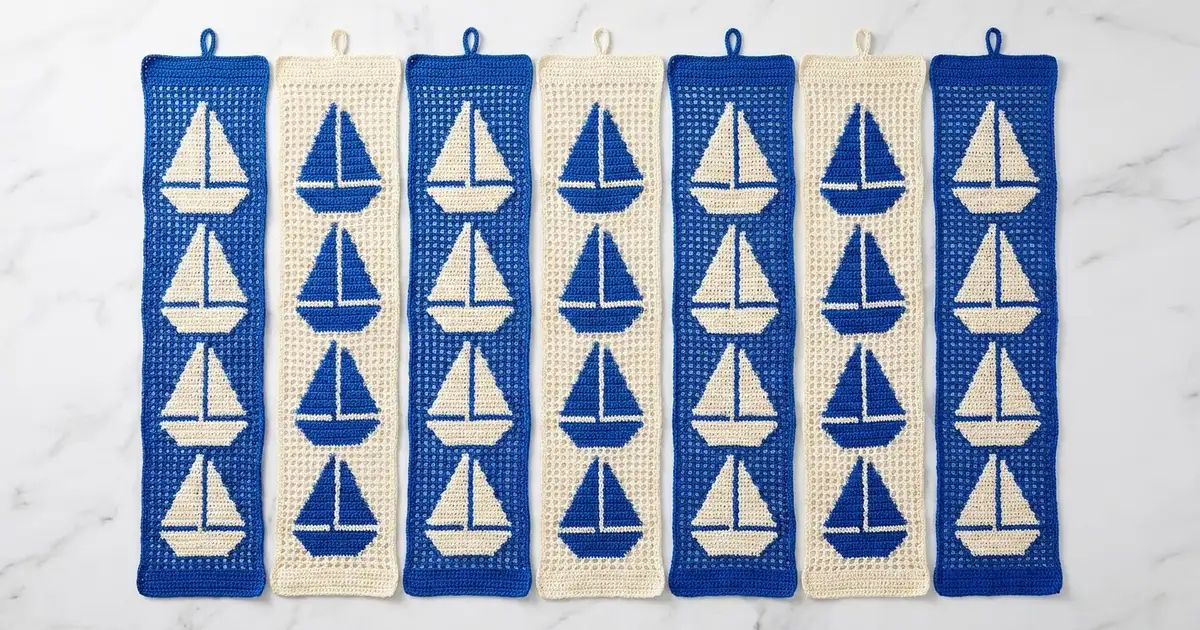
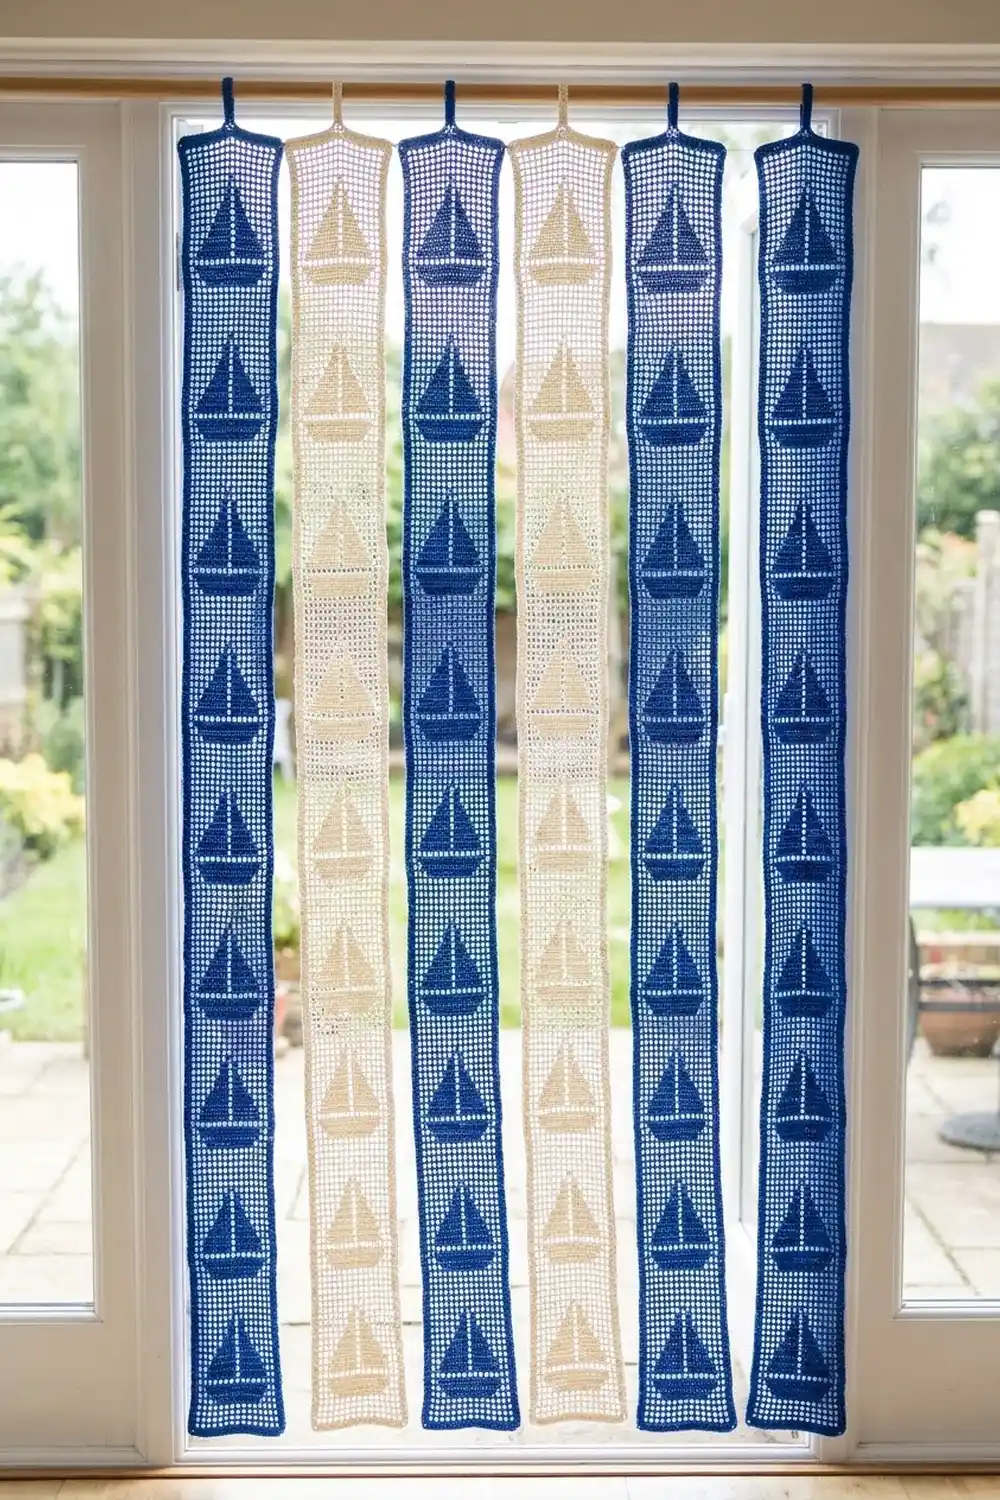
The Harbor Sails curtain is a set of seven long filet crochet strips. Each strip shows a column of little sailboats in solid blocks against an open mesh background. The strips alternate royal blue and cream and hang separately from a rod, so light comes through the mesh and the strips sway when you walk through.
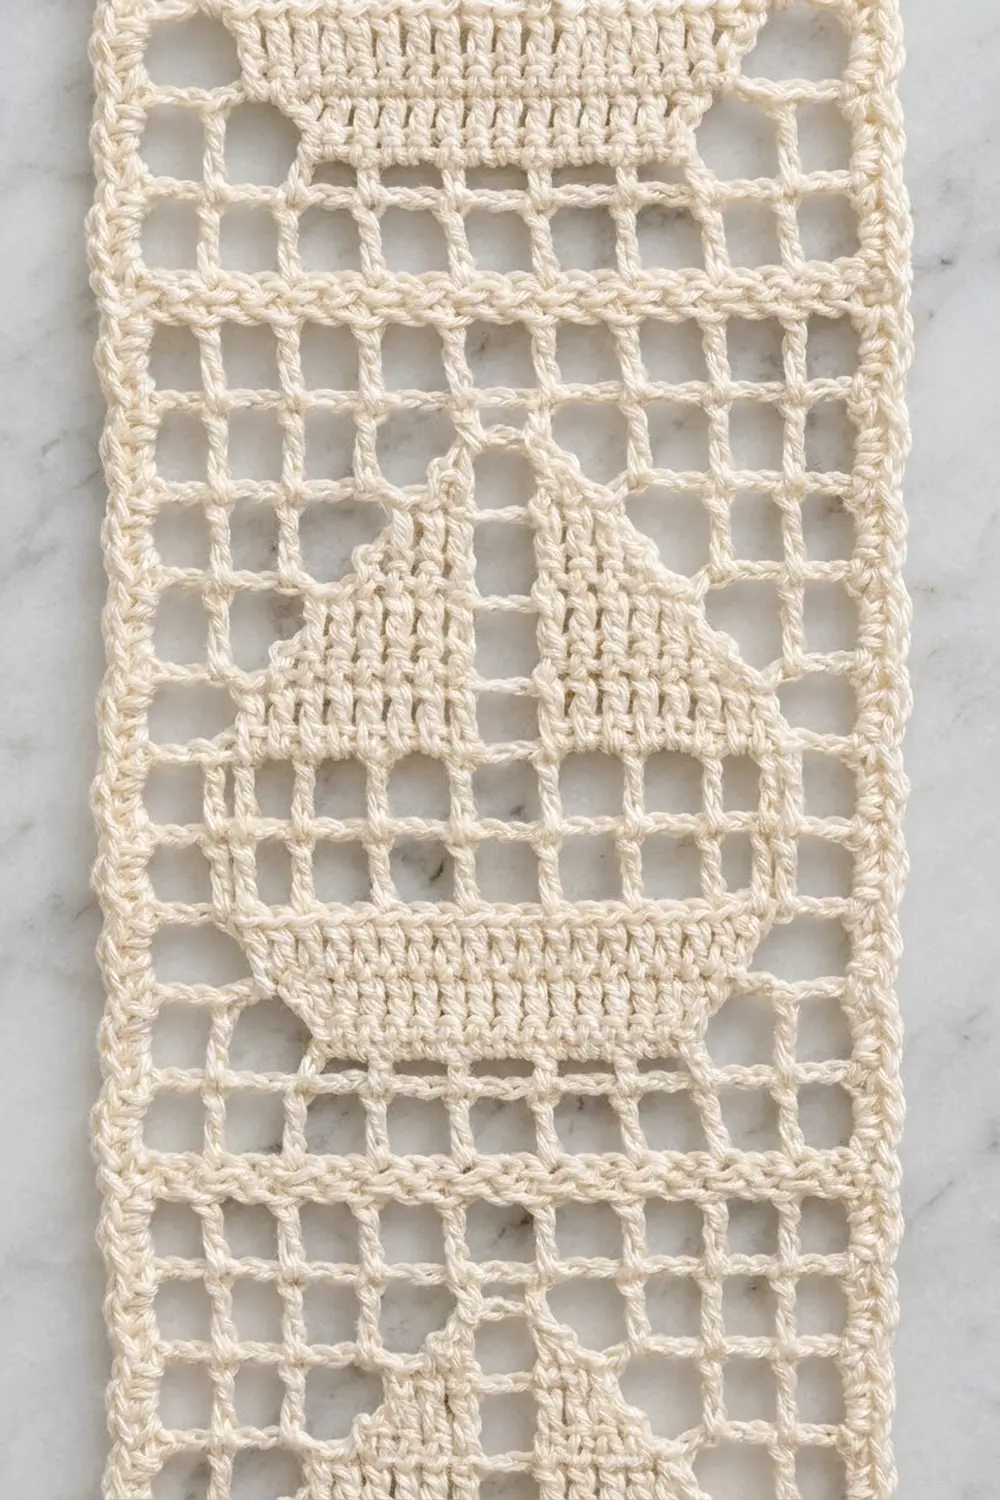
The look is crisp and nautical without being busy. Every sailboat has a wide hull, a short mast, and two triangular sails with a narrow open gap between them that reads as the mast line. Solid double-crochet rows separate the boats, so each strip looks like a stack of little framed pictures.
This pattern uses US crochet terms. Each finished strip measures 7.0 in (17.8 cm) wide by 73.0 in (185.4 cm) long, plus a 2.0 in (5.1 cm) hanging loop. Hung edge to edge, the seven strips span 49.0 in (124.5 cm).
Each strip is worked flat from the bottom up in rows of filet mesh and blocks. When the body is done, a single round of single crochet neatens all four edges, and a reinforced chain loop is added at the top center for hanging. The strips are not sewn together.
Finished Size and Construction
- Finished strip size: 7.0 × 73.0 in (17.8 × 185.4 cm), plus a 2.0 in (5.1 cm) loop
- Skill level: Easy intermediate (filet mesh and blocks)
- Terminology: US crochet terms
- Yarn weight: DK / light (#3) cotton
- Hook: 4.0 mm (US G-6)
- Number of pieces: 7 strips (4 blue, 3 cream)
- Layout: 7 strips side by side on one rod, not joined
- Strip size before border: 6.6 × 72.6 in (16.8 × 184.4 cm)
- Border depth: 0.2 in (0.5 cm) on every edge
- Grid per strip: 11 squares wide × 121 rows tall
Materials
Choose a smooth mercerized or combed cotton in DK weight. Cotton gives sharp mesh and blocks, and it doesn’t fuzz in a doorway. Avoid stretchy acrylic: long strips of it can grow under their own weight.
- Royal blue: 300 g / 690 m (6 balls of 50 g / 115 m), enough for 4 strips
- Cream: 250 g / 575 m (5 balls of 50 g / 115 m), enough for 3 strips
One strip uses about 60 g / 140 m. These quantities include a margin for your gauge swatch and small tension differences.
Tools:
- 4.0 mm (US G-6) crochet hook
- Tapestry needle
- Stitch markers
- Rust-proof pins and a long blocking surface (foam mats laid end to end)
- Measuring tape
- Spray bottle
- Curtain rod up to 1 in (2.5 cm) in diameter
Abbreviations (US Terms)
- ch – chain
- sl st – slip stitch
- sc – single crochet
- dc – double crochet
- sk – skip
- sp – space
- st(s) – stitch(es)
- RS / WS – right side / wrong side
Special stitches:
- Mesh (open square): ch 2, sk the next 2 sts (or the ch-2 sp), dc in the next dc.
- Starting a row with a mesh: ch 5 (counts as dc + ch 2), sk the next 2 sts, dc in the next dc.
- Block (filled square): dc in each of the next 3 sts. Over a ch-2 sp, work 2 dc in the sp and 1 dc in the next dc.
- Starting a row with a block: ch 3 (counts as dc), then dc in the next 3 sts.
Every row has 12 dc “posts” that frame 11 squares. Every row totals 34 sts. Each block adds 2 dc and removes one ch-2 sp, so a row with B blocks has 12 + 2B dc and 11 − B ch-2 sps.
Gauge and Checkpoints
Gauge: 10 squares wide and 10 rows tall = 6 in (15.2 cm) in filet mesh, before blocking. That makes each square 0.6 × 0.6 in (1.5 × 1.5 cm).
Test first. Make one strip’s first motif as a gauge test: work Row 1 plus one full 12-row repeat (13 rows). It should measure 6.6 in (16.8 cm) wide by 7.8 in (19.8 cm) tall. If it’s correct, keep going; the swatch becomes the bottom of your first strip.
Checkpoints:
- After Row 1: 6.6 in (16.8 cm) wide
- After Row 13: 7.8 in (19.8 cm) tall
- After Row 61 (5 repeats): 36.6 in (93.0 cm) tall
- After Row 121: 72.6 in (184.4 cm) tall
- After the border: 7.0 × 73.0 in (17.8 × 185.4 cm)
Too big? Try a 3.75 mm hook, or keep your ch-2 sps snug. Too small? Try a 4.5 mm hook, or pull up the dc loops a bit taller. Don’t change the stitch counts. A width error of 0.2 in (0.5 cm) or less can be fixed in blocking.
Strip Pattern (make 7)
Work each strip in a single color. Odd rows are RS rows and even rows are WS rows. All row instructions below are written in working order, so you can follow them exactly as printed without reversing anything.
Foundation
Ch 36.
Row 1 (RS): Dc in the 4th ch from the hook (the skipped 3 ch count as a dc) and in each ch across. Turn. (34 dc)
This solid row forms the bottom band.
Sailboat Repeat (Rows 2–13)
Work the next 12 rows, then repeat them 9 more times. Each repeat ends with a solid divider row.
Row 2 (WS): Mesh 11. Turn. (12 dc, 11 ch-2 sps)
Row 3 (RS), hull base: Mesh 3, block 5, mesh 3. Turn. (22 dc, 6 ch-2 sps)
Row 4 (WS), hull: Mesh 2, block 7, mesh 2. Turn. (26 dc, 4 ch-2 sps)
Row 5 (RS), hull top: Mesh 1, block 9, mesh 1. Turn. (30 dc, 2 ch-2 sps)
The hull gets wider at each step, so its top edge is 9 squares wide over a 5-square base.
Row 6 (WS), mast: Mesh 5, block 1, mesh 5. Turn. (14 dc, 10 ch-2 sps)
Row 7 (RS), sails begin: Mesh 2, block 3, mesh 1, block 4, mesh 1. Turn. (26 dc, 4 ch-2 sps)
Because RS rows are worked right to left, this places the 4-block left sail and the 3-block right sail on either side of an open mast square in the 6th column.
Row 8 (WS): Mesh 2, block 3, mesh 1, block 2, mesh 3. Turn. (22 dc, 6 ch-2 sps)
Row 9 (RS): Mesh 4, block 1, mesh 1, block 2, mesh 3. Turn. (18 dc, 8 ch-2 sps)
Row 10 (WS): Mesh 4, block 1, mesh 6. Turn. (14 dc, 10 ch-2 sps)
The right sail ends here. The left sail has one last block in the 5th column.
Row 11 (RS), mast tip: Mesh 5, block 1, mesh 5. Turn. (14 dc, 10 ch-2 sps)
Row 12 (WS): Mesh 11. Turn. (12 dc, 11 ch-2 sps)
Row 13 (RS), divider: Block 11. Turn. (34 dc)
From the right side, the left sail steps 4-3-2-1 squares wide and the right sail steps 3-2-1. The open mast square stays in the center column (column 6) through the sail rows.
Complete the Strip
Rows 14–121: Repeat Rows 2–13 nine more times, for 10 sailboats in total.
Row 121 is the last divider row. It’s a RS row of 34 dc and forms the top band. Do not fasten off. The strip now measures 6.6 × 72.6 in (16.8 × 184.4 cm).
Each 12-row repeat measures 7.2 in (18.3 cm). Ten repeats (120 rows) plus Row 1 gives 121 rows × 0.6 in = 72.6 in.
Make All Pieces
Make 7 identical strips:
- Royal blue: 4 strips
- Cream: 3 strips
Hanging order on the rod, left to right:
| B | C | B | C | B | C | B |
B = blue strip   C = cream strip
Finish each strip completely, including the border, hanging loop and blocking, before starting the next one. That way you can compare each strip with the first one.
Joining
The strips are not seamed together. They’re joined only by sharing a rod, so each one moves on its own and you can walk between them.
- Thread the strips onto the rod in the B-C-B-C-B-C-B order, with the RS facing into the room.
- Every strip has the same 34-st width and the same 121 rows, so all the bottom edges line up without any adjustment.
- Hanging edge to edge, the seven strips span 7 × 7.0 in = 49.0 in (124.5 cm). If your opening is wider, slide the loops apart to leave even gaps.
- Size checkpoint: Before you hang anything, lay all seven strips side by side. Their lengths should match within 0.4 in (1.0 cm). If one strip is longer, re-block it shorter before hanging.
Border
Work this border on each strip in the strip’s own color.
Border gauge: 5 sc per inch (2.5 cm) on every edge.
Round 1 (RS): Ch 1. Do not turn.
- Work 3 sc in the top of the last dc made. This is the top-left corner.
- Rotate the strip and work 3 sc in each row-end down the left side. (363 sc)
- Work 3 sc in the free loop of the foundation chain at the bottom-left corner.
- Sc in each of the next 32 free loops along the bottom edge. (32 sc)
- Work 3 sc in the bottom-right corner ch.
- Work 3 sc in each row-end up the right side. (363 sc)
- Work 3 sc in the top of the turning ch-3 at the top-right corner.
- Along the top edge, sc in each of the next 16 dc, ch 20, then sc in each of the next 16 dc. (32 sc)
- Sl st to the first sc. Fasten off.
Count: (2 long sides × 363) + (2 short sides × 32) + (4 corners × 3) = 726 + 64 + 12 = 802 sc. The ch-20 loop is not included in that count.
Why the math works: Each long side has 121 rows of 0.6 in, or 72.6 in. Three sc per row-end gives 363 sc ÷ 72.6 in = exactly 5 sc per inch. Each short side has 34 sts across 6.6 in. The 2 corner sts take the 3-sc corner groups, which leaves 32 sc between them, and 34 working positions ÷ 6.6 in comes to about 5 per inch. Because the density is the same on every edge, the border lies flat without ruffling or cupping, and each sc round adds 0.2 in (0.5 cm) per edge.
Hanging loop reinforcement: Join yarn at the base of the ch-20. Work 22 sc into the ch-20 loop, then sl st to the border at the other base. Fasten off.
The loop hangs 2.0 in (5.1 cm) tall and fits rods up to 1 in (2.5 cm) in diameter. Weave in all ends along solid blocks or divider rows, not across open mesh.
Final Blocking
- Soak the strip in cool water for 10 minutes. Gently press out the water; don’t wring it.
- Roll it in a towel to remove the excess moisture.
- Lay it flat on the mats, RS up.
- Pin the four corners to 7.0 × 73.0 in (17.8 × 185.4 cm).
- Pin along both long sides every 4 in (10.2 cm), keeping the edges straight.
- Square up the mesh, running a finger down each dc column so the columns are vertical.
- Make sure the mast gap and the triangle sails look crisp.
- Let the strip dry completely, then unpin it.
Final Quality-Control Checklist
- [ ] Every row has 34 sts and 11 squares.
- [ ] There are 10 sailboats, each followed by a solid divider row.
- [ ] Each hull is 5, then 7, then 9 blocks wide, wider at the top.
- [ ] The left sail steps 4-3-2-1 and the right sail steps 3-2-1.
- [ ] The open mast square sits in column 6 of every sail row.
- [ ] The border totals 802 sc, with 3 sc at each corner.
- [ ] The loop is centered, with 16 sc on each side of it.
- [ ] The strip measures 7.0 × 73.0 in (17.8 × 185.4 cm).
- [ ] You have 4 blue strips and 3 cream strips, all the same length.
Troubleshooting
Squares are taller than they are wide: Your dc is loose. Shorten the yarn-over pull-through, or go down a hook size.
The sails point the wrong way: You worked an RS row from the opposite end. Follow the row instructions exactly as written; don’t reverse them.
The edges wave: You may have worked 2 sc into some row-ends. Keep it to exactly 3 sc per row-end.
The strip stretches when hung: Cotton relaxes over time. Re-block it slightly shorter, or swap to a firmer mercerized cotton.
The loop is too tight for your rod: Rework it with ch 24 and 26 sc.
Care
Hand wash in cool water with mild detergent and dry flat. Re-block now and then to keep the strips straight and the same length.
Final Notes
The measurement chain is simple. Each 0.6 in (1.5 cm) square gives an 11-square strip of 6.6 in (16.8 cm), and 121 rows give 72.6 in (184.4 cm). One sc round adds 0.2 in (0.5 cm) per edge, for a finished size of 7.0 × 73.0 in (17.8 × 185.4 cm). Seven strips hung side by side span 49.0 in (124.5 cm).
Check your gauge on the first motif and count your blocks on every row. If the first strip comes out right, the other six should match it.
Happy crocheting!