

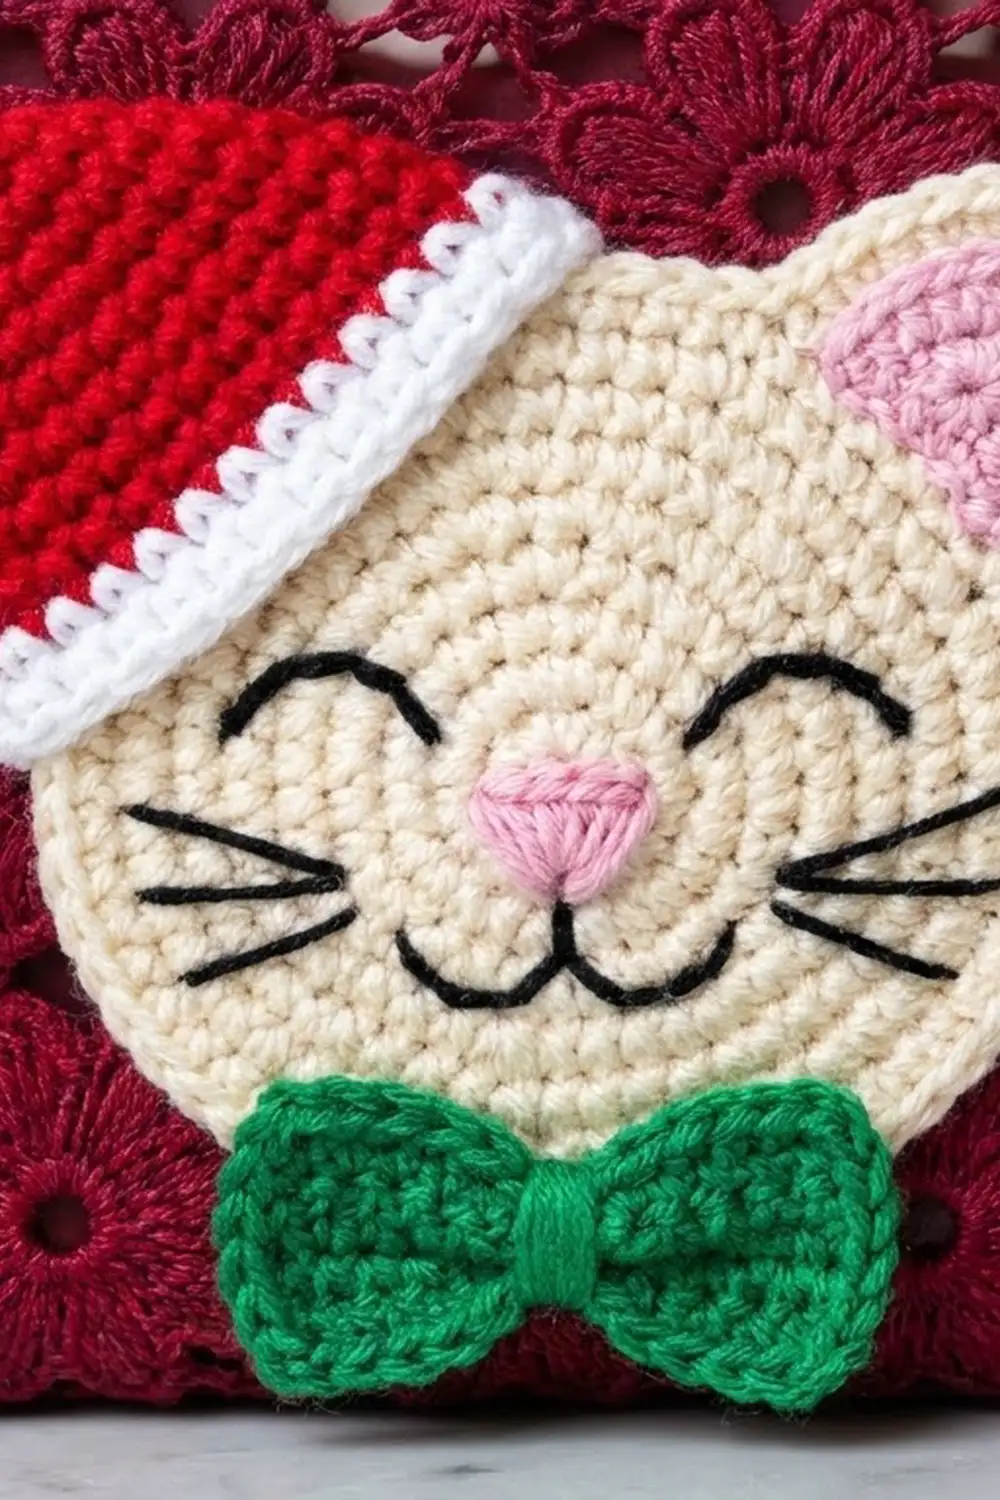
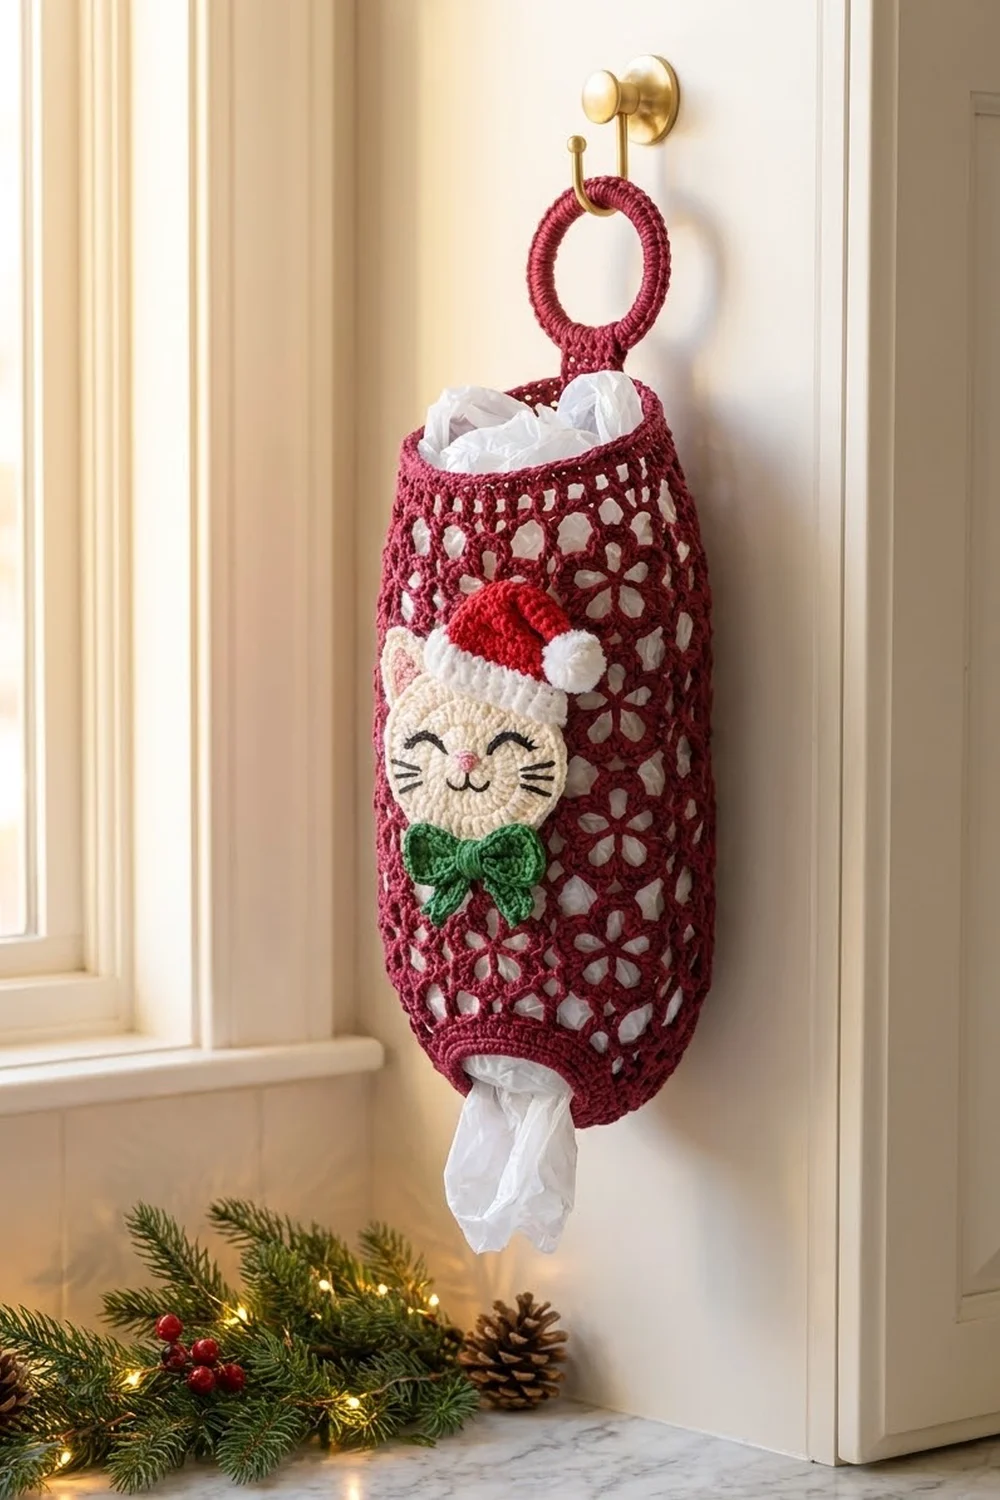
This cheerful bag holder turns a pile of plastic grocery bags into a small holiday decoration. The body is a burgundy tube of flower lace, so you can see the bags through it. A cream kitty in a Santa hat and a green bow sits on the front.
The palette is cranberry burgundy, cream, bright red, white and green, with small accents of pink and black embroidery. The style is cozy and a little whimsical, and the lace still looks tidy enough for a kitchen.
The pattern uses US crochet terms. The finished holder is about 7 in (17.8 cm) wide when flattened and 14 in (35.6 cm) long. With the strap and ring it hangs about 18 in (45.7 cm).
You work the body bottom-up as a single seamless tube: a solid band for the dispensing opening, seven bands of flower lace, then a solid top rim. A crochet-covered ring and strap form the hanger. The three appliqués are made separately and sewn on in layers.
Finished Size and Construction
- Finished size: 7 in (17.8 cm) wide flat × 14 in (35.6 cm) long body; about 18 in (45.7 cm) total with the hanger
- Skill level: Intermediate
- Terminology: US
- Yarn weight: Worsted (#4), cotton
- Hook: 4.0 mm (G-6) for the body; 3.5 mm (E-4) for the appliqués
- Number of pieces: 1 body (tube) + 1 covered ring + 4 appliqué parts (face, hat, pompom, bow set)
- Layout: Single tube; the appliqué stack is centered on the front
- Piece size: Tube is 64 stitches around (32 per flattened side)
- Size before border: 7 in (17.8 cm) × 13.4 in (34.0 cm)
- Border depth: Top rim is 0.6 in (1.5 cm); the bottom edge is a flat slip-stitch round
Materials
Use a smooth 100% cotton worsted yarn. Cotton holds its shape when the holder is stuffed with bags, and it washes well. Acrylic also works, but it stretches more over time.
- Burgundy (body, ring, strap): 120 g / 190 m
- Cream (cat face): 15 g / 24 m
- Bright red (hat): 10 g / 16 m
- Green (bow): 8 g / 13 m
- White (hat brim, pompom): 5 g / 8 m
- Black and pink: about 2 m each of embroidery floss or fingering-weight scraps
Tools:
- 4.0 mm (G-6) and 3.5 mm (E-4) hooks
- One 2.5 in (6.4 cm) metal or plastic ring
- Tapestry needle and embroidery needle
- 4 stitch markers
- Tape measure, blocking pins, spray bottle
- Thin cardboard, about 6 × 10 in (15.2 × 25.4 cm), to slip inside while sewing
These quantities include a margin of about 15% for swatching and tails.
Abbreviations (US Terms)
- ch – chain
- sl st – slip stitch
- sc – single crochet
- hdc – half double crochet
- dc – double crochet
- tr – treble crochet
- sc2tog / sc3tog – single crochet 2 (or 3) together
- sp – space
- MR – magic ring
- cl (3-dc cluster): yo, insert hook in the stated place, pull up a loop, yo, draw through 2 loops; repeat from * 2 more times in the same place, then yo and draw through all 4 loops.
- Fan: [cl, ch 3, cl, ch 3, cl] in the same loop.
- CJ (closing join): yo, insert in the first ch-3 sp of the fan, pull up a loop, yo, draw through 2. Yo, insert in the top of the center cl, pull up a loop, yo, draw through 2. Yo, insert in the second ch-3 sp of the fan, pull up a loop, yo, draw through 2. Yo and draw through all 4 loops. The CJ pulls the fan closed at the top, which turns it into a flower with an open center.
Gauge and Checkpoints
Gauge: 18 sc and 20 rounds = 4 in (10.2 cm) with the 4.0 mm hook. One flower band (3 rounds) = 1.7 in (4.3 cm) tall.
Work Rounds 1–5 first as your test piece. When flattened, the 48-sc band should measure about 5.25 in (13.3 cm) wide. After Round 5 (64 sc), the top edge should flatten to about 7 in (17.8 cm).
Height checkpoints (measure from the bottom edge):
- After Round 5: 1 in (2.5 cm)
- After Round 6: 1.5 in (3.8 cm)
- After Round 9 (band 1): 3.2 in (8.1 cm)
- After Round 18 (band 4): 8.3 in (21.1 cm)
- After Round 27 (band 7): 13.4 in (34.0 cm)
- After Round 30: 14 in (35.6 cm)
If your band is wider than 5.5 in (14.0 cm), go down half a hook size. If it is narrower than 5 in (12.7 cm), go up half a size. Keep the stitch counts the same and change only the hook.
Body
With burgundy and the 4.0 mm hook, ch 48. Join with a sl st to the first ch to form a ring, without twisting.
Bottom Band
Rnd 1: Ch 1, sc in each ch around, join with sl st to first sc. (48 sc)
Rnds 2–4: Ch 1, sc in each sc around, join. (48 sc)
Rnd 5 (increase): Ch 1, sc in next 2 sc, 2 sc in next sc; repeat from * 16 times total, join. (64 sc)
Rnd 6 (mesh setup): Ch 1, sc in first sc, ch 5, skip 3 sc, sc in next sc; repeat from * 14 more times, then ch 5, skip last 3 sc, join to first sc. (16 ch-5 loops, 16 sc)
Each loop plus its anchor sc uses 4 stitches, and 16 × 4 = 64.
Flower Bands (Rnds 7–27)
Each band is 3 rounds: A, B and C. Work the band 7 times in total. Band 1 is Rnds 7–9 and band 7 is Rnds 25–27.
Rnd A (fans): Sl st into the first ch-5 loop, ch 1, sc in the same loop. Ch 3, fan in next loop, ch 3, sc in next loop; repeat from * 6 more times. Ch 3, fan in last loop, ch 3, join to first sc. (8 fans = 24 cl, 8 sc)
Rnd B (close the flowers): Ch 1, sc in same st as join. Ch 4, CJ over next fan, ch 4, sc in next sc; repeat from * 6 more times. Ch 4, CJ over last fan, ch 4, join to first sc. (8 CJ, 8 sc, 16 ch-4 sps)
Rnd C (reset mesh): Sl st into the next ch-4 sp, ch 1, sc in the same sp. Ch 5, sc in next ch-4 sp; repeat from * 14 more times. Ch 5, join to first sc. (16 ch-5 loops, 16 sc)
Why the flowers stagger: In Rnd C, the odd-numbered loops sit over the flowers and the even-numbered loops sit over the sc between them. The next Rnd A anchors in loop 1 and places its fans in the even loops. Each new band’s flowers therefore land exactly halfway between the flowers below.
After Rnd 27, the piece should measure 13.4 in (34.0 cm).
Border (Top Rim and Bottom Edge)
Border gauge: 18 sc = 4 in (10.2 cm). That makes 64 sc = about 14 in (35.6 cm) around, or 7 in (17.8 cm) flat.
Rnd 28 (conversion): Ch 1, sc in each sc and 3 sc in each ch-5 loop, join. (16 sc worked 1-per-existing-sc + 48 sc added in loops = 64 sc)
Rnds 29–30: Ch 1, sc in each sc around, join. (64 sc) Fasten off.
When the tube is flattened, each side of the rim has 32 sc: 32 front + 32 back = 64.
Why the math works: Each loop-plus-anchor unit represents 4 stitches of width. Rnd 28 therefore adds back exactly 3 sc per loop, and the rim matches Rnd 5’s 64 sc, so the top neither flares nor puckers. The rim adds 0.6 in (1.5 cm) of height, bringing the body to 14 in (35.6 cm).
Bottom edge: Join burgundy in any free loop of the foundation chain. Sl st loosely in each free loop around and join. (48 sl sts) This firms up the dispensing opening without adding height.
Hanger
Covered Ring
With burgundy and the 4.0 mm hook, attach the yarn to the ring. Work 44 sc over the ring, pushing the stitches together so no ring shows, and join. (44 sc) Fasten off and weave in the ends.
Strap
Flatten the body with the side folds even. On the back, count 13 sts in from the right fold and join burgundy in the 14th st.
Row 1: Ch 1, sc in this st and the next 5. (6 sc)
Rows 2–12: Ch 1, turn, sc in each sc across. (6 sc)
This leaves 13 sts on each side of the strap: 13 + 6 + 13 = 32. The strap measures 2.4 in (6.1 cm) long and 1.3 in (3.3 cm) wide.
Pass the strap through the covered ring and fold it toward the inside of the bag. Whipstitch Row 12 to Rnd 29 on the inside. The visible tab should stand about 1 in (2.5 cm) tall.
Appliqués
Use the 3.5 mm hook for all appliqué pieces.
Cat Face (Cream)
Rnd 1: MR, ch 2 (does not count), 10 hdc in ring, join to first hdc. (10 hdc)
Rnd 2: Ch 2, 2 hdc in each st, join. (20 hdc)
Rnd 3: Ch 2, hdc in next st, 2 hdc in next; repeat around, join. (30 hdc)
Rnd 4: Ch 2, hdc in next 2 sts, 2 hdc in next; repeat around, join. (40 hdc)
Rnd 5 (edge and ears): Ch 1, sc in next 13, ear, sc in next 8, ear, sc in next 13, join. (34 sc + 2 ears; all 40 base sts used)
- Ear (worked over 3 sts): (hdc, dc) in next st; (tr, ch 3, sl st in 3rd ch from hook, tr) in next st; (dc, hdc) in next st.
Because the join falls at the bottom center, the ears sit symmetrically at the top. The face measures about 3 in (7.6 cm) wide and 3.75 in (9.5 cm) tall including the ears.
Embroidery:
- Pink: Fill each inner ear with a small satin-stitch triangle, and add a satin-stitch triangle nose in the center.
- Black: Stitch closed eyes as two downward-curving arcs with 2–3 tiny lashes each, a small “w” mouth under the nose, and three straight whiskers on each side.
Santa Hat (Red and White)
Row 1: With red, ch 16, sc in 2nd ch from hook and each ch across. (15 sc)
Even rows 2–14: Ch 1, turn, sc across.
Odd rows 3–13: Ch 1, turn, sc2tog, sc to the last 2 sts, sc2tog.
Stitch counts: Row 3 = 13, Row 5 = 11, Row 7 = 9, Row 9 = 7, Row 11 = 5, Row 13 = 3.
Row 15: Ch 1, turn, sc3tog. (1 st) Fasten off.
Brim: Join white in the first free loop of the foundation chain.
- Row 1: Ch 1, sc in each of the 15 free loops. (15 sc)
- Rows 2–3: Ch 1, turn, sc across. (15 sc) Fasten off.
Pompom (white):
- Rnd 1: MR, 6 sc.
- Rnd 2: 2 sc in each st. (12 sc)
- Rnd 3: Sc around. (12 sc)
- Rnd 4: Sc2tog 6 times. (6 sts)
Stuff the pompom with yarn ends and close it. It is about 0.9 in (2.3 cm) across.
Fold the top 1 in (2.5 cm) of the hat tip down toward one side and tack it in place so the hat curves. Sew the pompom to the tip. The hat is about 3 in (7.6 cm) wide at the brim.
Bow (Green)
Bow body: Ch 13, sc in 2nd ch from hook and each ch across. (12 sc) Rows 2–6: Ch 1, turn, sc across. (12 sc) It measures 2.5 × 1.25 in (6.4 × 3.2 cm).
Tails (make 2): Ch 9, sc in 2nd ch from hook and each ch across. (8 sc) Each tail is 1.75 in (4.4 cm) long.
Center strip: Ch 7, sc in 2nd ch from hook and each ch across. (6 sc)
To assemble the bow:
- Pinch the center of the bow body and wrap it tightly with green yarn 4–5 times.
- Lay the two tails behind the center in an inverted V.
- Wrap the center strip around everything and sew its ends together at the back.
Layering and Placement
- Sew the hat to the top of the face, tilted so it covers one ear. Let the curved tip and pompom extend past the side of the head, and leave the other ear showing.
- Sew the bow over the chin, overlapping the bottom edge of the face by 0.5 in (1.3 cm).
- Slip the cardboard inside the body. Center the stack on the front with the top of the hat 1.5 in (3.8 cm) below the rim.
- Whipstitch around the face outline, catching the lace bars and clusters underneath. Tack the bow and hat at their edges.
Final Blocking
- Weave in all ends before blocking.
- Spray the body until it is damp but not dripping.
- Stuff it firmly with a rolled towel until it lies 7 in (17.8 cm) wide flat.
- Gently open each flower center with your fingertips so the petals spread evenly.
- Pin the rim and bottom band straight, and check the 14 in (35.6 cm) length.
- Let it dry fully, then remove the towel.
- Before sewing them on, block the appliqués flat with pins and a light mist of water. Shape the ears to points and the bow loops to an even width.
Final Quality-Control Checklist
- Stitch counts: Rnd 5 has 64 sc, every Rnd C has 16 loops, and Rnd 28 has 64 sc.
- The flowers stagger evenly in all 7 bands, with no spiral drift.
- The flattened width is 7 in (17.8 cm) at the body and 5.25 in (13.3 cm) at the bottom band.
- The body is 14 in (35.6 cm) long and the total hanging length is about 18 in (45.7 cm).
- The strap is centered on the back, with 13 sts on each side.
- The ring is fully covered by 44 sc.
- The appliqué stitching went through the front layer only.
- The embroidery is symmetrical.
Troubleshooting
- Flowers drift diagonally: You placed a fan in the wrong loop. In every Rnd A, the fans must go into the loops that sit over the sc of the previous Rnd B.
- Top rim ruffles: You worked 4 sc into the loops. Use exactly 3 per loop.
- Bottom opening too loose: Work the slip-stitch edge more firmly, or use a 3.5 mm hook for Rnds 1–4.
- Ring shows through: Add 2–4 sc and push them together tightly.
- Face cups: You worked Rnd 4 too tightly. Go up to a 4.0 mm hook for that round.
- Bags fall out too fast: Weave a length of yarn through Rnd 2 and cinch it slightly.
Care
Hand wash in cool water and lay flat to dry. Reshape the flowers and appliqués while the piece is damp, and avoid wringing it.
Final Notes
The whole size chain starts from a 48-sc band 5.25 in (13.3 cm) wide. That band increases to 64 sc, about 7 in (17.8 cm) flat. Then 16 mesh loops build seven 1.7 in (4.3 cm) flower bands, reaching 13.4 in (34.0 cm). The rim converts back to exactly 64 sc and adds 0.6 in (1.5 cm), for a 14 in (35.6 cm) body and an 18 in (45.7 cm) total hang. If you check your gauge at the first band, everything else follows.
Happy crocheting!