

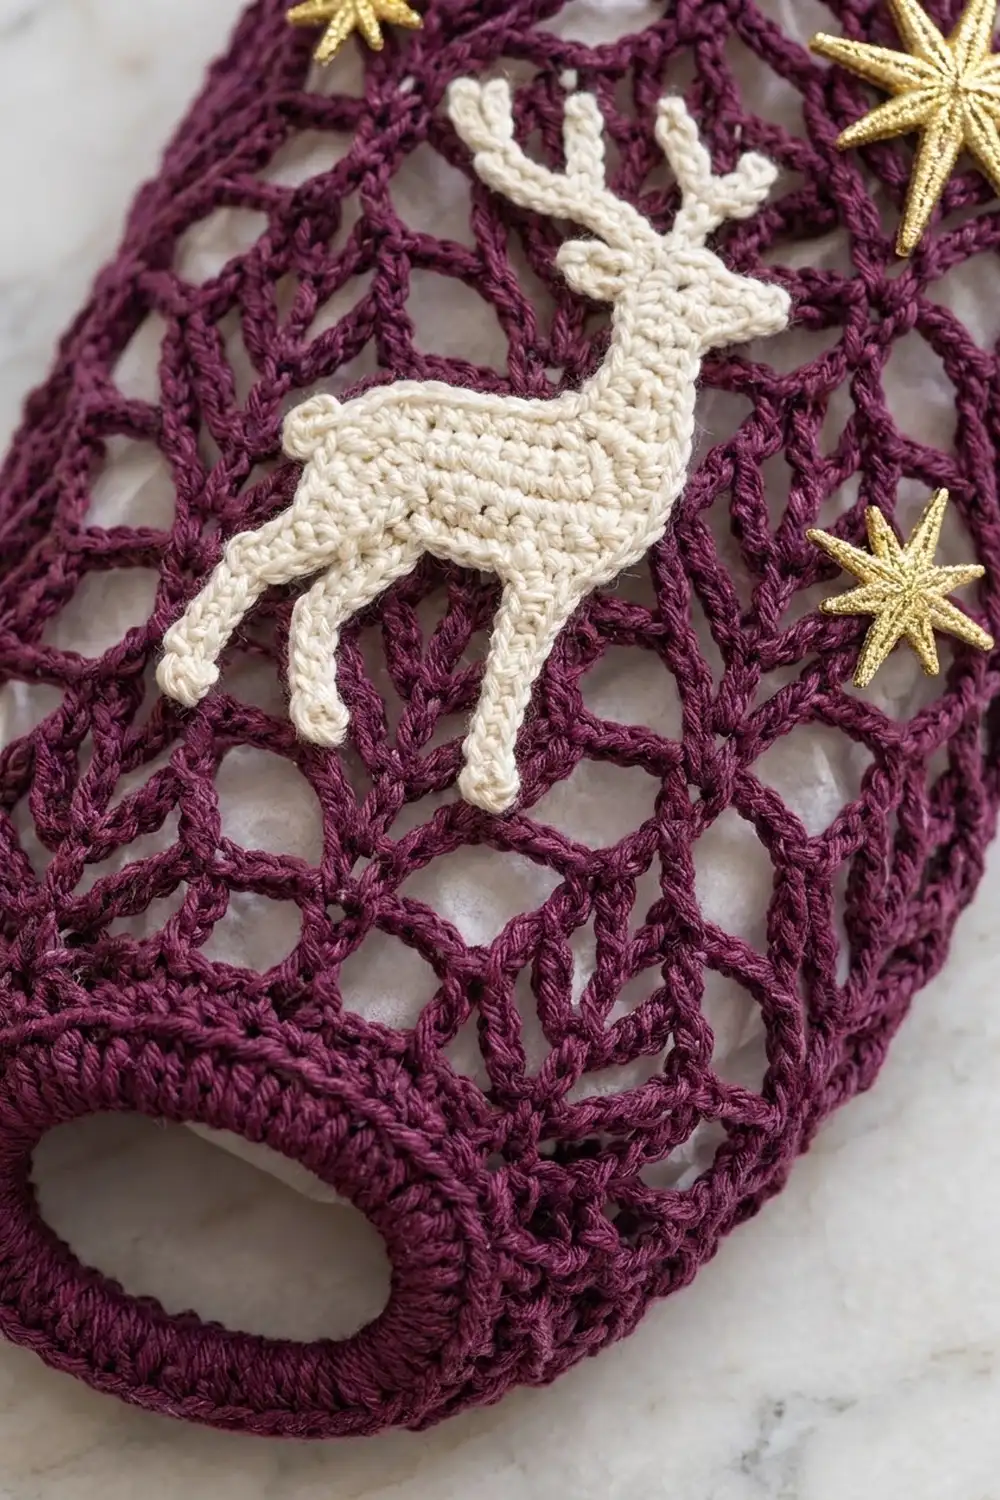
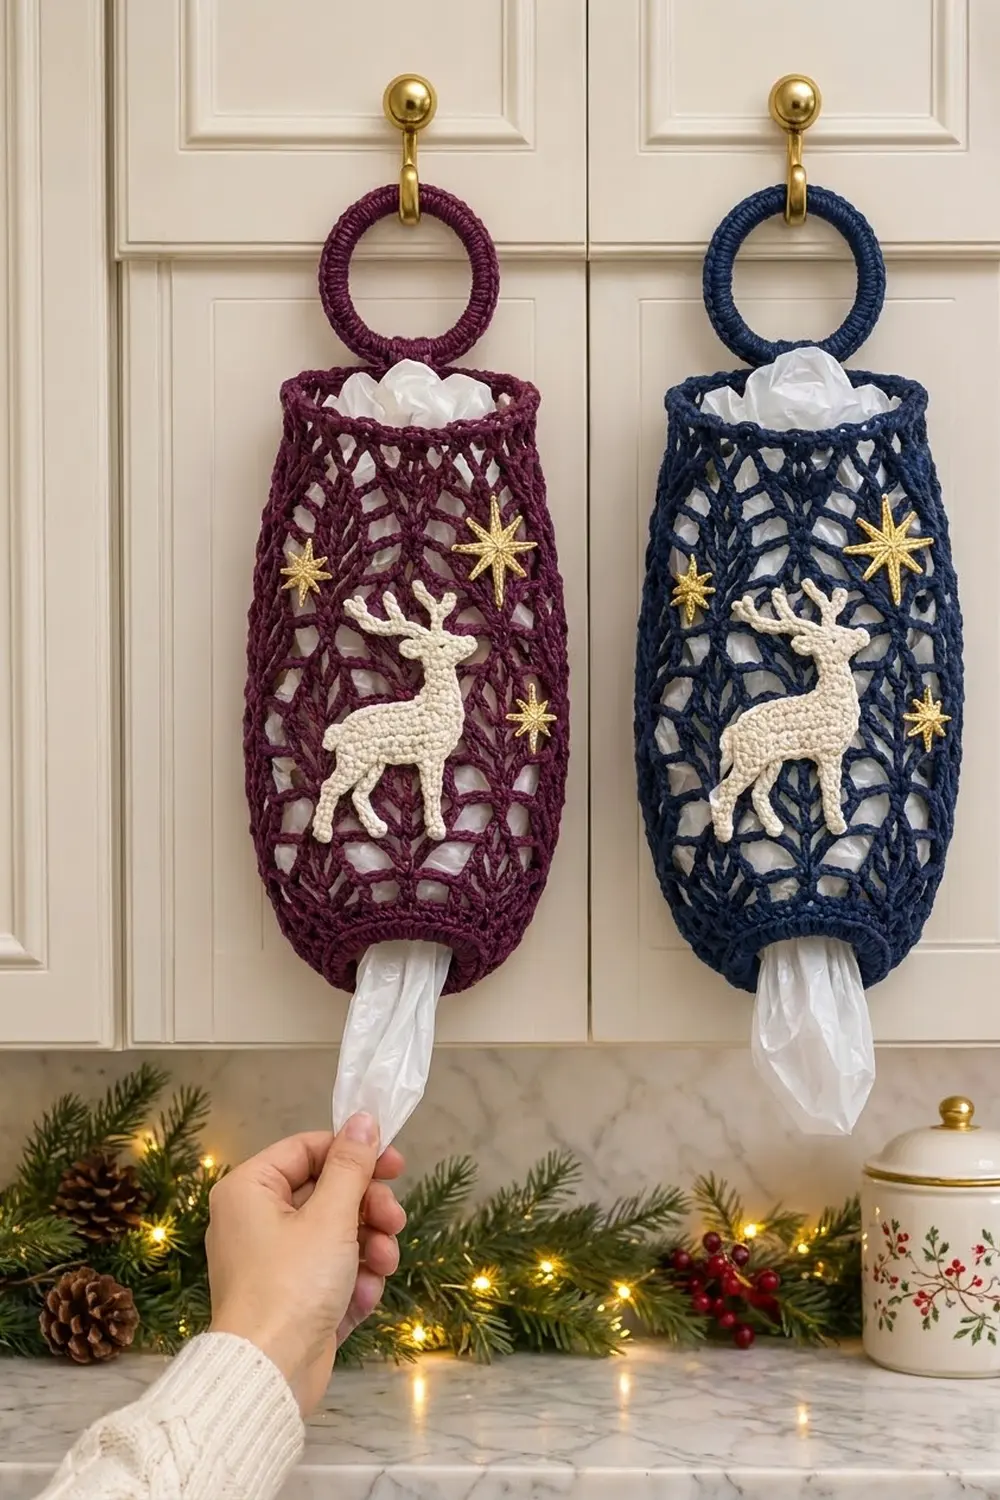
This holiday bag holder has a deep plum lace body, an ivory reindeer standing on the front and three small gold stars around it. Push used plastic bags in at the top, then pull them out one at a time through the oval opening at the bottom.
The lace is a simple two-round repeat of V-shaped shells and chain loops. Together they form a diamond lattice that looks like stacked leaves. The solid single-crochet bands at the bottom and top give the holder its shape, and a covered ring lets it hang from a cabinet hook or door knob.
The pattern uses US crochet terms. The finished body is 7.5 in (19.1 cm) wide when flat and 13.5 in (34.3 cm) tall. With the hanging tab and ring, the total hanging length is about 17 in (43.2 cm).
You make the body in one piece from the bottom up: a foundation ring, an increasing single-crochet band, 15 lace rounds, then a decreasing top rim. Next you cover a ring, add a tab and sew it inside the rim. Finally you make the reindeer and stars and sew them to the front.
Finished Size and Construction
- Finished size (flat): 7.5 in (19.1 cm) wide x 13.5 in (34.3 cm) tall; 17 in (43.2 cm) including ring
- Skill level: Intermediate (easy lace, small appliqué shaping)
- Terminology: US crochet terms
- Yarn weight: Worsted (#4) cotton for the body and reindeer; metallic sport/DK for the stars
- Hooks: 4.5 mm (US 7) for the body; 4.0 mm (US G-6) for the appliqués
- Number of pieces: 1 body, 1 covered ring with tab, 1 reindeer, 3 stars
- Layout: Reindeer centered on the front, facing left; large star upper right, small stars upper left and middle right
- Body width: 60 sts around = 7.5 in (19.1 cm) flat
- Size before border: 7.5 in x 12.5 in (19.1 x 31.8 cm)
- Border depth: top rim 1 in (2.5 cm); the bottom slip-stitch edging adds no height
Materials
Use a smooth, firm cotton or cotton blend. It shows the lace clearly and holds the oval shape better than acrylic. Choose a gold that is stiff enough to keep the star points sharp.
- Plum (Color A), worsted cotton: 110 g / 190 m
- Ivory (Color B), worsted cotton: 10 g / 18 m
- Gold metallic (Color C), sport/DK: 5 g / 20 m
All quantities include a margin of about 10%.
Tools:
– 4.5 mm and 4.0 mm hooks
– 1 plastic or metal ring, 3 in (7.6 cm) outer diameter
– Stitch markers
– Tapestry needle
– Scissors
– Tape measure
– Rustproof pins and a blocking mat
Abbreviations (US Terms)
- ch: chain
- sl st: slip stitch
- sc: single crochet
- hdc: half double crochet
- dc: double crochet
- sc2tog: single crochet 2 together
- sk: skip
- sp: space
- st(s): stitch(es)
- rnd(s): round(s)
Shell: (2 dc, ch 2, 2 dc) in the same space.
Gauge and Checkpoints
Single crochet gauge (4.5 mm, Color A): 16 sc x 16 rnds = 4 in (10.2 cm).
Lace gauge: one 6-stitch repeat (1 shell + 1 sc) = 1.5 in (3.8 cm) around. Two lace rounds (shell + net) = 1.5 in (3.8 cm) tall.
Appliqué gauge (4.0 mm, Color B): 18 sc x 18 rows = 4 in (10.2 cm).
Before you start the full holder, work Rnds 1–5 as your gauge test. Lay the piece flat and check these points:
- After Rnd 1: 36 sts; flat width 4.5 in (11.4 cm).
- After Rnd 5: 60 sts; flat width 7.5 in (19.1 cm); band height 1.25 in (3.2 cm).
- After Rnd 20: height 12.5 in (31.8 cm) from the bottom edge.
- After Rnd 24: top flat width 6 in (15.2 cm); total height 13.5 in (34.3 cm).
If your piece is too big, go down 0.5 mm. If it is too small, go up 0.5 mm. If only the lace rounds are too tall, make your chain-5 loops tighter instead of changing hooks.
Body
Use Color A and the 4.5 mm hook. Do not turn at the end of rounds. Mark the first stitch of each round.
Bottom Band
Foundation: Ch 36, then sl st to the first ch to form a ring. Don’t twist the chain.
Rnd 1: Ch 1, sc in each ch around, then sl st to the first sc. (36 sts)
Rnd 2: Ch 1, sc in each st around, join. (36 sts)
Rnd 3 (growth): Ch 1, sc in next 2 sts, 2 sc in next st; repeat from * 12 times total, join. (48 sts)
Rnd 4: Ch 1, sc in each st around, join. (48 sts)
Rnd 5 (growth): Ch 1, sc in next 3 sts, 2 sc in next st; repeat from * 12 times total, join. (60 sts)
Checkpoint: Flat width 7.5 in (19.1 cm). The band cups upward like the bowl in the progress photo.
Lace Body
Rnd 6 (net set-up): Ch 1, sc in the first st. Ch 5, sk 2 sts, sc in next st; repeat from * 18 more times. Ch 5, sk the last 2 sts, then sl st to the first sc. (20 sc, 20 ch-5 loops)
Each repeat uses 3 sts: 20 x 3 = 60 sts.
Rnd 7 (shell round): Sl st in the next 3 ch to reach the center of the first loop. Ch 3 (counts as dc), then work (dc, ch 2, 2 dc) in the same loop. This is your first shell. Ch 2, sc in next loop, ch 2, shell in next loop; repeat from * 8 more times. Ch 2, sc in the last loop, ch 2, then sl st to the top of the ch-3. (10 shells, 10 sc)
Rnd 8 (net round): Sl st in the next dc and into the ch-2 sp of the shell. Ch 1, sc in the same sp. Ch 5, sc in next sc, ch 5, sc in ch-2 sp of next shell; repeat from * around, ending with ch 5, sc in the last sc, ch 5, then sl st to the first sc. (20 sc, 20 ch-5 loops)
Rnds 9–20: Repeat Rnds 7 and 8 six more times. You end on a net round (Rnd 20).
Each new shell round puts its shells into loops that sit halfway between the shells of the round before. This offset is what creates the diamond-and-leaf lattice.
Checkpoint: Height 12.5 in (31.8 cm). Rnds 6–20 are 15 rounds x 0.75 in = 11.25 in (28.6 cm), on top of the 1.25 in (3.2 cm) band.
Hanging Ring and Tab
Use Color A and the 4.5 mm hook.
Ring: Join the yarn around the ring and work 56 sc over it, packing them tightly so no plastic shows. Sl st to the first sc. (56 sts)
Tab Row 1: Ch 1, sc in the next 6 sts. (6 sts)
Tab Rows 2–6: Ch 1, turn, sc in each st across. (6 sts)
Fasten off and leave a 12 in (30.5 cm) tail. The finished tab is 1.5 in (3.8 cm) wide and 1.5 in (3.8 cm) long. You will sew it on after the rim is done.
Reindeer Appliqué
Use Color B and the 4.0 mm hook. The deer faces left.
Body:
– Foundation: Ch 11.
– Row 1: Sc in the 2nd ch from the hook and in each ch across. (10 sts)
– Rows 2–5: Ch 1, turn, sc in each st across. (10 sts)
Row 5 ends at the left edge. This is the chest.
Neck:
– Row 6: Ch 1, turn, sc in the first 3 sts only. Leave the rest unworked. (3 sts)
– Rows 7–9: Ch 1, turn, sc in each st. (3 sts)
Head:
– Row 10: Ch 4, turn. Sc in the 2nd ch from the hook and in the next 2 ch (this is the snout), then sc in the 3 neck sts. (6 sts)
– Row 11: Ch 1, turn, sc in each st across. (6 sts)
Fasten off.
Antlers: Count the head sts from the snout end. Join yarn in st 4 of Row 11. Then:
1. Ch 9. Sl st in the 2nd ch from the hook and the next 2 ch.
2. Ch 3, then sl st in the 2nd and 3rd ch from the hook (this makes a tine). Sl st in the next 2 ch of the main chain.
3. Ch 3, then sl st in the 2nd and 3rd ch from the hook (second tine). Sl st in the last 3 ch of the main chain.
4. Sl st in st 4 again.
You have now worked all 8 slip stitches along the main chain. Sl st in st 5 and repeat steps 1–4 to make the second antler.
Ear: In st 6, ch 3, sl st in the 2nd ch from the hook, sc in the next ch, then sl st in st 6. Fasten off.
Legs: Join yarn in the first remaining loop of the foundation chain at the back (tail) end. Make a leg:
1. Ch 7.
2. Sl st in the 2nd ch from the hook, then sc in the next 5 ch.
3. Sl st in the same loop.
Place legs in loops 1, 3, 8 and 10. Sl st across the loops between them.
Tail: Join yarn at the top back corner. Ch 3, sl st in the 2nd and 3rd ch, then sl st in the corner. Fasten off.
Finished reindeer: about 3.25 in (8.3 cm) wide and 4.75 in (12.1 cm) tall.
Star Appliqués
Use Color C and the 4.0 mm hook. Make 1 large star and 2 small stars.
Rnd 1: In a magic ring, ch 1 and work 8 sc. Pull the ring closed and join. (8 sts)
Large star, Rnd 2: Repeat the following 4 times:
– Long point: Ch 6. Sl st in the 2nd ch from the hook, sc in the next ch, hdc in the next ch, dc in the next 2 ch, then sl st in the next sc.
– Short point: Ch 4. Sl st in the 2nd ch from the hook, sc in the next 2 ch, then sl st in the next sc.
(8 points)
Small star, Rnd 2: Repeat the following 4 times:
– Long point: Ch 5. Sl st in the 2nd ch from the hook, sc in the next ch, hdc in the next ch, dc in the next ch, then sl st in the next sc.
– Short point: Ch 3. Sl st in the 2nd ch from the hook, sc in the next ch, then sl st in the next sc.
(8 points)
Each star uses all 8 Rnd 1 sts, one per point. The large star is 1.75 in (4.4 cm) across and each small star is 1.25 in (3.2 cm).
Border
The border has two parts: the solid top rim and a firming edge around the bottom opening.
Border gauge: same as the body, 16 sc x 16 rnds = 4 in (10.2 cm).
Top Rim
Rnd 21 (conversion): Ch 1. Sc in each sc of Rnd 20 and work 2 sc in each ch-5 loop, then join.
Count: 20 sc (1 per existing sc) + 40 sc (2 per loop x 20 loops) = 60 sts, or 30 per flat side.
Rnd 22 (shaping): Ch 1, sc in next 3 sts, sc2tog; repeat from * 12 times total, join. (48 sts, 24 per flat side)
Rnds 23–24: Ch 1, sc in each st around, join. (48 sts, 24 per flat side)
Fasten off and weave in the ends.
Why the math works: The lace counts as 60 sts around, and Rnd 21 turns it back into exactly 60 sc. Taking away 12 sts leaves 48. At 4 sts per inch, 48 sts is 12 in (30.5 cm) around, or 6 in (15.2 cm) flat. That narrows the top a little, like the rounded shoulder of the holder. Four rim rounds at 0.25 in each add 1 in (2.5 cm), which brings the body from 12.5 in to 13.5 in (31.8 to 34.3 cm).
Bottom Edging
Join Color A in any remaining loop of the foundation chain and sl st in each loop around. (36 sl st, 18 per flat side)
This firm edge stops the opening from stretching wider than 4.5 in (11.4 cm) flat. It adds no height because slip stitches lie flat.
Attaching the Ring
Flatten the body and mark the center of the back. Slide 1 in (2.5 cm) of the tab inside the rim, then whipstitch it on along three edges. Sew through Rnds 22–24 only. About 0.5 in (1.3 cm) of tab stays visible above the rim.
Final Blocking
- Wet-block the body before you add the appliqués. Soak it in cool water for 10 minutes, then press the water out in a towel. Don’t wring it.
- Stuff the body loosely with a rolled towel or a few plastic bags so it is 7.5 in (19.1 cm) wide flat.
- Ease the lace until it measures 13.5 in (34.3 cm) tall and the diamonds look even.
- Lay the reindeer and stars face down. Pin the antler tines and star points out to their full length, then steam lightly.
- Let everything dry completely.
- Sew the reindeer on with Color B. Center it on the front, with the hooves at about Rnd 9 and the antler tips at about Rnd 17. Use small hidden stitches into the lace bars.
- Sew the stars on with Color C: the large star upper right at Rnds 16–18, one small star upper left beside the antlers, and one small star middle right beside the deer’s back.
Final Quality-Control Checklist
- Body is 7.5 in (19.1 cm) wide flat at the widest point.
- Height is 13.5 in (34.3 cm), and 17 in (43.2 cm) including the ring.
- Rnd 5 has 60 sts and Rnd 24 has 48 sts.
- Each lace round has 10 shells or 20 loops.
- The bottom opening measures 4.5 in (11.4 cm) flat and lets a bag through easily.
- The ring is fully covered with 56 sc.
- The tab is sewn firmly at back center.
- The reindeer is centered and faces left, with all four legs and both antlers secured.
- All three stars have 8 crisp points.
- All ends are woven in on the inside.
Troubleshooting
The lace flares out wider than the band. Your chain-5 loops are too loose. Pull each chain snug or use ch 4.
The bottom band ripples. Check that Rnds 3 and 5 have exactly 12 increases each.
The top is too narrow to stuff bags in. Skip Rnd 22 and keep 60 sts for Rnds 22–24.
The antlers curl. Work the slip stitches loosely, then pin and steam them flat.
The ring shows through. Add 2–4 more sc until it is fully covered, then make the tab across any 6 sts.
The deer looks lopsided. Count the leg positions again. They must be in loops 1, 3, 8 and 10.
Care
Hand wash in cool water and lay flat to dry. Don’t wring, and keep metallic yarn away from a hot iron.
Final Notes
Here is the full measurement chain to check against:
- 36-st foundation = 4.5 in (11.4 cm) flat
- Band grows to 60 sts = 7.5 in (19.1 cm) flat
- 15 lace rounds keep 10 repeats and reach 12.5 in (31.8 cm)
- Rim turns back to 60 sc, then narrows to 48 sts = 6 in (15.2 cm) flat, finishing at 13.5 in (34.3 cm)
- Ring and tab bring the hanging length to 17 in (43.2 cm)
If you check each of these, your holder will match. Try the navy colorway for a second holder.
Happy crocheting!