
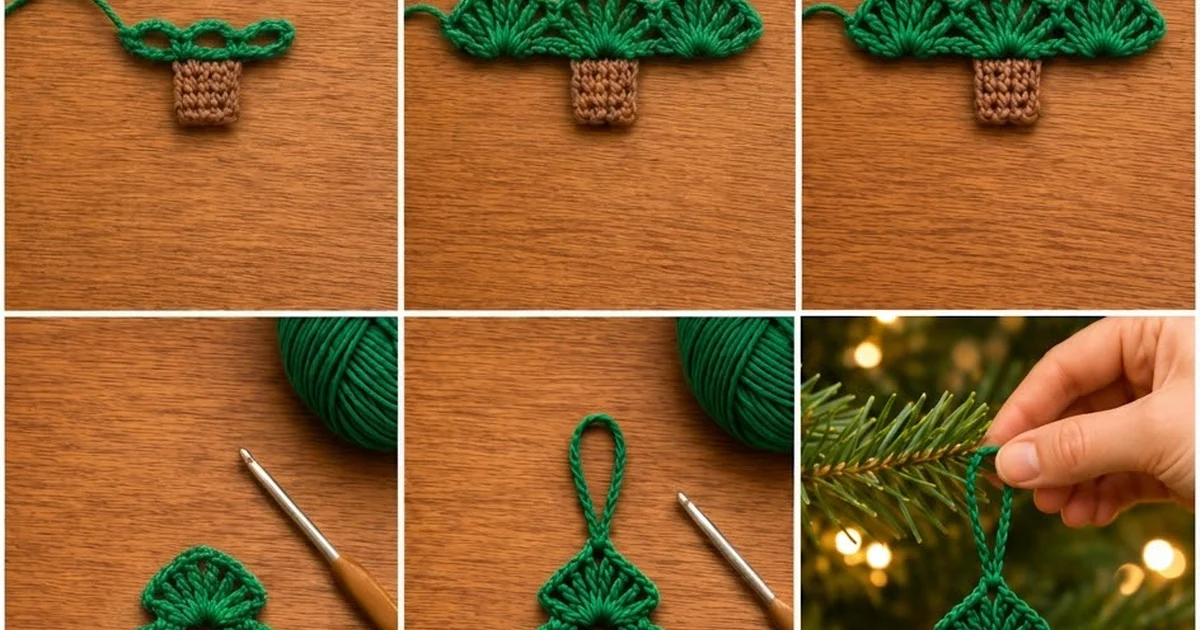
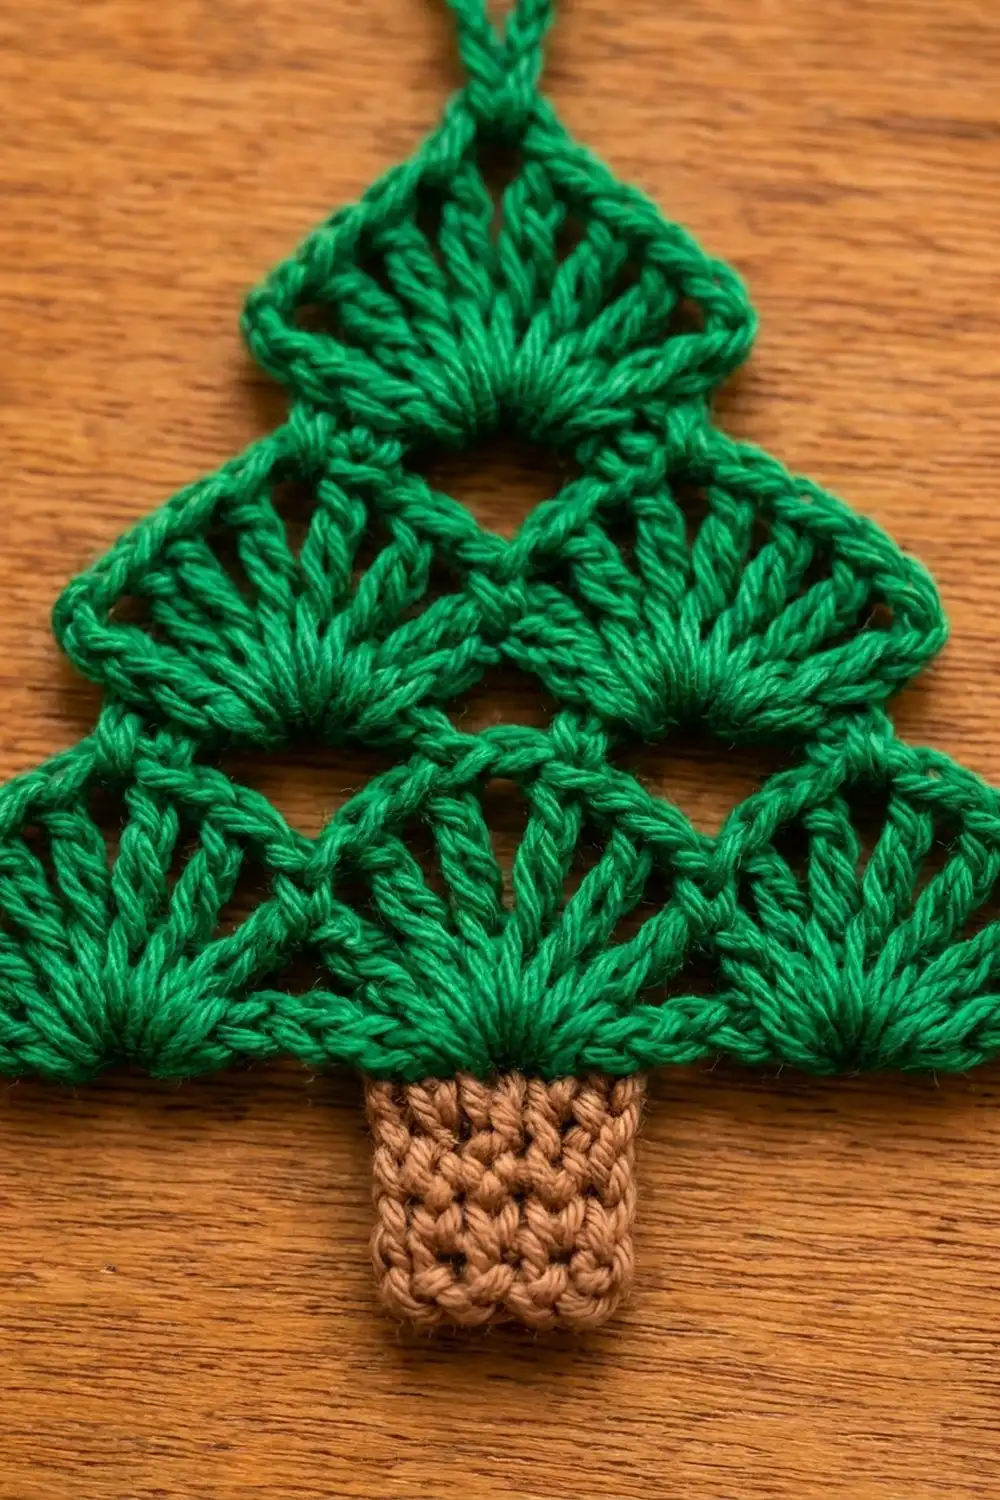
This little tree ornament is made from stacked shell-stitch fans. The bottom tier has three fans, the middle tier has two and a single fan sits at the top. A slim chain loop rises from the top fan, and a small solid trunk sits underneath. The open fans let tree lights glow through, so it looks lovely hanging on a real branch.
The color scheme is classic: kelly green for the tree and light brown for the trunk. The look is tidy and slightly lacy. A single-crochet outline gives every fan a crisp, scalloped edge.
This pattern uses US crochet terms. The finished ornament measures about 4 1/4 in (10.8 cm) wide and 4 in (10.2 cm) tall without the loop, or 5 1/4 in (13.3 cm) tall including the loop.
You work the green tree top flat in four rows: one chain-loop foundation row and three shell rows that step inward. Then you work one outline round with the hanging loop built in. Last, you crochet a small trunk separately and sew it to the center of the bottom edge.
Finished Size and Construction
- Finished size: 4 1/4 in (10.8 cm) wide x 4 in (10.2 cm) tall; 5 1/4 in (13.3 cm) tall with loop
- Skill level: Easy / advanced beginner
- Terminology: US crochet terms
- Yarn weight: DK (#3 light)
- Hook: 3.5 mm (E-4)
- Number of pieces: 1 ornament (green tree top plus a small sewn-on trunk)
- Layout: 3 fan tiers, with 3, 2 and 1 fans
- Green tree top before edging: 4 in (10.2 cm) wide x 2 1/2 in (6.4 cm) tall
- Trunk: 1 in (2.5 cm) wide x 1 1/4 in (3.2 cm) tall
- Edging depth: about 1/8 in (0.3 cm) per side
Materials
Yarn: Use a smooth DK yarn so the fans stay clearly defined. Mercerized cotton or a cotton blend gives the crispest shells. Acrylic is softer but works fine. Avoid fuzzy or brushed yarns, because they hide the openings between the fans.
- Green (tree): 10 g, about 23 m (25 yd)
- Light brown (trunk): 3 g, about 7 m (8 yd)
Both quantities include a margin for your gauge swatch and for weaving in ends.
Tools:
– 3.5 mm (E-4) crochet hook
– Tapestry needle
– Scissors
– Stitch marker (optional)
– Ruler or tape measure
– Blocking mat and rust-proof pins
– Spray bottle with water
Abbreviations (US Terms)
- ch – chain
- sl st – slip stitch
- sc – single crochet
- tr – treble crochet (yarn over twice, insert hook, pull up a loop, [yarn over, pull through 2 loops] 3 times)
- sk – skip
- sp – space
- st(s) – stitch(es)
- RS – right side
Special stitch – Shell: work 7 tr in the same stitch. The 4th tr is the center tr, which is the top point of the fan.
Gauge and Checkpoints
Gauge: 20 sc and 22 rows = 4 in (10.2 cm) in sc with the 3.5 mm hook.
This is a small project, so the best gauge test is the first two green rows. Work Rows 1 and 2, then measure before you go on.
Checkpoints:
– After Row 1: 3 3/4 in (9.5 cm) long, lying flat with no curl.
– After Row 2: about 4 in (10.2 cm) wide and 1 in (2.5 cm) tall at the fan tops.
– After Row 3: 1 3/4 in (4.4 cm) tall.
– After Row 4: 2 1/2 in (6.4 cm) tall.
– After the edging: 4 1/4 in (10.8 cm) wide x 2 3/4 in (7.0 cm) tall at the top of the peak, not counting the loop.
– Trunk: 1 in (2.5 cm) wide x 1 1/4 in (3.2 cm) tall.
If your piece is too big: go down to a 3.25 mm (D-3) hook, or make sure your tr stitches aren’t loose and loopy.
If your piece is too small: go up to a 3.75 mm (F-5) hook.
A difference of 1/4 in (0.6 cm) is fine for an ornament. Shape matters more than exact size here.
Tree Top (Green)
Ch 20.
Row 1 (foundation loops): Sc in 2nd ch from hook, ch 2, sk next 2 ch, sc in next ch; repeat from * 5 more times. Turn.
(7 sc and 6 ch-2 sps = 19 sts.)*
This is the chain-loop row you can see before the fans begin. It gives 3 repeats of 6 stitches, one repeat for each bottom fan.
Row 2 (bottom tier, 3 fans): Ch 1, sc in first sc, sk next ch-2 sp, Shell in next sc, sk next ch-2 sp, sc in next sc; repeat from * 2 more times. Turn.
(4 sc and 3 Shells = 4 sc + 21 tr = 25 sts.)*
Each Shell sits on a single sc, so it fans upward from one point. The sc between the fans anchor the valleys.
Row 3 (middle tier, 2 fans): Sl st in first sc and in each of next 3 tr (4 sl sts), ch 1, sc in next tr (center tr of first fan), Shell in next sc, sc in center tr of next fan; repeat from * once more. Turn. Leave the last sc and 3 tr of Row 2 unworked.
(3 sc and 2 Shells = 3 sc + 14 tr = 17 sts, not counting the 4 sl sts.)*
The new fans sit in the valleys between the bottom fans. This creates the stepped tree shape and the small openings between tiers.
Row 4 (top tier, 1 fan): Sl st in first sc and in each of next 3 tr (4 sl sts), ch 1, sc in next tr (center tr), Shell in next sc, sc in center tr of next fan. Do not turn. Leave the last sc and 3 tr of Row 3 unworked.
(2 sc and 1 Shell = 2 sc + 7 tr = 9 sts, not counting the 4 sl sts.)
Fasten off. You will rejoin for the edging so you can start in a clean spot.
Checkpoint: The piece should be a stepped triangle about 4 in (10.2 cm) wide and 2 1/2 in (6.4 cm) tall.
Trunk (Light Brown)
Ch 6.
Row 1: Sc in 2nd ch from hook and in each ch across. Turn. (5 sc)
Rows 2–7: Ch 1, sc in each sc across. Turn. (5 sc each row)
Fasten off and leave a 10 in (25.4 cm) tail for sewing.
Checkpoint: The trunk should be 1 in (2.5 cm) wide x 1 1/4 in (3.2 cm) tall. If it is wider than the 5 center stitches of the tree’s bottom edge, rework it with a smaller hook.
Edging Round with Hanging Loop
How the edging works: Look closely at each slanted side of the tree and you’ll see the edges of the tiers. Each tier gives you exactly 4 stitch tops along the outline. On one side, those are the tier’s end sc and its 3 outer tr. On the other side, they are the 4 slip stitches lying on top of the end sc and 3 outer tr. Either way, you work 1 sc into each of the 4 tops. When working into a slip stitch, insert the hook under both of its loops.
Edging round: With RS facing, join green with a sl st in the end sc of Row 2 at the lower right corner. Ch 1.
- Side 1 (going up): Sc in same st and in next 3 tops (4 sc for tier 1), sc in next 4 tops (tier 2), sc in next 4 tops (tier 3). (12 sc)
- Peak: (Sc, ch 20, sc) in center tr of the Row 4 fan. (2 sc + ch-20 loop)
- Side 2 (going down): Sc in next 4 tops for each tier, 3 times. (12 sc)
- Corner: 2 sc over the end of Row 1. (2 sc)
- Bottom: Working along the opposite side of the foundation chain, sc in each of the 19 ch. (19 sc)
- Corner: 2 sc over the end of Row 1. (2 sc)
Join with a sl st to the first sc. Fasten off.
Round total: 12 + 2 + 12 + 2 + 19 + 2 = 49 sc, plus the ch-20 loop.
Why the math works: The bottom edge gets 19 sc, one in each of the 19 foundation chains that Row 1 was worked across. At 5 sts per inch, that is 3 3/4 in (9.5 cm), the same length as Row 1, so nothing gathers or ruffles. Each side gets 12 sc, one per existing stitch top. The 4 corner sc cover the short ends of Row 1, and the 2 peak sc create the point. No other stitches are added, so the edging stays flat and adds only about 1/8 in (0.3 cm) all around.
The ch-20 loop is about 2 1/2 in (6.4 cm) long, which folds into a loop about 1 1/4 in (3.2 cm) tall.
Attaching the Trunk
- Find the center 5 sc on the bottom edge: sc 8 through 12 of the 19, which leaves 7 sc on each side.
- Place the last row of the trunk against those 5 sc, with RS facing you on both pieces.
- Using the brown tail, whipstitch through each of the 5 trunk stitches and the matching bottom edge sc, one to one.
- Make one extra pass at each corner of the trunk to secure it.
- Weave in all ends along stitches of the same color.
Checkpoint: The ornament should measure 4 1/4 in (10.8 cm) wide x 4 in (10.2 cm) tall without the loop.
Final Blocking
- Lightly mist the ornament with water until it is damp but not soaked.
- Lay it RS up on your blocking mat.
- Pin the bottom corners 4 1/4 in (10.8 cm) apart, keeping the bottom edge straight.
- Pin the peak 2 3/4 in (7.0 cm) above the bottom edge, centered.
- Gently open each fan with your fingertips and pin the scallop tips so the openings between fans stay clear.
- Pin the trunk square, 1 in (2.5 cm) wide.
- Lay the hanging loop straight up, without pins.
- Let it dry completely, then remove the pins.
If you used cotton, you can also press it lightly with a warm iron through a cloth.
Final Quality-Control Checklist
- Row 2 has 3 fans, Row 3 has 2 and Row 4 has 1.
- Every fan has exactly 7 tr.
- Each side of the edging has 12 sc and the bottom has 19 sc.
- The hanging loop comes from the exact center of the top fan.
- The trunk is centered, with 7 sc showing on each side.
- The tree is symmetrical: the left and right sides match in length and slope.
- All ends are woven in and hidden on the wrong side.
- Overall size is about 4 1/4 in (10.8 cm) x 4 in (10.2 cm), plus the loop.
Troubleshooting
Fans cup or ruffle: Your tr stitches are too tight or too loose compared with the base. Change hook size, or let each tr stand to its full height.
The tree leans to one side: You probably slipped across too many or too few stitches at the start of Row 3 or Row 4. Count exactly 4 sl sts.
The bottom edge puckers: You skipped foundation chains during the edging. Work 1 sc in every chain, 19 in total.
The edging flares at the corners: Use only 2 sc over each end of Row 1, not 3.
The loop twists: Before you finish blocking, let the ornament hang by its loop while still damp, or chain more loosely.
The trunk pulls the bottom edge in: It is wider than 5 stitches’ worth. Rework it with a smaller hook so it matches the 1 in (2.5 cm) width.
Care
Hand wash in cool water with mild soap, press out the water in a towel and dry flat. Store it flat or hanging so the fans keep their shape.

Final Notes
Here is the measurement chain from start to finish:
- The 19-stitch foundation row measures 3 3/4 in (9.5 cm).
- The three fan tiers build the piece to 4 in (10.2 cm) wide and 2 1/2 in (6.4 cm) tall.
- The 49-sc edging brings it to 4 1/4 in (10.8 cm) wide and 2 3/4 in (7.0 cm) tall.
- The 1 1/4 in (3.2 cm) trunk brings the ornament to 4 in (10.2 cm) tall, and the loop adds 1 1/4 in (3.2 cm) for a total hanging height of 5 1/4 in (13.3 cm).
If each checkpoint matches, the finished tree will too. Make a few in different greens for a cheerful set of tree decorations or gift toppers.
Happy crocheting!