

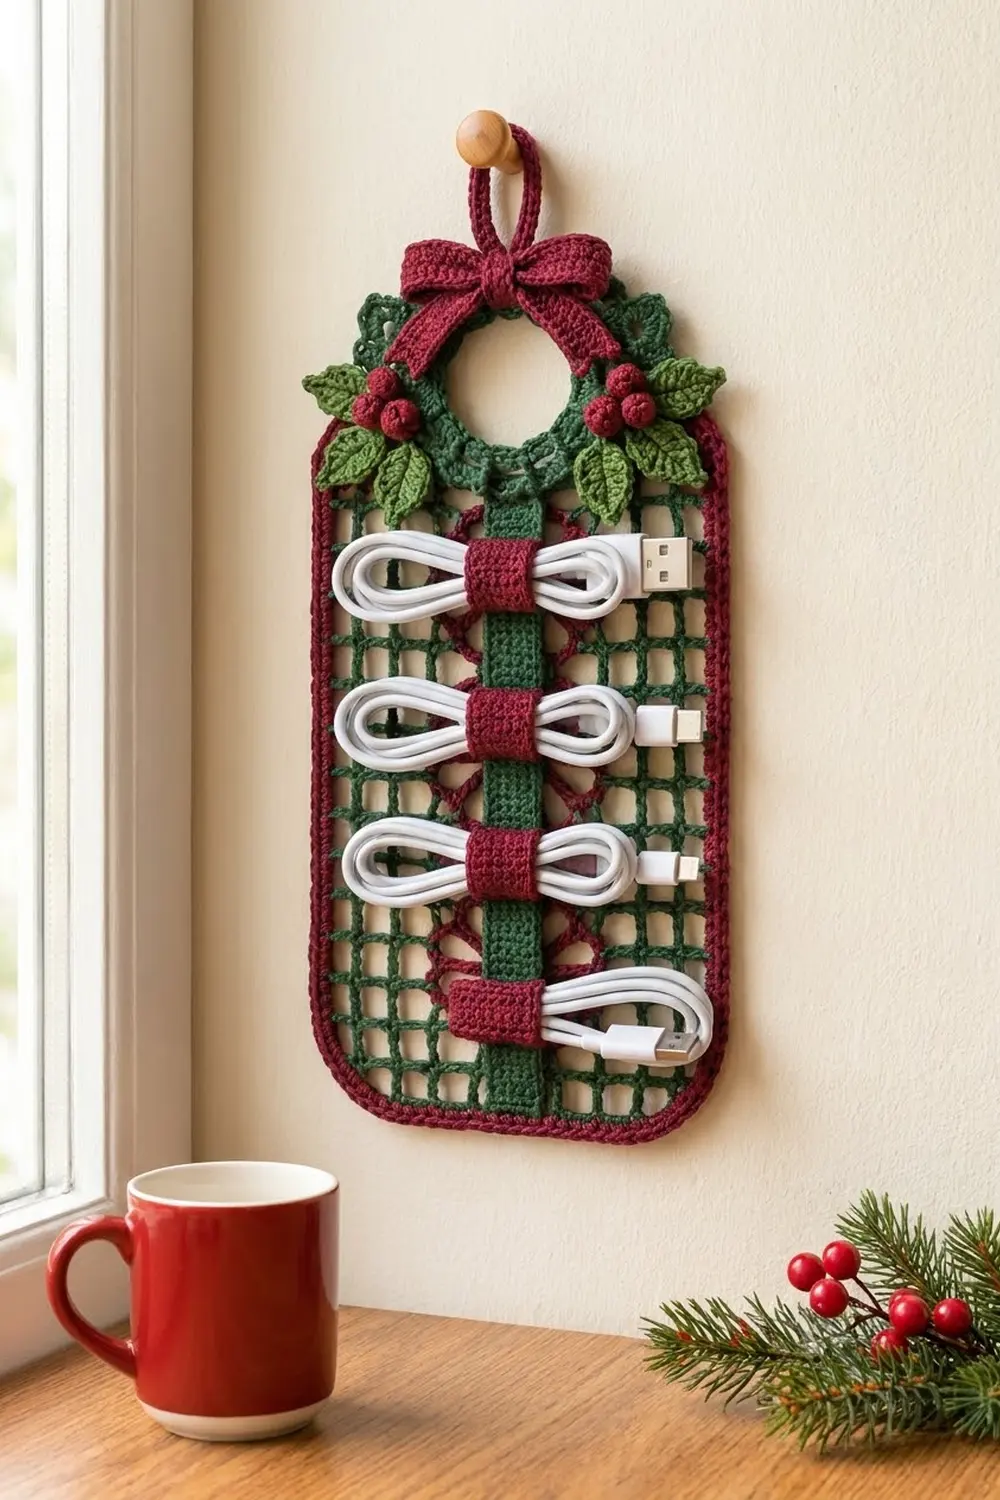
This festive wall hanging keeps charging cables tidy and looks like a small piece of holiday lace. The dark green filet mesh panel has three burgundy wheel flowers down its center. A corded burgundy edge frames it, and the bottom corners are softly rounded.
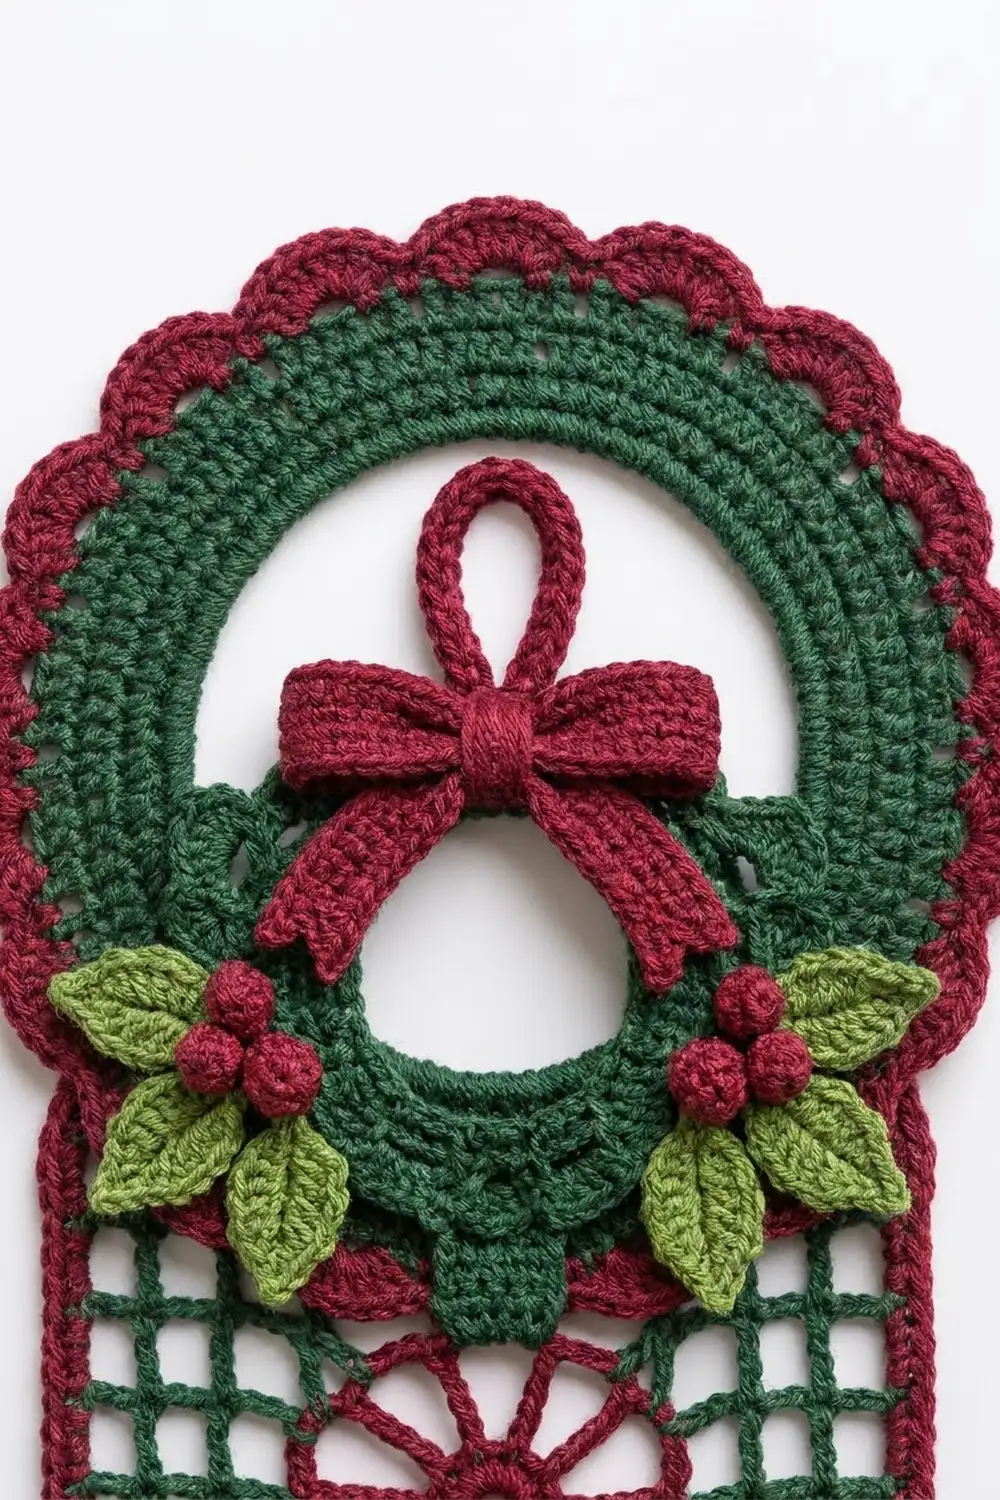
At the top is a green mesh ring with a scalloped edge, dressed as a wreath. It has leaf-green holly leaves, burgundy berries, a burgundy bow and a hanging loop. A green strap runs down the middle with four burgundy bands, and each band holds one coiled cable.
The pattern uses US crochet terms. The finished hanging is 7.5 in (19.1 cm) wide and 14.25 in (36.2 cm) tall. With the hanging loop it is 15.75 in (40.0 cm) tall.
Construction is simple. You crochet one rectangular mesh panel in rows and add a three-round border. Then you make the ring cap and the small appliqué parts and sew everything in place.
Finished Size and Construction
- Finished size: 7.5 in (19.1 cm) wide x 14.25 in (36.2 cm) tall; 15.75 in (40.0 cm) with loop
- Skill level: Intermediate
- Terminology: US
- Yarn weight: Worsted (#4)
- Hook: 5 mm (H-8)
- Number of pieces: 1 main mesh panel, plus sewn-on parts (ring cap, 3 flowers, strap, 4 bands, 6 leaves, 6 berries, bow parts, loop)
- Layout: one vertical panel; ring cap at the top; flowers and strap on the center column
- Panel size before border: 6.5 in (16.5 cm) x 9 in (22.9 cm), which is 13 squares x 18 rows
- Size after border: 7.5 in (19.1 cm) x 10 in (25.4 cm)
- Border depth: 0.5 in (1.3 cm)
Materials
Choose a smooth worsted-weight acrylic or cotton blend with good stitch definition. Mesh and wheels look crisp in a tightly plied yarn. Avoid fuzzy or novelty yarns.
- Color A, dark green: 50 g (about 100 m) – panel, ring cap, strap
- Color B, burgundy: 40 g (about 80 m) – border, flowers, bands, bow, berries, loop
- Color C, leaf green: 10 g (about 20 m) – holly leaves
These amounts include extra for swatching and sewing.
Tools:
- 5 mm (H-8) crochet hook
- Tapestry needle
- Stitch markers
- Scissors
- Rust-proof pins and a blocking board
- Spray bottle
- Ruler or tape measure
Abbreviations (US Terms)
- ch – chain
- sl st – slip stitch
- sc – single crochet
- hdc – half double crochet
- dc – double crochet
- sc2tog – single crochet 2 together
- rsc – reverse single crochet
- sp – space
- st(s) – stitch(es)
- rep – repeat
- RS / WS – right side / wrong side
Mesh square: one dc post plus the ch-2 space beside it. Work each new square as ch 2, then dc in the next dc.
Reverse single crochet (rsc): work from left to right (if you are right-handed). Insert the hook in the next st to the right, yarn over and pull up a loop. Yarn over again and pull through both loops. This makes the corded edge.
Gauge and Checkpoints
- Mesh gauge: 4 squares = 2 in (5.1 cm) wide, and 4 rows = 2 in (5.1 cm) tall
- Sc gauge: 16 sc x 18 rows = 4 in (10.2 cm)
Test first: crochet the first 4 rows of the panel and measure them. They should be 6.5 in (16.5 cm) wide and 2 in (5.1 cm) tall.
Checkpoints:
- After Row 4: 6.5 in (16.5 cm) x 2 in (5.1 cm)
- After Row 18: 6.5 in (16.5 cm) x 9 in (22.9 cm)
- After the border: 7.5 in (19.1 cm) x 10 in (25.4 cm)
- Ring cap: 6 in (15.2 cm) across, with a 2.5 in (6.4 cm) center hole
- Each flower: 2.5 in (6.4 cm) across
- Strap: 1.25 in (3.2 cm) x 8.5 in (21.6 cm)
If your panel is too big, use a hook 0.5 mm smaller. If it is too small, use a hook 0.5 mm larger. Mesh height is easy to adjust in blocking, so match the width first.
Main Panel
With Color A, ch 44.
Row 1 (RS): Dc in 8th ch from hook, *ch 2, sk 2 ch, dc in next ch; rep from * across. Turn. (13 squares; 14 dc posts, counting the skipped beginning chains as one post)
Row 2: Ch 5 (counts as dc and ch 2), sk first ch-2 sp, dc in next dc, *ch 2, dc in next dc; rep from * across. Work the last dc in the 3rd ch of the turning ch. Turn. (13 squares)
Rows 3–18: Rep Row 2. (13 squares in every row)
Fasten off. The panel measures 6.5 in (16.5 cm) x 9 in (22.9 cm). Square 7 is the center column; mark it at the top and bottom.
Border
Border gauge: 3 sc per mesh square or row, which is 6 sc per inch (2.5 cm).
In this border, the corner groups are counted separately from the side segments.
Rnd 1: With RS facing, join Color B in the top-right corner post. Ch 1.
- Top: 3 sc in the corner post (corner group). Then *2 sc in next ch-2 sp, 1 sc in next dc; rep from * across, ending with 2 sc in the last sp. That is 38 sc between corner groups. Work 3 sc in the top-left corner post.
- Left side: 2 sc in the Row 18 row-end, 3 sc in each row-end of Rows 17–2, and 2 sc in the Row 1 row-end = 52 sc. Work 3 sc in the bottom-left corner.
- Bottom (other side of the foundation ch): 2 sc in each ch-2 sp and 1 sc at the base of each inner dc = 38 sc. Work 3 sc in the bottom-right corner.
- Right side: work as for the left side = 52 sc.
Join with sl st to first sc. (Total: 38 + 38 + 52 + 52 + 4 corner groups x 3 = 192 sc)
Rnd 2: Ch 1, sc in each sc around. At each top corner, work 3 sc in the center st of the corner group. At each bottom corner, work 2 sc in each of the 3 sts of the corner group. Join. (Side segments stay at 38, 52, 38 and 52; each top corner group is now 5 sc; each bottom corner group is now 6 sc. Total: 180 + 10 + 12 = 202 sc)
Each bottom corner gains 3 stitches instead of 2. The extra stitch rounds the corner into a smooth curve.
Rnd 3: Ch 1, rsc in each sc around. Join. (202 rsc) Fasten off.
Why the math works: each mesh square is 0.5 in (1.3 cm) wide and each row is 0.5 in (1.3 cm) tall. Working 3 sc per square or row gives 6 sc per inch on all four sides. That matches the sc gauge, so the border lies flat without ruffling or cupping.
Ring Cap
With Color A, ch 36. Join with sl st to form a ring, taking care not to twist the chain.
Rnd 1: Ch 3 (counts as dc), dc in each ch around. Join to top of ch-3. (36 dc)
Rnd 2: Ch 5 (counts as dc and ch 2), sk next dc, *dc in next dc, ch 2, sk next dc; rep from * around. Join to 3rd ch of ch-5. (18 dc, 18 ch-2 sps)
Rnd 3: Ch 6 (counts as dc and ch 3), *dc in next dc, ch 3; rep from * around. Join to 3rd ch of ch-6. (18 dc, 18 ch-3 sps)
Rnd 4: Sl st into first ch-3 sp. *(Sc, hdc, dc, hdc, sc) in ch-3 sp; rep from * around. Join. (18 scallops, 90 sts)
Fasten off. The cap measures 6 in (15.2 cm) across, with a 2.5 in (6.4 cm) hole.
Wheel Flowers (Make 3)
With Color B, ch 4 and join to form a ring.
Rnd 1: Ch 1, 12 sc in ring. Join. (12 sc)
Rnd 2: Ch 6 (counts as dc and ch 3), *dc in next sc, ch 3; rep from * around. Join to 3rd ch of ch-6. (12 spokes, 12 ch-3 sps)
Rnd 3: Sl st into first ch-3 sp, ch 1, sc in same sp, *ch 6, sc in next ch-3 sp; rep from * around, ending with ch 6. Join to first sc. (12 ch-6 petal loops)
Fasten off, leaving a 12 in (30.5 cm) tail. Each flower is 2.5 in (6.4 cm) across.
Strap
With Color A, ch 6.
Row 1: Sc in 2nd ch from hook and in each ch across. Turn. (5 sc)
Rows 2–38: Ch 1, sc in each sc. Turn. (5 sc)
Fasten off. The strap measures 1.25 in (3.2 cm) x 8.5 in (21.6 cm).
Cable Bands (Make 4)
With Color B, ch 21.
Row 1: Sc in 2nd ch from hook and in each ch across. Turn. (20 sc)
Rows 2–4: Ch 1, sc in each sc. Turn. (20 sc)
Fasten off, leaving a long tail. Each band is 5 in (12.7 cm) x 0.9 in (2.3 cm).
Holly Leaves (Make 6)
With Color C, ch 8.
Rnd 1: Work in the back bumps of the chain. Sc in 2nd ch from hook, hdc in next ch, dc in each of next 3 ch, hdc in next ch. In the last ch, work (sc, ch 2, sc) for the leaf tip. Then work along the other side of the chain: hdc, 3 dc, hdc, sc. Sl st to first sc. (14 sts plus the ch-2 tip)
Fasten off. Each leaf is 2 in (5.1 cm) long.
Berries (Make 6)
With Color B, make a magic ring.
Rnd 1: 6 sc in ring. (6 sc)
Rnd 2: 2 sc in each sc. (12 sc)
Rnd 3: Sc in each sc. (12 sc)
Rnd 4: Sc2tog 6 times. (6 sts)
Stuff each berry with its own yarn tails and close the opening. Leave a tail for sewing. Each berry is 0.6 in (1.5 cm) across.
Bow and Hanging Loop
Bow body: With Color B, ch 26. Sc in 2nd ch from hook and in each ch across. (25 sc) Work 3 more rows of 25 sc and fasten off. Fold both short ends to the center so they overlap by 0.25 in (0.6 cm), and tack them down. The bow is 3 in (7.6 cm) wide.
Tails (make 2): Ch 11. Sc in 2nd ch from hook and in each ch across. (10 sc) Work 2 more rows of 10 sc. Each tail is 2.5 in (6.4 cm) long.
Center wrap: Ch 7. Sc in 2nd ch from hook and in each ch across. (6 sc) Work 2 more rows of 6 sc. Wrap it tightly around the center of the bow, over the tails, and sew it closed at the back.
Hanging loop: With Color B, ch 25. Sc in 2nd ch from hook and in each ch across. (24 sc) Fasten off.
Assembly
- Flowers: center the flowers on square 7. Place the flower centers 1.5 in (3.8 cm), 4 in (10.2 cm) and 6.5 in (16.5 cm) above the bottom edge of the mesh. Sew around each center ring and at the tip of each petal loop.
- Ring cap: center the cap on square 7, with the center of the hole 1.75 in (4.4 cm) above the top edge of the mesh. The lower edge of the hole meets the top of the border, and the cap overlaps the top 1.25 in (3.2 cm) of the mesh. Whipstitch the lower half of the cap to the panel.
- Bands: wrap each band around the strap and sew its short ends together behind the strap. Place the band centers 1.5 in (3.8 cm), 3.25 in (8.3 cm), 5 in (12.7 cm) and 6.75 in (17.1 cm) from the bottom of the strap. Tack each band’s seam to the strap.
- Strap: tuck the top of the strap 0.5 in (1.3 cm) under the lower edge of the cap and center it over square 7. Sew both long edges to the mesh in the gaps between the bands. The lower end of the strap rests on the bottom border.
- Wreath: sew the bow at 12 o’clock on the cap. Fold the hanging loop in half and sew both ends behind the bow, leaving 1.5 in (3.8 cm) visible. Sew 3 leaves on each side of the ring, spread between about 2 and 4 o’clock and between 8 and 10 o’clock, fanning outward. Add a cluster of 3 berries on each side.
Final Blocking
- Pin the hanging RS up on a blocking board.
- Pin the bordered panel to 7.5 in (19.1 cm) x 10 in (25.4 cm), easing the bottom corners into curves.
- Pin each flower’s petal loops evenly around its center.
- Pin the cap’s scallops into a smooth circle 6 in (15.2 cm) across.
- Spray lightly with water until damp, not soaked.
- Shape the leaf tips and fluff the bow loops by hand.
- Let dry completely before unpinning.
Final Quality-Control Checklist
- Panel is 13 squares x 18 rows, with straight side edges
- Border Rnd 1 has 192 sc; Rnds 2 and 3 have 202 sts each
- Bordered panel is 7.5 in (19.1 cm) x 10 in (25.4 cm)
- Overall height is 14.25 in (36.2 cm) without the loop
- Ring hole is fully open and 2.5 in (6.4 cm) across
- The three flowers are evenly spaced on the center column
- All four bands are firm and evenly spaced
- Loop holds the hanging and its cables without stretching
- All ends are woven in securely
Troubleshooting
- Mesh slants or narrows: make sure you work the last dc into the turning ch on every row.
- Border ruffles: you have too many sc per row-end. Stick to exactly 3.
- Border cups: your sc is too tight. Go up one hook size for the border only.
- Ring cap curls: the Rnd 3 chains are too tight. Loosen them, or block the cap firmly flat.
- Flower petals flop: block the flowers wet and pin each loop.
- Bands are too loose: make each band 18 sc wide instead of 20.
- Hanging tips forward: sew the cap and strap through the mesh as well as the border, not only at the edges.
Care
Hand wash in cool water with mild soap, press the water out in a towel, and dry flat. Reshape the bow and leaves while they are still damp.
Final Notes
The measurements build on each other. 13 squares and 18 rows give a mesh panel of 6.5 in (16.5 cm) x 9 in (22.9 cm). The three-round border adds 0.5 in (1.3 cm) on every side, for 7.5 in (19.1 cm) x 10 in (25.4 cm). The 6 in (15.2 cm) ring cap rises 4.75 in (12.1 cm) above the top of the mesh. That brings the total height to 14.25 in (36.2 cm), or 15.75 in (40.0 cm) with the 1.5 in (3.8 cm) loop.
If every checkpoint matches, your cables will have a cheerful, tidy home all season long.
Happy crocheting!