

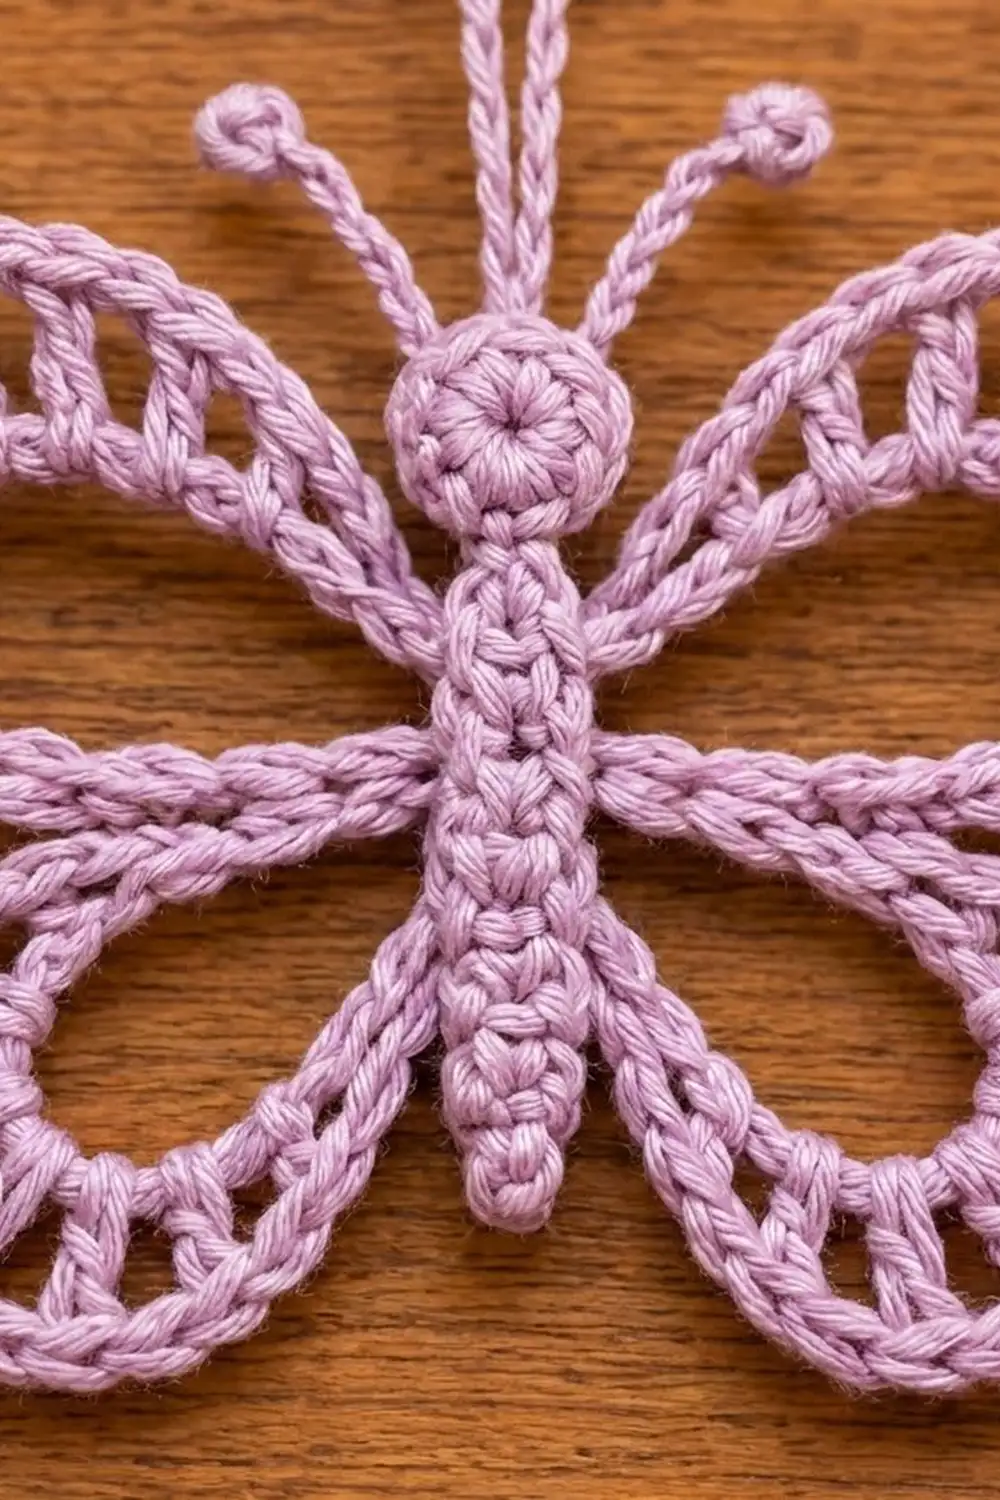
This little butterfly is light, lacy and quick to make. It is a flat, open ornament with a round head, a slim body, four airy wings and two curled antennae. A long chain loop at the top lets it hang from a branch, a window latch or a gift bow.
The sample is soft lilac. It also looks lovely in cream, blush pink or mint green, so you can make a whole set for the tree in one evening. Each ornament is a single piece in one color. A smooth mercerized cotton gives the clearest stitch definition and makes the lace “rungs” stand out.
The pattern uses US crochet terms. The finished butterfly is 4.5 in (11.4 cm) wide and 3.5 in (8.9 cm) tall, not counting the antennae and hanging loop.
Construction overview: You’ll start with the head, worked in a magic ring. The body is made as a short two-row strip off the head. Each wing begins as a chain loop anchored to the body edge. A lace pass of double crochet and chain spaces goes along the outside of each loop, and a single-crochet rim finishes each wing. Last come the antennae and the hanging loop.
Finished Size and Construction
- Finished size: 4.5 in (11.4 cm) wide × 3.5 in (8.9 cm) tall
- Skill level: Easy–Intermediate
- Terminology: US crochet terms
- Yarn weight: Fingering weight (Category 1) cotton
- Hook: 2.5 mm
- Number of pieces: 1 (single motif)
- Layout: Head at the top center, body down the middle, two upper wings and two lower wings, one pair on each side of the body
- Piece size: 4.5 in × 3.5 in (11.4 cm × 8.9 cm)
- Size before border: 4 in × 3 in (10.2 cm × 7.6 cm)
- Border depth: 0.25 in (0.6 cm) on each outer wing edge
- Hanging loop: about 2 in (5.1 cm) tall when folded
Materials
Yarn advice: Choose a smooth fingering-weight cotton or cotton blend with about 170 m per 50 g. Mercerized cotton holds its shape best after blocking. Fuzzy or very stretchy yarns will blur the open spaces.
Colors (per ornament):
- Lilac (main sample): 8 g / 27 m
- Optional colorways, 8 g / 27 m each:
- Cream
- Blush Pink
- Mint Green
These quantities include a margin of about 25%. One butterfly actually uses close to 6 g.
Tools:
- 2.5 mm crochet hook
- Tapestry needle
- Small scissors
- Rustproof pins and a foam blocking mat
- Spray bottle with water
- Ruler or tape measure
- Optional: fabric stiffener, for a crisper ornament
Abbreviations (US Terms)
- ch – chain
- sl st – slip stitch
- sc – single crochet
- dc – double crochet
- sk – skip
- st(s) – stitch(es)
- sp – space
- MR – magic ring
- [ ] – repeat the instructions in brackets as many times as stated
Special note – body edge stitches: The body has two long edges. Edge A is the tops of the Row 2 single crochets. Edge B is the free loops of the foundation chain. On both edges, stitches are numbered 1 to 11, starting from the head end.
Gauge and Checkpoints
Gauge: 7 sc and 8 sc rows = 1 in (2.5 cm).
Gauge matters here mainly for proportions, not fit. Make one complete butterfly first, check it against the checkpoints below, and only then make a set.
Checkpoints:
- Head: 0.5 in (1.3 cm) across
- Body (Rows 1–2): 1.6 in (4.1 cm) long and 0.25 in (0.6 cm) wide. Head plus body is 2.1 in (5.3 cm).
- Upper wing chain loop, laid flat: about 2 in (5.1 cm) long
- Lower wing chain loop, laid flat: about 1.5 in (3.8 cm) long
- After the lace passes: 4 in × 3 in (10.2 cm × 7.6 cm)
- After the border: 4.5 in × 3.5 in (11.4 cm × 8.9 cm)
If your butterfly is too big, go down to a 2.25 mm hook, or check that your chains aren’t loose. Loose chains are the most common cause.
If it is too small, go up to a 2.75 mm hook.
Chain tension matters most in this design, because each wing is built on a chain loop. Keep your chains the same size as your single crochets.
Pattern
Head
Rnd 1: Make a MR. Ch 1 (does not count as a st), work 8 sc into the ring. Pull the ring closed. Sl st in the first sc to join. (8 sc)
Number the head stitches 1–8, with st 1 being the stitch you just joined into. St 1 is the bottom of the head, where the body attaches. St 5 is the top center. Do not fasten off.
Body
Row 1: Ch 12. Sc in the 2nd ch from the hook and in each ch across. Sl st in the next head st (st 2). (11 sc)
Row 2: Ch 1, turn. Sc in each of the 11 sc, working from the head end down to the tail. (11 sc)
Fasten off and weave in the ends.
The body is now a narrow two-column strip with a softly rounded tail. Edge A (the Row 2 tops) runs down one side. Edge B (the foundation chain’s free loops) runs down the other. Checkpoint: 1.6 in (4.1 cm) long.
Wings – Edge A Side
Hold the butterfly with the right side facing you and Edge A on your right.
Upper wing frame: Join yarn with a sl st in Edge A st 2. Ch 28, then sl st in Edge A st 4 to make a loop. (28 ch)
Upper wing lace pass: Ch 1 (does not count as a st). Work along the outer side of the chain loop, from the chain closest to st 4 back toward st 2:
- Sc in each of the first 3 ch.
- [Dc in the next ch, ch 1, sk the next ch] 11 times.
- Sc in each of the last 3 ch.
- Sl st in Edge A st 2.
Stitch count: 3 sc + 11 dc + 11 ch-1 sps + 3 sc = 28 sts. This uses the loop’s 28 chains exactly: 3 + 22 + 3 = 28.
Travel: Sl st in Edge A st 3, st 4 and st 5.
Lower wing frame: Ch 22, then sl st in Edge A st 8 to make a loop. (22 ch)
Lower wing lace pass: Ch 1. Work along the outer side of the loop, from st 8 back toward st 5:
- Sc in each of the first 3 ch.
- [Dc in the next ch, ch 1, sk the next ch] 8 times.
- Sc in each of the last 3 ch.
- Sl st in Edge A st 5.
Stitch count: 3 sc + 8 dc + 8 ch-1 sps + 3 sc = 22 sts. This uses all 22 chains: 3 + 16 + 3 = 22.
Fasten off.
Keep the dc stitches on the outer curve of each loop, so the rungs point outward like the veins of a wing. The inside of the loop stays open.
Wings – Edge B Side
Turn the butterfly so that Edge B is on your right, still with the right side facing. Repeat both wing frames and both lace passes exactly as for Edge A, working into the free loops of Edge B sts 2, 4, 5 and 8.
The two sides now mirror each other. Checkpoint: 4 in × 3 in (10.2 cm × 7.6 cm).
Antennae and Hanging Loop
Join yarn with a sl st in head st 4.
- First antenna: Ch 7. Work 4 sc in the 2nd ch from the hook to make the knob. Sl st in each of the next 5 ch. Sl st in head st 4.
- Hanging loop: Sl st in head st 5. Ch 30, then sl st in head st 5 again. (30 ch)
- Second antenna: Sl st in head st 6. Ch 7, work 4 sc in the 2nd ch from the hook, sl st in each of the next 5 ch, and sl st in head st 6.
Fasten off.
Each antenna is about 1 in (2.5 cm) long including the knob. Twist the knobs gently forward so they curl. The 30-ch loop is about 4.3 in (10.9 cm) around, so it hangs about 2 in (5.1 cm) tall when folded.
Border
The border is a single-crochet rim around the outer edge of each wing. It smooths the edge and gives the lace a defined frame.
Border gauge: 7 sc = 1 in (2.5 cm), the same as the main gauge. The rim adds 0.25 in (0.6 cm) of depth to each outer edge.
Edge A Side
- Join yarn with a sl st in Edge A st 8. Ch 1.
- Lower wing rim: Sc in each sc, each dc and each ch-1 sp around the lower wing. (22 sc)
- Sl st in Edge A st 5, then sl st in Edge A st 4. Ch 1.
- Upper wing rim: Sc in each sc, each dc and each ch-1 sp around the upper wing. (28 sc)
- Sl st in Edge A st 2.
Fasten off.
Edge B Side
Repeat the Edge A border on Edge B, starting in Edge B st 8. (22 sc lower rim, 28 sc upper rim)
Total border: 2 × 22 + 2 × 28 = 100 sc
Why the Math Works
Each rim has exactly one sc for every stitch or space in its lace pass:
- Upper wing: 28 lace sts → 28 rim sc
- Lower wing: 22 lace sts → 22 rim sc
You don’t add or skip anything, so the rim lies flat. The outer curve of the lace pass is a little longer than the chain loop. The 11 (or 8) ch-1 spaces spread the dc tops apart to cover that extra length, so one sc per space fills the curve without cupping or ruffling.
Each side of the finished butterfly gains 0.25 in (0.6 cm), so 4 in × 3 in (10.2 cm × 7.6 cm) becomes 4.5 in × 3.5 in (11.4 cm × 8.9 cm).
Final Blocking
- Weave in all remaining ends along the body or inside the rims, where they won’t show through the lace.
- Mist the butterfly evenly with water until it is damp, not dripping.
- Lay it right side up on the blocking mat.
- Pin the center of the body first, keeping it straight and 1.6 in (4.1 cm) long.
- Pin the tip of each upper wing out to a total width of 4.5 in (11.4 cm).
- Pin the bottom of each lower wing so the total height is 3.5 in (8.9 cm).
- Add pins along each rim, between the rungs, so the open spaces stay even.
- Curl the antenna knobs with your fingertips and let the hanging loop lie straight.
- If you like, brush on a thin coat of fabric stiffener for a crisper ornament.
- Let it dry completely before unpinning, usually 4–6 hours.
Final Quality-Control Checklist
- [ ] Head has 8 sc and is 0.5 in (1.3 cm) across
- [ ] Body has 11 sc in each of its 2 rows
- [ ] Each upper wing has 11 dc rungs and a 28-sc rim
- [ ] Each lower wing has 8 dc rungs and a 22-sc rim
- [ ] Both sides mirror each other (same anchor stitches 2, 4, 5 and 8)
- [ ] Rims lie flat with no ruffling or cupping
- [ ] Antennae are equal in length, about 1 in (2.5 cm), with curled knobs
- [ ] Hanging loop is secure at head st 5
- [ ] Finished size is 4.5 in × 3.5 in (11.4 cm × 8.9 cm)
- [ ] All ends are woven in securely
Troubleshooting
Wings ruffle. Your chain loop is too tight compared with your dc stitches. Remake the frame with looser chains, or go up one hook size for the chains only.
Wings cup or curl inward. The rim is too tight. Work the rim sc a little more loosely, and check that you placed exactly one sc in each ch-1 sp.
Lace pass count is off. Count the chains in the loop before you start the lace. It must be exactly 28 chains (upper) or 22 chains (lower).
The two sides look different. Check the anchor stitches. Both edges use sts 2, 4, 5 and 8, counted from the head.
The body twists. Pin it straight while blocking. A light coat of stiffener on the body helps.
Antennae droop. Make the knob stitches tight, and curl the tips while the piece is still damp.
The ornament is floppy. Use mercerized cotton, or add fabric stiffener after blocking.
Care
Hand wash in cool water with mild soap, press out the water in a towel, and dry flat, reshaping the wings. Store flat or hanging so the wings and antennae keep their shape.

Final Notes
The measurement chain is short and easy to check:
- The head is 0.5 in (1.3 cm).
- The body adds 1.6 in (4.1 cm), for 2.1 in (5.3 cm) in total.
- The wing loops and lace passes bring the butterfly to 4 in × 3 in (10.2 cm × 7.6 cm).
- The rims add 0.25 in (0.6 cm) on each edge, for a finished size of 4.5 in × 3.5 in (11.4 cm × 8.9 cm).
If each stage matches its checkpoint, the finished ornament will too. Make one in lilac, then try cream, blush and mint for a full set on the tree.
Happy crocheting!