
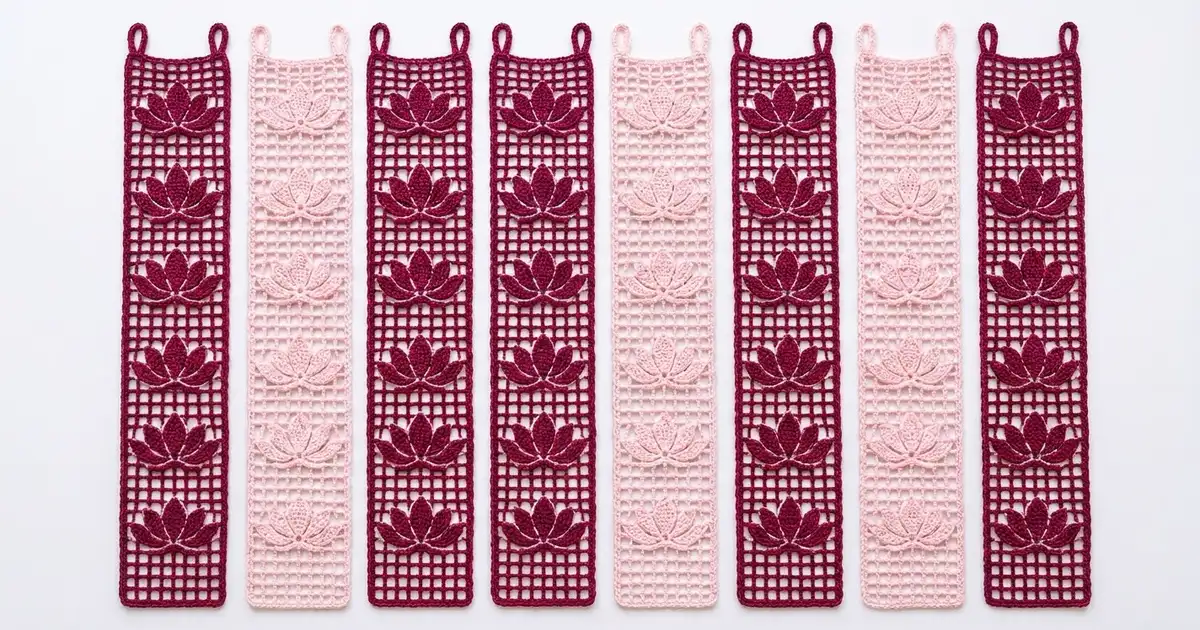
This curtain is made of seven tall, narrow filet-mesh strips, and each strip has a column of lotus flowers sewn down its center. Each strip hangs on its own from a rod, so you can walk through the curtain, and light and air still pass through the open squares.
The color plan alternates deep burgundy and soft light pink, with burgundy at both outer edges. Four strips are burgundy and three are pink. Each lotus matches its strip color, so the flowers show up as raised texture rather than as color contrast.
This pattern uses US crochet terms. Each strip finishes at about 5.9 in (15.0 cm) wide and 74.9 in (190.2 cm) long, plus hanging loops. With 1 in (2.5 cm) gaps between strips, the full curtain is about 47.3 in (120.1 cm) wide.
Construction is simple and repetitive. You work a 9-square filet mesh strip in rows, add one round of single crochet border, then work two hanging loops along the top edge. Next you make 60 small petals per strip (12 lotuses of 5 petals each) and sew them onto the mesh in fans.
Finished Size and Construction
- Strip size: 5.9 in × 74.9 in (15.0 cm × 190.2 cm), plus about 1.5 in (3.8 cm) of loop
- Skill level: Easy to intermediate
- Terminology: US
- Yarn weight: Worsted (#4), cotton or cotton blend
- Hook: 5 mm (H-8)
- Number of pieces: 7 strips plus 84 lotus appliqués (420 petals)
- Layout: 7 strips side by side, hung separately and not seamed together
- Mesh size before border: 9 squares × 124 rows = 5.4 in × 74.4 in (13.7 cm × 189.0 cm)
- Border depth: 1 round of sc, about 0.25 in (0.6 cm) on each side
Materials
Choose a smooth, firm worsted cotton. Cotton keeps the squares crisp and doesn’t stretch much when the strips hang. Avoid fuzzy yarns, because they blur the mesh.
- Burgundy: 850 g (about 1,530 m), for 4 strips and 48 lotuses
- Light pink: 650 g (about 1,170 m), for 3 strips and 36 lotuses
One strip with its lotuses and loops uses about 320 m (about 178 g). The quantities above include a margin of roughly 20% for swatching, sewing tails, and differences between dye lots.
Tools:
– 5 mm (H-8) crochet hook
– Tapestry needle
– Rust-proof pins
– Measuring tape
– Stitch markers
– Blocking mats or a large towel
– A wooden curtain rod up to 1.25 in (3.2 cm) in diameter
Abbreviations (US Terms)
- ch: chain
- sl st: slip stitch
- sc: single crochet
- hdc: half double crochet
- dc: double crochet
- sk: skip
- sp: space
- st(s): stitch(es)
Special stitch: mesh square. A mesh square is (dc, ch 2), followed by a dc that closes the square. Two neighboring squares share the dc between them, so a row of 9 squares has 10 dc and 9 ch-2 spaces.
Gauge and Checkpoints
Gauge: 5 mesh squares = 3 in (7.6 cm) wide, and 5 rows = 3 in (7.6 cm) tall. Each square measures 0.6 in (1.5 cm) on each side.
Test one piece first. Work Rows 1–10 of the first strip, then pin it flat without stretching and measure:
- Width: 5.4 in (13.7 cm)
- Height: 6 in (15.2 cm)
Then make one test lotus and lay it on the mesh. It should cover about 7 squares across.
If the swatch is too big, go down to a 4.5 mm hook. If it’s too small, go up to a 5.5 mm hook. Your squares should be square. If they’re taller than they are wide, pull up less on the dc. If they’re wider than tall, loosen your chains.
Checkpoints for each strip:
- After Row 20: 12 in (30.5 cm) long, 5.4 in (13.7 cm) wide
- After Row 62: 37.2 in (94.5 cm) long
- After Row 124: 74.4 in (189.0 cm) long
- After the border: 5.9 in × 74.9 in (15.0 cm × 190.2 cm)
A width difference of up to 0.2 in (0.5 cm) is fine. If you’re off by more than that, check your hook size before you go further.
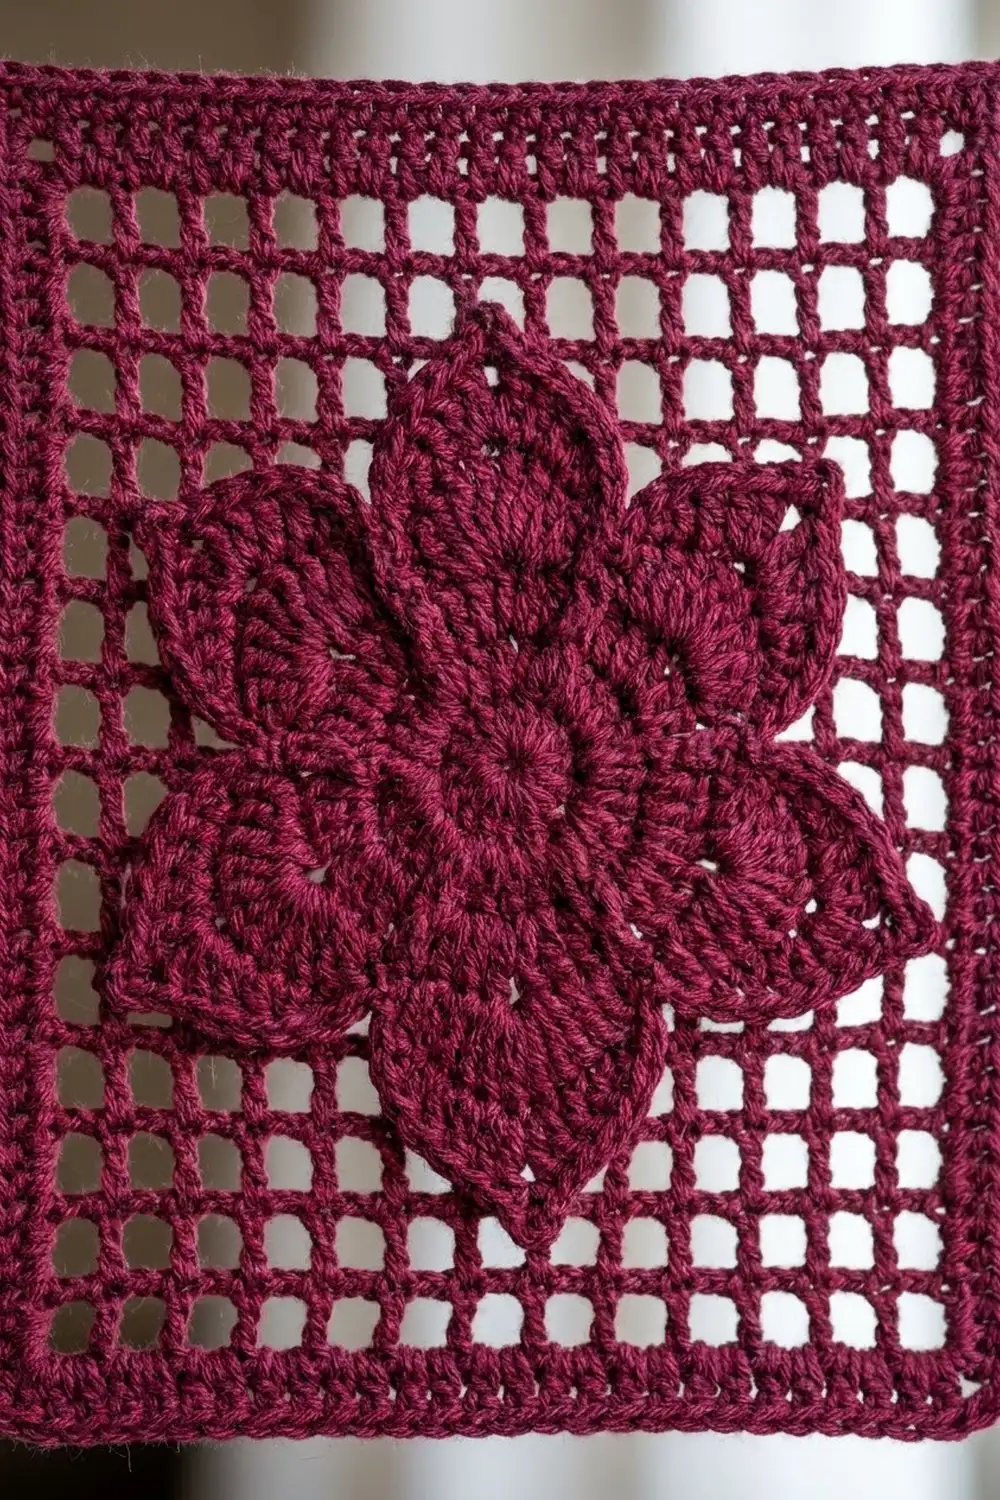
Mesh Strip (make 7)
Rows are worked from the bottom edge to the top. Row 124 is the top edge, where the loops go.
Foundation: Ch 32.
Row 1: Dc in 8th ch from hook. The skipped chains count as dc, ch 2 and the skipped chains of the first square. Ch 2, sk 2 ch, dc in next ch; repeat from * 7 more times. Turn. (9 squares: 10 dc, 9 ch-2 sps)*
Row 2: Ch 5 (counts as dc and ch 2). Sk the first ch-2 sp, dc in the next dc. Ch 2, dc in next dc; repeat from * across, working the last dc in the 3rd ch of the turning chain. Turn. (9 squares: 10 dc, 9 ch-2 sps)*
Rows 3–124: Repeat Row 2. Every row has 9 squares (10 dc, 9 ch-2 sps). Don’t fasten off.
Count your dc every 10 rows. If you skip the turning-chain dc at the end of a row, the strip loses a square.
Border (each strip)
Border gauge: 5 sc = 1 in (2.5 cm) along every edge.
Across the top and bottom edges, each 0.6 in (1.5 cm) square gets 3 sc (1 sc in the dc and 2 sc in the space). Along the sides, each 0.6 in (1.5 cm) row-end also gets 3 sc. Because both directions use the same density, the border lies flat without ruffling or pulling in.
Round 1: Ch 1. Work along the top edge of Row 124 as follows:
- 3 sc in the first dc (corner).
- 2 sc in each ch-2 sp and 1 sc in each of the 8 inner dc.
- 3 sc in the last dc (corner).
- Down the side, work 3 sc in each of the 124 row-ends.
- Along the foundation chain, work 3 sc in the first ch (corner). Work 2 sc in each ch-2 sp and 1 sc at the base of each of the 8 inner dc. Work 3 sc in the last ch (corner).
- Up the second side, work 3 sc in each of the 124 row-ends.
- Join with a sl st to the first sc.
Counts per side, including both corner sc:
– Top: 1 + 1 + 18 + 8 + 1 + 1 = 30 sc
– Bottom: 30 sc
– Each long side: 1 + 1 + 372 + 1 + 1 = 376 sc
– Round total: 4 corner groups of 3 (12) + 26 + 26 + 372 + 372 = 808 sc
Why the math works: The top edge has 28 sc between the corner sc over 5.4 in (13.7 cm), which is about 5.2 sc per inch. Each side has 372 sc over 74.4 in (189.0 cm), which is exactly 5 sc per inch. These densities match closely enough to keep the corners square.
Don’t fasten off. Sl st along the top edge to the 3rd st of the top side.
Hanging loops: Number the 30 top-edge sts from left to right.
- Left loop: With your working loop at st 3, ch 16, which measures about 3.2 in (8.1 cm). Sl st in st 6. Work 24 sc into the ch-16 loop, working back toward st 3, then sl st in st 3. Sl st along to st 25.
- Right loop: Ch 16, sl st in st 28. Work 24 sc into the loop, then sl st in st 25. Fasten off and weave in the ends.
Each loop stands about 1.5 in (3.8 cm) tall and fits a rod up to 1.25 in (3.2 cm) in diameter.
Lotus Appliqué (12 per strip)
Each lotus has 5 separate petals: 1 large, 2 medium, and 2 small. Every petal is a pointed leaf shape worked around both sides of a chain. The tip is pointed and the base is rounded. Leave a 12 in (30.5 cm) tail on each petal for sewing.
Large petal (make 1): Ch 12.
– Side 1, in chs 2–11: sl st, sc, hdc, dc in each of the next 4 ch, hdc, sc, sc. (10 sts)
– Base: 3 sc in ch 12.
– Side 2, in the other side of chs 11–2: sc, sc, hdc, dc in each of the next 4 ch, hdc, sc, sl st. (10 sts)
– Tip: ch 2, sl st in the first sl st. Fasten off. (23 sts plus ch-2 tip; about 2.4 in / 6.1 cm long)
Medium petal (make 2): Ch 10.
– Side 1, in chs 2–9: sl st, sc, hdc, dc in each of the next 3 ch, hdc, sc. (8 sts)
– Base: 3 sc in ch 10.
– Side 2, in chs 9–2: sc, hdc, dc in each of the next 3 ch, hdc, sc, sl st. (8 sts)
– Tip: ch 2, sl st in the first sl st. Fasten off. (19 sts; about 2 in / 5.1 cm long)
Small petal (make 2): Ch 8.
– Side 1, in chs 2–7: sl st, sc, hdc, dc in each of the next 2 ch, hdc. (6 sts)
– Base: 3 sc in ch 8.
– Side 2, in chs 7–2: hdc, dc in each of the next 2 ch, hdc, sc, sl st. (6 sts)
– Tip: ch 2, sl st in the first sl st. Fasten off. (15 sts; about 1.6 in / 4.1 cm long)
Placement: Each strip has 12 repeats of 10 rows (Rows 3–122). Rows 1–2 and 123–124 stay plain. In each repeat, place a marker at the middle of square 5 (the center square) at the bottom of the repeat’s 3rd row. This marker is the lotus base point.
Stacking order:
1. Pin the two small petals first. Put their bases on the marker and angle them about 20° above horizontal, pointing left and right. Their tips should reach square 2 and square 8.
2. Pin the two medium petals next, angled about 50° and overlapping the small petal bases.
3. Pin the large petal last, standing straight up. Its tip should reach the top of the repeat’s 6th row.
Leave a gap of about 1/8 in (0.3 cm) between neighboring petals so the background shows through. Finished lotuses are about 4.2 in (10.7 cm) wide and 2.75 in (7.0 cm) tall.
Sewing: Use each petal’s tail to whipstitch its edge to the dc posts and chains underneath. Catch only the back loops of the petal so the stitches stay hidden. Tack the 3-sc base of every petal firmly to the marker point. Weave in the ends on the back.
Make All Pieces
- Burgundy: 4 strips, 48 lotuses (240 petals: 48 large, 96 medium, 96 small)
- Light pink: 3 strips, 36 lotuses (180 petals: 36 large, 72 medium, 72 small)
Layout, from left to right on the rod:
| B | P | B | P | B | P | B |
  1   2   3   4   5   6   7
B = burgundy strip   P = light pink strip
Before sewing on the appliqués, block all the strips and check that they’re the same length (see below).
Joining (Hanging Without Seams)
The strips are not joined to each other, so you don’t need any seam math. Each strip’s loops slide onto the rod, and the strips hang next to each other.
- Slide all 14 loops onto the rod in the layout order.
- Space the strips evenly, with a 1 in (2.5 cm) gap between neighbors.
- Make sure each strip’s two loops are the same distance apart as its own top edge (about 4.2 in / 10.7 cm between loop centers). If they’re farther apart, the strip will stretch sideways and the squares will distort.
Size checkpoint: 7 × 5.9 in + 6 × 1 in = 47.3 in (120.1 cm) total width. Bottom edges should line up within 0.5 in (1.3 cm). If a strip hangs lower, re-block it shorter.
Final Blocking
- Soak each finished strip, with its lotuses sewn on, in cool water for 10 minutes.
- Press out the water in a towel. Don’t wring.
- Lay the strip flat and pin it to 5.9 in × 74.9 in (15.0 cm × 190.2 cm).
- Pin a few rows of squares straight, using a ruler along the dc columns.
- Gently shape each petal with your fingers so the tips are pointed and the gaps between petals are open.
- Leave it to dry completely. Then hang it for 24 hours before you trim any ends.
Final Quality-Control Checklist
- Every row has 9 squares, and the strip has 124 rows.
- The border has 808 sc: 30 on the top and bottom sides and 376 on each long side.
- Both loops sit at sts 3–6 and 25–28 of the top side.
- There are 12 lotuses per strip, evenly spaced and centered.
- Each lotus has 5 petals stacked in order with visible gaps between them.
- All strips are within 0.5 in (1.3 cm) of each other in length.
- No tails show on the front.
Troubleshooting
- Squares are tall rectangles: Your dc are too loose. Go down a hook size, or shorten the yarn-over pull.
- Strip slants or narrows: You probably missed the last dc into the turning chain. Count 10 dc per row.
- Border ruffles on the sides: Your sc are too loose. Change to a smaller hook for the border only.
- Border pulls in: Make sure you’re working 3 sc per row-end, not 2. If it still pulls in, use a larger hook for the border.
- Petal tips curl: Block them pinned flat, and tack each tip down with 1 stitch.
- Strip stretches longer when hanging: This is normal for cotton. Block shorter, or take out 2 plain rows at the top before working the border.
Care
Hand wash in cool water, lay flat to dry, and re-block as needed. Avoid tumble drying, because it can stretch the mesh.

Final Notes
The measurements build on each other. A 0.6 in (1.5 cm) square sets the 9-square width of 5.4 in (13.7 cm). The 124 rows give 74.4 in (189.0 cm) of length. A border of 5 sc per inch brings each strip to 5.9 in × 74.9 in (15.0 cm × 190.2 cm). Seven strips with 1 in (2.5 cm) gaps make a 47.3 in (120.1 cm) curtain. Check your gauge first and every later number will follow.
Happy crocheting!