

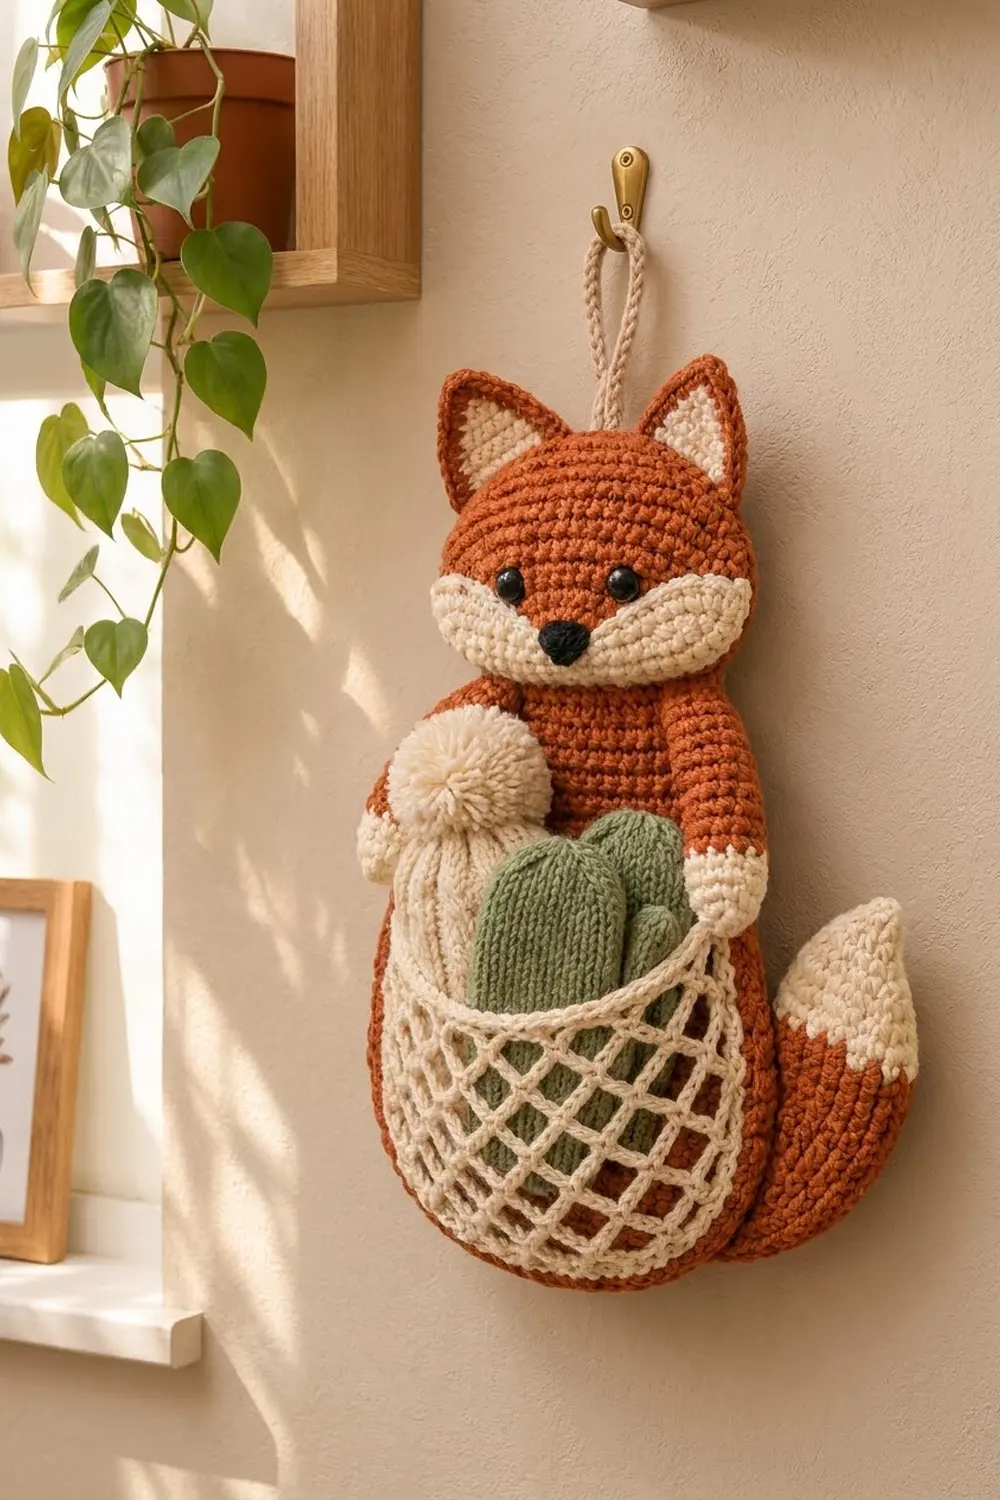
The Fernwood Fox is a flat wall organizer: a smiling rust-orange fox with a cream mesh pocket across its tummy. It hangs from a cream cord loop and holds small, light things like hats, mittens, hair ties or baby socks.
The palette is three colors. Rust is for the head, outer ears, body, arms and most of the tail. Cream is for the cheeks, inner ears, paws, tail tip, mesh pocket and hanging loop. Black is for the small nose, and you add two black safety eyes. The head and body are dense single crochet, so the open diamond net stands out clearly against them.
This pattern uses US crochet terms. The assembled fox measures about 12 in (30.5 cm) tall from ear tip to bottom edge and 8 in (20.3 cm) wide including the tail. The loop adds about 3.5 in (8.9 cm), for a total hanging height of about 15.5 in (39.4 cm).
You crochet 14 small flat parts:
– The head and body are flat ovals worked in rounds.
– The pocket is worked in rows from the top band down.
– The arms and tail are tubes that you leave unstuffed and press flat.
Then you add a border to the pocket and sew everything onto the body.
Finished Size and Construction
- Finished size: 12 in x 8 in (30.5 cm x 20.3 cm), plus a 3.5 in (8.9 cm) loop
- Skill level: Intermediate (oval rounds, net mesh, sewing pieces on)
- Terminology: US crochet terms
- Yarn weight: Worsted weight (#4), cotton or cotton blend
- Hook: 4.0 mm (G-6)
- Number of pieces: 14 crocheted parts plus 2 safety eyes
- Layout: Head over the top of the body, ears behind the head, tail behind the lower right of the body, arms down the sides, pocket over the lower body
- Body size: 6.25 in x 8.25 in (15.9 cm x 21.0 cm)
- Pocket size before border: 5.25 in x 5 in (13.3 cm x 12.7 cm)
- Pocket border depth: about 0.45 in (1.1 cm), 2 rows
Materials
Choose a smooth worsted cotton. Cotton holds its shape on a wall and keeps the mesh crisp. Acrylic also works, but the pocket will stretch more when it’s full.
- Rust: 75 g (130 m)
- Cream: 45 g (75 m)
- Black: 3 g (5 m)
These amounts include a safety margin of about 15%.
Tools:
– 4.0 mm (G-6) crochet hook
– Two 9 mm black safety eyes with washers
– Tapestry needle
– Stitch markers
– Rust-proof pins and a blocking mat
– Scissors and a tape measure
Abbreviations (US Terms)
- ch – chain
- sl st – slip stitch
- sc – single crochet
- hdc – half double crochet
- dc – double crochet
- sc2tog – single crochet 2 together
- MR – magic ring
- sp – space
- st(s) – stitch(es)
- RS – right side
Special stitch: sl st cord. Make a chain. Then work a sl st into the back bump of each chain. This makes a firm cord that looks braided.
Gauge and Checkpoints
Gauge: 16 sc and 18 rounds = 4 in (10.2 cm). That’s 4 sts per inch, and each round is about 0.22 in (0.6 cm) tall.
Make the head first as your test piece. It’s quick and shows whether your gauge works on these flat ovals.
Checkpoints:
– Head after Rnd 9: 5.5 in x 4 in (14.0 cm x 10.2 cm)
– Body after Rnd 7: 3.1 in x 5.1 in (7.9 cm x 13.0 cm)
– Body after Rnd 14: 6.25 in x 8.25 in (15.9 cm x 21.0 cm)
– Pocket before border: 5.25 in x 5 in (13.3 cm x 12.7 cm)
If your pieces don’t measure right:
– Too big: go down half a hook size.
– Too small: go up half a hook size.
– An oval cups: you’re working too tightly, so relax your tension.
– An oval ruffles: check that each round adds exactly 6 sts.
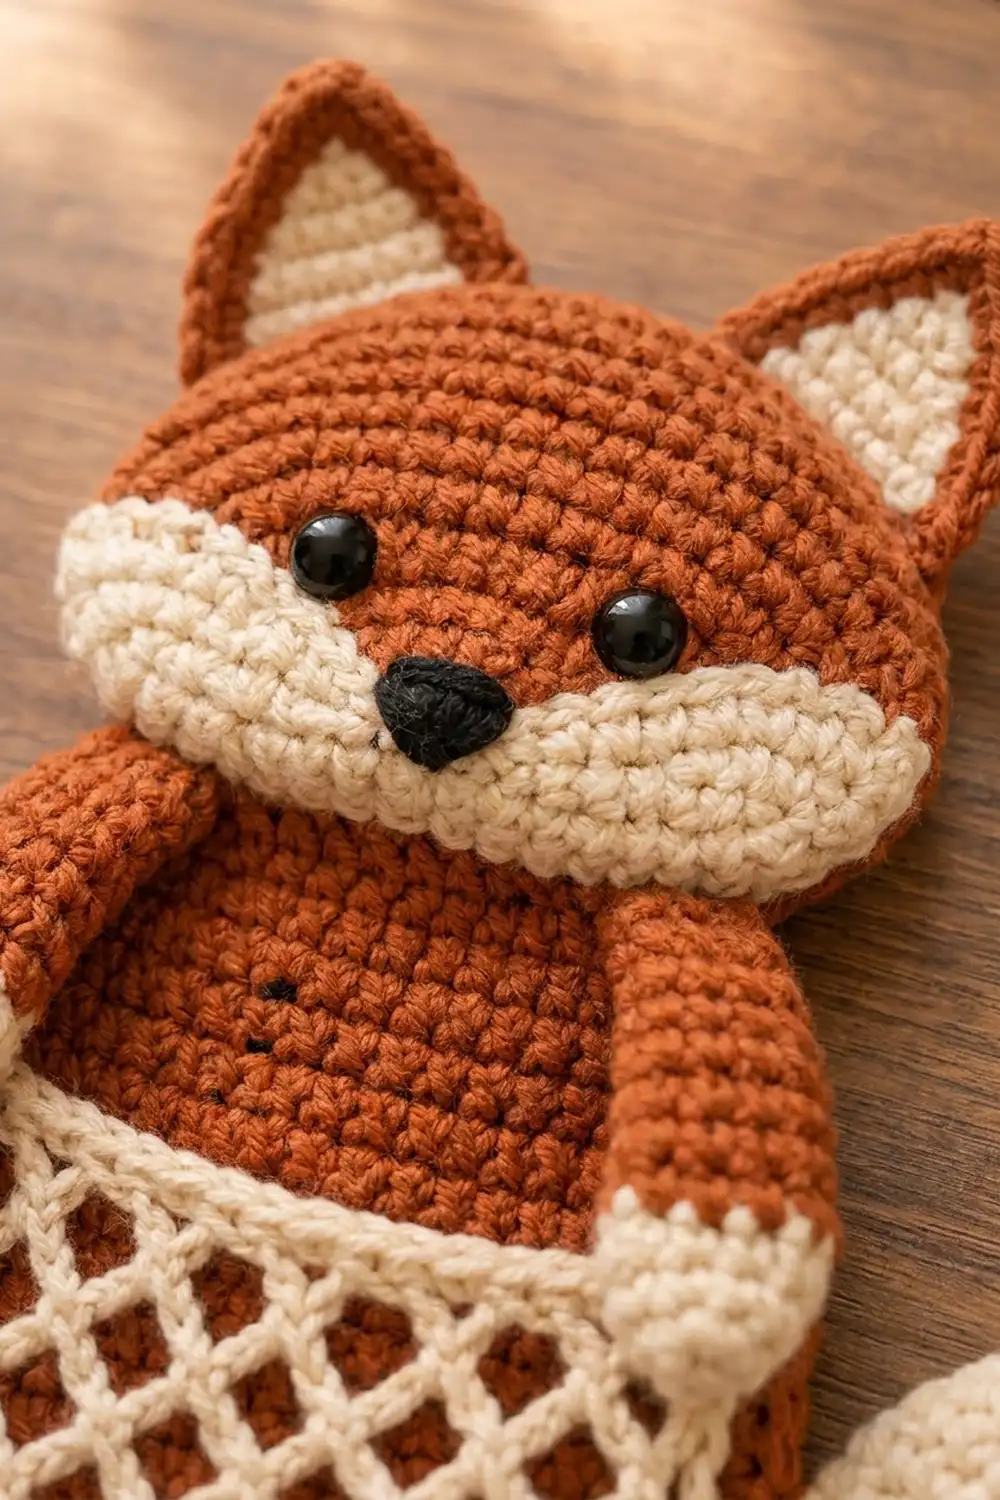
Head (Rust, make 1)
Ch 9.
Rnd 1: 3 sc in the 2nd ch from the hook, sc in the next 6 ch, 3 sc in the last ch. Continue along the other side of the foundation chain: sc in the next 6 ch. Join with a sl st to the first sc. (18 sts)
Rnd 2: Ch 1, [2 sc in each of the next 3 sts, sc in the next 6] twice. Join. (24 sts)
Rnd 3: Ch 1, [(sc in the next st, 2 sc in the next st) 3 times, sc in the next 6] twice. Join. (30 sts)
Rnds 4–9: Ch 1. For round number n, work [(sc in the next n − 2 sts, 2 sc in the next st) 3 times, sc in the next 6] twice. Join.
Each round adds 6 sts:
– Rnd 4: 36 sts
– Rnd 5: 42 sts
– Rnd 6: 48 sts
– Rnd 7: 54 sts
– Rnd 8: 60 sts
– Rnd 9: 66 sts
Fasten off and leave a long tail for sewing. The head should measure 5.5 in x 4 in (14.0 cm x 10.2 cm).
Body (Rust, make 1)
Ch 11.
Rnd 1: 3 sc in the 2nd ch from the hook, sc in the next 8 ch, 3 sc in the last ch. Continue along the other side of the chain: sc in the next 8 ch. Join. (22 sts)
Rnd 2: Ch 1, [2 sc in each of the next 3 sts, sc in the next 8] twice. Join. (28 sts)
Rnds 3–14: Ch 1. For round number n, work [(sc in the next n − 2 sts, 2 sc in the next st) 3 times, sc in the next 8] twice. Join.
The total for each round is 6n + 16:
– Rnd 3: 34 sts
– Rnd 4: 40 sts
– Rnd 5: 46 sts
– Rnd 6: 52 sts
– Rnd 7: 58 sts
– Rnd 8: 64 sts
– Rnd 9: 70 sts
– Rnd 10: 76 sts
– Rnd 11: 82 sts
– Rnd 12: 88 sts
– Rnd 13: 94 sts
– Rnd 14: 100 sts
Fasten off and weave in the ends. The body is a tall oval, 6.25 in x 8.25 in (15.9 cm x 21.0 cm). Once the head covers its top, it looks egg-shaped.
Ears (make 2 outer in rust, 2 inner in cream)
Outer ear (rust):
- Row 1: Ch 2, 3 sc in the 2nd ch from the hook. (3 sts)
- Row 2: Ch 1, turn. 2 sc in the first st, sc in the next st, 2 sc in the last st. (5 sts)
- Row 3: Ch 1, turn. Sc across. (5 sts)
- Row 4: Ch 1, turn. 2 sc in the first st, sc in the next 3 sts, 2 sc in the last st. (7 sts)
- Row 5: Ch 1, turn. Sc across. (7 sts)
- Row 6: Ch 1, turn. 2 sc in the first st, sc in the next 5 sts, 2 sc in the last st. (9 sts)
Edging: Ch 1. Work around the ear and join:
– 1 sc in each row end up the first slanted side (6 sts)
– 3 sc in the tip
– 1 sc in each row end down the second slanted side (6 sts)
– 1 sc in each st across the base (9 sts)
Total: 6 + 3 + 6 + 9 = 24 sts. The outer ear measures about 2.5 in wide x 1.75 in tall (6.4 cm x 4.4 cm).
Inner ear (cream): Work Rows 1–4 of the outer ear. (7 sts) Fasten off and leave a tail. It measures about 1.75 in x 1 in (4.4 cm x 2.5 cm).
Center the inner ear on the outer ear with the bases lined up, and whipstitch it in place.
Cheeks (Cream, make 2)
Ch 11.
Rnd 1:
1. Starting in the 2nd ch from the hook: sl st, sc, hdc, dc in the next 4 ch, hdc, sc, then 3 sc in the last ch. (12 sts)
2. Continue along the other side of the chain: sc, hdc, dc in the next 4 ch, hdc, sc, sl st in the last ch. (9 sts)
Rnd 1 total: 12 + 9 = 21 sts.
Rnd 2: Ch 1, sc in each st around, working 2 sc in each of the 3 sts at the rounded end. Join. (21 sts + 3 added = 24 sts)
The cheek is an almond shape about 2.75 in x 1.25 in (7.0 cm x 3.2 cm). The sl st end is pointed and the other end is rounded.
Nose (Black, make 1)
Ch 4.
- Row 1: Sc in the 2nd ch from the hook and in the next 2 ch. (3 sts)
- Row 2: Ch 1, turn. Sc2tog, sc. (2 sts)
- Row 3: Ch 1, turn. Sc2tog. (1 st)
Fasten off and leave a tail. The nose is a triangle about 0.75 in (1.9 cm) wide.
Arms (make 2)
Work in continuous rounds, starting with cream.
- Rnd 1: 6 sc in a MR. (6 sts)
- Rnd 2: 2 sc in each of the next 4 sts, sc in the next 2. (10 sts)
- Rnds 3–4: Sc in each st around. (10 sts)
- Rnds 5–16: Change to rust. Sc in each st around. (10 sts)
Don’t stuff the arm. Flatten the tube and work 5 sc through both layers to close the top, then fasten off. Each arm measures about 1.25 in x 3.5 in (3.2 cm x 8.9 cm) and has a cream paw.
Tail (make 1)
Work in continuous rounds, starting with cream.
- Rnd 1: 4 sc in a MR. (4 sts)
- Rnd 2: (Sc, 2 sc in the next st) twice. (6 sts)
- Rnd 3: (Sc in the next 2, 2 sc in the next st) twice. (8 sts)
- Rnd 4: (Sc in the next 3, 2 sc in the next st) twice. (10 sts)
- Rnd 5: (Sc in the next 4, 2 sc in the next st) twice. (12 sts)
- Rnd 6: (Sc in the next 5, 2 sc in the next st) twice. (14 sts)
- Rnd 7: Change to rust. (Sc in the next 6, 2 sc in the next st) twice. (16 sts)
- Rnd 8: (Sc in the next 7, 2 sc in the next st) twice. (18 sts)
- Rnds 9–12: Hdc in the next 9, sc in the next 9. (18 sts) The taller hdc side makes the tail curve.
- Rnds 13–14: Sc in each st around. (18 sts)
- Rnd 15: (Sc in the next 7, sc2tog) twice. (16 sts)
- Rnd 16: (Sc in the next 6, sc2tog) twice. (14 sts)
Flatten the tail with the curve to one side. Work 7 sc through both layers to close it. The tail measures about 2.25 in x 4 in (5.7 cm x 10.2 cm) and has a pointed cream tip.
Mesh Pocket (Cream, make 1)
Ch 22.
Row 1: Sc in the 2nd ch from the hook and in each ch across. (21 sts)
Row 2: Ch 1, turn. Sc across. (21 sts) Rows 1–2 form the solid top band.
Row 3: Ch 1, turn. Sc in the first st, *ch 5, skip 3 sts, sc in the next st; repeat from * 4 more times. (5 ch-5 loops, using 1 + 5 × 4 = 21 sts)
Row 4: Ch 5 (counts as dc + ch 2), turn. Sc in the first ch-5 loop, *ch 5, sc in the next loop; repeat from * 3 more times. Ch 2, dc in the last sc. (4 full loops + 2 half loops)
Row 5: Ch 1, turn. Sc in the dc, *ch 5, sc in the next ch-5 loop; repeat from * 3 more times. Ch 5, sc in the 3rd ch of the turning ch. (5 full loops)
Rows 6–11: Repeat Rows 4–5 three more times, ending on a full-loop row.
Don’t fasten off. Before the border, the pocket measures 5.25 in x 5 in (13.3 cm x 12.7 cm). Each mesh row is about 0.5 in (1.3 cm) tall when lightly stretched.
Hanging Loop (Cream, make 1)
Ch 41. Work a sl st cord into the back bumps (40 sl sts). The cord is about 9 in (22.9 cm) long. Fold it in half.
Make All Pieces
Rust: head, body, 2 outer ears, upper part of both arms, main part of the tail
Cream: 2 inner ears, 2 cheeks, paws, tail tip, pocket, loop
Black: nose
Layout (front view):
        [Ear]      [Ear]
         [   HEAD    ]
         [Cheek|Cheek]
   [Arm] [   BODY    ] [Arm]
         [  POCKET   ]
         [  POCKET   ][Tail]
Assembly
Head:
1. Pin the two cheeks across the lower half of the head, with the rounded ends meeting in the center and the points facing outward.
2. Push the safety eyes through just above the inner edge of each cheek, 1.75 in (4.4 cm) apart. Attach the washers on the back.
3. Whipstitch the cheeks in place.
4. Sew the nose over the cheek seam, point down.
5. Sew the bottom 0.5 in (1.3 cm) of each ear behind the head, so each ear stands about 1.25 in (3.2 cm) above the head.
Head, tail and arms onto the body:
1. Lay the head over the top of the body so it overlaps by 1.5 in (3.8 cm). Whipstitch along the lower edge of the head.
2. Sew the tail behind the lower right of the body so 1.75 in (4.4 cm) sticks out, with the tip pointing up.
3. Sew the closed top of each arm just under the head, one on each side of the body.
Sewing tips: Use matching yarn and catch only the back loops of the top layer. Keep your tension snug but even, because tight stitches will pucker the body.
Size checkpoint: 12 in x 8 in (30.5 cm x 20.3 cm).
Border (Pocket)
The border uses the same gauge as the rest of the fox: 4 sts per inch. In this section, the corner groups are counted separately and are not included in the side totals.
Border Row 1: Don’t turn. With the RS facing, work the U-shaped border down the left side, across the bottom and up the right side:
1. Left side: 1 sc in each of the 2 band row ends, then 2 sc around each of the 9 mesh row ends. (20 sts)
2. Bottom-left corner: 3 sc.
3. Bottom edge: 4 sc in each of the 5 loops. (20 sts)
4. Bottom-right corner: 3 sc.
5. Right side: Work it the same way as the left side. (20 sts)
Total: 20 + 3 + 20 + 3 + 20 = 66 sts.
Border Row 2: Ch 1, turn.
1. Sc in the next 21 sts.
2. 3 sc in the center st of the corner.
3. Sc in the next 22 sts.
4. 3 sc in the center st of the corner.
5. Sc in the last 21 sts.
Total: 21 + 3 + 22 + 3 + 21 = 70 sts (66 + 4 added). Fasten off and leave a long tail.
Why the math works:
– Each side has 20 sts. At 4 sts per inch that’s 5 in, which matches the 5 in (12.7 cm) pocket height.
– The bottom has 20 sts under a 21-stitch top band. That one stitch less pulls the bottom in slightly, so the pocket bows outward and can hold things.
– The finished pocket is 6.15 in x 5.45 in (15.6 cm x 13.8 cm).
Attach the pocket and loop:
1. Center the pocket on the lower body, about 0.25 in (0.6 cm) inside the body’s edge.
2. Pin the bottom corners into the curve of the body.
3. Whipstitch the sides and bottom through the Row 2 stitches. Leave the top band open.
4. Tack each paw over the top band.
5. Sew the folded ends of the loop 1 in (2.5 cm) down the back of the head. This leaves a 3.5 in (8.9 cm) loop above the head.
Final Blocking
- Mist the fox lightly with water.
- Pin it face up to 12 in x 8 in (30.5 cm x 20.3 cm).
- Open the diamonds evenly, pinning at the bottom loops.
- Press the ears and tail flat and shape the tail’s curve.
- Let it dry completely, then unpin.
Final Quality-Control Checklist
- Head is 66 sts and body is 100 sts.
- Ears match, and the inner ears are centered.
- Eyes are level and the washers are secure.
- Nose is centered on the cheek seam.
- Pocket border is 66 sts in Row 1 and 70 sts in Row 2, and the top is open.
- The loop holds firmly.
- All ends are woven in.
Troubleshooting
- The oval cups: Loosen your tension.
- The oval ruffles: Recount your stitches. Each round should add exactly 6.
- The mesh slants: Check the turning chain at the start of each row.
- The pocket gapes open: Snug up the bottom border.
- The fox hangs crooked: Re-center the loop.
Care
Hand wash in cold water and lay flat to dry. Empty the pocket before washing.
Final Notes
Here is the measurement chain from start to finish:
– Gauge: 4 sts per inch
– Head: 5.5 in x 4 in (14.0 cm x 10.2 cm)
– Body: 6.25 in x 8.25 in (15.9 cm x 21.0 cm)
– Pocket: 5.25 in x 5 in (13.3 cm x 12.7 cm) before the border, 6.15 in x 5.45 in (15.6 cm x 13.8 cm) after
– Finished fox: 12 in x 8 in (30.5 cm x 20.3 cm)
Happy crocheting!