

The Calla Lily Cascade Strip Curtain is a light, airy doorway curtain made from six long lace strips. Each strip has a column of ridged calla lilies sitting in an open chain-arch mesh and is finished with a firm border and a hanging loop.
The palette is plum and cream. All six strips have a cream mesh background, and the lilies alternate plum and cream down each strip. Each lily has a small spadix in the opposite colour. Borders alternate plum and cream across the rod, so the curtain reads as a soft vertical stripe.
This pattern uses US crochet terms. Each finished strip measures 5 in × 55 in (12.7 cm × 139.7 cm), including the border. Six strips cover a doorway about 30–33 in (76.2–83.8 cm) wide, depending on the gaps you leave on the rod.
Construction is simple and modular. You work each mesh background flat in rows. The lilies are worked separately as flat fans that you fold into cones, and the spadices are tiny pieces sewn inside them. You sew 12 lilies to each background and then add a two-round border with a built-in hanging loop. The strips are never joined to each other.
Finished Size and Construction
- Finished strip size: 5 in × 55 in (12.7 cm × 139.7 cm)
- Skill level: Intermediate
- Terminology: US
- Yarn weight: DK (light worsted, #3) cotton
- Hook: 3.5 mm (E-4)
- Number of pieces: 6 strips; each strip has 1 mesh background, 12 lilies and 12 spadices
- Layout: 6 strips hung side by side, not joined; 12 lilies per strip in a single column
- Strip size before border: 4 in × 54 in (10.2 cm × 137.2 cm)
- Border depth: 0.5 in (1.3 cm) on every side
- Lily size (folded): about 3.25 in wide × 3 in tall (8.3 cm × 7.6 cm)
Materials
Use a smooth mercerized or combed DK cotton of about 113 m per 50 g. Cotton holds the ridges crisply and hangs straight without stretching.
- Cream: 500 g (about 1130 m). This covers the mesh for all 6 strips, 3 borders, 36 lilies and 36 spadices.
- Plum: 200 g (about 452 m). This covers 3 borders, 36 lilies and 36 spadices.
These quantities include a margin of roughly 15% for gauge differences and swatching.
Tools:
– 3.5 mm (E-4) crochet hook
– Tapestry needle
– Stitch markers
– Rust-proof pins and a blocking surface at least 56 in (142.2 cm) long, or block in sections
– Spray bottle
– Tape measure
– Curtain rod or tension rod
Abbreviations (US Terms)
- ch – chain
- sl st – slip stitch
- sc – single crochet
- hdc – half double crochet
- dc – double crochet
- tr – treble crochet
- dtr – double treble crochet (yarn over 3 times, then work off the loops in pairs)
- BLO – back loop only
- sp(s) – space(s)
- sk – skip
- rep – repeat
- RS / WS – right side / wrong side
Special stitch:
– Picot point: ch 3, sl st in the 3rd ch from hook.
Gauge and Checkpoints
- Single crochet: 21 sc = 4 in (10.2 cm).
- Mesh: 5 ch-5 arches across = 4 in (10.2 cm), and 2 mesh rows = 1 in (2.5 cm).
Test one piece first. Before you start a full strip, make a swatch: ch 22, work the Foundation Row, Rows 1–8 of the mesh, and the Top Row. It should measure 4 in wide × 4.5 in tall (10.2 cm × 11.4 cm). Then make one lily and check it against the folded size of 3.25 in × 3 in (8.3 cm × 7.6 cm).
Checkpoints:
– Foundation Row: 4 in (10.2 cm) wide.
– After 20 mesh rows: about 10.25 in (26 cm) from the bottom edge.
– After Row 107: 53.75 in (136.5 cm). After the Top Row: 54 in (137.2 cm).
– After the border: 5 in × 55 in (12.7 cm × 139.7 cm).
If your piece is too big, go down 0.25–0.5 mm in hook size. If it is too small, go up by the same amount. If only the length is off, change the number of mesh rows in multiples of 18 (9 in / 22.9 cm) and keep the lily spacing. This changes the lily count, so recalculate your yarn.
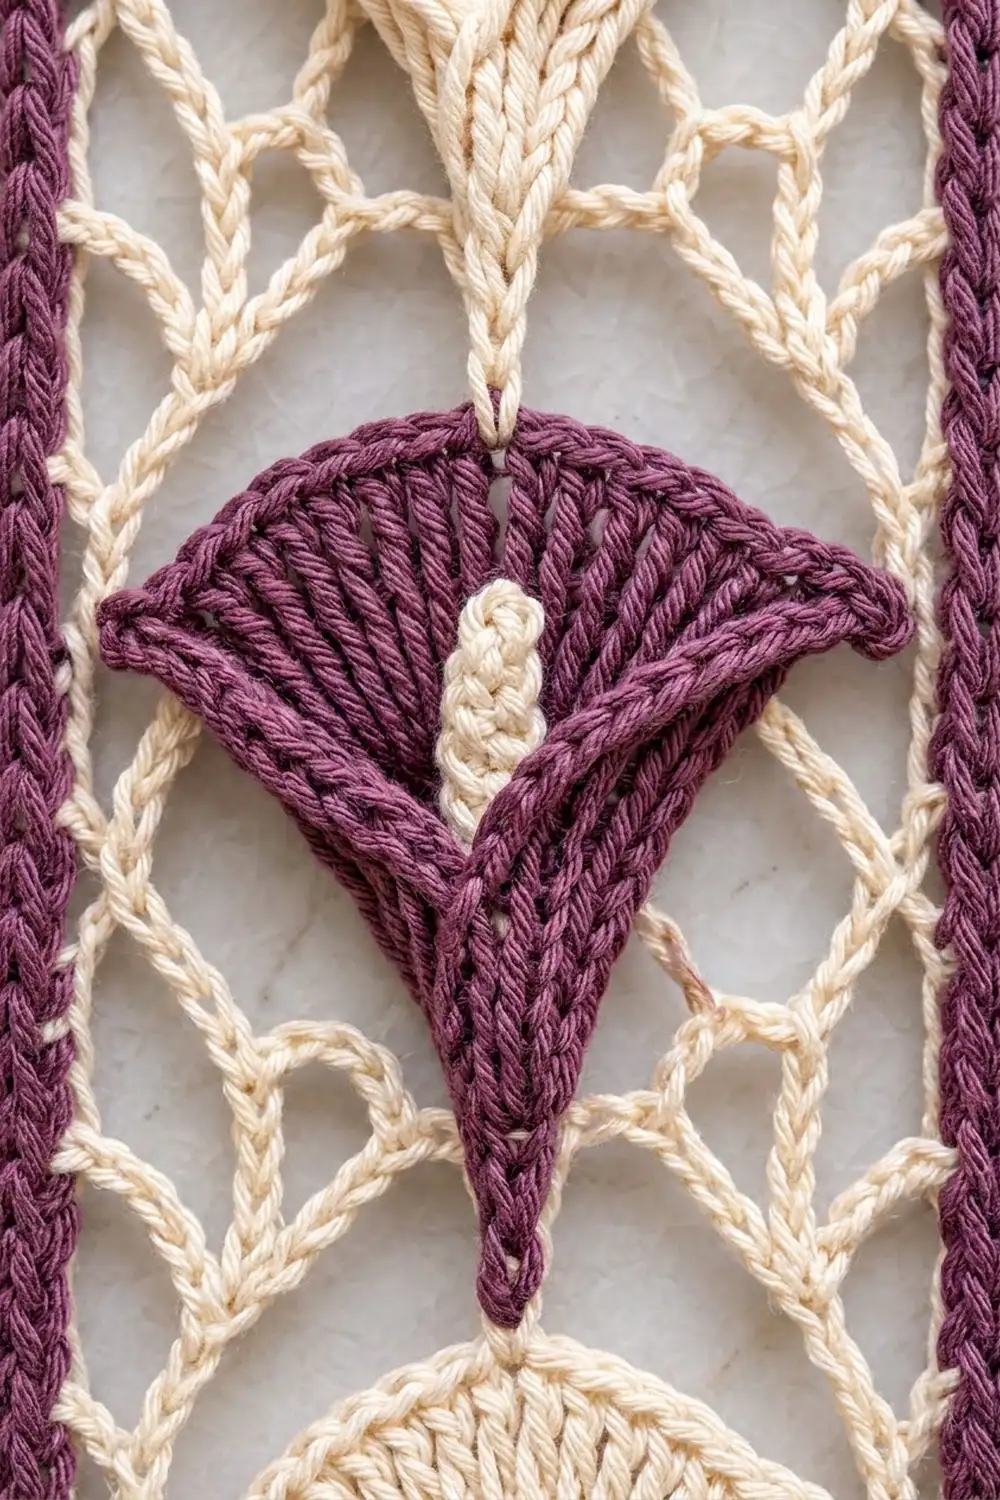
Mesh Background (make 6, cream)
Foundation Row (RS): Ch 22. Sc in the 2nd ch from hook and in each ch across. (21 sc)
Row 1: Ch 1, turn. Sc in the first sc, ch 5, sk 3 sc, sc in the next sc; rep from * 4 more times. (6 sc, 5 ch-5 sps)
Row 2: Ch 5 (counts as dc + ch 2), turn. Sc in the first ch-5 sp, ch 5, sc in the next ch-5 sp; rep from * 3 more times. Ch 2, dc in the last sc. (4 ch-5 sps + 2 half sps)
Row 3: Ch 1, turn. Sc in the first dc, ch 5, sc in the next ch-5 sp; rep from * 3 more times. Ch 5, sc in the 3rd ch of the turning ch. (6 sc, 5 ch-5 sps)
Rows 4–107: Rep Rows 2 and 3 alternately, ending with a Row 3 repeat. Every odd row has 5 full arches. (107 mesh rows total)
Top Row: Ch 1, turn. Sc in the first sc, 3 sc in the next ch-5 sp, sc in the next sc; rep from * 4 more times. That is 1 + (5 × 4) = 21 sc. Fasten off.
The strip now measures 4 in × 54 in (10.2 cm × 137.2 cm). The foundation and top rows add 0.25 in (0.6 cm) each, and the 107 mesh rows add 53.5 in (135.9 cm).
Calla Lily Appliqué (make 72)
The lily is worked flat as a fan in back loops only, so its ridges radiate from the base. The last row grades from short to tall stitches, which gives the flared top its single pointed tip on one side.
Row 1: Ch 4. Work 7 dc in the 4th ch from hook. (8 sts; the skipped ch-3 counts as a st)
Row 2: Ch 3 (counts as dc), turn. Dc BLO in the same st, then 2 dc BLO in each st across. (16 sts)
Row 3: Ch 3 (counts as dc), turn. Dc BLO in the next st, 2 dc BLO in the next st; rep from * across, ending with 2 dc BLO in the top of the turning ch. Count: the ch-3 and the first dc BLO cover the first 2 sts, then 7 more repeats, for 8 repeats of 3 sts. (24 sts)
Row 4 (shaping row): Ch 1, turn. Work BLO throughout, except the picot:
– sc in the next 4 sts
– hdc in the next 4 sts
– dc in the next 6 sts
– tr in the next 7 sts
– 2 tr in the next st
– (dtr, picot point, dtr) in the next st
– sl st in the last st
(26 sts + 1 picot) Fasten off with a 12 in (30.5 cm) tail.
Fold: Lay the fan RS up with the Row 1 point at the bottom. Bring the two straight row-end edges together and overlap them by 0.75 in (1.9 cm) at the base, tapering to no overlap about halfway up. Tack the overlap with the tail. You now have a shallow cone with the picot tip curling to one side, about 3.25 in × 3 in (8.3 cm × 7.6 cm) when lightly flattened.
Spadix (make 72)
Row 1: Ch 8. Starting in the 2nd ch from hook, work sc, hdc, hdc, dc, dc, hdc, sc. (7 sts)
Fasten off with an 8 in (20.3 cm) tail. Roll the piece lengthwise and tack it so it forms a firm little rod about 1.4 in (3.6 cm) long.
Sew one spadix inside each lily with its base at the bottom of the cone and the top rising about two-thirds of the way up the opening. Plum lilies get cream spadices, and cream lilies get plum spadices.
Make All Pieces
Quantities by colour:
– Mesh backgrounds: 6, all cream
– Plum lilies: 36, each with a cream spadix
– Cream lilies: 36, each with a plum spadix
– Borders: 3 plum, 3 cream
Strip order on the rod, left to right:
Strip:   1      2      3      4      5      6
Border:  Plum   Cream  Plum   Cream  Plum   Cream
Lily column in each strip, top to bottom (12 lilies):
Plum-border strips:   P C P C P C P C P C P C
Cream-border strips:  C P C P C P C P C P C P
Each strip has 6 plum and 6 cream lilies, so the six strips use 36 of each.
Joining (Appliqué Assembly)
The strips are not joined to each other. “Joining” here means sewing the lilies onto each mesh background before the border goes on.
Placement logic: The lily centres are spaced every 4.5 in (11.4 cm), which is 9 mesh rows. The first centre sits 2.25 in (5.7 cm) below the top edge: the Top Row plus 4 mesh rows. Check the bottom: 2.25 + (11 × 4.5) = 51.75 in, and 54 − 51.75 = 2.25 in (5.7 cm). The column is the same distance from both ends. Mark all 12 centres with stitch markers before you sew anything.
Method:
1. Centre each lily across the width, with the cone point down. This leaves about 0.375 in (1 cm) of clear mesh on each side.
2. Use a strand matching the lily colour and whipstitch the lower half of the cone, including the point, to the mesh sc and arch chains behind it.
3. Leave the flared top edge and the picot tip free so they stand slightly forward.
Tension: Sew loosely enough that the mesh behind each lily stays flat. If the arches pucker, unpick and resew with longer stitches.
Size checkpoint: After sewing, the strip should still lie at 4 in × 54 in (10.2 cm × 137.2 cm) without forcing.
Border
Border gauge:
– Top and bottom: 21 sc = 4 in (10.2 cm), matching the edge stitches.
– Long sides: 5 sc per 2 mesh rows = 5 sc per inch, matching the mesh row gauge of 2 rows = 1 in.
Use plum for strips 1, 3 and 5 and cream for strips 2, 4 and 6.
Round 1 (RS): Join the border colour in the first sc of the Top Row. Ch 1 (does not count as a st throughout).
- Top: 3 sc in the first st (corner), sc in the next 19 sts, 3 sc in the last st (corner).
- First long side: 1 sc in the end of the Top Row, then 3 sc in the end of each odd mesh row and 2 sc in the end of each even mesh row, then 1 sc in the end of the Foundation Row. That is 1 + (54 × 3) + (53 × 2) + 1 = 270 sc.
- Bottom: Working into the opposite side of the foundation chain, 3 sc in the first st (corner), sc in the next 19, 3 sc in the last st (corner).
- Second long side: Work as the first side. (270 sc)
- Sl st to the first sc.
Stitches per side, each including its 2 corner-centre sts:
– Top and bottom: 1 + 1 + 19 + 1 + 1 = 23
– Long sides: 1 + 1 + 270 + 1 + 1 = 274
Round 1 total: (2 × 23) + (2 × 274) − 4 shared corners = 590 sc
Round 2: Ch 1. Sc in each st, working 3 sc in each corner-centre st. When you reach the 13th st of the top side (its exact centre), work sc, ch 18, then sl st in the same sc to form the hanging loop. Sl st to the first sc.
- Top and bottom: 25 sts per side
- Long sides: 276 sts per side
- Round 2 total: 590 + 8 = 598 sc, plus the ch-18 loop
Loop finish: Join the border colour at the base of the loop. Work 30 sc into the ch-18 loop and sl st to the first sc. The loop is about 1.25 in (3.2 cm) tall. Fasten off and weave in the ends.
Why the math works: The top and bottom use exactly the 21 existing stitches, so the width stays at 4 in (10.2 cm). The sides follow the mesh row gauge, 2.5 sc per row at 2 rows per inch, which is 5 sc per inch, so the lace neither flares nor tightens. Two sc rounds add 0.5 in (1.3 cm) per side, which brings the strip to 5 in × 55 in (12.7 cm × 139.7 cm).
Final Blocking
- Wet each strip thoroughly, or mist it heavily, then press out the water in a towel without wringing.
- Lay it flat and pin the corners to a 5 in × 55 in (12.7 cm × 139.7 cm) rectangle.
- Pin along the long sides every 3 in (7.6 cm) so they stay straight.
- Open each mesh arch with your fingers so the rows look even.
- Shape each lily: press the ridges into fans, lift the flared top edge, and curl the picot tip.
- Let it dry completely before unpinning, then hang the strip immediately so it keeps its length.
Final Quality-Control Checklist
- Every strip measures 5 in × 55 in (12.7 cm × 139.7 cm).
- Each mesh background has 107 mesh rows with 5 arches on every odd row.
- There are 12 lilies per strip, centred 4.5 in (11.4 cm) apart, with colours alternating correctly.
- Each lily has 26 sts plus 1 picot in Row 4, and the tip curls to the same side on every lily.
- Every spadix is in the contrasting colour and stitched securely.
- Border Round 2 counts are 25 / 276 / 25 / 276.
- The hanging loops are centred and the same size.
- All ends are woven in invisibly.
Troubleshooting
- Mesh is narrower than 4 in (10.2 cm): Your chains are too tight. Go up a hook size for the ch-5s only.
- Lilies cup too deeply: Reduce the base overlap to 0.5 in (1.3 cm).
- The tip doesn’t point: Make sure the dtr stitches are worked fully and pin the picot tip during blocking.
- Sides wave after the border: Use 2 sc in every row end for a few rows to pull them in.
- Sides pull tight: You likely skipped row ends. Recount for 270 per side.
- The strip grows when hung: Block it hanging, with light weights clipped to the bottom edge.
Care
Hand wash in cool water with mild detergent, roll in a towel, and dry flat or block again. Avoid tumble drying, which can stretch the strips unevenly.

Final Notes
The measurement chain is short:
– 21 sc = 4 in (10.2 cm), and 2 mesh rows = 1 in (2.5 cm).
– 107 mesh rows plus 2 sc rows = 54 in (137.2 cm).
– 12 lilies spaced every 4.5 in (11.4 cm), with 2.25 in (5.7 cm) at each end.
– 2 border rounds add 0.5 in (1.3 cm) per side, for 5 in × 55 in (12.7 cm × 139.7 cm).
Check each link as you go and all six strips will hang evenly together.
Happy crocheting!