
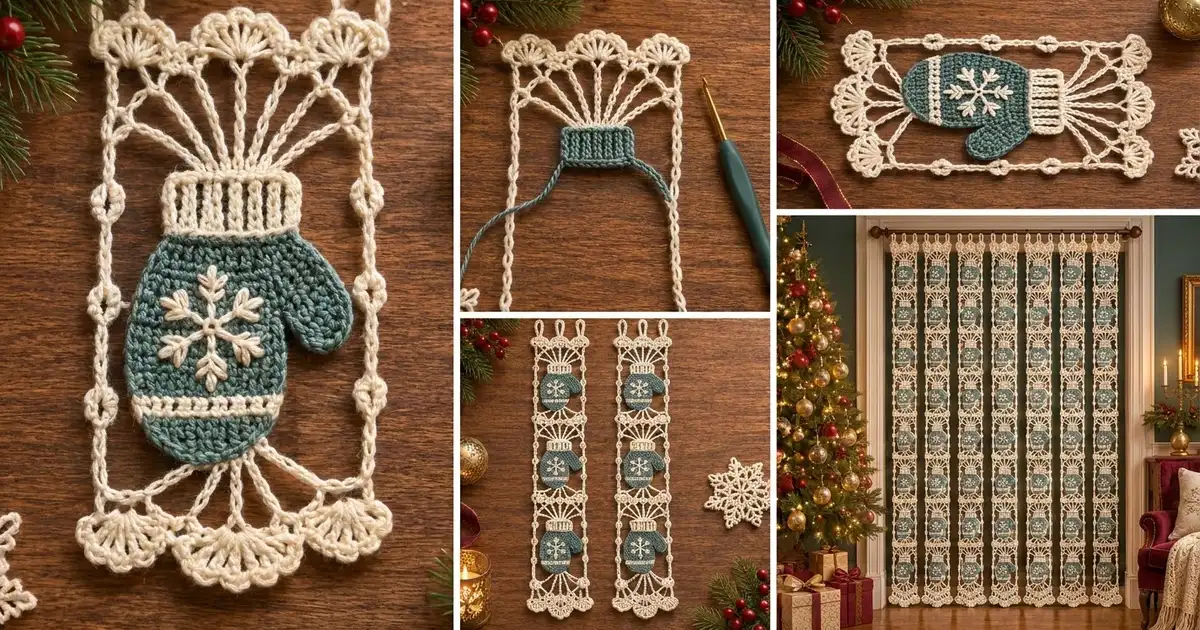
This hanging lace strip pairs airy cream filigree with solid teal mittens. Each section is a lace frame with chain rails, fan-shaped scallops, and spokes that sweep toward a mitten stitched to the center. Three sections join end to end into one long strip.
The palette is two colors: cream for the lace, cuffs, stripes, and snowflakes, and a soft muted teal for the mitten bodies. The style is vintage-inspired holiday lace, light enough to let window or doorway light pass through.
The pattern uses US crochet terms. The finished strip measures 5.5 in (14.0 cm) wide and 25.0 in (63.5 cm) long including the hanging loops.
Construction is simple to follow: crochet three mittens, crochet three lace frames in rounds around a short hidden spine, sew a mitten onto each frame, add scallops while joining the frames together, then work a picot border down both long edges and add three hanging loops.
Finished Size and Construction
- Finished size: 5.5 in (14.0 cm) wide x 25.0 in (63.5 cm) long with loops; 24.0 in (61.0 cm) without loops
- Skill level: Intermediate
- Terminology: US
- Yarn weight: Sport (#2) mercerized cotton
- Hook: 2.75 mm (US C/2)
- Number of pieces: 3 lace frames + 3 mitten appliqués
- Layout: 1 column x 3 units, joined end to end
- Piece size: frame body 5.0 x 7.0 in (12.7 x 17.8 cm); 5.0 x 8.0 in (12.7 x 20.3 cm) with scallops
- Size before border: 5.0 x 24.0 in (12.7 x 61.0 cm)
- Border depth: 0.25 in (0.6 cm) per long side, plus 1 in (2.5 cm) hanging loops
Materials
Choose a smooth mercerized cotton in sport weight. It holds crisp lace, blocks well, and keeps the teal and cream stitches defined.
- Cream: 40 g, about 124 m
- Teal: 20 g, about 62 m
Tools:
- 2.75 mm (US C/2) crochet hook
- Tapestry needle
- 6 locking stitch markers
- Rust-proof pins and a blocking mat
- Spray bottle; optional light spray starch
- Scissors and a measuring tape
Yarn quantities include a margin of about 25% for gauge swatching and tails.
Abbreviations (US Terms)
- ch – chain
- sl st – slip stitch
- sc – single crochet
- dc – double crochet
- blo – back loop only
- sc2tog – single crochet 2 together
- sk – skip
- st(s) – stitch(es)
- sp – space
- RS – right side
Picot: ch 3, sl st in the 3rd ch from hook.
Shell: 7 dc in the same st.
Joining shell: 4 dc in the st, sl st in the center (4th) dc of the matching shell on the previous unit, 3 dc in the same st.
Gauge and Checkpoints
Gauge: 25 sc and 26 rows = 4 in (10.2 cm).
Make one complete mitten and one frame through Round 4 before you commit to the full strip. Measure each stage:
- Mitten cuff: 0.8 in (2.0 cm) tall x 2.2 in (5.6 cm) long
- Finished mitten: 3.3 in (8.4 cm) wide x 3.6 in (9.1 cm) tall
- Frame spine after Round 1: about 2.7 in (6.9 cm) long
- Frame after Round 4: 5.0 x 7.0 in (12.7 x 17.8 cm)
- Unit with scallops: 5.0 x 8.0 in (12.7 x 20.3 cm)
If your pieces are too big, go down 0.25 mm. If they are too small, go up 0.25 mm. Lace chains tighten easily, so check that each 42-ch rail measures close to 7.0 in (17.8 cm) after Round 4.
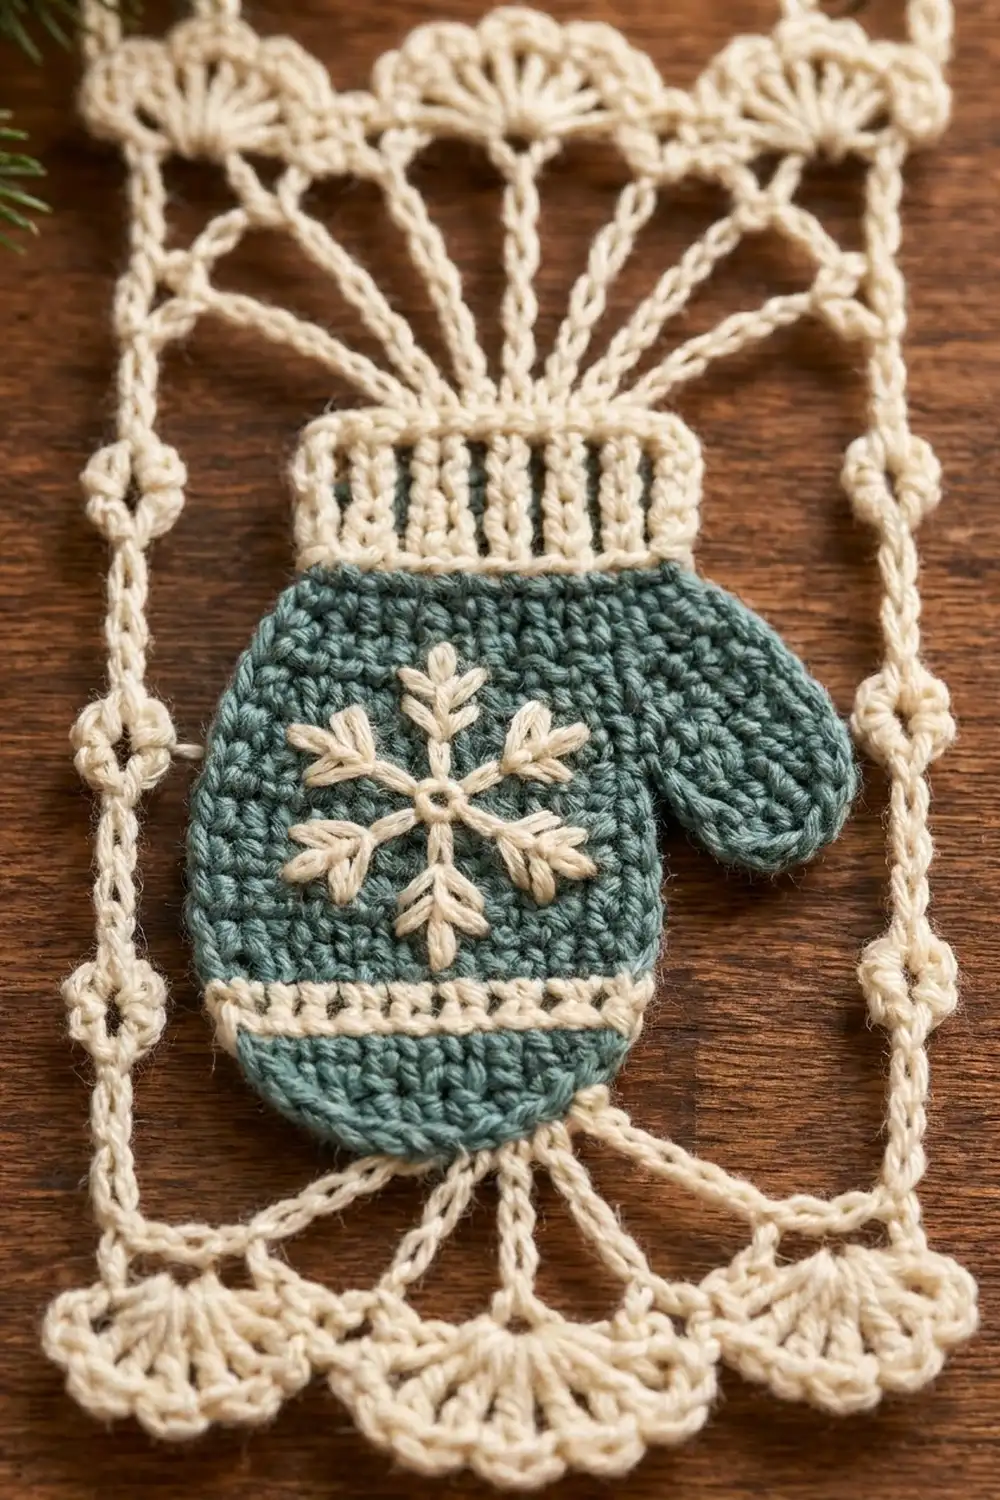
Mitten Appliqué (Make 3)
Cuff
With cream, ch 6.
Row 1: Sc in 2nd ch from hook and each ch across. (5 sc)
Rows 2–14: Ch 1, turn, sc blo in each st across. (5 sc)
Fasten off cream. Once the body is worked from the long edge, the blo rows become vertical ribs.
Body
Rotate to work along the long edge of the cuff. Join teal.
Row 1: Ch 1, work 1 sc in each row-end across. (14 sc)
Row 2: Ch 1, turn, 2 sc in first st, sc in next 12 sts, 2 sc in last st. (16 sc)
Rows 3–10: Ch 1, turn, sc in each st. (16 sc)
Rows 11–12: Change to cream. Ch 1, turn, sc in each st. (16 sc)
Rows 13–14: Change to teal. Ch 1, turn, sc in each st. (16 sc)
Row 15: Ch 1, turn, sc2tog, sc in next 12 sts, sc2tog. (14 sc)
Row 16: Ch 1, turn, sc2tog, sc in next 10 sts, sc2tog. (12 sc)
Row 17: Ch 1, turn, sc2tog, sc in next 8 sts, sc2tog. (10 sc)
Row 18: Ch 1, turn, sc2tog, sc in next 6 sts, sc2tog. (8 sc)
Fasten off. The body is 2.6 in (6.6 cm) wide and 2.8 in (7.1 cm) tall.
Thumb
Hold the mitten cuff-up with the RS facing. Join teal at the row-end of Row 9 on the right edge.
Row 1: Ch 1, sc in the row-ends of Rows 9 through 4. (6 sc)
Rows 2–3: Ch 1, turn, sc in each st. (6 sc)
Row 4: Ch 1, turn, sc2tog, sc in next 2 sts, sc2tog. (4 sc)
Row 5: Ch 1, turn, sc2tog twice. (2 sc)
Fasten off. The thumb adds 0.8 in (2.0 cm), which brings the mitten to 3.3 in (8.4 cm) wide.
Snowflake
With cream and a tapestry needle, embroider three straight stitches that cross at one center point within Rows 3–10. Make each one 1.1 in (2.8 cm) long. Add a small V-shaped stitch at each of the six tips and a French knot in the center.
Lace Frame (Make 3)
Round 1 – Spine
With cream, ch 16.
5 sc in 2nd ch from hook (bottom group), sc in next 13 ch (side A), 5 sc in last ch (top group). Working along the opposite side of the foundation, sc in next 13 ch (side B), sl st to first sc. (36 sc: 5 + 13 + 5 + 13)
Round 2 – Spokes
Ch 1, sc in first st, ch 29, sc in next st, ch 23, sc in next st, ch 23, sc in next st, ch 29, sc in next st (bottom group: 5 sc and 4 loops), sl st in each of next 13 sts, sc in next st, ch 29, sc in next st, ch 23, sc in next st, ch 23, sc in next st, ch 29, sc in next st (top group), sl st in each of next 13 sts, sl st to first sc. (10 sc, 26 sl st, 8 loops)
Fasten off. Each loop forms a doubled spoke. The longer outer loops reach toward the frame corners at an angle.
Round 3 – Frame Outline
With RS facing, join cream in the center ch (15th) of an outer top loop.
Ch 1, sc in same ch, ch 5, sc in center ch (12th) of next loop, ch 5, sc in center ch of next loop, ch 5, sc in center ch (15th) of outer loop, ch 6 (mark the 6th ch as a corner), ch 43 (mark the 43rd ch as a corner), ch 5, sc in center ch of nearest outer bottom loop, [ch 5, sc in center ch of next loop] 3 times, ch 6 (mark the 6th ch as a corner), ch 43 (mark the 43rd ch as a corner), ch 5, sl st to first sc.
Count: each short side has 5 ch + 19 sts (4 sc and 15 ch) + 5 ch = 29 sts between corners. Each long side rail has 42 ch between corners. (146 sts: 29 + 29 + 42 + 42 + 4 corner ch)
Keep the rails untwisted.
Round 4 – Firming Round
Ch 1, sc in each st around, working (sc, ch 2, sc) in each marked corner ch, sl st to first sc. (146 sc worked 1-per-existing-st + 4 extra corner sc = 150 sc, plus 4 ch-2 corner sps)
Per side, counting the corner sc on each end: short sides 31 sc, long sides 44 sc.
Checkpoint: 5.0 x 7.0 in (12.7 x 17.8 cm).
Attach the Mitten
Pin a mitten cuff-up over the spine, centered side to side, with the top edge of the cuff covering the top group of Round 1. The mitten extends about 0.45 in (1.1 cm) past the spine at each end, so the spokes appear to come out from under the cuff and fingertips. Whipstitch around the mitten edge with teal and along the top of the cuff with cream.
Make All Pieces
- Mittens: 3 (teal bodies and thumbs; cream cuffs, stripes, and snowflakes)
- Lace frames: 3 (cream)
Layout, top to bottom:
 [loop]      [loop]      [loop]
+------------------------------+
| Unit 1 (free top shells)     |
+------------------------------+
| Unit 2                       |
+------------------------------+
| Unit 3 (free bottom shells)  |
+------------------------------+
Joining – Shell Rows
You work scallops on the short sides only, and the units join through the shell tips.
Unit 1, top and bottom: With RS facing, join cream in the first sc after a ch-2 corner on a short side. Ch 1, sc in same st, [sk 2 sts, shell in next st, sk 2 sts, sc in next st] 5 times, ending in the last corner sc. (5 shells, 6 sc; 1 + 5 x 6 = 31 sts used) Fasten off. Repeat on the other short side.
Unit 2, top: Lay Unit 2 below Unit 1, both RS up and facing the same way. Work the shell row as above, but replace each shell with a joining shell. Connect the leftmost shell to the leftmost shell of Unit 1’s bottom row, and continue across in order. (5 joined shells)
Unit 2, bottom: Work a regular shell row.
Unit 3: Join its top shell row to Unit 2’s bottom shells, then work a regular shell row on its bottom edge.
The seam is stitch-to-stitch: each 31-st short side meets an identical 31-st short side, so nothing gathers or flares. Keep the sl st joins snug but not tight, because a tight join pulls the scallops into points.
Size checkpoint: 5.0 x 24.0 in (12.7 x 61.0 cm), since 3 units x 8.0 in (20.3 cm) meet tip to tip.
Border
The border uses the same gauge as the main pattern: 25 sc = 4 in (10.2 cm). A ch-6 bridge spans about 1.0 in (2.5 cm).
Long Edges (work twice)
With RS facing, join cream in the first long-side sc at the top corner of Unit 1.
Ch 1, *sc in next 4 sts, [picot, sc in next 9 sts] 4 times, picot, sc in next 4 sts (44 sts, 5 picots), ch 6, skip past the joined shells, and make the next sc in the first long-side sc of the next unit; rep from * once more. Work the 44-st sequence once along Unit 3, ending in the last corner sc. Fasten off.
Count per long edge: 3 units x 44 sc = 132 sc, plus 2 bridges x 6 ch = 12 ch, for a total of 144 sts and 15 picots. The 44 already includes each unit’s two corner sc, and you don’t work into the corner ch-2 sps, so the bridges are the only seam stitches added. Repeat on the other long edge.
Hanging Loops
Join cream in the center dc of shell 1 on Unit 1’s top edge. (Sc, ch 14, sc) in the same st. Fasten off. Repeat on shells 3 and 5. (3 loops)
Why the Math Works
Each unit’s 44-st border section sits on the 44 rail sts from Round 4, so the edging lies flat at 7.0 in (17.8 cm). Each ch-6 bridge covers two scallop depths of 0.5 in (1.3 cm), so the rails stay straight across each join. The border adds 0.25 in (0.6 cm) per side, taking the width from 5.0 in (12.7 cm) to 5.5 in (14.0 cm).
Final Blocking
- Weave in all ends, hiding them under the mitten or along the rails.
- Soak the strip in cool water for 10 minutes, then roll it in a towel to remove excess water.
- Pin it to 5.5 x 24.0 in (14.0 x 61.0 cm), pinning the rails straight first.
- Pin each spoke so it runs in a clean line from the mitten to its scallop band.
- Pin each shell into an even fan and open every picot.
- Mist with light starch if you want firmer lace, then let it dry completely.
Final Quality-Control Checklist
- Each mitten is 3.3 x 3.6 in (8.4 x 9.1 cm), hangs cuff-up, and has its thumb pointing right
- Each frame is 5.0 x 7.0 in (12.7 x 17.8 cm) before scallops
- Every short side has 5 shells, and every unit long side has 5 picots
- All 10 shells at the two joins are connected at their center dc
- Rails are untwisted and straight
- The strip is 5.5 x 25.0 in (14.0 x 63.5 cm) with loops
Troubleshooting
- Rails ripple: Your rail chain is loose. Redo Round 3 with a tighter chain, or go down a hook size for the chain only.
- Frame pulls into an hourglass: The rails are too short. Check the 42-ch count between corners.
- Spokes sag: The loops are too long for your tension. Shorten each loop by 2 ch.
- Mitten cups: The increases are too tight. Block the mitten flat before sewing it on.
- Scallops ruffle: Use 6 dc per shell instead of 7, and keep the center join.
- Strip curves sideways: One border edge is tighter than the other. Redo it to match.
Care
Hand-wash in cool water with mild soap and dry flat, reshaping the scallops while they are damp. Store the strip rolled around a tube so the lace doesn’t crease.

Final Notes
The measurements build in a simple chain. A 25-sc gauge gives a 5.0 x 7.0 in (12.7 x 17.8 cm) frame. Scallops bring each unit to 8.0 in (20.3 cm) tall, and three units make 24.0 in (61.0 cm). The border and loops finish the strip at 5.5 x 25.0 in (14.0 x 63.5 cm). Check each stage before moving on, and the final strip will hang straight. For a doorway curtain like the one pictured, make more strips and hang them side by side.
Happy crocheting!