

This little strawberry slips over a standard cube-style wall charger. The plug prongs poke out the top and the cable comes out through the narrow bottom. A matching green vine wraps the charging cable, so the whole set looks like a strawberry plant growing out of the outlet.
The body is bright red single crochet with short cream seed stitches embroidered on top. A green calyx with pointed sepals circles the top, decorated with two tiny cream flowers with yellow centers and two accent leaves. The cable cover is a slim green cord with eight small leaves sewn along it. The style is cottagecore: tidy, solid, and easy to recognize from across the room.
All instructions use US crochet terms. The finished strawberry is 3.6 in (9.1 cm) wide at its widest when flat and about 3.3 in (8.4 cm) tall including the collar. The cable cord is 30 in (76.2 cm) long.
You’ll crochet seven different small components, embroider the seeds, sew everything together, and finish the two openings with a slip-stitch edge. Everything is worked in joined rounds or short rows, so each stitch count is easy to check.
Finished Size and Construction
- Strawberry body: 3.6 in (9.1 cm) wide flat at the widest point, 2.9 in (7.4 cm) tall
- Total height with collar: about 3.3 in (8.4 cm)
- Cable cord: 30 in (76.2 cm) long, 0.55 in (1.4 cm) wide flat before folding
- Skill level: Easy to intermediate
- Terminology: US
- Yarn weight: DK (#3), cotton or cotton blend
- Hook: 3.5 mm (E-4)
- Number of pieces: 15 (1 body, 1 calyx, 2 flowers, 2 accent leaves, 1 cord, 8 cord leaves)
- Layout:
- The calyx is sewn to the top of the body.
- The flowers and accent leaves are sewn to the calyx.
- The cord is a separate piece closed around the cable.
- Body circumference: 4.8 in (12.2 cm) at the bottom, 7.2 in (18.3 cm) at the widest point, 6 in (15.2 cm) at the top
- Size before border: Same as the finished size, because the slip-stitch edge adds no width
- Border depth: Less than 0.1 in (0.3 cm)
Materials
Choose a smooth DK-weight cotton, either mercerized or matte. Cotton holds its shape on a firm sleeve and won’t fuzz around the plug. Acrylic also works, but it stretches more, so check your gauge carefully. Go for a true tomato red, a fresh leaf green, and a cream that stands out clearly against the red.
- Red: 15 g / 35 m (body)
- Green: 20 g / 46 m (calyx, all leaves, cord)
- Cream: 3 g / 7 m (seeds and petals)
- Yellow: 1 g / 2 m (flower centers)
Tools:
- 3.5 mm (E-4) crochet hook
- Tapestry needle
- Stitch markers
- Scissors
- Measuring tape
- Pins
- Your charger and cable, for test fitting
These quantities include a margin of about 15% for swatching and sewing tails.
Abbreviations (US Terms)
- ch: chain
- sl st: slip stitch
- sc: single crochet
- hdc: half double crochet
- dc: double crochet
- inc: 2 sc in the same stitch
- sc2tog: single crochet 2 together
- st(s): stitch(es)
- rnd(s): round(s)
- MR: magic ring
Special stitch – seed stitch (embroidery): Thread cream yarn on a tapestry needle. Bring the needle up at the base of a single crochet and take it down at the top of the same stitch. This makes one short vertical straight stitch, exactly one round tall.
Gauge and Checkpoints
Gauge: 20 sc x 22 rnds = 4 in (10.2 cm) in joined rounds. That works out to 5 sts and 5.5 rnds per inch.
Make the body before anything else. It’s the piece that has to fit your charger, and every other piece is sized to match it.
Checkpoints:
- After Rnd 3: 24 sts, 4.8 in (12.2 cm) around, 0.55 in (1.4 cm) tall
- After Rnd 7: 36 sts, 7.2 in (18.3 cm) around, about 1.3 in (3.3 cm) tall
- After Rnd 12: 36 sts, about 2.2 in (5.6 cm) tall
- After Rnd 16: 30 sts, 6 in (15.2 cm) around, 2.9 in (7.4 cm) tall
If it’s too big: If the piece measures more than 0.25 in (0.6 cm) over at Rnd 3, start again with a 3.25 mm hook. A loose sleeve will slide off the charger.
If it’s too small: If the charger won’t pass through the top at Rnd 16, go up to a 3.75 mm hook. Don’t add stitches, because the calyx has to match the body stitch for stitch.
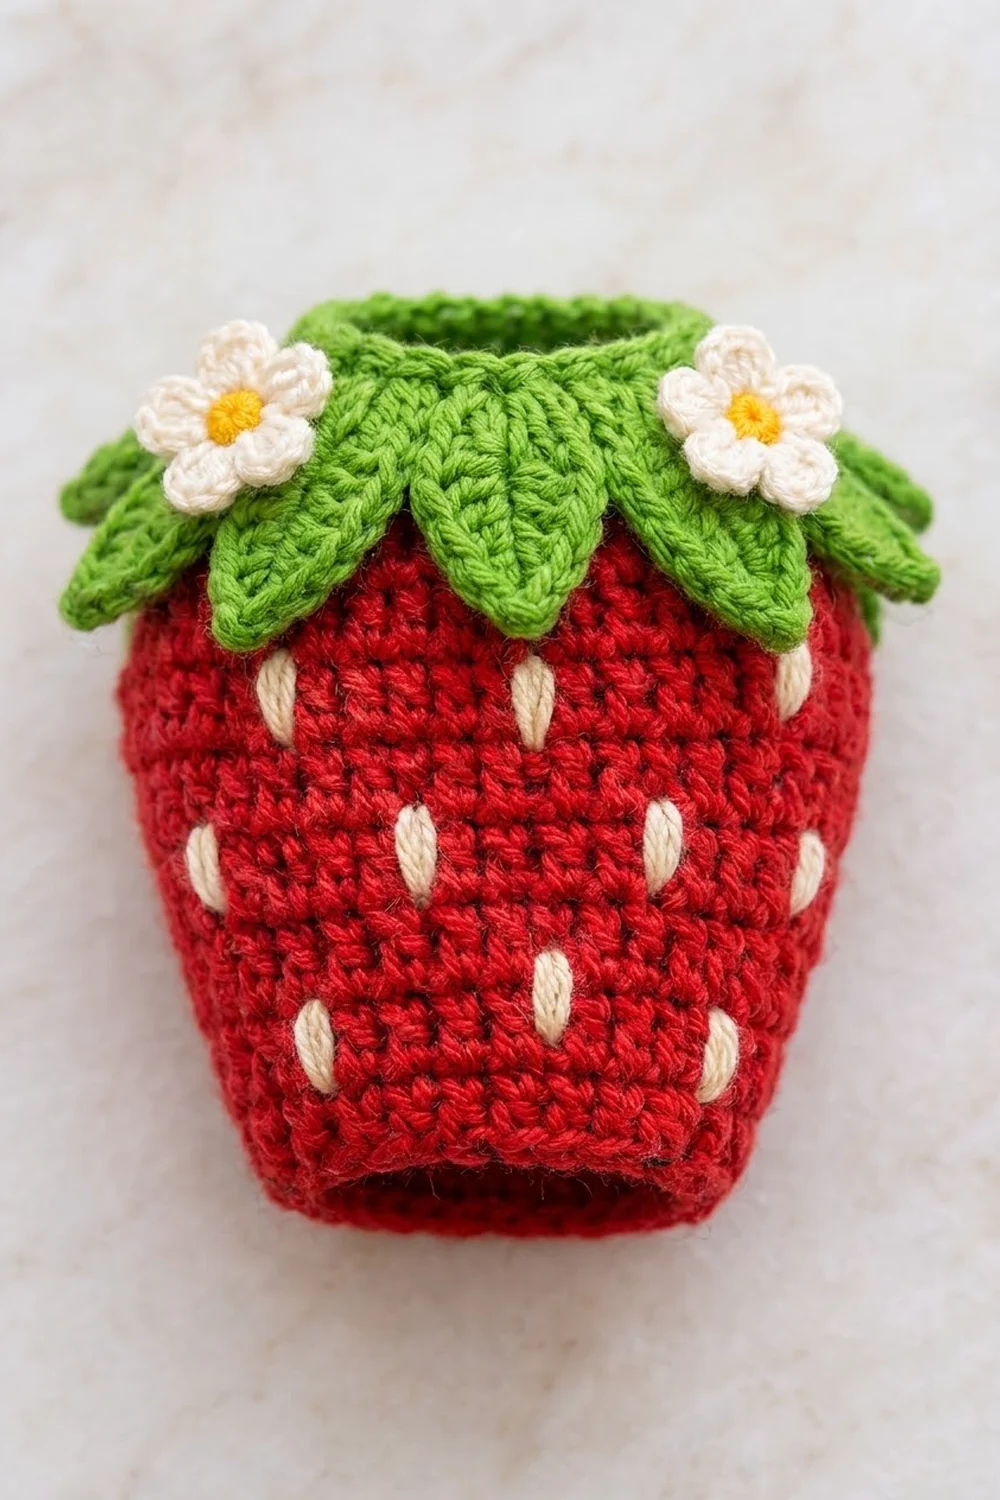
Strawberry Body
The body is worked from the bottom up in joined rounds. Don’t turn. The bottom stays open for the cable.
With red, ch 24 and sl st to the first ch to form a ring, taking care not to twist the chain.
Rnd 1: Ch 1, sc in each ch around, sl st to first sc. (24 sts)
Rnds 2–3: Ch 1, sc in each st around, sl st to first sc. (24 sts)
Rnd 4 (growth): Ch 1, sc in next 3 sts, inc in next st; repeat from * 6 times total, sl st to first sc. (30 sts)
Rnds 5–6: Ch 1, sc in each st around, sl st to first sc. (30 sts)
Rnd 7 (growth): Ch 1, sc in next 4 sts, inc in next st; repeat from * 6 times total, sl st to first sc. (36 sts)
Rnds 8–14: Ch 1, sc in each st around, sl st to first sc. (36 sts)
Rnd 15 (decrease): Ch 1, sc in next 4 sts, sc2tog; repeat from * 6 times total, sl st to first sc. (30 sts)
Rnd 16: Ch 1, sc in each st around, sl st to first sc. (30 sts)
Fasten off and weave in the ends. The growth rounds make the swelling berry shape, and Rnd 15 brings in the shoulder at the top.
Seeds
Count each round’s stitches starting from the joining seam. Place seeds on five rounds, shifting each row so the seeds stagger:
- Rnd 3 (24 sts): Every 4th st, starting at st 2 (6 seeds)
- Rnd 6 (30 sts): Every 5th st, starting at st 4 (6 seeds)
- Rnd 9 (36 sts): Every 6th st, starting at st 2 (6 seeds)
- Rnd 12 (36 sts): Every 6th st, starting at st 5 (6 seeds)
- Rnd 15 (30 sts): Every 5th st, starting at st 2 (6 seeds)
That’s 30 seeds in total. Keep the tension even so each seed lies flat on the surface and doesn’t pucker the fabric. Weave the tails through the wrong side of the stitches.
Calyx
The calyx is a short green collar with ten pointed sepals hanging from its lower edge.
With green, ch 30 and sl st to the first ch to form a ring.
Rnd 1: Ch 1, sc in each ch around, sl st to first sc. (30 sts)
Rnd 2: Ch 1, sc in each st around, sl st to first sc. (30 sts)
Rnd 3 (sepals):
- Sl st in the first st.
- Ch 7.
- Working back along the chain, starting in the 2nd ch from hook, work: sc, hdc, dc, dc, hdc, sc. (6 sts on the chain)
- Skip the next 2 sts of Rnd 2 and sl st in the next st.
- Repeat steps 2–4 for a total of 10 sepals. The last sl st lands in the starting st.
You’ll have 10 sepals. Each one uses 3 sts of Rnd 2, so 10 × 3 = 30.
Each sepal is about 1 in (2.5 cm) long. Fasten off, leaving a 20 in (50.8 cm) tail for sewing.
Flowers (Make 2)
With yellow, make a MR.
Rnd 1: Ch 1, work 5 sc into the ring, pull the ring closed, sl st to first sc. (5 sts) Fasten off yellow.
Rnd 2: Join cream in any st. (Sl st, ch 2, 2 dc, ch 2, sl st) all in the same st; repeat in each st around. (5 petals)
Each flower is about 0.9 in (2.3 cm) across. Fasten off, leaving an 8 in (20.3 cm) tail.
Accent Leaves (Make 2)
With green, ch 8.
Rnd 1:
- Starting in the 2nd ch from hook, work: sl st, sc, hdc, dc, dc, hdc, sc. (7 sts)
- Ch 1 at the tip.
- Rotate and work along the other side of the foundation chain: sc, hdc, dc, dc, hdc, sc, sl st. (7 sts)
- Sl st to the first st.
That’s 14 sts plus the tip ch. Each leaf is about 1.25 in (3.2 cm) long. Fasten off, leaving an 8 in (20.3 cm) tail.
Cable Cord
The cord is worked flat in rows, then folded around the cable and closed with slip stitches.
With green, ch 151.
Row 1: Sc in the 2nd ch from hook and in each ch across. Ch 1, turn. (150 sts)
Rows 2–3: Sc in each st across. Ch 1, turn. (150 sts)
The strip should measure 30 in (76.2 cm) by 0.55 in (1.4 cm). Don’t fasten off. You’ll use the live loop to close the cord.
Cord Leaves (Make 8)
With green, ch 6.
Rnd 1:
- Starting in the 2nd ch from hook, work: sc, hdc, dc, hdc, sc. (5 sts)
- Ch 1 at the tip.
- Work along the other side of the chain: sc, hdc, dc, hdc, sc. (5 sts)
- Sl st to the first st.
That’s 10 sts plus the tip ch. Each leaf is about 1 in (2.5 cm) long. Fasten off, leaving a 6 in (15.2 cm) tail.
Make All Pieces
Before you start assembling, check that you have:
- Red: 1 body, with 30 cream seeds embroidered on it
- Green: 1 calyx, 2 accent leaves, 1 cord strip, 8 cord leaves
- Yellow and cream: 2 flowers
Assembly map (front view):
          [ collar rim – 30 sts ]
   [flower + leaf]     [flower + leaf]
   \/ \/ \/ \/ \/ 10 sepals \/ \/ \/ \/ \/
   |       red body, Rnds 16 to 1      |
          [ bottom opening – 24 sts ]
                     |
     cord: 150 sts, leaf every 3.5 in (8.9 cm)
Joining
Calyx to body:
- Slide the calyx over the top of the body with the sepals pointing down.
- Line up Rnd 16 of the body with Rnd 2 of the calyx, at the base of the sepals. Both rounds have 30 sts, so they join one to one with nothing left over.
- Match the two joining seams, then pin at sts 1, 8, 16 and 23.
- Using the calyx tail, whipstitch each body st to its matching calyx st.
Pull each stitch just snug. If you pull too hard, the top of the body gathers and the collar tilts. Calyx Rnds 1–2 now stand above the body as a collar, bringing the total height to about 3.3 in (8.4 cm).
Flowers and accent leaves: Tuck an accent leaf under each flower, angled outward. Sew the two flowers to the front of the collar, 7 sts apart and centered. Stitch through the flower centers only, so the petals stay free.
Cord:
- Lay the cable along the strip.
- Fold Row 3 up to meet the foundation edge.
- Using the live loop, sl st through each Row 3 st and its matching foundation ch, one to one, for 150 sl sts.
- Fasten off.
Keep these slip stitches loose. Tight ones make the cord twist and pucker.
Cord leaves: Sew the leaves along the seam line, alternating sides. Put the first leaf 2.75 in (7.0 cm) from one end, then add one every 3.5 in (8.9 cm). The last leaf lands 2.75 in (7.0 cm) from the other end, so the spacing is symmetrical.
Size check: The body should still lie 3.6 in (9.1 cm) wide flat, and the cord should still be 30 in (76.2 cm) long.
Border
The border is a single slip-stitch edge on the two raw openings. It firms them up so they don’t flare or stretch with use.
Border gauge: 1 sl st per existing st, which matches the body gauge of 5 sts per inch.
Bottom opening: With red, join in any remaining loop of the body’s foundation chain. Sl st in each loop around: 24 sl sts, or 12 per side when the body is flattened. Fasten off.
Collar rim: With green, join in any remaining loop of the calyx foundation chain. Sl st in each loop around: 30 sl sts, or 15 per side when flattened. Fasten off.
Why the math works: The edging is worked one stitch into one stitch, with nothing added and nothing skipped. That keeps the openings at exactly 4.8 in (12.2 cm) and 6 in (15.2 cm) around, the same as the foundation rounds. Work the slip stitches at the same tension as your sc so the edges don’t tighten.
Final Blocking
- Weave in all the remaining ends.
- Mist the body and calyx lightly with water.
- Slip the body over the charger, or over a folded cardboard form 3.6 in (9.1 cm) wide.
- Smooth the sepals down and pinch their points into shape.
- Pin the flower petals open.
- Lay the cord out straight and roll it gently into an even tube.
- Let everything dry completely before you use it on the charger.
Final Quality-Control Checklist
- [ ] The body has 36 sts at the widest point and 30 sts at the top.
- [ ] The body is 3.6 in (9.1 cm) wide flat and 2.9 in (7.4 cm) tall.
- [ ] There are 30 seeds, evenly staggered.
- [ ] There are 10 sepals, evenly spaced.
- [ ] The flowers are secure and the petals are free.
- [ ] The cord is 30 in (76.2 cm) long with 8 leaves.
- [ ] Both openings are edged and lie flat.
- [ ] The charger fits snugly and the prongs are fully exposed.
Troubleshooting
- The sleeve slides off: Your gauge is too loose. Remake the body with a smaller hook.
- The charger won’t fit: Go up a hook size rather than adding stitches.
- The seam drifts diagonally: Place a marker in the first st of every round.
- The seeds pucker: Loosen your embroidery tension.
- The sepals curl upward: Steam them flat and let them dry pinned.
- The cord twists: Loosen the slip stitches that close it.
- The cord is too tight on the cable: Add a 4th row to the strip.
- The flowers droop: Add two tacking stitches behind each one.
Care
Remove the cover from the charger before washing. Hand wash in cool water, press out the water in a towel, and dry flat. Never use the cover on a charger that runs hot.

Final Notes
The measurement chain is simple. Working at 5 sts per inch gives a 24-st bottom opening of 4.8 in (12.2 cm) and a 36-st body that’s 3.6 in (9.1 cm) wide flat. The 30-st top matches the 30-st calyx stitch for stitch, and a 150-st cord makes 30 in (76.2 cm) of leafy vine. Check your gauge at each checkpoint and every piece will fit without guesswork.
Happy crocheting!