

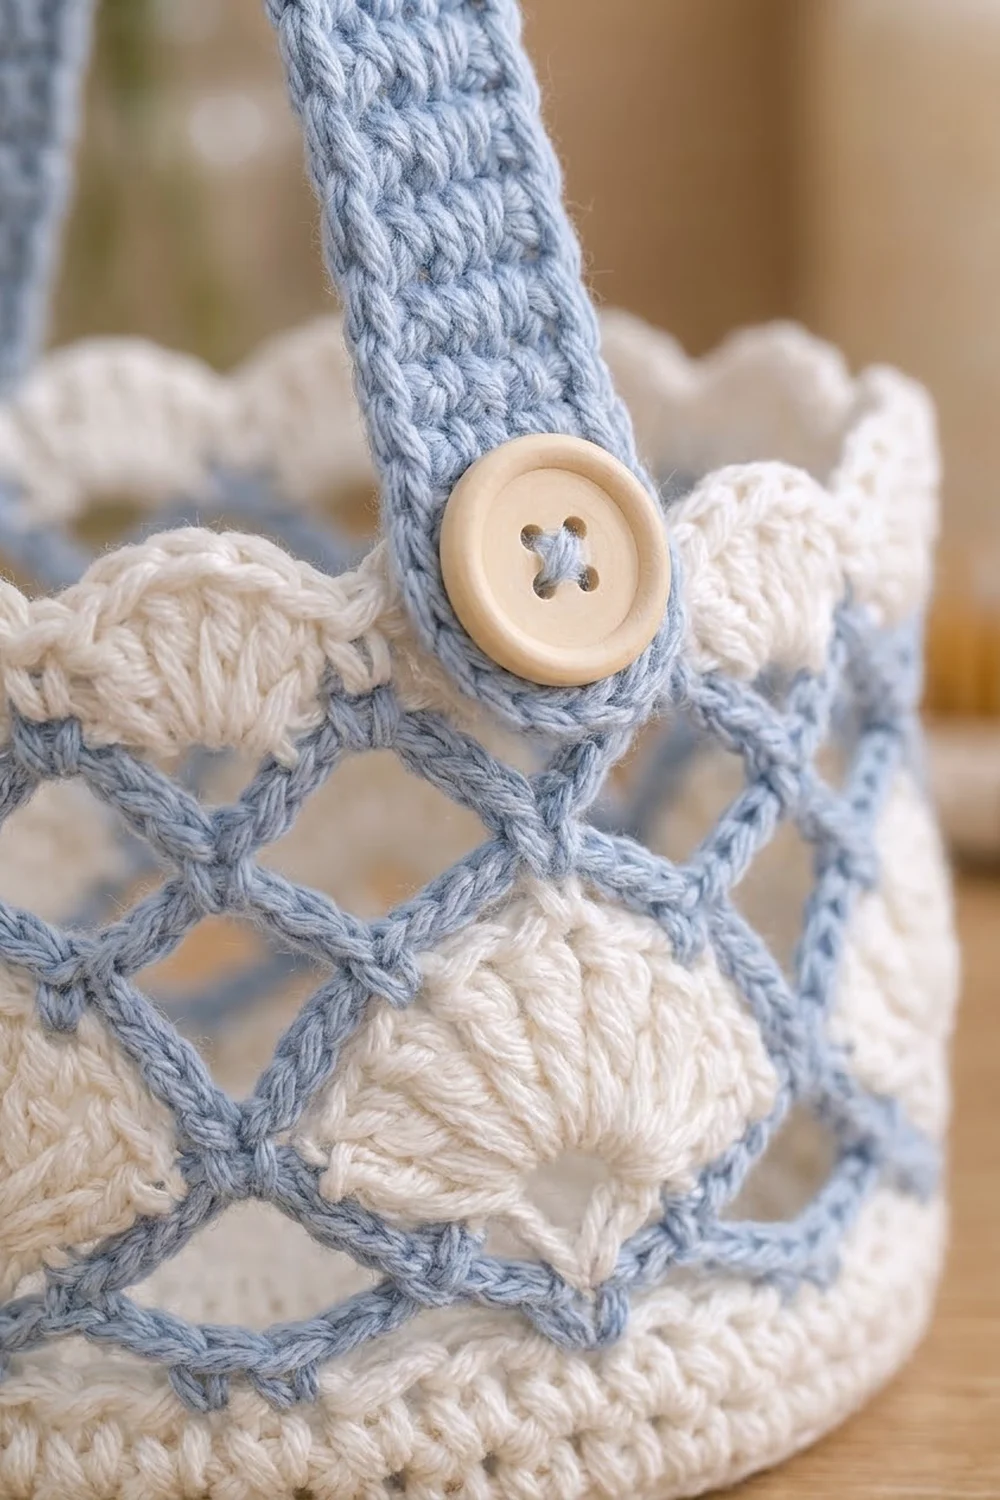
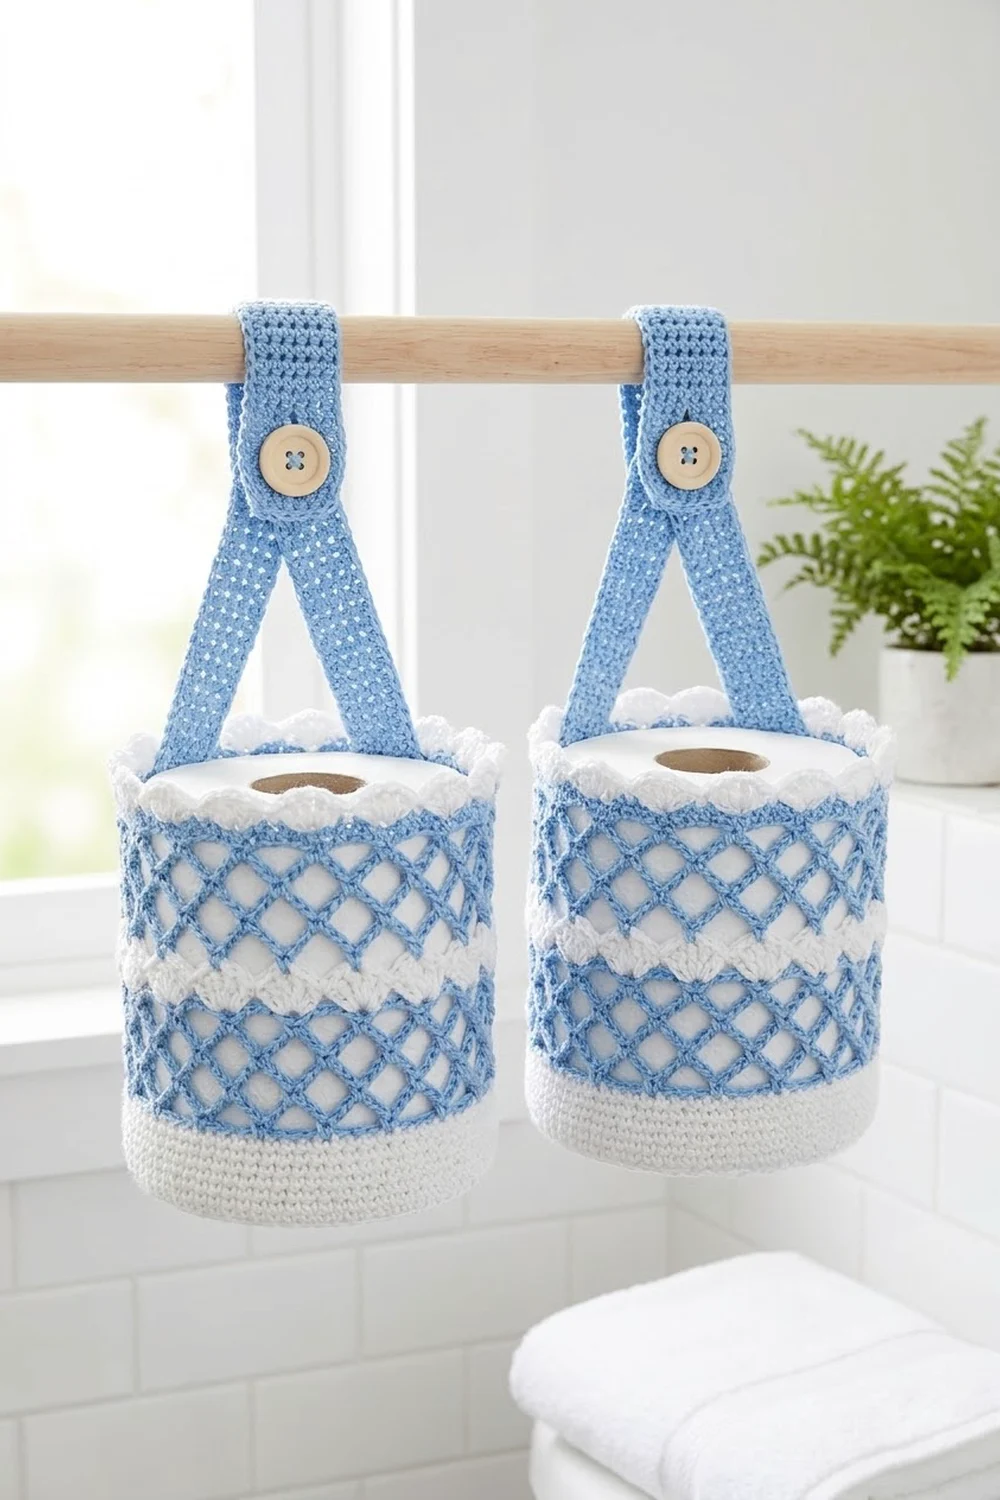
This pair of hanging baskets holds a spare toilet paper roll each and hangs from a towel bar. Each basket has a solid white base and a short white band at the bottom. Above that, an open powder-blue diamond lattice wraps around the wall, with white shell fans set into it. A soft white scalloped edge finishes the rim. The blue hanger splits into a V, goes over the bar, and closes with a light wooden button.
The look is cottage-coastal: cream white, pale sky blue, and natural wood. It suits a bright bathroom, and a cotton yarn keeps the baskets firm and washable.
This pattern uses US crochet terms. Each finished basket measures 4.75 in (12.1 cm) across the base and 4 in (10.2 cm) tall. The hanger adds 12 in (30.5 cm) of strap above the rim.
Each basket starts as a flat circle of single crochet. Next comes a back-loop turning round, and then the wall is worked in joined rounds that alternate shells and chain-loop mesh. A two-round border finishes the rim. The hanger is made separately and sewn inside the rim at two opposite points. Make two complete baskets for the set.
Finished Size and Construction
- Finished size (each basket): 4.75 in (12.1 cm) base diameter, 15 in (38.1 cm) circumference, 4 in (10.2 cm) tall
- Skill level: Easy-intermediate
- Terminology: US
- Yarn weight: Worsted (#4), 100% cotton
- Hook: 4.5 mm (US 7)
- Number of pieces: 4 in total, made as 2 baskets plus 2 hangers. The two baskets are not joined to each other.
- Layout: Two baskets hung side by side on one bar
- Piece size: Basket body 4.75 in (12.1 cm) diameter x 4 in (10.2 cm) tall; hanger 12 in (30.5 cm) long
- Size before border: 4.75 in (12.1 cm) diameter x 3.25 in (8.3 cm) tall (through Round 19)
- Border depth: 0.75 in (1.9 cm), 2 rounds
Materials
Use a smooth, firm worsted cotton. Cotton keeps its shape when a roll is dropped in and handles bathroom humidity well. Acrylic will work, but the walls will be softer.
- White / cream: 70 g, about 112 m (bases, white band, shells, border)
- Light powder blue: 40 g, about 64 m (lattice mesh, hangers)
- 4.5 mm (US 7) crochet hook
- 2 wooden buttons, 5/8 in (1.6 cm), 4-hole
- Tapestry needle
- Sewing needle and matching thread for the buttons
- 4 locking stitch markers
- Scissors and measuring tape
These amounts are for the full set of two baskets and already include a margin of about 10% for swatching and tails. One basket uses about 32 g of white and 18 g of blue.
Abbreviations (US Terms)
- ch – chain
- sl st – slip stitch
- sc – single crochet
- hdc – half double crochet
- dc – double crochet
- inc – 2 sc in the same stitch
- BLO – back loop only
- MR – magic ring
- st(s) – stitch(es)
- sp – space
Special stitches
- Shell: 5 dc in the stitch or loop given.
- Scallop: 5 hdc in the stitch given.
- Ch-5 loop: ch 5, then sc in the next anchor point given.
Gauge and Checkpoints
Gauge: 16 sc x 16 rounds = 4 in (10.2 cm) in sc. You want square stitches, 4 sts and 4 rounds per inch. All of the math depends on this.
Make one whole basket body before you start the second. Measure as you go:
- After Round 5 (30 sts): base is about 2.4 in (6.1 cm) across.
- After Round 10 (60 sts): base is 4.75 in (12.1 cm) across and lies flat.
- After Round 13: wall is 0.75 in (1.9 cm) tall.
- After Round 14: wall is 1.25 in (3.2 cm) tall.
- After Round 16: wall is 2 in (5.1 cm) tall.
- After Round 17: wall is 2.5 in (6.4 cm) tall.
- After Round 19: wall is 3.25 in (8.3 cm) tall.
- After Round 21: wall is 4 in (10.2 cm) tall.
If the base is too big (more than 5 in / 12.7 cm), go down to a 4 mm hook. If it is too small (less than 4.5 in / 11.4 cm), go up to a 5 mm hook. A standard roll is about 4.25 in (10.8 cm) across, so stay inside that range. If the base cups up into a bowl, your tension is too tight. If it ruffles, your tension is too loose.
Basket Base (White)
Work in joined rounds. Start every round with ch 1, which does not count as a stitch. Work the first sc into the same st as the join, and end each round with a sl st to the first sc.
Round 1: MR, 6 sc in ring, sl st to first sc. (6 sts)
Round 2: Inc in each st around. (12 sts)
Round 3: Sc 1, inc 6 times. (18 sts)
Round 4: Sc 2, inc 6 times. (24 sts)
Round 5: Sc 3, inc 6 times. (30 sts)
Round 6: Sc 4, inc 6 times. (36 sts)
Round 7: Sc 5, inc 6 times. (42 sts)
Round 8: Sc 6, inc 6 times. (48 sts)
Round 9: Sc 7, inc 6 times. (54 sts)
Round 10: Sc 8, inc 6 times. (60 sts)
Checkpoint: 4.75 in (12.1 cm) across, flat.
Basket Wall
Round 11 (white): Sc in BLO of each st around. (60 sts) This leaves a ridge that turns the wall upward.
Rounds 12–13 (white): Sc in each st around. (60 sts)
Checkpoint: the white band is 0.75 in (1.9 cm) tall.
Round 14 (white shells): Ch 1, sc in first st, sk 2, shell in next st, sk 2, sc in next st. Repeat from * 9 more times. On the last repeat, after the shell, work sk 2 and sl st to the first sc instead of the final sc. Fasten off.
(10 shells + 10 sc = 60 sts)
Round 15 (blue mesh): Join blue with sc in the center (3rd) dc of any shell. Ch 5, sc in next sc between shells, ch 5, sc in center dc of next shell. Repeat from * around. On the last repeat, end with ch 5 and sl st to the first sc.
(20 ch-5 loops)
Round 16 (blue mesh): Sl st into the first 2 ch of the next loop. Ch 1, sc in the same loop. Ch 5, sc in next loop 19 times, ch 5, sl st to the first sc. Fasten off.
(20 ch-5 loops)
Each new loop now sits over a sc from Round 15, so the two mesh rounds form the diamond lattice.
Round 17 (white shells): Join white with sc in any ch-5 loop. Shell in next loop. Sc in next loop, shell in next loop 9 times. Sl st to the first sc. Fasten off.
(10 shells + 10 sc = 60 sts)
These shells sit inside the lower points of the diamonds.
Round 18 (blue mesh): Work as Round 15. (20 ch-5 loops)
Round 19 (blue mesh): Work as Round 16, then fasten off. (20 ch-5 loops)
Checkpoint: 3.25 in (8.3 cm) tall, with the wall straight and not flaring.
Border (White Scalloped Rim)
Border gauge: At the rim, 3 sc fill each ch-5 loop. That gives 60 sts around, 4 sts per inch, the same as the base.
The rim has no corners, so count it in two halves of 30 sts each, front and back. The hanger legs attach where the halves meet.
Round 20 (conversion round, white): Join white with sc in any ch-5 loop, then work 2 more sc in the same loop. Work 3 sc in each remaining loop. Sl st to the first sc.
Count: 20 loops x 3 sc = 60 sc + 0 extra = 60 sts, which is 30 sts per half.
Round 21 (scallops): Ch 1, sc in first st, sk 2, scallop in next st, sk 2, sc in next st. Repeat from * 9 more times. On the last repeat, after the scallop, work sk 2 and sl st to the first sc. Fasten off.
(10 scallops + 10 sc = 60 sts, 5 scallops per half)
Why the math works: In Round 15, each ch-5 loop spans 3 stitches of the shell round below, from a center dc to the next sc. Three sc per loop puts back exactly the 60 stitches of the base. Because the rim and the base have the same count, the wall stays straight.
The scallop repeat is 6 sts, and 60 divides evenly by 6, so the border has no partial scallop. Sts 1 and 31 of Round 21 are both sc, directly opposite each other. Place a marker in each one for the hanger.
Hanger (Blue, make 2)
Work in rows. Ch 1 at the start of each row does not count as a stitch.
Leg 1: Ch 4. Sc in 2nd ch from hook and in the next 2 ch. (3 sts)
Rows 2–20: Ch 1, turn, sc 3. (3 sts) Fasten off.
Leg 2: Work as Leg 1, but do not fasten off.
Row 21 (joining row): Ch 1, turn, sc 3 across Leg 2, then sc 3 across Leg 1. (6 sts)
Rows 22–45: Ch 1, turn, sc 6. (6 sts)
Row 46 (buttonhole): Ch 1, turn, sc 2, ch 2, sk 2, sc 2. (4 sc + 1 ch-2 sp)
Row 47: Ch 1, turn, sc 2, 2 sc in ch-2 sp, sc 2. (6 sts)
Row 48: Ch 1, turn, sc 6. (6 sts) Fasten off and weave in the end.
Checkpoint: the legs are 5 in (12.7 cm) long and 0.75 in (1.9 cm) wide. The band is 7 in (17.8 cm) long and 1.5 in (3.8 cm) wide. The whole hanger is 12 in (30.5 cm) long.
Button: Sew the button to the center of the band on Row 23, two rows above the point of the V, on the front face.
Make All Pieces
For the full set, make:
- White: 2 basket bodies (Rounds 1–14, 17, and 20–21)
- Blue: mesh Rounds 15–16 and 18–19 on both baskets, plus 2 hangers
Layout on the bar:
|=========== towel bar ===========|
     [Band A]          [Band B]
       / \               / \
  [Basket A]        [Basket B]
Leave about 2 in (5.1 cm) of space between the baskets so the rims do not rub.
Joining (Hanger to Basket)
Method: Whipstitch with a 12 in (30.5 cm) length of blue yarn and a tapestry needle.
Stitch-to-stitch logic: Place the bottom 4 rows of each leg, 1 in (2.5 cm), against the inside of the wall. The center of the leg’s 3 foundation sts lines up with a marked st (st 1 or st 31). The 3 leg sts then cover sts 60, 1, 2 on one side and sts 30, 31, 32 on the other. Sew the foundation edge of the leg to Round 19. Then sew both long edges up to Round 21, going through one stitch for each leg row.
Tension: Pull each stitch snug, but not so tight that the rim puckers. Both legs must overlap by the same 4 rows, or the basket will hang tilted.
Size checkpoint: Each leg should show 4 in (10.2 cm) above the rim. Fold the band over the bar and button it. The loop from Row 23 to Row 46 is 6 in (15.2 cm) long, which fits bars up to 1.25 in (3.2 cm) thick. The button should sit about 1 in (2.5 cm) below the bar.
Final Blocking
- Weave in all the tails on the inside of the wall, following the same color.
- Spritz the basket with water until it is damp but not soaked.
- Stand it over a jar or a spare roll about 4.25 in (10.8 cm) across.
- Pinch each shell and scallop into an even fan.
- Pull the mesh gently upward so the diamonds open evenly.
- Lay the hanger flat and pat it straight.
- Let everything dry completely before hanging, about 24 hours.
Final Quality-Control Checklist
- [ ] Base is 4.75 in (12.1 cm) across and lies flat
- [ ] Wall is 4 in (10.2 cm) tall all the way around
- [ ] Rounds 14 and 17 each have 10 shells
- [ ] Rounds 15, 16, 18 and 19 each have 20 ch-5 loops
- [ ] Round 20 has 60 sc and Round 21 has 10 scallops
- [ ] The two legs are sewn exactly opposite each other, at sts 1 and 31
- [ ] Button passes through the buttonhole firmly
- [ ] Both baskets match in height and hang level
Troubleshooting
Base cups or ruffles: Check every round’s count against the list. Change the hook size if needed.
Wall flares outward: The mesh chains are too loose. Try ch 4 loops, or use a smaller hook for the mesh rounds only.
Wall pulls inward: The mesh chains are too tight. Loosen them, or go up 0.5 mm for the mesh rounds.
Lattice does not form diamonds: In Round 16, the sc goes into the loop, not into the sc. Each new loop should cover a sc from Round 15.
Wrong count in Round 20: Recount the loops in Round 19. You need 20 loops for 60 sts.
Basket hangs tilted: Unpick one leg and sew it again with exactly 4 rows overlapping.
Button slips out: Add a few stitches with sewing thread to make the buttonhole smaller.
Care
Hand wash in cool water, or machine wash on a gentle cycle in a laundry bag. Keep the wooden buttons out of long soaks, reshape while damp, and lay flat to dry.
Final Notes
Here is how the measurements build. A 60-st base is 4.75 in (12.1 cm) across. The wall keeps those 60 sts through three sc rounds, two shell rounds of 10 repeats, and four mesh rounds of 20 loops, reaching 3.25 in (8.3 cm). Round 20 puts back exactly 60 sts at 3 sc per loop. Round 21 adds 10 scallops, for a total height of 4 in (10.2 cm). The 12 in (30.5 cm) hanger is sewn at two opposite stitches. Make a second matching basket and the set is ready for the bar.
Happy crocheting!