

This small Christmas tree ornament is made of soft rose-pink shell fans in three stacked tiers: three shells at the base, two in the middle and one at the top. Each fan is outlined in deep burgundy, so the tree looks like a piece of stained glass hanging on the branches.
The colors are simple. Burgundy is used for the outlines, lattice, side edges, trunk and hanging loop, and dusty rose for the shells. The look is light and lacy, with small open windows between the tiers that let the tree lights shine through.
The pattern uses US crochet terms. The finished ornament is 4 in (10.2 cm) wide at the base and 3.8 in (9.7 cm) tall from the bottom of the trunk to the top of the tree. With the hanging loop it is about 5 in (12.7 cm) tall.
You work it flat in one piece from the bottom up. Each tier has three short rows: a burgundy base, a rose shell row and a burgundy outline. You work the trunk into the free loops of the foundation chain. A final burgundy edging adds the slanted sides and the hanging loop.
Finished Size and Construction
- Finished size: 4 in (10.2 cm) wide x 3.8 in (9.7 cm) tall; about 5 in (12.7 cm) tall with loop
- Skill level: Easy
- Terminology: US crochet terms
- Yarn weight: DK (#3 light) cotton or cotton blend
- Hook: 3.5 mm (E-4)
- Number of pieces: 1
- Layout: single ornament with three tiers of shells (3, 2, 1) plus a trunk
- Piece size: tree triangle 4 in (10.2 cm) wide x 3 in (7.6 cm) tall; trunk 0.8 in (2.0 cm) square
- Size before border: 4 in (10.2 cm) x 3.8 in (9.7 cm) including trunk
- Border depth: about 0.125 in (0.3 cm) on the sides; the loop adds 1.25 in (3.2 cm) at the top
Materials
Choose a smooth DK-weight cotton, either mercerized or matte. Cotton holds the shell shape crisply and blocks flat, which matters on a lacy ornament. Avoid fuzzy or very stretchy yarns, because the open windows close up and the sides curl.
- Color A, Burgundy: 6 g, about 15 m
- Color B, Dusty Rose: 4 g, about 10 m
These quantities include a margin of roughly 30 percent for swatching and weaving in. One small ball of each color makes several ornaments.
Tools:
– 3.5 mm (E-4) crochet hook
– Tapestry needle
– Scissors
– Stitch markers (2)
– Ruler or tape measure
– Blocking mat, rust-proof pins and a spray bottle
Abbreviations (US Terms)
- ch – chain
- sl st – slip stitch
- sc – single crochet
- dc – double crochet
- sk – skip
- sp – space
- st(s) – stitch(es)
Special stitch – Shell: work 7 dc into the same stitch. Each shell fans out from a single base point, like the rose fans on this tree.
Standing sc: with a slipknot on the hook, insert the hook in the stitch, yarn over and pull up a loop, then yarn over and pull through both loops.
Gauge and Checkpoints
Gauge: 25 sc and 30 rows = 4 in (10.2 cm) in sc with a 3.5 mm hook, which is 6.25 sc per inch. Chains should work up at about the same rate: 7 ch measure about 1.1 in (2.8 cm).
The ornament is small, so the first tier is your gauge swatch. Make Rows 1-3 and measure before you go further.
Checkpoints:
- After Row 3 (Tier 1): 4 in (10.2 cm) wide and 1 in (2.5 cm) tall at the shell centers.
- After Row 6 (Tier 2): 2 in (5.1 cm) tall in total.
- After Row 9 (Tier 3): 3 in (7.6 cm) tall in total.
- After the trunk: 3.8 in (9.7 cm) tall in total.
If Tier 1 is too wide (over 4.25 in / 10.8 cm), go down one hook size to 3.25 mm (D-3). If it is too narrow (under 3.75 in / 9.5 cm), go up to 3.75 mm (F-5). If the shells cup instead of lying flat, the outline row is usually too tight. Loosen your sc on Row 3 rather than changing hooks.
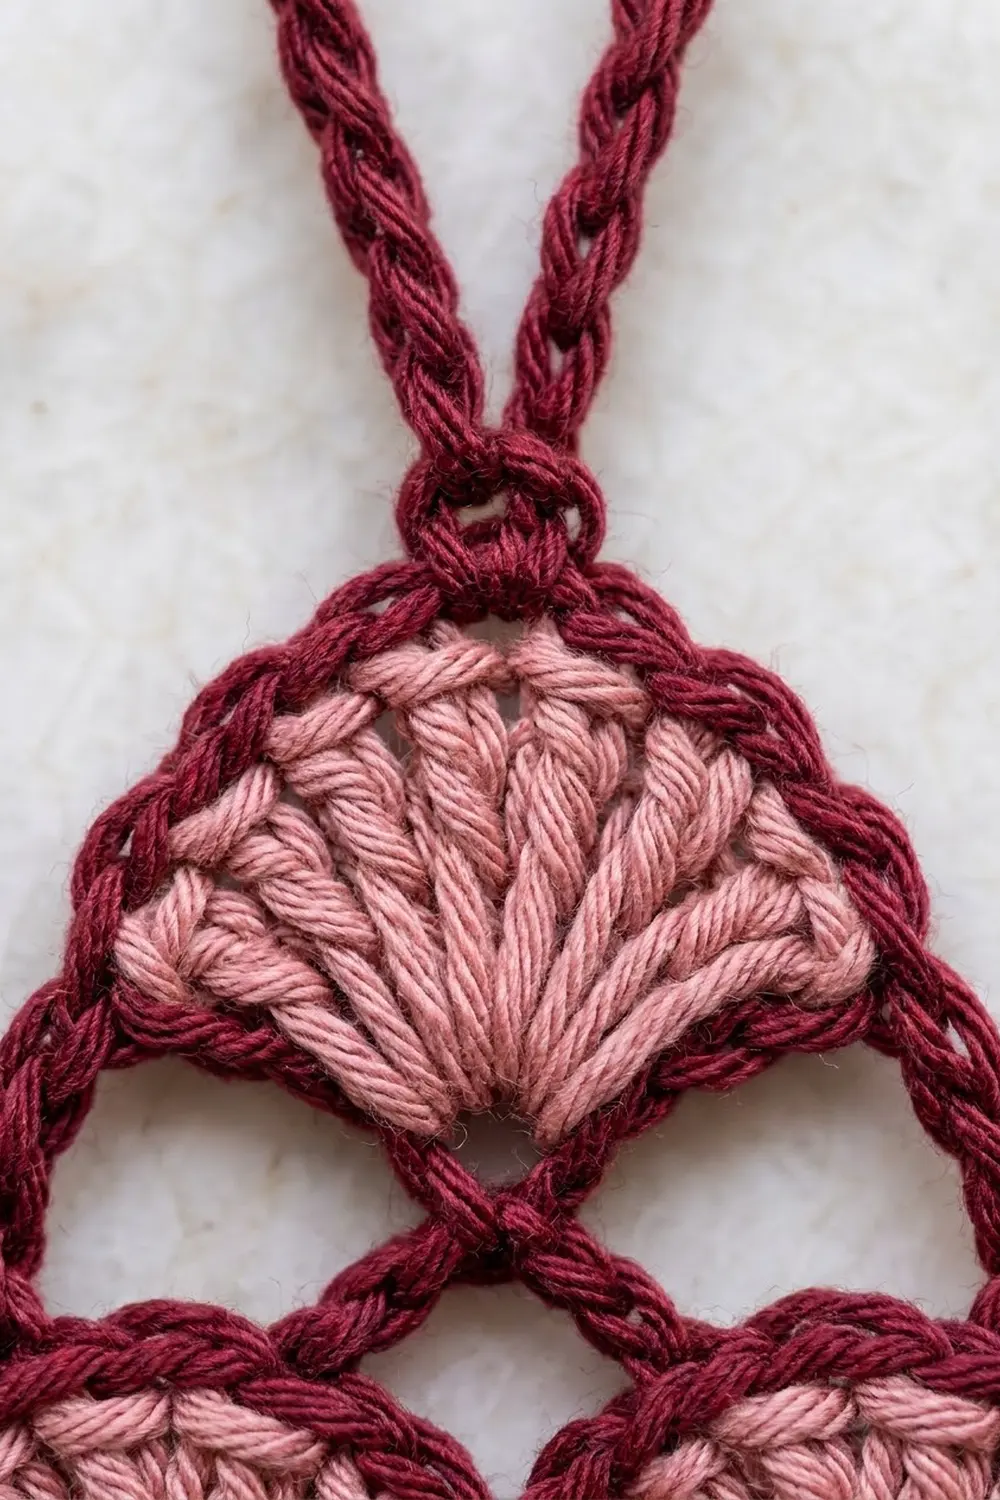
Tier 1 (Bottom, 3 Shells)
Foundation: With A, ch 26.
Row 1 (A): Sc in 2nd ch from hook, [ch 3, sk 3 ch, sc in next ch] 6 times. Fasten off A. (7 sc and 6 ch-3 sps = 25 sts.)
The ch-3 spaces sit directly above the skipped foundation chains. They form small burgundy eyelets on either side of each shell’s base.
Row 2 (B): Do not turn. Join B with a standing sc in the first sc of Row 1. [Sk next ch-3 sp, shell in next sc, sk next ch-3 sp, sc in next sc] 3 times. Fasten off B. (3 shells and 4 sc = 21 dc + 4 sc = 25 sts.)
The shells land on the 2nd, 4th and 6th sc of Row 1. Each fan opens upward from one point, and the sc between the fans anchors the dip.
Row 3 (A, outline): Do not turn. Join A with a standing sc in the first sc of Row 2. [Sc in each of next 7 dc, sc in next sc] 3 times. Do not fasten off. (25 sc.)
This row traces the curved top of each shell in burgundy. The single sc between shells sits low in the V, which creates the scalloped outline.
Checkpoint: 4 in (10.2 cm) wide, 1 in (2.5 cm) tall.
Tier 2 (Middle, 2 Shells)
Number the 25 sc of Row 3 from 1 to 25, counting from the end where your hook is after turning. Shell centers are sc 5, 13 and 21. The low V points are sc 9 and 17.
Row 4 (A, lattice): Ch 1, turn. Sl st in each of first 4 sc, sc in next sc (sc 5), [ch 3, sk 3 sc, sc in next sc] 4 times. Fasten off A. (5 sc and 4 ch-3 sps = 17 sts, worked over sc 5 to sc 21.)
The sc land on sc 5, 9, 13, 17 and 21. Each ch-3 bridges from a shell top down into a V and leaves a small open window under the bridge.
Row 5 (B): Do not turn. Join B with a standing sc in the first sc of Row 4. [Sk next ch-3 sp, shell in next sc, sk next ch-3 sp, sc in next sc] 2 times. Fasten off B. (2 shells and 3 sc = 14 dc + 3 sc = 17 sts.)
Both shells sit on the V points, so they nestle between the three bottom fans.
Row 6 (A, outline): Do not turn. Join A with a standing sc in the first sc of Row 5. [Sc in each of next 7 dc, sc in next sc] 2 times. Do not fasten off. (17 sc.)
Checkpoint: 2 in (5.1 cm) tall in total.
Tier 3 (Top, 1 Shell)
Number the 17 sc of Row 6 from 1 to 17 the same way. Shell centers are sc 5 and 13, and the V point is sc 9.
Row 7 (A, lattice): Ch 1, turn. Sl st in each of first 4 sc, sc in next sc (sc 5), [ch 3, sk 3 sc, sc in next sc] 2 times. Fasten off A. (3 sc and 2 ch-3 sps = 9 sts.)
Row 8 (B): Do not turn. Join B with a standing sc in the first sc of Row 7, sk next ch-3 sp, shell in next sc, sk next ch-3 sp, sc in last sc. Fasten off B. (1 shell and 2 sc = 7 dc + 2 sc = 9 sts.)
Row 9 (A, outline): Do not turn. Join A with a standing sc in the first sc of Row 8, sc in each of next 7 dc, sc in last sc. Fasten off A. (9 sc.)
The 5th sc of Row 9 is the apex of the tree. Place a marker in it.
Checkpoint: 3 in (7.6 cm) tall in total. Each tier is 8 sts narrower than the one below (25, 17, 9), which gives an even triangle.
Trunk
Turn the tree upside down so the foundation chain is at the top. The 4th sc of Row 1 sits directly below the center shell, and the foundation chain under it is the center of the trunk.
Row 1 (A): Count 2 foundation chains to the right of the center chain. Join A with a standing sc in the free loop of that chain, then sc in the free loops of the next 4 ch. (5 sc, centered under the middle shell.)
Rows 2-6: Ch 1, turn, sc in each sc across. (5 sc.)
Fasten off, leaving a 6 in (15.2 cm) tail to weave in.
Checkpoint: trunk 0.8 in (2.0 cm) wide x 0.8 in (2.0 cm) tall; whole tree 3.8 in (9.7 cm) tall.
Border (Side Edges and Hanging Loop)
The border is one continuous pass in A: up the left side, around the hanging loop and down the right side. You leave the bottom as it is, so the burgundy foundation and eyelets stay visible.
Border gauge: the same as the body, 6.25 ch per inch. Each side chain must match the length of the diagonal it spans, so the sides stay straight without pulling or rippling.
Border Row (A): With the right side facing, join A with a standing sc in the outer end sc of Row 3 on the left side.
- Left side: ch 7, sc in outer end sc of Row 6, ch 7, sc in outer end sc of Row 9, ch 6, sc in apex sc (marked). (Left side: 3 sc + 20 ch, plus the apex sc.)
- Hanging loop: ch 16, sl st in the same apex sc. (16 ch.)
- Right side: ch 6, sc in outer end sc of Row 9 on the right side, ch 7, sc in outer end sc of Row 6, ch 7, sc in outer end sc of Row 3. (Right side: 3 sc + 20 ch.)
Fasten off. (Total: 7 sc including the apex, and 56 ch: 20 + 16 + 20.)
Why the math works: each tier is 4 sts narrower on each side than the tier below. So each side chain spans 4 sts across, which is 0.64 in (1.6 cm), and rises 1 in (2.5 cm). That diagonal is about 1.19 in (3.0 cm). A ch 7 measures 1.12 in (2.8 cm), just snug enough to keep the edge straight. The top segment rises only about 0.75 in (1.9 cm) over the same 4 sts, a diagonal of about 0.99 in (2.5 cm), so ch 6 at 0.96 in (2.4 cm) fits. Both sides use the same counts, so the tree stays symmetrical. The 16 ch fold into a loop about 1.25 in (3.2 cm) tall.
Final Blocking
- Weave in all ends through burgundy rows of the matching color, not through the rose shells.
- Spray the ornament lightly with water until it is damp but not soaked.
- Lay it face up on the blocking mat and smooth each shell into an even fan.
- Pin the two bottom corners 4 in (10.2 cm) apart.
- Pin the apex 3 in (7.6 cm) above the base line, centered between the corners.
- Pull the side chains into straight lines and pin each side sc.
- Open each lattice window with a pin tip so the bridges sit evenly.
- Pin the trunk square at 0.8 in (2.0 cm) on each side, centered under the middle shell.
- Lay the hanging loop flat and straight above the apex.
- Let it dry completely, then unpin. For a crisper ornament, use a light spray starch before it dries.
Final Quality-Control Checklist
- There are three tiers with 3, 2 and 1 shells, and each shell has 7 dc.
- Stitch counts: Tier 1 rows are 25 sts, Tier 2 rows are 17 sts and Tier 3 rows are 9 sts.
- The middle shells sit in the V points between the bottom shells, and the top shell sits between the middle two.
- Every shell is outlined in burgundy, with no rose showing through the outline.
- Small open windows are visible between all tiers.
- The side chains are straight and the same on both sides.
- The trunk is 5 sc wide and centered under the middle shell.
- Width is 4 in (10.2 cm), height is 3.8 in (9.7 cm) and the loop is 1.25 in (3.2 cm).
- All ends are woven in and can’t be seen from the front.
Troubleshooting
Shells cup or ruffle: the outline row is too tight or the dc are too tall. Loosen the outline sc, or work the shells a little shorter.
Upper shells don’t sit in the V: recount Row 4 or Row 7. The first sc must land in sc 5, not sc 4 or sc 6.
Sides bow inward: the side chains are too short for your gauge. Add 1 ch to each side chain and keep both sides the same.
Sides ripple: the side chains are too long. Remove 1 ch from each, or chain more tightly.
Trunk is off center: pull it out and count again from the chain directly under the 4th sc of Row 1.
Burgundy edges look gappy at the joins: join with a standing sc instead of a slip stitch, and pull the tails snug before weaving them in.
Care
Hand wash in cool water and lay flat to dry, reshaping the shells and pinning the sides if needed. Store the ornament flat or hang it by the loop so the triangle keeps its shape.

Final Notes
The measurements build in a short, simple chain. Tier 1 sets the gauge at 25 sts for 4 in (10.2 cm). Each tier drops 8 sts and adds 1 in (2.5 cm) of height, reaching 3 in (7.6 cm) at the apex. The trunk adds 0.8 in (2.0 cm), for 3.8 in (9.7 cm) in total. The side chains are sized to the diagonals so the border keeps the triangle straight. Check Tier 1, keep the counts at 25, 17 and 9, and the rest of the tree falls into place.
Happy crocheting!