

The Winter Fan Tree is a small, flat Christmas tree ornament made from stacked cream shells framed in burgundy. It has three tiers of fan stitches, with three shells at the bottom, two in the middle and one at the top. Each tier is outlined in burgundy, so the tree reads clearly from across the room.
The two colors are a deep burgundy and a soft cream, and together they give the tree a classic, slightly vintage holiday look. Small diamond openings form between the tiers on their own, which makes the ornament look lacy without any extra effort. A burgundy single-crochet edge pulls the shape together, a solid trunk anchors the bottom, and a chain-and-single-crochet loop at the top lets you hang it.
This pattern uses US crochet terms. The finished ornament is about 4.5 in (11.4 cm) wide and 4.25 in (10.8 cm) tall without the hanger. With the hanger it is about 6 in (15.2 cm) tall.
You work the tree flat from the bottom up, in rows that alternate between cream shell rows and burgundy single-crochet rows. Every row is worked with the right side facing. After that you add one burgundy edging round, then the trunk, then the hanging loop.
Finished Size and Construction
- Finished size: 4.5 in (11.4 cm) wide × 4.25 in (10.8 cm) tall, not counting the hanger
- Height with hanger: about 6 in (15.2 cm)
- Skill level: Easy / advanced beginner
- Terminology: US crochet terms
- Yarn weight: Fine (#2, sport) cotton or cotton blend
- Hook: 3.25 mm (US D-3)
- Number of pieces: 1
- Layout: One triangular tree with 3 shell tiers (3, 2, 1), plus a trunk and hanger worked onto the piece
- Piece size before edging: 4.2 in (10.7 cm) wide × 3.25 in (8.3 cm) tall
- Edging depth: about 0.125 in (0.3 cm), one round of single crochet
Materials
Yarn: Use a smooth, mercerized or matte sport-weight cotton. Cotton holds the shell shapes crisply and blocks well. Acrylic will work, but the fans will be softer and less defined.
- Burgundy (Color A): 6 g, about 19 m
- Cream (Color B): 4 g, about 12 m
These quantities include a margin for swatching and weaving in ends. If you plan to make a set of ornaments, multiply the amounts by the number of trees.
Tools:
– 3.25 mm (US D-3) crochet hook
– Tapestry needle
– Scissors
– Stitch markers (2)
– Blocking mat and rust-proof pins
– Spray bottle with water
– Optional: fabric stiffener or spray starch
Abbreviations (US Terms)
- ch – chain
- sl st – slip stitch
- sc – single crochet
- dc – double crochet
- st(s) – stitch(es)
- sk – skip
- RS – right side
Special stitch:
– Shell: 7 dc worked into the same stitch.
Gauge and Checkpoints
Gauge: 24 sc and 26 rows = 4 in (10.2 cm) in burgundy single crochet.
Gauge matters more than usual here, because every width in the tree comes straight from the foundation count. Make one full ornament as your test piece before you start a batch.
Checkpoints:
– After Row 1: the foundation row of 25 sc measures 4.2 in (10.7 cm) wide.
– After Row 3: the bottom tier measures 1.25 in (3.2 cm) tall.
– After Row 5: the middle tier’s top row spans about 2.8 in (7.1 cm), and the work measures about 2.25 in (5.7 cm) tall.
– After Row 7: the top row spans about 1.5 in (3.8 cm), and the triangle measures 3.25 in (8.3 cm) tall.
– After edging: the tree is 4.5 in (11.4 cm) wide × 3.5 in (8.9 cm) tall.
– After trunk: the total height is 4.25 in (10.8 cm), without the hanger.
If the piece is too big: Go down to a 3.0 mm hook, or tighten your foundation chain.
If the piece is too small: Go up to a 3.5 mm (US E-4) hook. Make sure your dc stitches are pulled up to full height, because short dc make flat, cramped fans.
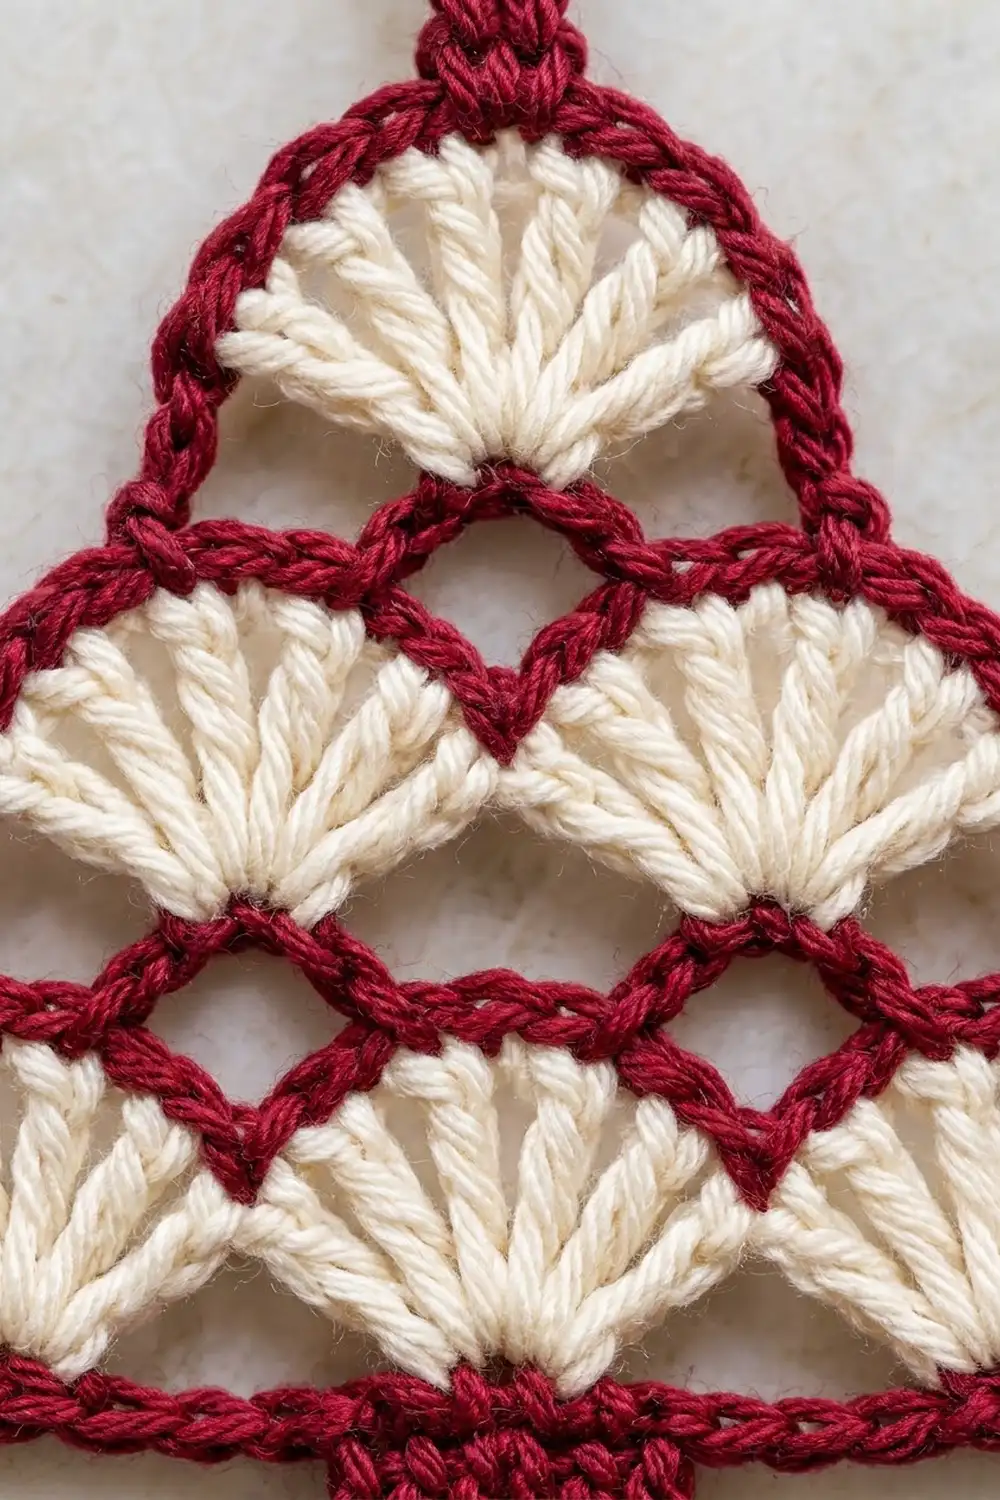
Tree Body
Every row is worked with the RS facing. Fasten off at the end of each row, then rejoin the next color at the right-hand edge. Work over the yarn tails as you go wherever you can. The edging round will cover the rest.
Row 1 (Color A, burgundy): Ch 26. Sc in the 2nd ch from the hook and in each ch across. Fasten off. (25 sc)
Row 2 (Color B, cream, bottom shells): With the RS facing, join cream in the first sc at the right edge. Ch 1, then sc in the same st. Sk 3 sts, shell in the next st, sk 3 sts, sc in the next st. Repeat from * 2 more times. Fasten off. (3 shells + 4 sc = 25 sts)
The shells now sit centered over sts 5, 13 and 21, and the sc anchors sit at sts 1, 9, 17 and 25.
Row 3 (Color A, outline): Join burgundy in the first sc of Row 2. Ch 1, then sc in the same st. Sc in each of the next 7 dc, then sc in the next sc. Repeat from * 2 more times. Fasten off. (25 sc)
This row hugs the tops of the fans, so it forms the burgundy scallop outline with dips at sts 9 and 17. Checkpoint: 1.25 in (3.2 cm) tall.
Row 4 (Color B, middle shells): Skip the first 4 sc of Row 3. Join cream in the 5th sc, which sits at the peak of the first shell. Ch 1, then sc in the same st. Sk 3 sts, shell in the next st, sk 3 sts, sc in the next st. Repeat from * once more. Fasten off. (2 shells + 3 sc = 17 sts)
These shells sit in the dips at sts 9 and 17. The skipped stitches on either side of each shell leave small diamond windows between the fan edges and the burgundy outline below. Sts 1–4 and 22–25 of Row 3 stay unworked. They form the shoulders of the tree.
Row 5 (Color A, outline): Join burgundy in the first sc of Row 4. Ch 1, then sc in the same st. Sc in each of the next 7 dc, then sc in the next sc. Repeat from * once more. Fasten off. (17 sc)
Checkpoint: this row spans about 2.8 in (7.1 cm), and the work is about 2.25 in (5.7 cm) tall.
Row 6 (Color B, top shell): Skip the first 4 sc of Row 5. Join cream in the 5th sc. Ch 1, then sc in the same st. Sk 3 sts, shell in the next st, sk 3 sts, sc in the next st. Fasten off. (1 shell + 2 sc = 9 sts)
Row 7 (Color A, outline): Join burgundy in the first sc of Row 6. Ch 1, then sc in the same st. Sc in each of the next 7 dc, then sc in the last sc. Fasten off. (9 sc)
Checkpoint: the top row spans about 1.5 in (3.8 cm), and the triangle is 3.25 in (8.3 cm) tall.
Weave in any cream tails that the edging won’t cover. Leave the burgundy tails short and lay them along the edges, so you can crochet over them in the next round.
Edging Round
Edging gauge: 6 sc per inch (2.54 cm), the same as the body. Keep the sts relaxed along the sloped sides, so the edges don’t pull inward.
With the RS facing, join burgundy in the bottom-right corner, in the first foundation ch loop. You are working into the opposite side of the Row 1 foundation chain.
Bottom edge: Work 3 sc in the first ch (corner), sc in each of the next 23 ch, then 3 sc in the last ch (corner).
– Count: 25 ch worked 1-per-ch + 4 extra corner sts = 29 sc. Place a marker in the center st of each 3-sc corner.
Left side (working up): 1 sc in the Row 1 end, 2 sc in the Row 2 end, then sc in each of the 4 exposed sc of Row 3. Next work 2 sc in the Row 4 end, sc in each of the 4 exposed sc of Row 5, 2 sc in the Row 6 end, and 1 sc in the Row 7 end.
– Count: 1 + 2 + 4 + 2 + 4 + 2 + 1 = 16 sc. The bottom corner sts are not included in this count. They already belong to the bottom edge.
Top: Sc in each of the first 4 sc of Row 7, 3 sc in the center (5th) sc to form the tree point, then sc in each of the last 4 sc.
– Count: 9 sts worked 1-per-st + 2 extra at the point = 11 sc.
Right side (working down): Work the same as the left side in reverse: 1 sc in the Row 7 end, 2 in the Row 6 end, 4 in the exposed Row 5 sts, 2 in the Row 4 end, 4 in the exposed Row 3 sts, 2 in the Row 2 end, and 1 in the Row 1 end. (16 sc)
Sl st to the first sc to join. Fasten off.
Round total: 29 + 16 + 11 + 16 = 72 sc.
Why the math works: The bottom has 25 foundation sts, which matches the 4.2 in (10.7 cm) foundation width. The 4 corner sts let the work turn the corner without cupping. On each side, the 4 exposed sts at each shoulder match the 4 stitches the row above stepped in by. The row-end counts follow row height: 1 sc for a single-crochet row and 2 sc for a taller shell row, which keeps the slope flat. The top point gets 2 extra sts so it can turn the sharp angle. The edging adds about 0.125 in (0.3 cm) on every side, which brings the width from 4.2 in (10.7 cm) to 4.5 in (11.4 cm).
Trunk
The 29 bottom-edge sts are numbered from the right corner, starting with the first corner st. The center st is st 15.
Row 1: With the RS facing and the tree upside down, join burgundy in st 13 of the bottom edge. Ch 1, then sc in the same st and in each of the next 4 sts. (5 sc)
Rows 2–5: Ch 1, turn, then sc in each st across. (5 sc)
Fasten off. The trunk measures about 0.8 in (2.0 cm) wide × 0.75 in (1.9 cm) tall.
Hanging Loop
Join burgundy in the center st of the 3-sc group at the top point. Ch 30, then sl st in the same st to form a loop. Turn, and work 40 sc into the loop. Sl st into the base st and fasten off.
The finished loop stands about 1.75 in (4.4 cm) above the tree point. Wrap the tail around the base of the loop twice before weaving it in, so the loop stands upright.
Final Blocking
- Weave in all the remaining ends along the burgundy edging, where they won’t show.
- Lay the ornament RS up on a blocking mat.
- Mist it evenly with water until it is damp, not soaked.
- Pin the two bottom corners 4.5 in (11.4 cm) apart, then pin the top point so the triangle is 3.5 in (8.9 cm) tall.
- With your fingertip, open each fan so all 7 dc spread evenly, and nudge the diamond openings into shape.
- Pin the trunk square, at 0.8 in (2.0 cm) wide.
- Lay the hanger straight up from the point.
- Optional: spray the ornament lightly with starch or fabric stiffener for a crisp ornament.
- Leave it to dry completely before you unpin it.
Final Quality-Control Checklist
- The tree is 4.5 in (11.4 cm) wide × 4.25 in (10.8 cm) tall without the hanger.
- The tiers contain 3, 2 and 1 shells, and every shell has 7 dc.
- Each burgundy outline row has the right count: 25, 17 and 9 sc.
- The edging round totals 72 sc, with crisp corners and a defined top point.
- The diamond openings show clearly between the tiers.
- The trunk is centered under the tree, 5 sc wide and 5 rows tall.
- The hanger is secure and stands straight.
- No yarn tails are visible from the front.
Troubleshooting
Fans curl or ruffle: Your dc stitches are too loose for the skipped space. Go down one hook size for the shell rows only.
Fans look cramped or flat: Pull each dc up to its full height, or use a slightly larger hook for the cream rows.
Sides pull inward: You worked too few sc along the row ends. Use 2 sc in every shell-row end.
Sides ripple: You worked too many sc along the sides. Stick to 16 sc per side.
Trunk is off-center: Recount the bottom edge. The trunk must start in st 13 of 29.
Hanger flops over: Work the sc around the loop more firmly, or stiffen the loop when you block.
Care
Hand wash in cool water with mild soap, then press out the water in a towel. Reshape the ornament and dry it flat. Re-stiffen if needed before you store it in a flat box.

Final Notes
Everything in this tree follows from one measurement chain. The 25-st foundation sets the 4.2 in (10.7 cm) base width. Each tier then steps in by 4 sts per side, giving 25, 17 and 9 sts across. The 72-st edging brings the piece to 4.5 in (11.4 cm) wide and 3.5 in (8.9 cm) tall. The trunk adds 0.75 in (1.9 cm) for a total of 4.25 in (10.8 cm), and the hanger adds 1.75 in (4.4 cm). If your foundation row matches gauge, every later checkpoint will fall into place.
Happy crocheting!