
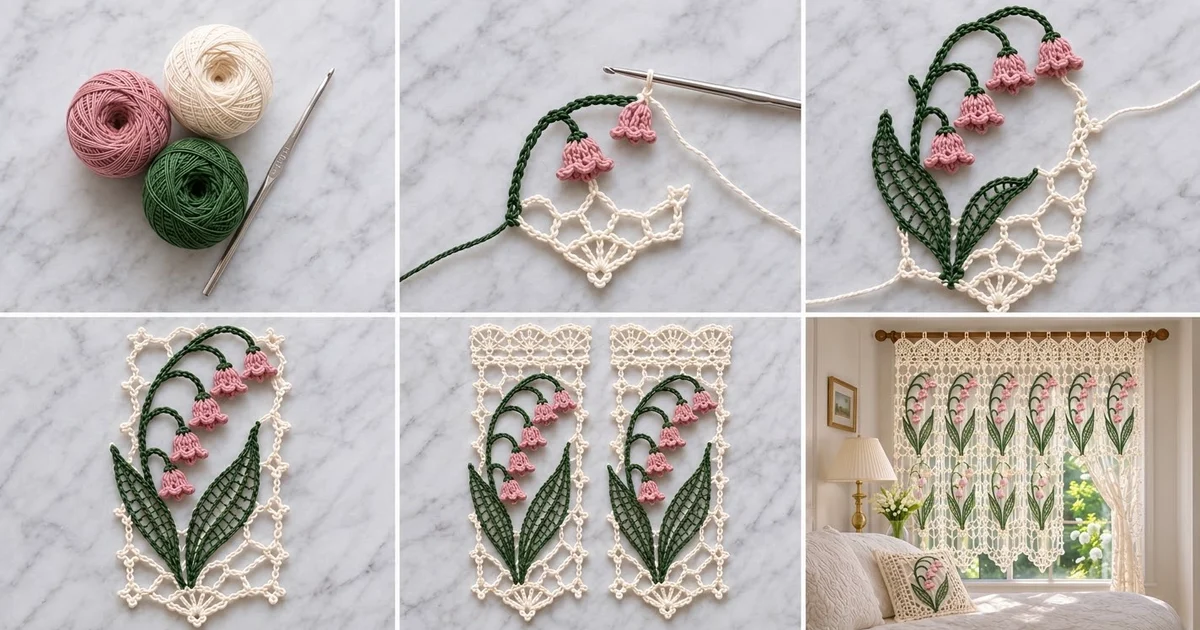
The Valley Bells Lace Panel is one rectangle of ivory openwork lace with a lily of the valley spray sewn on top. A dark green stem rises from the bottom center, climbs the left side and arches over to the right. Five pink bells hang from it. Two pointed lattice leaves frame the base, with a small ivory fan beneath them.
The ivory, dusty pink and deep green palette gives the panel a soft, vintage Irish-lace style. The textured bells and stem stand out clearly against the open net.
This pattern uses US crochet terms. The finished panel measures 6.5 x 11 in (16.5 x 27.9 cm) after the border and blocking.
You work it in four stages. First you make an ivory chain-loop net in rows. Next you make the separate appliqué parts: a fan, two leaves, a stem with short side branches (pedicels) and five bells. Then you layer the parts and sew them on. Finally you add a three-round picot border.
Finished Size and Construction
- Finished size: 6.5 x 11 in (16.5 x 27.9 cm)
- Skill level: Intermediate
- Terminology: US crochet terms
- Yarn weight: Size 3 cotton crochet thread (about 150 m per 50 g)
- Hook: 2.5 mm
- Number of pieces: 1 finished panel (net background plus 10 sewn-on appliqué parts)
- Layout: single vertical rectangle, no joining
- Net size before border: 5.5 x 10 in (14.0 x 25.4 cm)
- Border depth: 0.5 in (1.3 cm) on every side
Materials
Use mercerized cotton thread, which gives crisp stitches and blocks flat. Choose a green that is clearly darker than the pink.
- Ivory: 20 g, about 60 m (net, fan, border)
- Dark green: 8 g, about 24 m (stem, pedicels, leaves)
- Dusty pink: 4 g, about 12 m (bells)
The quantities include a margin of about 20 percent for swatching and sewing tails.
Tools:
- 2.5 mm hook
- Fine tapestry needle
- Rustproof pins
- Blocking board or foam mat
- Spray bottle
- Scissors
- Tape measure
Abbreviations (US Terms)
- ch: chain
- sl st: slip stitch
- sc: single crochet
- hdc: half double crochet
- dc: double crochet
- FPhdc: front post half double crochet
- sk: skip
- sp: space
- st(s): stitch(es)
- BB: back bump of the chain
Picot: ch 3, sl st into the 3rd ch from the hook.
Gauge and Checkpoints
- Sc gauge: 6 sc = 1 in (2.5 cm)
- Net gauge: 4 ch-5 loops = 2 in (5.1 cm) wide; 5 rows = 2 in (5.1 cm) tall
Test first: Ch 22 and work the net pattern for 10 rows (4 loops wide). Pin it out lightly. It should measure 2 x 4 in (5.1 x 10.2 cm). Then make one bell and the small leaf to check your gauge on the green and pink parts.
Checkpoints:
- Bell: 0.6 in (1.5 cm) tall
- Large leaf: 5 in (12.7 cm) long, 1.25 in (3.2 cm) wide
- Small leaf: 4 in (10.2 cm) long
- Fan: 1.75 in (4.4 cm) wide
- Main stem: 8.5 in (21.6 cm) long
- Blocked net: 5.5 x 10 in (14.0 x 25.4 cm)
If your pieces come out too big, use a hook 0.25 mm smaller. If they are too small, use a hook 0.25 mm larger.

Ivory Net Background
Foundation: With ivory, ch 57.
Row 1: Sc in the 2nd ch from the hook. Ch 5, sk 4 ch, sc in the next ch. Repeat from * 11 times. (12 sc, 11 ch-5 loops)
Row 2: Ch 5, turn. Sc in the first loop. Ch 5, sc in the next loop. Repeat from * 10 times. Ch 2, dc in the last sc. (11 sc, 10 full loops, plus a half loop at each edge)
Row 3: Ch 1, turn. Sc in the dc. Ch 5, sc in the next loop. Repeat from * 10 times. Ch 5, sc in the 3rd ch of the turning ch. (12 sc, 11 ch-5 loops)
Rows 4–25: Repeat Rows 2 and 3 eleven more times. Fasten off.
Row 25 is a full row of 11 loops, so the top edge matches the foundation edge.
Checkpoint: Pin the net flat without stretching. It should measure 5.5 x 10 in (14.0 x 25.4 cm).
Fan
With ivory, ch 4.
Row 1: 8 dc in the 4th ch from the hook. (9 dc; the skipped ch counts as 1 dc)
Row 2: Ch 4 (counts as dc + ch 1), turn. Dc in the next dc. Ch 1, dc in the next dc. Repeat from * 7 times. (9 dc, 8 ch-1 sps)
Row 3: Ch 1, turn. Sc in the first dc. Ch 3, sc in the next dc. Repeat from * 8 times. (9 sc, 8 ch-3 loops) Fasten off.
Join ivory at the base point and make 1 picot. Fasten off, leaving a 12 in (30.5 cm) tail.
Checkpoint: The fan is 1.75 in (4.4 cm) wide and 1 in (2.5 cm) tall.
Leaves (Make 2)
Each leaf is worked in rounds around a foundation chain, which becomes the center vein. The ch-1 spaces in Round 1 form the lattice, and Round 3 adds a solid green edge.
Number the working chains from the hook end: position 1 is the 2nd ch from the hook.
Large Leaf
With green, ch 31. (30 working positions)
Round 1, first side: Sc in position 1, hdc in 2, dc in 3. Ch 1, sk 1, dc in the next ch. Repeat from * 12 times (last dc in 27). Hdc in 28, sc in 29. Work (sc, ch 2, sc) in 30 for the tip.
Round 1, second side: Rotate and work into the free loops. Sc in 29, hdc in 28, dc in 27. Ch 1, sk 1, dc in the next ch. Repeat from * 12 times (last dc in 3). Hdc in 2, (sc, ch 2) in 1, then sl st to the first sc.
Round 1 count: each side has 17 sts and 12 ch-1 sps. The tip adds 2 sc and the base adds 1 sc, for 37 sts and 2 ch-2 tip sps in all.
Round 2: Sl st into the base ch-2 sp. Ch 1, (sc, ch 3, sc) in the same sp. Ch 3, sc in the next ch-1 sp. Repeat from * 12 times. Ch 3, (sc, ch 3, sc) in the tip sp. Ch 3, sc in the next ch-1 sp. Repeat from * 12 times. Ch 3, sl st to the first sc. (13 loops per side + 2 tip loops = 28 loops)
Round 3: Ch 1. Work 3 sc in each side loop and (2 sc, ch 2, 2 sc) in each tip loop. Sl st to the first sc. (39 sc per side + 4 sc per tip = 86 sc) Fasten off, leaving a 12 in (30.5 cm) tail.
Small Leaf
With green, ch 25. (24 working positions)
Round 1: Work as for the large leaf, but repeat the ch-1/dc section 9 times per side (last dc in 21 on the first side). Hdc in 22, sc in 23, and work the tip in 24. Each side has 14 sts and 9 ch-1 sps, for 31 sts and 2 ch-2 tip sps in all.
Round 2: Work as for the large leaf, repeating 9 times per side. (10 loops per side + 2 tip loops = 22 loops)
Round 3: Work as for the large leaf. (30 sc per side + 4 sc per tip = 68 sc)
Stem and Pedicels
Main stem: With green, ch 52. Sc in the BB of the 2nd ch from the hook and in each ch across. (51 sc, 8.5 in / 21.6 cm) Fasten off, leaving a 12 in (30.5 cm) tail. The end where you finished is the top tip, and Bell 1 hangs here.
Pedicels (make 4): Count stitches from the top tip. Join green with a sl st in sc 10. Ch 7, then sc in the BB of the 2nd ch from the hook and in each ch back. (6 sc, 1 in / 2.5 cm) Sl st into the stem and fasten off. Repeat in sc 20, 30 and 40.
Bells (Make 5)
With pink, leave a 6 in (15.2 cm) tail and make a magic ring.
Round 1: 6 sc in the ring. (6 sc) Pull the ring tight.
Round 2: 2 sc in each st. (12 sc)
Round 3: FPhdc around the next st, sc in the next st. Repeat from * 6 times. (12 sts; the FPhdc form raised ribs)
Round 4: FPhdc around the next FPhdc, sc in the next sc. Repeat from * 6 times. (12 sts)
Round 5 (trim): Sl st in the next st, (hdc, dc, hdc) in the next st. Repeat from * 6 times. (24 sts = 12 sts worked 1 per existing st + 12 extra sts from the shells, making 6 petals) Sl st to the first sl st and fasten off.
Checkpoint: Each bell is 0.6 in (1.5 cm) tall with a flared, scalloped edge.
Use the starting tail to sew the top of each bell to the end of a pedicel. Sew Bell 1 to the top tip of the stem.
Layer and Sew the Appliqué
Pin the net out at 5.5 x 10 in (14.0 x 25.4 cm), right side up. Sew each part with matching thread, catching only the net strands.
- Fan: Place it at the bottom center, with the picot point on the foundation edge and the scallops facing up.
- Leaves: Place the bases together over the top of the fan. Angle the large leaf up and to the left, and the small leaf up and to the right. Sew along Round 3.
- Stem: Place the base between the two leaf bases. Run the stem up the left side about 1.5 in (3.8 cm) from the edge. Arch it to the right so the tip sits about 1 in (2.5 cm) below the top and 0.75 in (1.9 cm) from the right edge. Whipstitch it in place.
- Pedicels: Angle them down under the arch and tack each one at its base.
- Bells: Tack each bell at the top only so the scallops stay free.
Border
Border gauge: 6 sc = 1 in (2.5 cm).
Round 1: Join ivory at the top right corner. Ch 2 at each corner. These corner spaces are not counted in the side totals.
- Top: 3 sc in each of the 11 loops of Row 25. (33 sc)
- Long sides: 3 sc in each even-numbered row-end (12 rows = 36 sc). 2 sc in each odd-numbered row-end, except Rows 1 and 25, which get 1 sc each (24 sc). (60 sc per side)
- Bottom: 3 sc over each of the 11 foundation segments between the sc bases. (33 sc)
Sl st to the first sc. (186 sc + 4 ch-2 corner sps)
Round 2: Sl st into the corner sp. Ch 3 (counts as dc), then (dc, ch 2, 2 dc) in the same sp. Dc in each sc along each side, and work (2 dc, ch 2, 2 dc) in each corner sp. Sl st to the top of the ch-3. (37 dc per short side and 64 dc per long side, each including 2 corner dc at each end; 202 dc)
Round 3: Sl st into the corner sp. Ch 1, (sc, picot, sc) in the same sp.
- Short sides: Sc in the first dc. Picot, sc in the next 3 dc. Repeat from * 12 times. (37 sc, 12 picots)
- Long sides: Sc in the first dc. Picot, sc in the next 3 dc. Repeat from * 21 times. (64 sc, 21 picots)
- Corners: (sc, picot, sc) in each corner sp.
Sl st to the first sc. (210 sc, 70 picots) Fasten off.
Why the math works: At 6 sc per inch, 33 sc fills exactly 5.5 in (14.0 cm) and 60 sc fills exactly 10 in (25.4 cm), so the edge neither ruffles nor pulls in. The corner dc in Round 2 bring the sides to 37 and 64. Each is one more than a multiple of 3, so the 3-stitch picot repeat ends cleanly at every corner. The three rounds add 0.5 in (1.3 cm) per side, for a 6.5 x 11 in (16.5 x 27.9 cm) panel.
Final Blocking
- Weave in all tails behind the appliqué, using matching colors.
- Soak the panel in cool water for 10 minutes, then roll it in a towel to remove excess water.
- Pin it to 6.5 x 11 in (16.5 x 27.9 cm), with a pin in each corner and each picot.
- Open every net loop into an even diamond.
- Sharpen the leaf tips and smooth the curve of the stem.
- Shape each bell over a fingertip and fan out the petals.
- Let the panel dry completely before you unpin it.
Final Quality-Control Checklist
- The net has 25 rows and 11 loops across.
- Border counts per side are 33/60, then 37/64, then 12/21 picots.
- There are five bells, each with 6 ribs and 6 petals.
- The leaves lie flat and the lattice is open.
- There are no puckers under the stem and no tails on the front.
- The panel measures 6.5 x 11 in (16.5 x 27.9 cm).
Troubleshooting
- Net slants: Recount the loops. Odd rows need 11 full loops.
- Net too short: Your loops are tight. Go up a hook size.
- Leaf curls: Ch 4 instead of 3 in Round 2, then block firmly.
- Bells look flat: Pull the ring tighter and dry each bell over a rolled scrap of fabric.
- Border ruffles: Use a hook 0.25 mm smaller for Round 1.
- Net puckers under the appliqué: Resew more loosely while the net is pinned to size.
Care
Hand wash in cool water with mild soap, then pin flat to dry. Press lightly under a cloth if needed.

Final Notes
Each measurement builds on the one before it. The net gauge gives a 5.5 x 10 in (14.0 x 25.4 cm) background, and the appliqué parts are sized to fit inside it. The 33/60 border counts match that background exactly, and the border adds 0.5 in (1.3 cm) per side. Check each stage against its checkpoint, and the finished 6.5 x 11 in (16.5 x 27.9 cm) panel will lie flat and square.
Happy crocheting!