
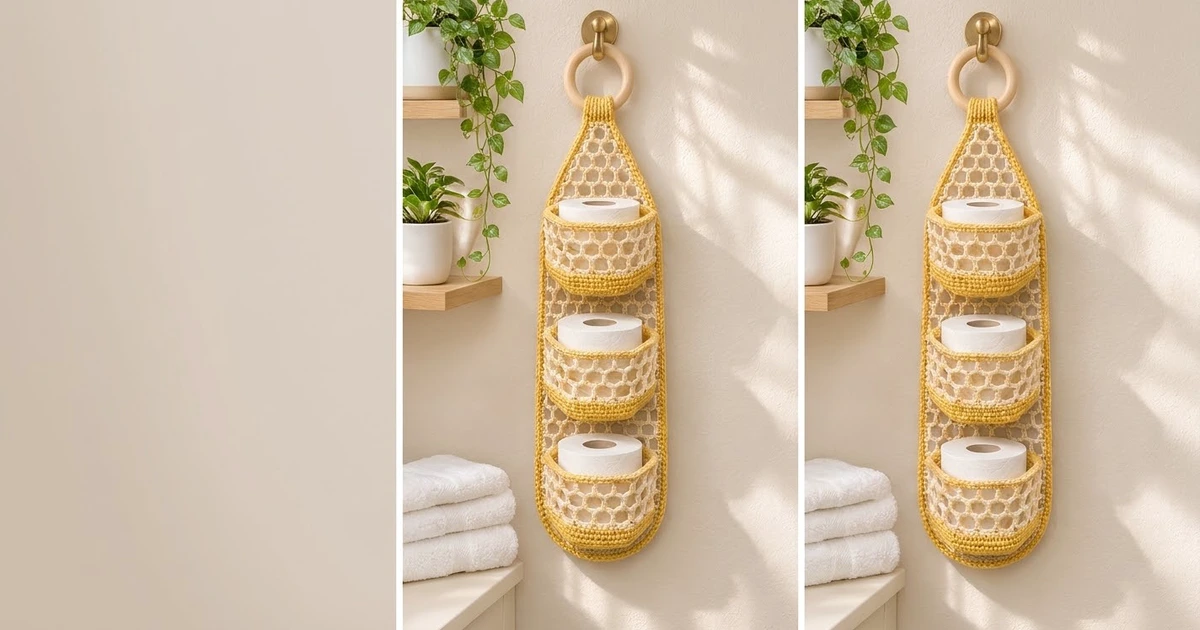
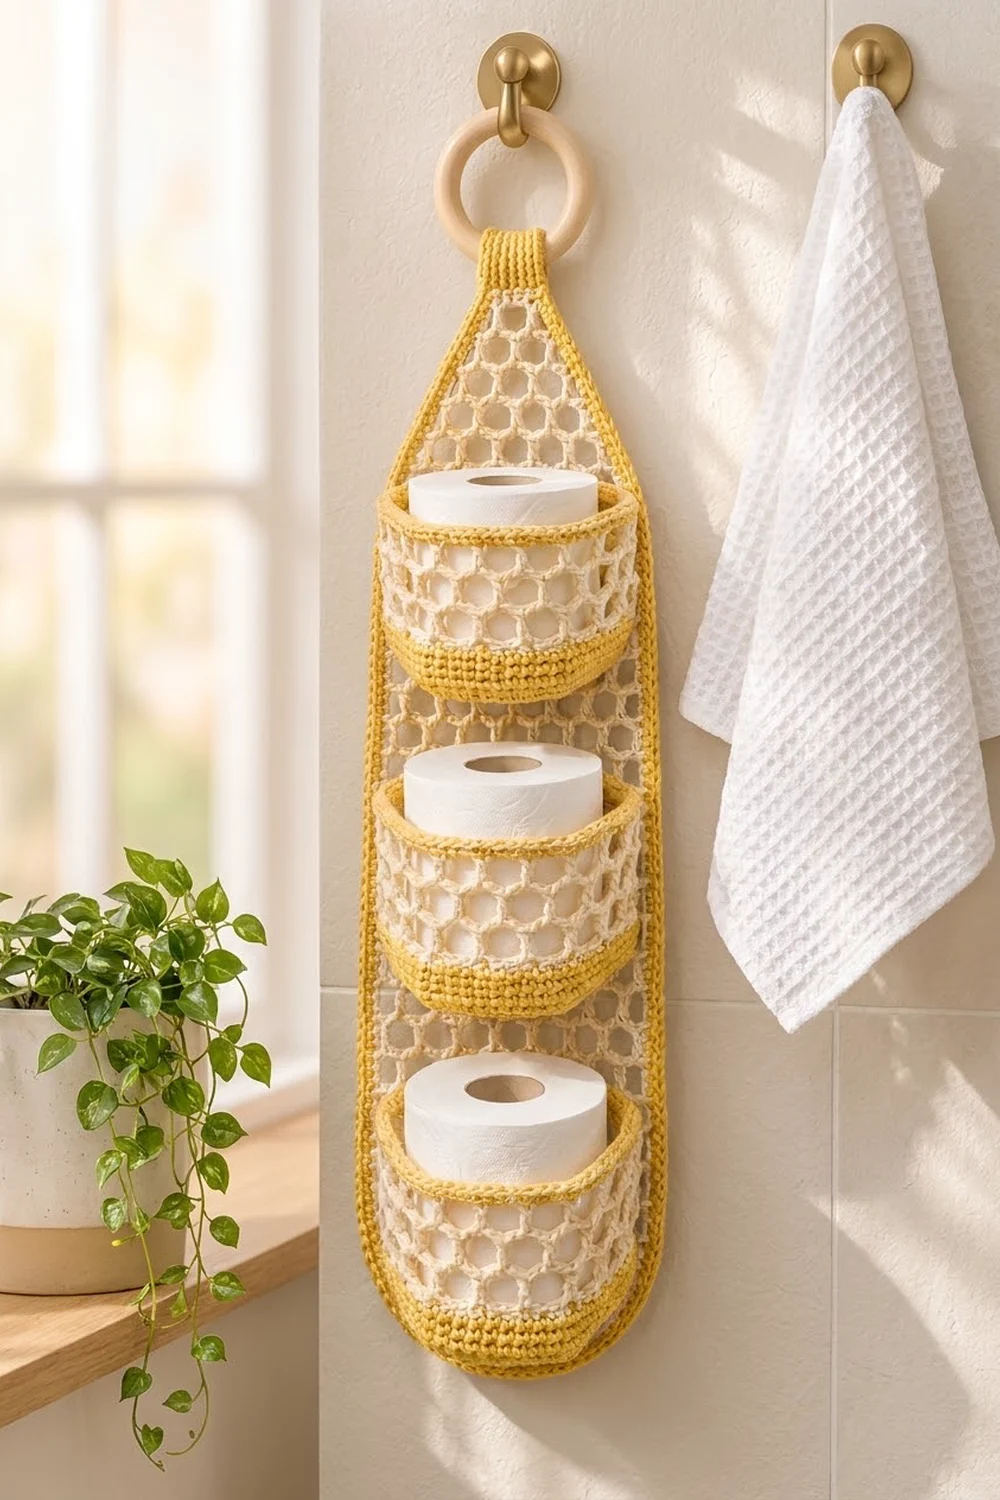
This hanging toilet paper holder is like a little beehive for your bathroom wall. Three hexagonal baskets are sewn onto a tall, tapered back panel made of honeycomb mesh, and the whole thing hangs from a wooden ring.
Two colors are used: warm mustard yellow and soft cream. The basket bases, the bottom bands, the rims and the panel border are solid mustard. All the open honeycomb mesh is cream, so the mustard base shows through the holes. The style is clean and modern, and it is a little bit playful.
The pattern uses US crochet terms. The finished panel measures 6.5 in (16.5 cm) wide by 22.4 in (56.9 cm) long. The total hanging length, including the ring, is about 25.5 in (64.8 cm). Each basket is 6 in (15.2 cm) across the corners and about 3.8 in (9.7 cm) tall. That holds a standard roll about 4.5 in (11.4 cm) across, with the top of the roll peeking out.
Construction is simple. You crochet three baskets from the base up, crochet one flat mesh panel in rows from the bottom up, add a two-round border, wrap a tab around the ring, and sew the baskets on.
Finished Size and Construction
- Finished panel size: 6.5 in x 22.4 in (16.5 cm x 56.9 cm)
- Overall hanging length: about 25.5 in (64.8 cm), including the ring
- Skill level: Intermediate
- Terminology: US
- Yarn weight: #4 worsted, 100% cotton
- Hook: 4.5 mm (US 7)
- Number of pieces: 4 (1 panel and 3 baskets), plus 1 wooden ring
- Layout: baskets stacked in one vertical column on the panel
- Basket size: 6 in (15.2 cm) across the corners, 5.2 in (13.2 cm) across the flat sides, 3.8 in (9.7 cm) tall
- Panel size before border: 5.75 in x 21.6 in (14.6 cm x 54.9 cm)
- Border depth: 2 rounds, about 0.375 in (1.0 cm)
Materials
Use a smooth, firm worsted cotton, about 50 g / 85 m per ball. Cotton holds the basket shape better than acrylic and copes well with bathroom humidity.
- Mustard yellow: 100 g (170 m)
- Cream: 75 g (128 m)
These quantities include a safety margin of about 30%.
Tools:
– 4.5 mm (US 7) crochet hook
– Wooden ring, 2.75 in (7.0 cm) outer diameter
– Tapestry needle
– 4 stitch markers
– Rust-proof pins and a blocking mat
– Measuring tape
Abbreviations (US Terms)
- ch – chain
- sc – single crochet
- sl st – slip stitch
- st(s) – stitch(es)
- sp – space
- sk – skip
- BLO – back loop only
- rep – repeat
Special stitch – Cluster (cl): (sc, ch 1, sc) worked into the same space. Each cluster has 2 sc and one ch-1 sp in the middle. In every mesh row or round, a cluster sits in each ch-2 sp, and a ch-2 bridge connects it to the next cluster. Each row or round shifts the clusters by half a repeat, which opens the hexagon-shaped holes.
Gauge and Checkpoints
- Sc gauge: 16 sts x 18 rows = 4 in (10.2 cm)
- Mesh gauge: 8 mesh rows = 3 in (7.6 cm), so each row is 0.375 in (1.0 cm)
Make one basket base (Rounds 1–12) before anything else, and treat it as your gauge swatch.
Checkpoints:
– After Round 6 of the base (36 sts), it should measure 3 in (7.6 cm) across the corners.
– After Round 9 (54 sts), it should measure 4.5 in (11.4 cm) across the corners.
– After Round 12 (72 sts), it should measure 6 in (15.2 cm) across the corners and lie flat.
– After panel Row 43, the panel should measure 16 in (40.6 cm) long and 5.75 in (14.6 cm) wide.
If the base is too big, go down 0.5 mm in hook size. If it is too small, go up 0.5 mm. If the base ruffles, your rows are too short, so loosen your yarn-over. If it cups, your rows are too tall, so tighten up.
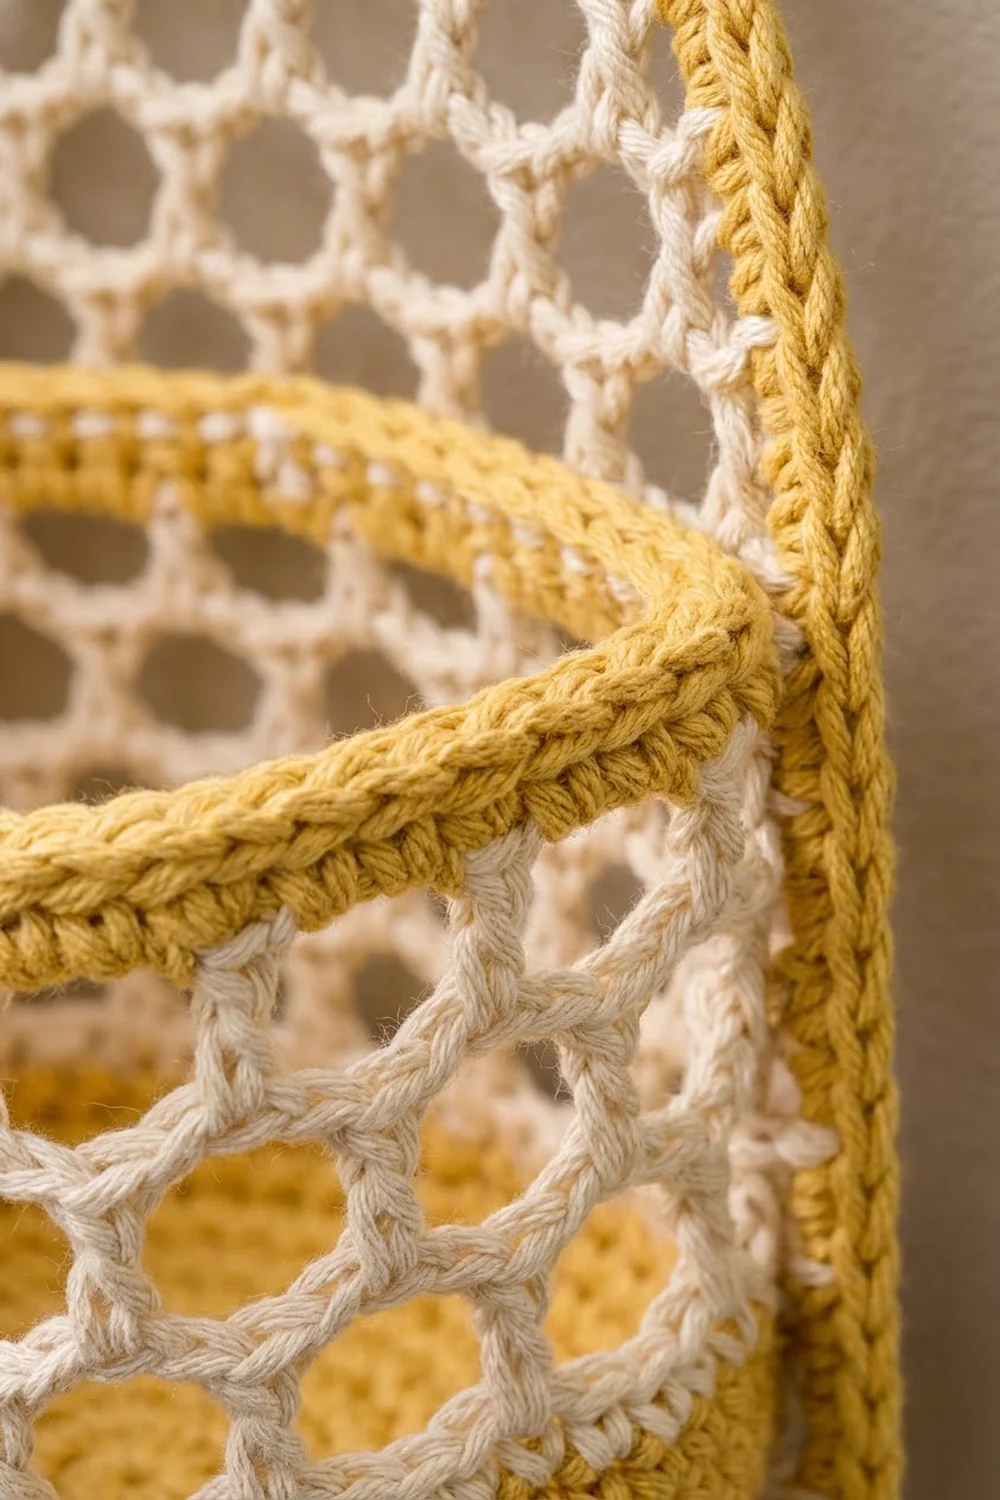
Basket (Make 3)
Work in continuous joined rounds. Join each round with a sl st to the first sc. The beginning ch 1 never counts as a stitch.
Base (Mustard)
Rnd 1: Make a magic ring, ch 1, work 6 sc in the ring, then join. (6)
Rnd 2: Ch 1, work 2 sc in each st around, then join. (12)
Rnd 3: Ch 1, sc in next st, 2 sc in next st, rep 6 times, then join. (18)
Rnd 4: Ch 1, sc in next 2 sts, 2 sc in next st, rep 6 times, then join. (24)
Rnds 5–12: Keep working 1 more plain sc between increases in each round. Stack the increases directly on top of the previous ones so you get 6 sharp corners.
– Rnd 5: 30
– Rnd 6: 36
– Rnd 7: 42
– Rnd 8: 48
– Rnd 9: 54
– Rnd 10: 60
– Rnd 11: 66
– Rnd 12: sc in next 10 sts, 2 sc in next st, rep 6 times. (72)
At this point there are 12 sts per side, and that count includes each side’s increase stitch.
Wall
Rnd 13 (turning ridge): Ch 1, sc in BLO of each st around, then join. (72) The unworked front loops form a crisp ridge that turns the wall upward.
Rnds 14–16: Ch 1, sc in each st around, then join. (72) This mustard band is about 0.9 in (2.3 cm) tall. Fasten off the mustard.
Rnd 17 (cream, mesh setup): Join the cream yarn in any st.
– Ch 1, sc in next st, ch 1, sk 1 st, sc in next st, ch 2, sk 1 st, rep 18 times, then join.
– Count: 18 clusters (36 sc, 18 ch-1 sps) and 18 ch-2 sps. You used 4 base sts per repeat, and 18 x 4 = 72.
Rnd 18 (honeycomb):
– To move into position, sl st in the next ch-1 sp, the next sc and the next ch-2 sp.
– Ch 1, cl in the same ch-2 sp, ch 2, cl in next ch-2 sp, ch 2, rep 17 times, then join to the first sc.
– Count: 18 clusters and 18 ch-2 sps.
Rnds 19–22: Repeat Rnd 18. (18 clusters and 18 ch-2 sps in each round) The 6 mesh rounds together measure about 2.25 in (5.7 cm). Fasten off the cream.
Rim (Mustard)
Rnd 23 (conversion): Join the mustard in the first sc.
– Ch 1, sc in sc, sc in ch-1 sp, sc in sc, sc in ch-2 sp, rep 18 times, then join.
– Count: 36 (sc in sc) + 18 (in ch-1 sps) + 18 (in ch-2 sps) = 72.
Rnds 24–25: Ch 1, sc in each st around, then join. (72) The rim is about 0.65 in (1.7 cm) tall.
Fasten off and leave a 30 in (76.2 cm) tail for sewing. The basket is 3.8 in (9.7 cm) tall: 0.9 in + 2.25 in + 0.65 in.
Back Panel (Cream)
The panel is worked in rows from the bottom up. Turn at the end of every row. The ch 1 at the start of a row does not count as a stitch.
Two row types alternate:
– Row type A (k clusters): edge sc, ch 2, then k clusters separated by ch 2, then ch 2, edge sc. This gives k clusters and k + 1 ch-2 sps.
– Row type B (k + 1 clusters): edge sc, then k + 1 clusters separated by ch 2, then edge sc. This gives k + 1 clusters and k ch-2 sps.
Row 1: Ch 24, sc in the 2nd ch from the hook and in each ch across. (23)
Row 2 (setup, A5):
– Ch 1, sc in the first st, ch 2, sk 1 st, sc in next st, ch 1, sk 1 st, sc in next st, ch 2, sk 1 st, rep 5 times, sc in the last st.
– Count: 5 clusters, 6 ch-2 sps and 2 edge sc. Check: 1 + 1 + 5 x 4 + 1 = 23 sts used.
Row 3 (B6):
– Ch 1, sc in the first sc, cl in next ch-2 sp, ch 2, rep 5 times, cl in the last ch-2 sp, sc in the last sc.
– Count: 6 clusters and 5 ch-2 sps.
Row 4 (A5):
– Ch 1, sc in the first sc, ch 2, cl in next ch-2 sp, ch 2, rep 5 times, sc in the last sc.
– Count: 5 clusters and 6 ch-2 sps.
Rows 5–43: Repeat Rows 3 and 4 in turn, ending with a Row 3. Odd rows are B6 and even rows are A5. The panel is now 16 in (40.6 cm) long.
Taper
To work B-dec:
– Ch 1, sl st across to the first ch-2 sp. Sc in that sp (this is the edge sc).
– Work a cl in each of the middle ch-2 sps, with ch 2 between clusters.
– Skip to the last ch-2 sp and work the edge sc there.
– Result: 2 fewer clusters than a normal B row, so the panel narrows by one repeat on each side. Each B-dec leaves a short ledge on both edges.
The taper rows:
– Row 44: A5
– Row 45: B-dec (4 clusters, 3 ch-2 sps)
– Rows 46–50: A3, B4, A3, B4, A3
– Row 51: B-dec (2 clusters, 1 ch-2 sp)
– Rows 52–58: A1, B2, A1, B2, A1, B2, A1
Row 58 is: edge sc, ch 2, cl, ch 2, edge sc. The taper is 15 rows, or 5.6 in (14.2 cm). Do not fasten off. Keep the loop on a marker.
Panel before border: 5.75 in x 21.6 in (14.6 cm x 54.9 cm).
Make All Pieces
- Mustard: 3 basket bases, bands and rims, plus the panel border and tab
- Cream: 3 basket mesh walls and 1 panel
Layout (front view):
        [ ring ]
          [tab]
         /     \     taper
        |       |
        | [B1]  |   top basket
        |       |
        | [B2]  |   middle basket
        |       |
        | [B3]  |   bottom basket
         \_____/
Border
Border gauge: 3 sc per 2 mesh rows (0.75 in / 1.9 cm), which is 4 sc per in. That matches the sc gauge, so the edges stay flat.
Round 1 (mustard): Join the mustard at the top right corner (the last edge sc of Row 58). Corner counts below are given separately from side counts.
Top:
– 3 sc in the edge sc (corner).
– 2 sc in the ch-2 sp, sc in the sc, sc in the ch-1 sp, sc in the sc, 2 sc in the ch-2 sp. That is 7 sts.
– 3 sc in the last edge sc (corner).
Left side: Work down the row ends.
– Even rows (2–58): 2 sc in each row end.
– Odd rows (3–57) and Row 1: 1 sc in each row end.
– At each ledge (the tops of Rows 44 and 50), add 1 sc in the edge sc and 1 sc in the ch-2 sp.
– Count: 29 x 2 + 28 x 1 + 1 + 4 = 91 sts.
Bottom:
– 3 sc in the first foundation ch (corner).
– Sc in the next 21 chs.
– 3 sc in the last ch (corner).
– That is 21 sts between the corners.
Right side: Work up the row ends the same way as the left side. (91)
Join. Round 1 total: 91 + 91 + 21 + 7 + (4 x 3) = 222.
Round 2:
– Ch 1 and sc in each st.
– At the two top corners, work 3 sc in the center corner st. (+2 each)
– At the two bottom corners, work 2 sc in each of the 3 corner sts to round them. (+3 each)
– Join.
– Count: 91 + 91 + 21 + 7 + (2 x 5) + (2 x 6) = 232.
Why the math works:
– The sides: 87 row-end sts at 4 per in gives 21.75 in, which matches the 21.6 in edge. The 4 ledge sts cover the step-ins.
– The bottom: 21 + 2 corners gives 23 working sts, the same count as the foundation, so the bottom edge stays 5.75 in.
– The 2 rounds add 0.375 in per side, so 5.75 in + 0.75 in = 6.5 in.
Hanging Tab
Row 1: Join the mustard in the first of the 7 center top sts. Ch 1 and work sc in those 7 sts. (7)
Rows 2–14: Ch 1, turn, sc in each st across. (7)
The tab is 1.75 in x 3.1 in (4.4 cm x 7.9 cm).
Joining
Ring: Fold the tab over the wooden ring toward the back. Whipstitch the 7 sts of Row 14 to the base of Row 1, one stitch to one stitch, with mustard.
Baskets: On each basket, place markers to mark one flat side of the hexagon. That side has 12 base sts, and the 12 rim sts directly above them. Pin the baskets to the panel, centered:
– The bottom basket’s base sits 1 in (2.5 cm) above the bottom edge.
– Leave a 1.25 in (3.2 cm) gap between baskets.
Whipstitch with the rim tail and mustard yarn:
– Sew the 12 front loops left free by Rnd 13 to the panel mesh, working 1 stitch into a mesh strand for each basket st.
– Then sew the 12 rim sts of Rnd 25 the same way.
– Also tack the two corner lines between those points every 0.5 in (1.3 cm).
Tension: Pull each stitch just snug. If the panel puckers, your stitches are too tight.
Size checkpoint: The panel must still measure 6.5 in (16.5 cm) wide behind each basket.
Final Blocking
- Weave in all ends along solid mustard sts.
- Wet the piece fully, then roll it in a towel to remove the water.
- Pin the panel flat to 6.5 in x 22.4 in (16.5 cm x 56.9 cm). Open each mesh hole into a hexagon.
- Put a toilet roll or a rolled towel inside each basket so the corners stay sharp.
- Pinch the 6 base corners and the rim into points that line up with them.
- Let it dry completely, at least 24 hours.
Final Quality-Control Checklist
- Each base has 72 sts, 6 sharp corners, and lies flat.
- Each basket wall has 18 clusters in every mesh round.
- Every rim has 72 sts.
- The panel is 6.5 in (16.5 cm) wide and 22.4 in (56.9 cm) long.
- Border Round 2 has 232 sts, and the bottom corners are rounded.
- All three baskets are centered and evenly spaced.
- The tab is secure, and the ring sits centered.
Troubleshooting
Base ruffles: Your rows are too short or you have extra increases. Recount each round against 6n.
Base cups: Your rows are too tall, or you missed an increase. Go up 0.5 mm in hook size.
Mesh walls flare: Use ch 1 instead of ch 2 for the bridges in Rnds 18–22, and keep 18 clusters.
Border waves: Change the side pattern to 1 sc in every row end for a stretch of a few rows.
Taper steps look sharp: Block the ledges hard on a curve, or work sc2tog over the inner ledge corner in Round 2.
Basket sags: Tack the corner lines more often, and use cotton instead of acrylic.
Care
Hand wash cold and lay flat to dry, reshaping the baskets over rolls. Do not tumble dry, and keep the wooden ring as dry as you can.
Final Notes
The measurement chain runs like this:
– The gauge of 16 sc x 18 rows = 4 in (10.2 cm) gives a 6 in (15.2 cm) base after 12 rounds.
– The 72 sts carry up through the wall, which ends 3.8 in (9.7 cm) tall.
– The 23-st panel builds 21.6 in (54.9 cm) of mesh.
– The border adds 0.375 in (1.0 cm) all around, for a final panel of 6.5 in x 22.4 in (16.5 cm x 56.9 cm).
If you check each link in that chain, the finished holder hangs straight and holds three rolls neatly.
Happy crocheting!