

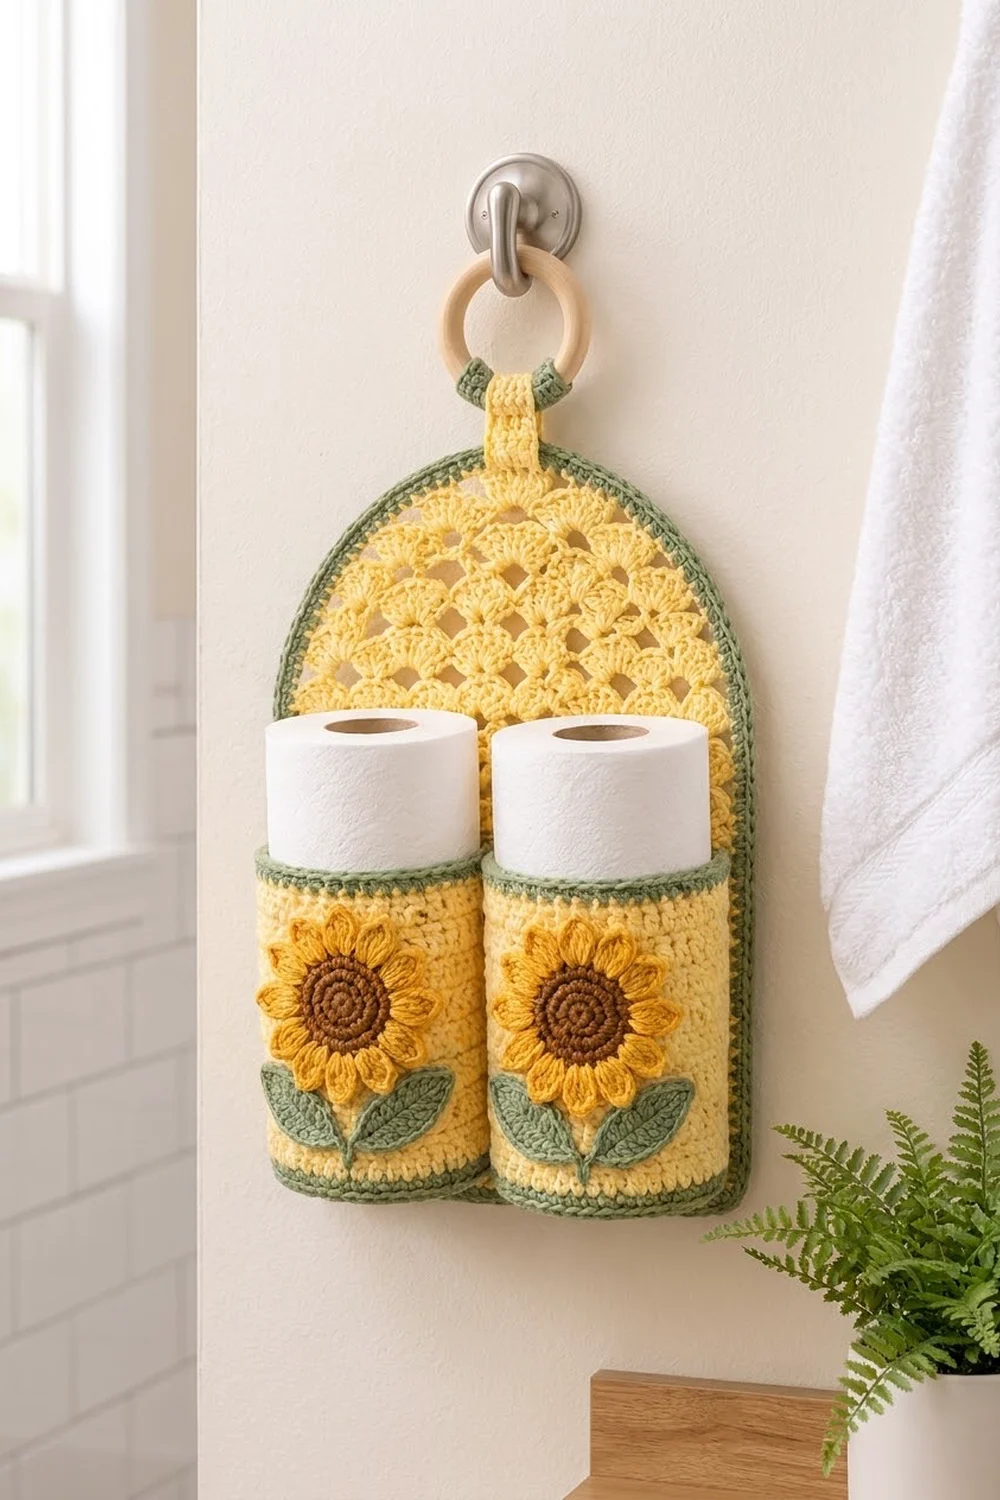
This holder brings a little sunshine to the bathroom. A tall arched panel in a pale butter yellow shell lattice hangs from a wooden ring. Across its lower half sit two round cups, and each one holds a standard toilet roll with a cheerful sunflower on the front.
The palette is soft and fresh: butter yellow for the panel and cup walls, sage green for the edges and leaves, golden yellow for the petals and chocolate brown for the spiral flower centers. The style is cottage-garden, practical but decorative.
The pattern uses US crochet terms. The finished holder measures 11.5 in (29.2 cm) wide and 16 in (40.6 cm) tall, not counting the ring. Each cup is 5.25 in (13.3 cm) across and 5.5 in (14.0 cm) tall.
You will work the panel flat in rows from the bottom up, shaping the arch with stepped decreases, and then add a green border and a hanging tab. The cups are worked in the round from a flat base. You’ll sew the sunflowers onto the cups, then sew the cups onto the panel.
Finished Size and Construction
- Finished size: 11.5 in (29.2 cm) wide × 16 in (40.6 cm) tall
- Skill level: Intermediate
- Terminology: US
- Yarn weight: Worsted (#4) cotton
- Hook: 4.5 mm (US 7)
- Number of pieces: 1 panel, 2 cups, 2 flower heads, 2 stems, 4 leaves
- Layout: 2 cups side by side across the bottom of 1 arched panel
- Panel size before border: 10.5 in (26.7 cm) wide × 15 in (38.1 cm) tall
- Cup size: 5.25 in (13.3 cm) diameter × 5.5 in (14.0 cm) tall
- Border depth: 0.5 in (1.3 cm), 2 rounds
Materials
Use a smooth, firm worsted-weight cotton or cotton blend. Cotton keeps the cups upright, holds the shell texture well and copes with bathroom humidity. Avoid fuzzy acrylics, because they blur the lattice.
- Pale butter yellow: 220 g / 375 m (panel, cup bases and walls)
- Sage green: 60 g / 100 m (borders, cup bands, tab, stems, leaves)
- Golden yellow: 15 g / 25 m (petals)
- Chocolate brown: 10 g / 17 m (flower centers)
All quantities include a margin of about 15%.
Tools:
– 4.5 mm (US 7) crochet hook
– Wooden ring, 3 in (7.6 cm) outside diameter
– Tapestry needle
– Stitch markers
– Scissors
– Rust-proof pins and a blocking mat
– Tape measure
Abbreviations (US Terms)
- ch – chain
- sl st – slip stitch
- sc – single crochet
- hdc – half double crochet
- dc – double crochet
- BLO – back loop only
- sp – space
- sk – skip
- st(s) – stitch(es)
- MR – magic ring
- rev sc – reverse single crochet (crab stitch)
Shell: 5 dc in the same stitch.
Half shell: 3 dc in the same stitch. At the start of a row, ch 3 counts as the first dc, so you work ch 3 and 2 dc.
Rev sc: Work single crochet from left to right (right-handed). This makes a rolled, rope-like edge.
Gauge and Checkpoints
- Sc: 16 sts × 18 rows = 4 in (10.2 cm)
- Shell pattern: 18 sts (3 repeats) = 4.5 in (11.4 cm); 6 rows = 4 in (10.2 cm)
- Moss stitch in rounds: 16 sts × 18 rounds = 4 in (10.2 cm)
Make one cup first. It is the quickest piece to test, and it has to fit a roll.
Checkpoints:
– Cup base after Round 11: 5.25 in (13.3 cm) across.
– Cup after Round 33: about 5 in (12.7 cm) tall.
– Panel after Row 17: 10.5 in (26.7 cm) wide and about 11 in (27.9 cm) tall.
– Panel after Row 23: 15 in (38.1 cm) tall.
If your pieces come out too big, go down 0.5 mm in hook size. If they’re too small, go up 0.5 mm. Don’t add or remove stitches, because the cup circumference and panel width are linked.
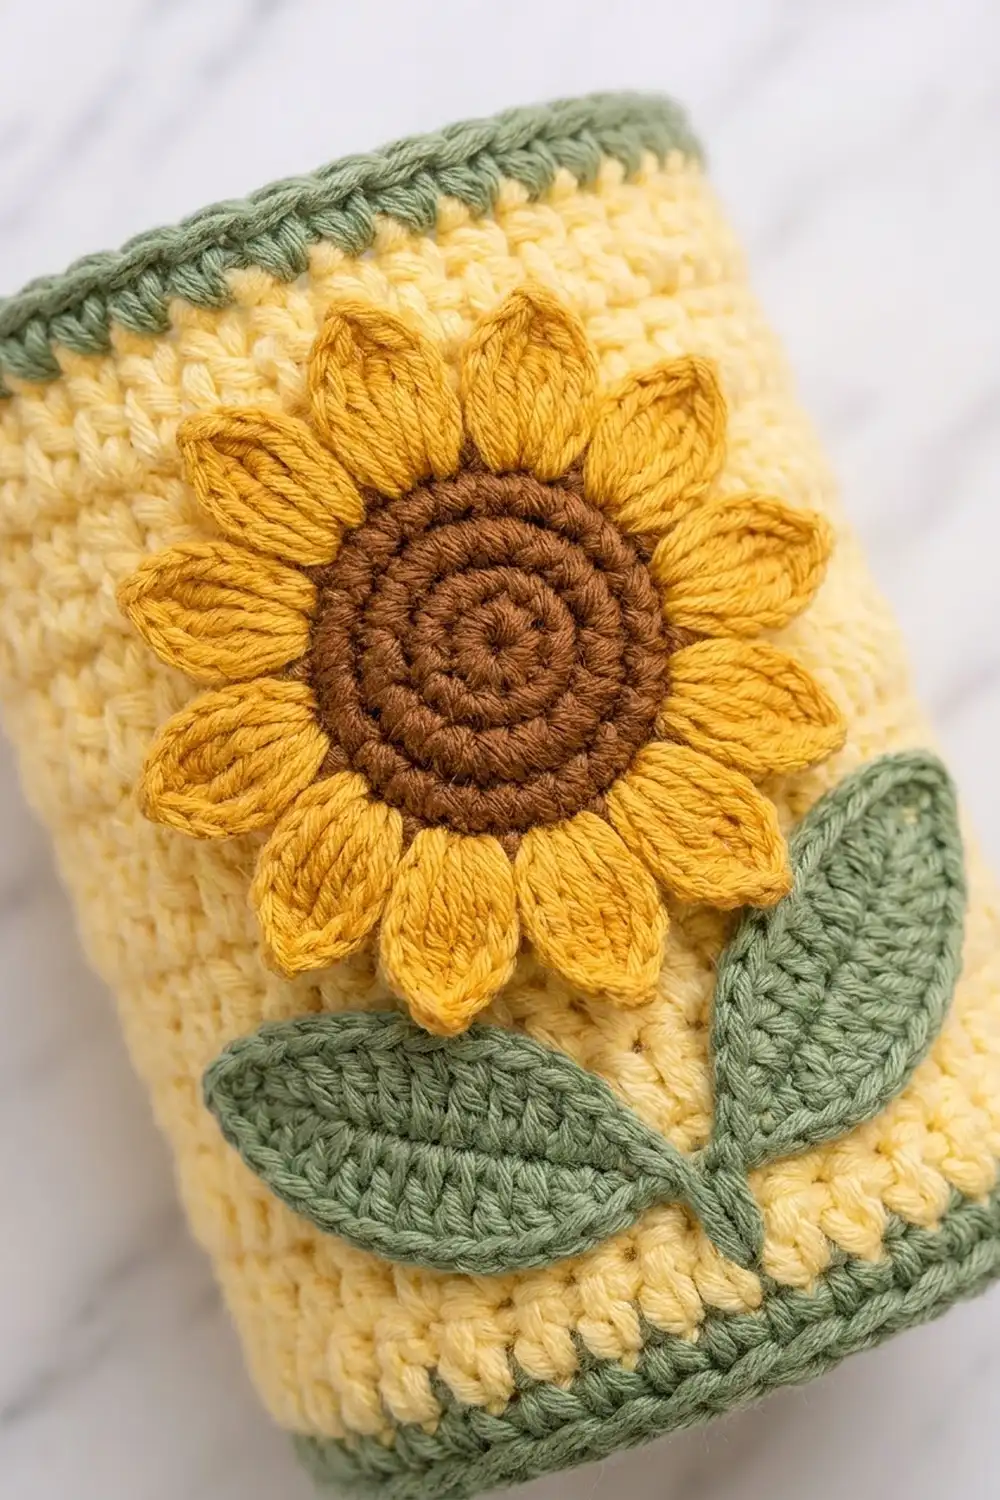
Cups (Make 2)
Work joined rounds: sl st to the first st at the end of each round, then ch 1. The ch 1 doesn’t count as a stitch.
Base
With pale yellow, make a MR.
- Rnd 1: 6 sc in ring. (6)
- Rnd 2: 2 sc in each st. (12)
- Rnd 3: sc, 2 sc in next around. (18)
- Rnd 4: sc in next 2, 2 sc in next around. (24)
- Rnds 5–11: Continue increasing 6 sts evenly each round, with 1 more sc between increases each time. Rnd 5: 30; Rnd 6: 36; Rnd 7: 42; Rnd 8: 48; Rnd 9: 54; Rnd 10: 60; Rnd 11: 66.
Checkpoint: The base should lie flat and measure 5.25 in (13.3 cm) across. Fasten off yellow.
Walls
- Rnd 12: Join sage green. Sc in BLO of each st around. (66) This turns the work upward and gives the base a crisp edge.
- Rnd 13: Sc in each st. (66)
- Rnd 14 (conversion): Change to yellow. Sc in next st, ch 1, sk next st 33 times. (33 sc + 33 ch-1 = 66)
- Rnds 15–33: Sc in next ch-1 sp, ch 1, sk next sc around. (66 each round)
These 20 yellow moss-stitch rounds create the bumpy, horizontally ridged texture. Checkpoint: The cup should be about 5 in (12.7 cm) tall.
- Rnd 34 (conversion): Change to sage green. Sc in each sc and in each ch-1 sp. (33 + 33 = 66)
- Rnd 35: Sc in each st. (66)
- Rnd 36: Rev sc in each st. (66) Fasten off.
The finished cup is 5.25 in (13.3 cm) across and 5.5 in (14.0 cm) tall, with 25 wall rounds at 4.5 rounds per inch.
Sunflowers (Make 2 of Each Part)
Flower Head
With brown, make a MR. Work in a continuous spiral without joining so the center forms a visible spiral.
- Rnd 1: 6 sc in ring. (6)
- Rnd 2: 2 sc in each st. (12)
- Rnd 3: sc, 2 sc in next around. (18)
- Rnd 4: sc in next 2, 2 sc in next around. (24) Sl st to the next st and fasten off. The center measures 1.8 in (4.6 cm).
- Rnd 5 (petals): Join golden yellow. Sl st in next st, ch 5, sl st in 2nd ch from hook, sc in next ch, hdc in next ch, dc in last ch, sl st in next st 12 times. (12 petals, using all 24 sts)
Each petal is pointed and about 0.9 in (2.3 cm) long. The flower measures 3.6 in (9.1 cm) across.
Stem
With sage green, ch 7. Sl st in 2nd ch from hook and in each remaining ch. (6 sl st) The stem is about 1.5 in (3.8 cm) long.
Leaves (Make 4)
With sage green, ch 8.
- Side 1: Sc in 2nd ch from hook, hdc, dc, dc, dc, hdc, sc in last ch. (7)
- Tip: Ch 2, sl st in 2nd ch from hook.
- Side 2: Working along the other side of the foundation chain, sc, hdc, dc, dc, dc, hdc, sc. (7)
- Sl st to the first sc and fasten off.
Each leaf has 14 sts plus the tip picot and is 1.75 in (4.4 cm) long. Working around the chain leaves a raised center vein.
Assembling the Sunflowers
Center the flower head on the front of the cup, with its middle 3.5 in (8.9 cm) above the bottom edge. Sew around the brown Rnd 4 and tack each petal tip. Sew the stem straight down from the flower to the green base band. Sew 1 leaf on each side of the stem, angled upward with the tips pointing out.
Backing Panel
Rows 1–17: Rectangle
With pale yellow, ch 44.
- Row 1: Sc in 2nd ch from hook and in each ch across. Turn. (43)
- Row 2: Ch 1, sc in first st, sk 2, shell in next, sk 2, sc in next 7 times. Turn. (7 shells, 8 sc = 43)
- Row 3: Ch 3, 2 dc in first sc, sc in center dc of next shell, shell in next sc 6 times, sc in center dc of last shell, 3 dc in last sc. Turn. (2 half shells + 6 shells + 7 sc = 43)
- Row 4: Ch 1, sc in first dc, shell in next sc, sc in center dc of next shell 6 times, shell in next sc, sc in top of turning ch. Turn. (7 shells, 8 sc = 43)
- Rows 5–17: Repeat Rows 3 and 4 alternately, ending with a Row 3. (43 each row)
Even-numbered rows have sc at the edges. Odd-numbered rows have half shells at the edges. Staggering the shells this way leaves the diamond-shaped gaps.
Checkpoint: The panel should be 10.5 in (26.7 cm) wide and about 11 in (27.9 cm) tall.
Rows 18–23: Arch
Decrease row: Sl st in each of the first 3 sts. Begin the next pattern row in the 4th st and stop when 3 sts remain unworked. Turn. Each decrease row removes 6 sts and narrows the panel by half a repeat on each side.
- Row 18 (decrease): Sl st in first 3 sts, ch 3, 2 dc in next sc, sc in center dc of next shell, shell in next sc 5 times, sc in center dc of next shell, 3 dc in next sc. Turn, leaving 3 sts unworked. (2 half shells + 5 shells + 6 sc = 37)
- Row 19: Ch 1, sc in first dc, shell in next sc, sc in center dc of next shell 5 times, shell in next sc, sc in top of turning ch. Turn. (6 shells, 7 sc = 37)
- Row 20 (decrease): Sl st in first 3 sts, ch 1, sc in same center dc, shell in next sc, sc in center dc of next shell 5 times. Turn. (5 shells, 6 sc = 31)
- Row 21 (decrease): Work as Row 20, repeating from * 4 times. (4 shells, 5 sc = 25)
- Row 22 (decrease): Work as Row 20, repeating from * 3 times. (3 shells, 4 sc = 19)
- Row 23 (decrease): Work as Row 20, repeating from * 2 times. (2 shells, 3 sc = 13) Fasten off.
The arch rises 4 in (10.2 cm) over 6 rows, and the top is 3 in (7.6 cm) across. Checkpoint: The panel should now be 15 in (38.1 cm) tall. The border smooths the steps into a curve.
Make All Pieces
- Pale yellow: 1 panel, 2 cup bodies
- Sage green: 2 cup bands, 2 stems, 4 leaves, 1 border, 1 tab
- Golden yellow: 2 petal rounds
- Brown: 2 flower centers
Layout:
        [ ring ]
        [ tab  ]
   /‾‾‾‾‾‾‾‾‾‾‾‾‾‾‾‾\
  |   arched panel   |
  |                  |
  | [Cup 1] [Cup 2]  |
   ‾‾‾‾‾‾‾‾‾‾‾‾‾‾‾‾‾‾
Border
Border gauge is the same as sc gauge: 16 sts = 4 in (10.2 cm).
With RS facing, join sage green in the first foundation chain at the bottom right corner.
Rnd 1 (conversion):
– Bottom: Work 3 sc in the first ch, sc in each of the next 41 ch, and 3 sc in the last ch. This is 43 sts worked 1 per chain plus 4 extra corner sts, for 47.
– Left side, Rows 1–17: Work 1 sc in the end of Row 1, then 3 sc in each even row-end and 2 sc in each odd row-end of Rows 2–17. (1 + 24 + 16 = 41)
– Arch: Work 4 sc along each of Rows 18–23, counting each row-end and its slip-stitch step together, for 24. Work 1 sc in each of the 13 sts of Row 23. Work 4 sc along each of Rows 23–18 down the other side, for 24. (61 in total)
– Right side: Work as the left side. (41)
– Sl st to the first sc. (47 + 41 + 61 + 41 = 190)
Rnd 2: Ch 1. Sc in each st, working 3 sc in the center st of each bottom corner. Sl st to the first sc. (Bottom 51, sides 41 each, arch 61 = 194) Fasten off.
Why the math works: The bottom has 43 sts across 10.5 in (26.7 cm), matching the panel exactly. The side ratio of 41 sts to 17 rows keeps the edge from flaring. The arch’s 61 sts cover the smoothed curve of about 14.5 in at a very slightly gathered gauge, which keeps it from rippling. The two border rounds add 0.5 in (1.3 cm) on each side, so the panel becomes 11.5 in (29.2 cm) × 16 in (40.6 cm).
Hanging Tab
Count to the 29th st of the 61 arch sts on Rnd 2 and join sage green there.
- Row 1: Sc in sts 29–33. Turn. (5)
- Rows 2–18: Ch 1, sc in each st. Turn. (5 each row)
The tab is 1.25 in (3.2 cm) wide and 4 in (10.2 cm) long. Pass it through the ring from front to back and fold it down. Whipstitch Row 18 to the back of Row 8 so the ring hangs freely.
Joining
Lay the panel RS up. Place the cups so their bottom edges line up with the panel’s bottom edge and their sides touch at the center. Each cup covers half of the panel’s 10.5 in (26.7 cm) body, and the green border shows at each side.
Mark 2 vertical lines on the back of each cup, 4 sts on either side of the back center. The lines are 8 sts apart, or 2 in (5.1 cm). Thread a tapestry needle with pale yellow.
Stitch-to-stitch logic: The cup’s 25 wall rounds are 5.5 in (14.0 cm) tall. Each wall round is about 0.22 in tall, so sew 1 whipstitch per cup round along each marked line and catch the panel fabric directly behind it at the same height. That gives 25 stitches per line and 4 lines in total. Then tack the cups to each other where they touch with 6 sts at mid-height.
Tension: Snug each stitch until the cup sits flush, but don’t pull so hard that it dents the cup. Too much tension flattens the cylinder and puckers the shells.
Checkpoint: The cups together should measure 10.5 in (26.7 cm) across, and the holder should hang straight from the ring.
Final Blocking
- Before joining, mist the panel lightly with water.
- Pin it to 11.5 in (29.2 cm) × 16 in (40.6 cm), easing the arch into a smooth curve.
- Open each shell slightly with your fingertips so the diamond gaps show clearly.
- Stuff each cup with a towel-wrapped roll and mist it.
- Pin the petals and leaves flat against the cups.
- Let everything dry completely before you join the pieces.
Final Quality-Control Checklist
- [ ] The panel has 43 sts at the bottom, 13 sts at the top of the arch and 6 decrease steps.
- [ ] Border Rnd 2 has 194 sts.
- [ ] Each cup has 66 sts in every round from Rnd 11 on.
- [ ] Each flower has 12 even petals.
- [ ] The flowers are centered 3.5 in (8.9 cm) above the cup bottom.
- [ ] The tab is centered on the arch and sewn securely.
- [ ] All ends are woven in through at least 2 in (5.1 cm) of stitches.
- [ ] Each cup fits a roll easily.
Troubleshooting
- The cup base cups or ruffles: Check that Rnd 11 has exactly 66 sts and that you’re working at gauge.
- The cup walls lean: You worked Rnd 12 through both loops. Work it in BLO.
- The shells drift sideways: Confirm that every shell sits in a sc and every sc sits in a center dc.
- The arch looks boxy: Block it firmly into a curve. Make sure Rnd 1 has 24 sts on each arch side.
- The border waves: If it ruffles, use 2 sc per row-end throughout the sides.
- The panel sags: Add a third whipstitch line behind each cup.
Care
Hand wash in cool water with mild soap. Press out the water in a towel, reshape the holder and dry it flat.
Final Notes
The measurement chain is simple:
- 66 sts gives a 5.25 in (13.3 cm) cup.
- Two cups match the panel’s 43-st, 10.5 in (26.7 cm) width.
- 23 rows bring the panel to 15 in (38.1 cm).
- The 2-round border finishes the holder at 11.5 in (29.2 cm) × 16 in (40.6 cm).
Check each link as you go, and the pieces will fit together without any adjusting.
Happy crocheting!