
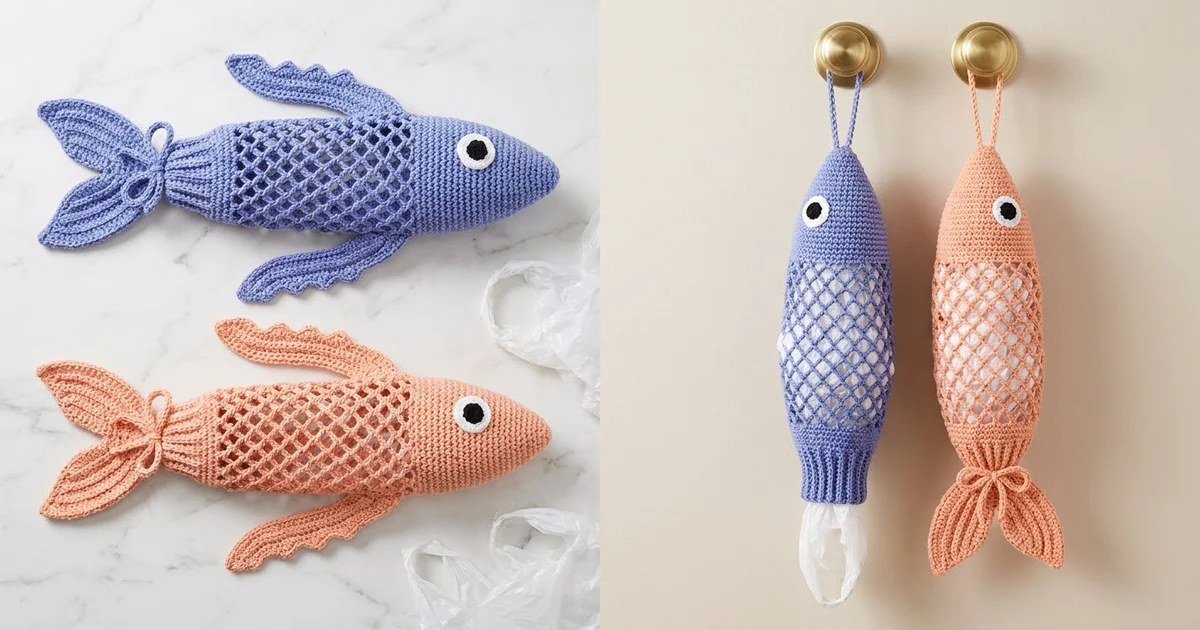
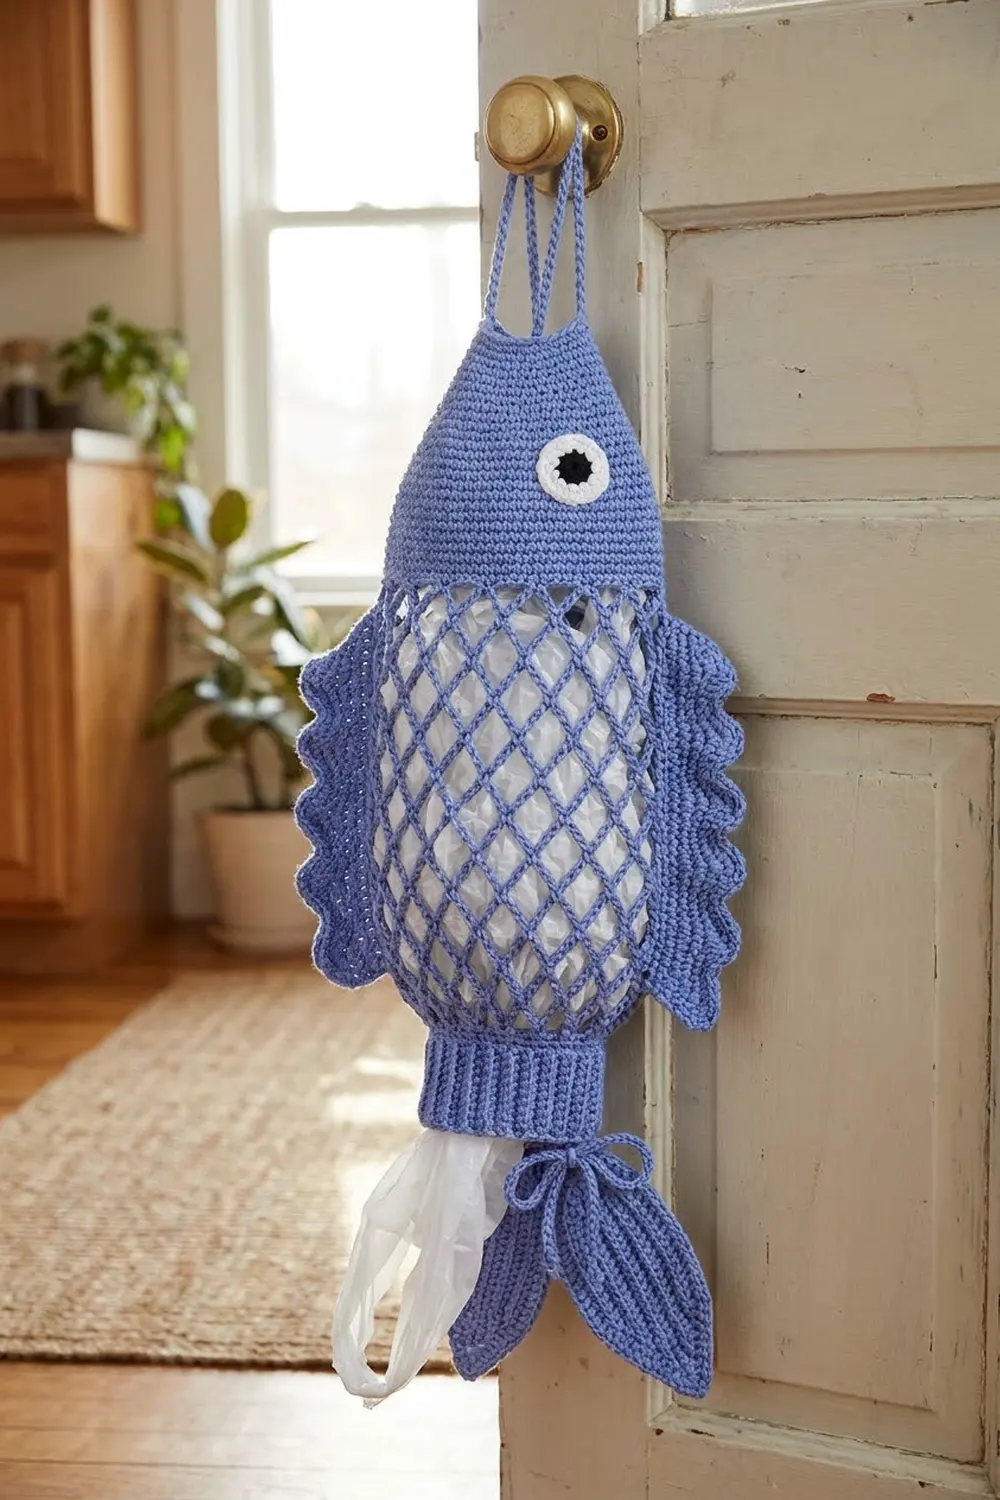
The Bluefin Bag Keeper is a fish-shaped plastic bag holder. It hangs from a door knob or hook, holds a big bundle of grocery bags inside its open mesh body, and lets you pull bags out one at a time through a ribbed cuff at the tail end.
The sample is periwinkle blue with a white-and-black eye. The peach version uses the same counts. The look is clean and playful: a solid head, a diamond net body, rippled side fins, and a pointed two-lobed tail with a small bow.
The pattern uses US crochet terms. The finished fish is about 19 in (48.3 cm) long from the top of the head to the tail tips, not counting the hanging loops. It measures about 9.5 in (24.1 cm) across the fins, and the hanging loops add 5 in (12.7 cm).
The body is one piece worked top-down in the round. You make a head cone, then a chain-loop mesh, then a ribbed cuff. The fins, tail lobes, bow, eye, and hanging cords are made separately and sewn on.
Finished Size and Construction
- Finished size: 19 in (48.3 cm) long and 9.5 in (24.1 cm) across the fins, plus 5 in (12.7 cm) of hanging loop
- Skill level: Intermediate (chain-loop mesh, front and back post stitches)
- Terminology: US
- Yarn weight: #4 worsted, cotton or cotton blend
- Hook: 4.5 mm (US 7)
- Number of pieces: 10 (1 body, 2 fins, 2 tail lobes, 1 bow strip, 1 bow wrap, 1 eye, 2 hanging cords)
- Layout: Head at the top, a fin on each side, tail at the bottom, hanging loops at the top center
- Body size before border: 14 in (35.6 cm) long (head plus mesh)
- Border depth: The ribbed cuff adds 2 in (5.1 cm), for a 16 in (40.6 cm) body
Materials
Use cotton or a cotton blend. It holds the cone shape, keeps the mesh crisp, and won’t stretch under the weight of the bags. The sample yarn is about 85 yds (78 m) per 50 g.
- Main color (periwinkle blue or peach): 130 g, about 222 yds (203 m)
- White: 5 g, about 9 yds (8 m), for the eye
- Black: one 15 mm safety eye, or 1 yd (0.9 m) of black worsted for an embroidered pupil
Tools:
– 4.5 mm (US 7) hook
– Tapestry needle
– Stitch markers
– Pins
– Scissors
– Spray bottle, plus a rolled towel or a paper towel tube for blocking
The quantities include a margin of about 15%, so you won’t run short.
Abbreviations (US Terms)
- ch – chain
- sl st – slip stitch
- sc – single crochet
- hdc – half double crochet
- dc – double crochet
- tr – treble crochet
- inc – 2 sc in the same stitch
- BLO – back loop only
- MR – magic ring
- sk – skip
- FPdc – front post double crochet: yarn over, insert the hook from front to back to front around the post of the stitch, and complete a dc.
- BPdc – back post double crochet: work it like FPdc, but insert the hook from back to front to back.
Special stitch – mesh loop: ch the stated number, then sc in the center chain of the next loop from the previous round. Each new sc sits in the middle of an old loop, which is how the diamonds form.
Gauge and Checkpoints
Gauge: 16 sc x 18 rounds = 4 in (10.2 cm) in sc worked in the round.
Make the head first and treat it as your test piece. Everything else is sized from its 40-stitch base.
Checkpoints:
– After Head Round 4: the flat circle is about 1.9 in (4.8 cm) across.
– After Head Round 22: the head is 5 in (12.7 cm) long and 5 in (12.7 cm) wide when flattened.
– After Mesh Round 5: the body is about 6.5 in (16.5 cm) wide when flattened and relaxed.
– After Mesh Round 9: the mesh is about 9 in (22.9 cm) long when hanging.
– After the cuff: the cuff is 2.5 in (6.4 cm) wide flat and 2 in (5.1 cm) tall.
If the head is too big, go down half a hook size. If it’s too small, go up half a size. Don’t add or remove stitches; the mesh and cuff counts depend on the 40-stitch base.
Body
Work in continuous rounds, moving a marker up each round. Use the main color.
Head Cone
- Round 1: MR, 6 sc in the ring. (6)
- Round 2: inc in each st. (12)
- Round 3: (sc, inc) x 6. (18)
- Round 4: (2 sc, inc) x 6. (24)
- Rounds 5–6: sc in each st. (24)
- Round 7: (5 sc, inc) x 4. (28)
- Rounds 8–9: sc in each st. (28)
- Round 10: (6 sc, inc) x 4. (32)
- Rounds 11–12: sc in each st. (32)
- Round 13: (7 sc, inc) x 4. (36)
- Rounds 14–15: sc in each st. (36)
- Round 16: (8 sc, inc) x 4. (40)
- Rounds 17–22: sc in each st. (40)
The head is now a closed cone, 22 rounds (about 5 in / 12.7 cm) long. Flattened, its base is 20 stitches per side, 5 in (12.7 cm) wide. End with a sl st into the next st.
Mesh
From here, work in joined rounds.
- Mesh Round 1: ch 1, sc in the same st, (ch 5, sk 3, sc in the next st) x 9, ch 5, sk 3, sl st to the first sc. (10 ch-5 loops)
Check: 1 + (9 x 4) + 3 skipped = 40 stitches used.
- Mesh Round 2: sl st in each of the next 3 ch, ch 1, sc in the same ch (the center of the loop), (ch 5, sc in the center ch of the next loop) x 9, ch 5, sl st to the first sc. (10 ch-5 loops)
All remaining mesh rounds start the same way: sl st up to the center ch of the first loop, ch 1, sc in that same ch. Then make 9 loops of the stated length, each ending with a sc in the center of the next loop. Finish with a 10th loop and a sl st to the first sc.
- Mesh Round 3: ch-6 loops. (10 loops)
- Mesh Round 4: ch-7 loops. (10 loops)
- Mesh Round 5: ch-7 loops. (10 loops)
- Mesh Round 6: ch-6 loops. (10 loops)
- Mesh Round 7: ch-5 loops. (10 loops)
- Mesh Round 8: ch-4 loops. (10 loops)
- Mesh Round 9: ch-3 loops. (10 ch-3 loops, 10 sc)
Use these chains as the center: the 4th ch of a ch-7 loop, the 3rd ch of a ch-6 or ch-5 loop, and the 2nd ch of a ch-4 or ch-3 loop.
The loops get longer to round out the belly, then shorter to taper toward the tail. The count stays fixed at 10 loops, so the diamonds stay lined up. Don’t fasten off; you’ll work the cuff from here in the Border section.
Side Fins (Make 2)
Each fin is worked in rows along its length. The BLO rows make the ridges.
- Ch 27.
- Row 1: sc in the 2nd ch from the hook and in each ch across. Turn. (26)
- Row 2: ch 1, working in BLO: 4 sc, 4 hdc, 6 dc, 3 hdc, 5 dc, 2 hdc, 2 sc. Turn. (26)
- Row 3: ch 1, sc in BLO of each st. Turn. (26)
- Row 4 (rippled edge): ch 1, sc in the first 2 sts, then [hdc in the next st, dc in the next st, 2 tr in the next st, dc in the next st, hdc in the next st, sc in the next st] x 3, then sl st in the last 6 sts. Fasten off with a long tail.
Row 4 count: 2 + (3 x 7) + 6 = 29 sts, worked over 26 stitches. Each 6-stitch repeat gets 7 stitches, so it puffs out into a ripple. The fin is about 6.5 in (16.5 cm) long and 2 in (5.1 cm) wide at the ripples. The foundation edge stays straight for sewing.
Tail Lobes (Make 2)
Each lobe is worked around both sides of a foundation chain.
- Ch 16.
- Round 1: Work into chs 1–14, counting from the hook: sc in the 2nd ch from the hook, hdc in the next 2, dc in the next 8, hdc in the next 2, sc in the next 1. Then 3 sc in the last ch for the tip. Rotate and work down the other side of the chain: sc in the next 1, hdc in the next 2, dc in the next 8, hdc in the next 2, sc in the last 1. Sl st to the first sc. (31: 14 + 3 + 14)
- Round 2: ch 1, sc in BLO of each st, with 3 sc in BLO of the center tip st. Sl st to the first sc. (31 sts worked 1 per existing st + 2 extra at the tip = 33)
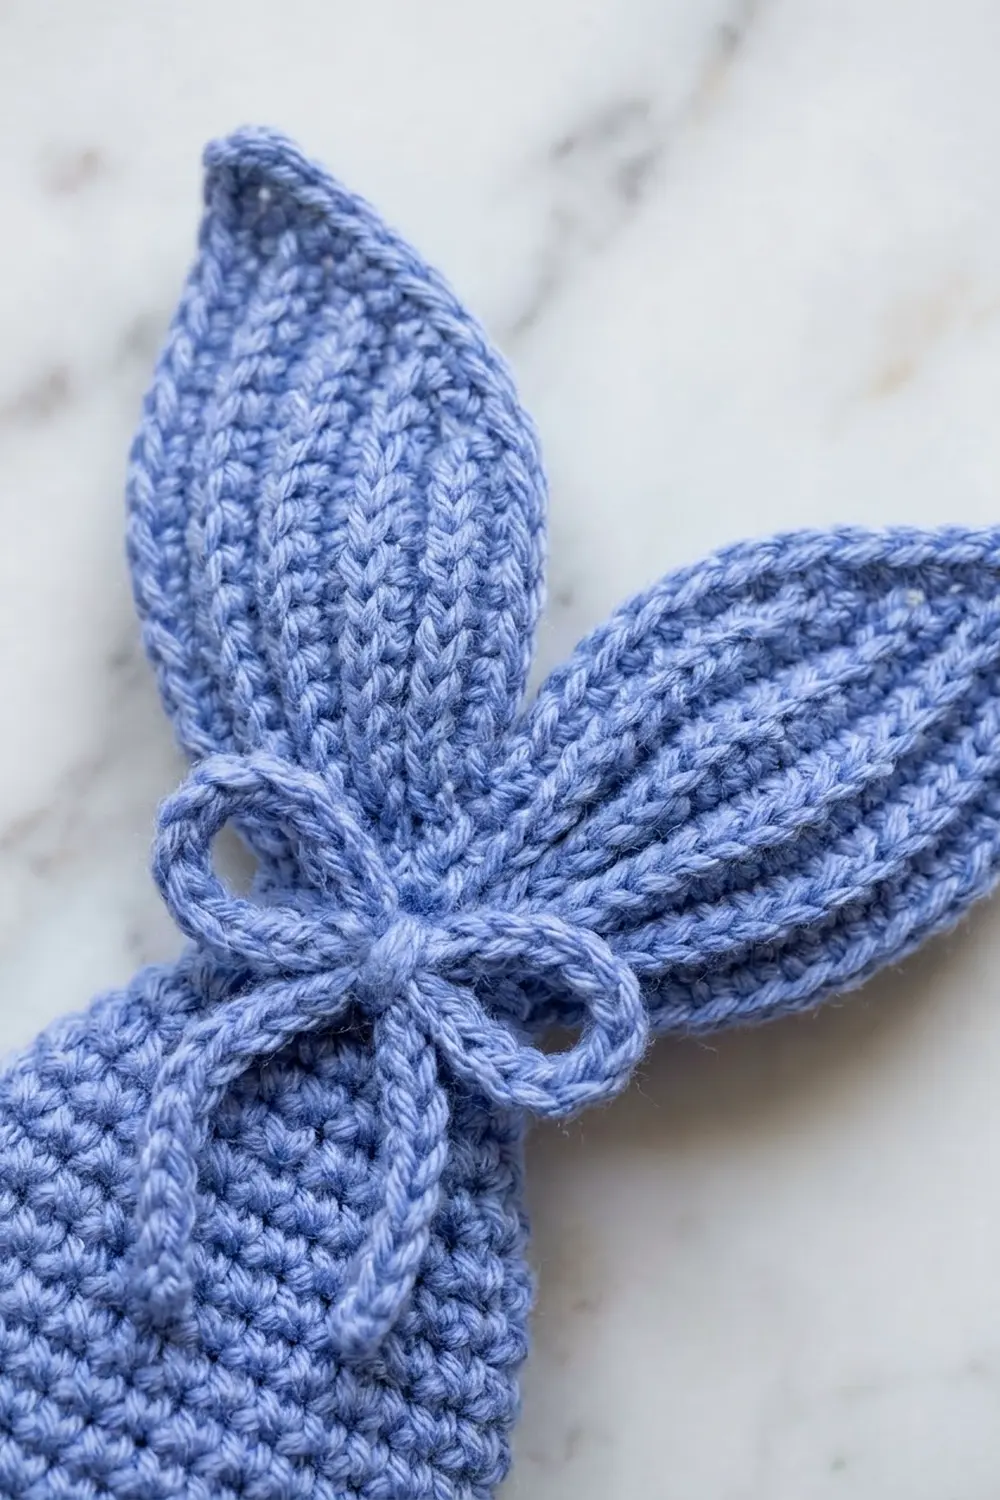
Fasten off with a long tail. Each lobe is about 4 in (10.2 cm) long and 1.5 in (3.8 cm) wide, pointed at one end and narrow at the base.
Bow
Bow strip:
– Ch 21.
– Row 1: sc in the 2nd ch from the hook and across. Turn. (20)
– Rows 2–4: ch 1, sc in each st. Turn. (20)
The strip is 5 in (12.7 cm) by 0.9 in (2.3 cm). Fold both short ends to the center back, overlap them by 2 sts, and stitch them down. You now have two loops and a bow about 2.5 in (6.4 cm) wide.
Bow wrap:
– Ch 7.
– Rows 1–3: sc across. (6)
Wrap this piece tightly around the center of the bow to pinch it, and sew the ends together at the back.
Eye
With white:
– Round 1: MR, 6 sc. (6)
– Round 2: inc in each st. (12)
– Round 3: (sc, inc) x 6. Sl st to finish. (18)
The eye is about 1.4 in (3.6 cm) across. Fix the 15 mm safety eye through the magic ring, or embroider a black satin-stitch pupil about 0.5 in (1.3 cm) wide.
Hanging Cords (Make 2)
- Ch 41.
- sl st in the back bump of the 2nd ch from the hook and in each ch across. (40)
Each cord is about 10 in (25.4 cm) long. Fasten off with a long tail.
Make All Pieces
Main color: 1 body, 2 fins, 2 tail lobes, 1 bow strip, 1 bow wrap, 2 hanging cords.
White: 1 eye.
Layout (front view):
        [cord][cord]
           HEAD   (eye)
   [fin]   MESH   [fin]
           MESH
           CUFF
           [bow]
       [lobe] [lobe]
Joining
Sew everything with the yarn tails and a tapestry needle, using a whipstitch. Pull each stitch snug but not tight so the pieces stay flat.
- Hanging cords: Fold each cord in half. Sew both ends of one cord into Head Rounds 1–2 on the front, and both ends of the other cord into the same rounds on the back. Each loop should hang 5 in (12.7 cm) above the head.
- Eye: Sew the eye to one side of the head between Rounds 8 and 14, stitching through all 18 Round 3 stitches.
- Fins: Flatten the body so the head shows 20 stitches per side. Line up the fin’s straight foundation edge along the side fold. Sew foundation stitches 1–8 to the head’s last 8 rounds, one fin stitch per round. Then tack the remaining 18 stitches to the mesh, one tack wherever the fin crosses a mesh sc, which is about every 1 in (2.5 cm). Point the rippled edge outward and downward, then repeat on the other side.
- Tail unit: Lay the two lobes side by side in a V, with their bases overlapping by 0.5 in (1.3 cm), and sew them together. Sew the bow over that join. Set the tail unit aside until the cuff is done.
Size checkpoint: Flatten the body. It should measure 14 in (35.6 cm) from the top of the head to Mesh Round 9, and about 9.5 in (24.1 cm) across the fin tips.
Border: Ribbed Dispenser Cuff
Border gauge: 4 sts = 1 in (2.5 cm) around. Flattened, the cuff has 10 stitches per side, with the fold points counted inside those 10.
Continue from Mesh Round 9.
- Round 1 (conversion): ch 1. Work sc in each of the 10 mesh sc (1 per existing st), plus 1 sc in each of the 10 ch-3 spaces (10 extra). Sl st to the first sc. (10 + 10 = 20; 10 per side)
- Round 2: ch 2 (doesn’t count as a st), dc in each st, sl st to the first dc. (20; 10 per side)
- Rounds 3–5: ch 2, (FPdc, BPdc) x 10, sl st to the first st. (20; 10 per side)
- Round 6: sl st loosely in each st. (20; 10 per side) Fasten off.
Why the math works: Each of the 10 loops contributes 1 sc plus 1 space, so you get exactly 20 stitches. Twenty is even, which keeps the 1 x 1 rib unbroken and puts 10 stitches on each flattened side. At 4 stitches per inch, 20 stitches make a 5 in (12.7 cm) circumference, which flattens to 2.5 in (6.4 cm). That’s snug enough to hold the bags in and loose enough to pull one out. Rounds 1–6 add 2 in (5.1 cm), which brings the body to 16 in (40.6 cm).
Attach the tail: Sew the overlapped lobe bases to the back half of Cuff Round 1, catching only those 10 stitches. Bring the bow over the top edge of the cuff to the front and tack it to the front half of Round 1. Keep the opening at Round 6 clear. The lobes extend about 3 in (7.6 cm) below the cuff, which makes the fish 19 in (48.3 cm) long overall.
Final Blocking
- Spray the fins, tail lobes, and bow until they’re damp, not soaked.
- Pin each fin flat, opening up each ripple. Pin each lobe to a sharp point.
- Slide a rolled towel or a paper towel tube into the body so the mesh diamonds open evenly.
- Pinch the head into a smooth cone, and press the cuff ribs together.
- Let everything dry completely, then unpin.
Final Quality-Control Checklist
- Head: 40 sts at the base, 5 in (12.7 cm) flat width
- Mesh: 10 loops in every round, and every sc centered in a loop
- Cuff: 20 sts, 10 per side, with the rib unbroken all the way around
- Fins: 26 sts along the straight edge and 3 ripples each, placed evenly on both sides of the body
- Tail: lobes in an even V, bow centered, opening clear
- Eye: secured, with the safety eye backing locked
- Hanging loops: equal length, sewn through two rounds
- All tails woven in
Troubleshooting
- The diamonds slant: You skipped the center chain. Always sc into the center ch of the loop.
- The head ruffles: Your tension is loose. Go down a hook size.
- The cuff is too tight to pull bags out: Work Rounds 3–5 with a hook one size larger.
- The fins curl: Block them wet and pin them flat. Check that you worked Rows 2–3 in BLO.
- The fish hangs crooked: Re-center the hanging cords so they sit exactly opposite each other.
Care
Hand wash in cool water, reshape, and lay flat to dry. Don’t wring out the mesh.
Final Notes
The measurement chain is simple. A 40-stitch head base gives 10 mesh loops. Those 10 loops give a 20-stitch cuff, which works out to 10 stitches per side and a 2.5 in (6.4 cm) opening. The body is 5 in (12.7 cm) of head, 9 in (22.9 cm) of mesh, and 2 in (5.1 cm) of cuff, for 16 in (40.6 cm) total. The tail adds 3 in (7.6 cm), so the finished fish is 19 in (48.3 cm) long. Check each stage as you go and the fish will hang straight and full.
Happy crocheting!