

This hanging holder stacks three toilet paper rolls in a slim column on the wall. A tapered filet mesh panel hangs from a wooden ring, and three round baskets are sewn to the front, one above the other. Each basket has a solid lower wall and a band of open square windows at the top that echoes the grid of the panel.
The sample uses one deep teal cotton, which pairs well with brass hardware and white towels. You only need simple stitches: single crochet for the solid fabric and a classic double crochet mesh for the lattice. The pattern uses US crochet terms throughout.
The finished panel measures 6.75 in (17.1 cm) wide and 17.9 in (45.5 cm) long below the strap. With the folded strap and a 2 in (5.1 cm) ring, the holder hangs about 21 in (53.3 cm) from the hook. Each basket is 5.25 in (13.3 cm) across and 4.25 in (10.8 cm) tall, so a standard roll fits with its top peeking out.
The construction is simple. You crochet three identical baskets from the bottom up, starting with a flat circle. Then you crochet the panel flat from the bottom edge up, tapering it into a solid strap. A single border round neatens the panel, the strap wraps around the ring, and the baskets are whipstitched to the front.
Finished Size and Construction
- Finished panel size: 6.75 in (17.1 cm) wide x 17.9 in (45.5 cm) long, plus strap loop
- Total hanging length: about 21 in (53.3 cm) including ring
- Skill level: Easy-Intermediate
- Terminology: US crochet terms
- Yarn weight: Worsted (#4) cotton
- Hook: 4.5 mm (US 7)
- Number of pieces: 4 (1 panel, 3 baskets)
- Layout: 3 baskets stacked vertically on 1 panel
- Basket size: 5.25 in (13.3 cm) diameter x 4.25 in (10.8 cm) tall
- Panel size before border: 6.25 in (15.9 cm) wide x 17.6 in (44.7 cm) long
- Border depth: 1 round of sc, about 0.25 in (0.6 cm)
Materials
Choose a smooth, firm 100% cotton or cotton blend. Cotton holds the basket shape and won’t stretch under the weight of the rolls. Avoid acrylic, which tends to sag in the mesh panel.
- Teal worsted cotton: 250 g, about 450 m. The panel uses about 50 g (90 m) and each basket about 55 g (100 m).
- 4.5 mm (US 7) crochet hook
- 2 in (5.1 cm) wooden ring
- Wall hook with screws and anchors
- Tapestry needle
- 4 stitch markers
- Scissors and a tape measure
- Rust-proof pins and a blocking mat
All quantities include a margin of about 15% for swatching and tension differences.
Abbreviations (US Terms)
- ch – chain
- sl st – slip stitch
- sc – single crochet
- dc – double crochet
- inc – 2 sc in the same stitch
- BLO – back loop only
- MR – magic ring
- sp – space
- tch – turning chain
- st(s) – stitch(es)
- RS / WS – right side / wrong side
Special stitch – filet mesh: Each window is one dc followed by ch 2, which either skips 2 stitches or sits over the previous ch-2 space. One window takes 3 stitches of width. The beginning ch 5 always counts as 1 dc plus ch 2.
Gauge and Checkpoints
- Solid gauge: 16 sc x 18 rounds/rows = 4 in (10.2 cm)
- Mesh gauge: 4 windows = 3 in (7.6 cm) wide; 5 mesh rows = 3 in (7.6 cm) tall. Each mesh row is 0.6 in (1.5 cm).
Make one basket first and use it as your gauge test. Check these measurements:
- After Rnd 5: the base is about 2.4 in (6.1 cm) across.
- After Rnd 11: the base is 5.25 in (13.3 cm) across.
- After Rnd 23: the wall is 2.7 in (6.9 cm) tall from the turning ridge.
- Finished basket: 4.25 in (10.8 cm) tall.
If your base comes out too big, go down 0.5 mm in hook size. If it’s too small, or the fabric is so stiff you can’t get the hook through, go up 0.5 mm. Check that a roll drops in loosely before you make the other two baskets.
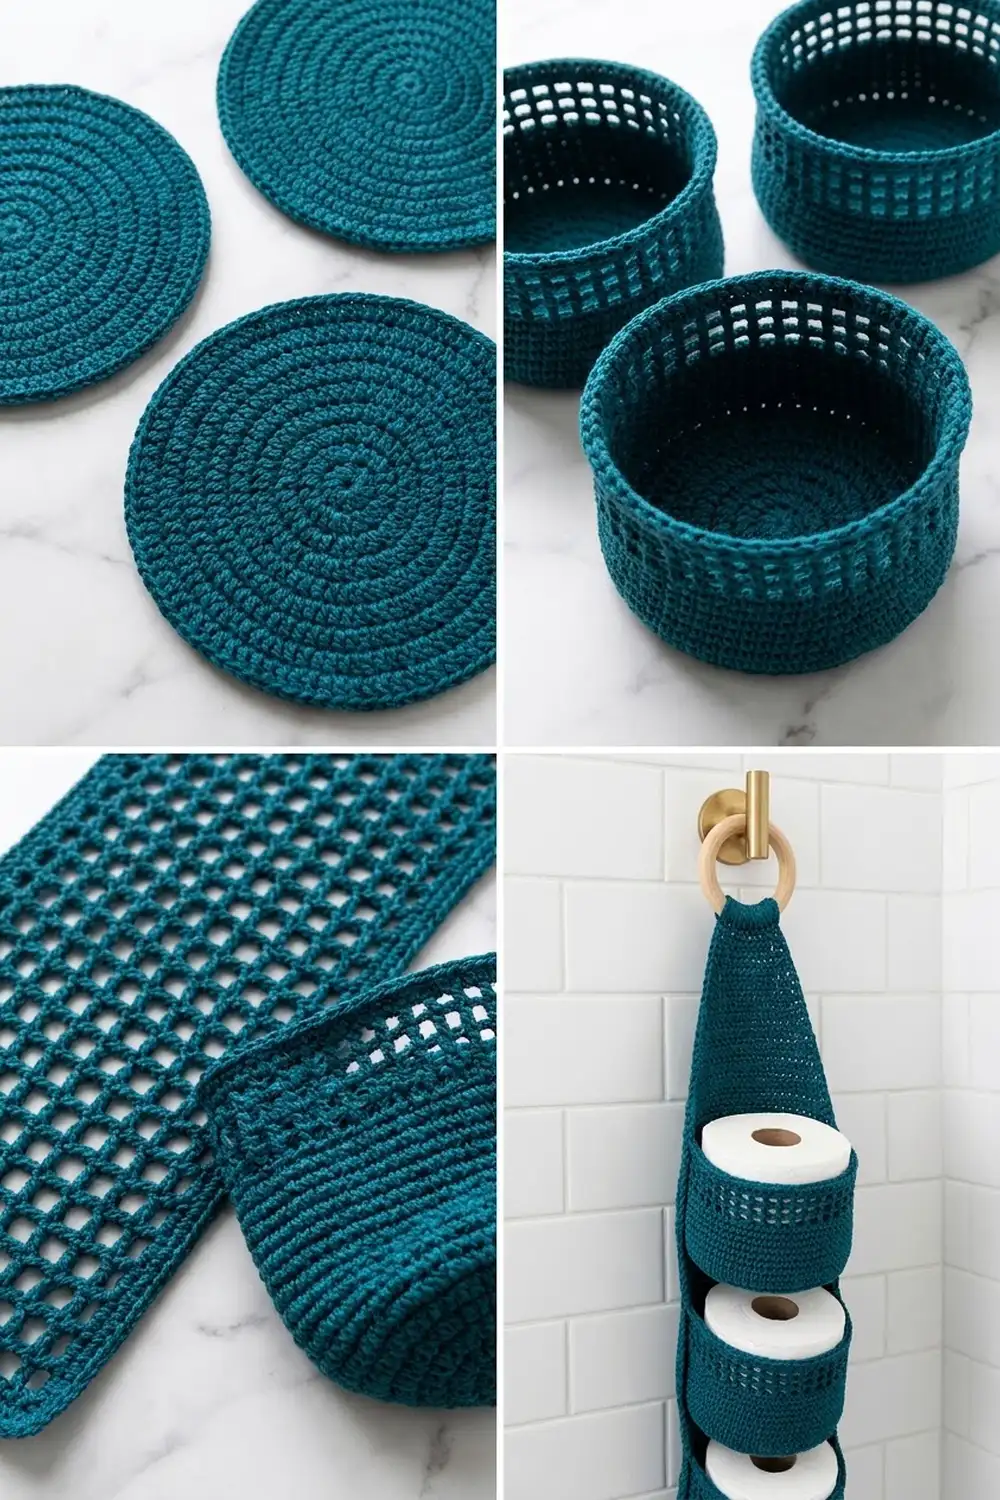
Basket (Make 3)
Work in joined rounds. Start each round with ch 1 (doesn’t count as a st), work the first st into the same st as the join, and join with sl st to the first sc. The increases are staggered so the base stays round.
Base
Rnd 1: MR, 6 sc in ring, join. (6 sts)
Rnd 2: Inc in each st around. (12 sts)
Rnd 3: Sc 1, inc 6 times. (18 sts)
Rnd 4: Sc 1, inc, sc 2, inc 5 times, sc 1. (24 sts)
Rnd 5: Sc 3, inc 6 times. (30 sts)
Rnd 6: Sc 2, inc, sc 4, inc 5 times, sc 2. (36 sts)
Rnd 7: Sc 5, inc 6 times. (42 sts)
Rnd 8: Sc 3, inc, sc 6, inc 5 times, sc 3. (48 sts)
Rnd 9: Sc 7, inc 6 times. (54 sts)
Rnd 10: Sc 4, inc, sc 8, inc 5 times, sc 4. (60 sts)
Rnd 11: Sc 9, inc 6 times. (66 sts)
Checkpoint: the base lies flat and measures 5.25 in (13.3 cm) across.
Solid Wall
Rnd 12: Sc in BLO of each st around. (66 sts) This makes the turning ridge at the bottom edge.
Rnds 13–23: Sc in each st around. (66 sts per round)
Checkpoint: the wall stands straight and measures 2.7 in (6.9 cm) from the ridge.
Window Band
Rnd 24: Ch 5 (counts as dc + ch 2), sk next 2 sts, dc in next st, ch 2, sk next 2 sts 21 times, join with sl st to 3rd ch of beg ch-5. (22 dc and 22 ch-2 sps = 22 windows, 66 sts of width)
Rnd 25: Ch 5 (counts as dc + ch 2), dc in next dc, ch 2 21 times, join with sl st to 3rd ch of beg ch-5. (22 windows)
The dc of Rnd 25 sit directly on top of the dc of Rnd 24. This makes two rows of square windows with a horizontal chain bar between them.
Rim
Rnd 26 (conversion round): Ch 1, sc in each dc and 2 sc in each ch-2 sp around, join. (22 sc in dc + 44 sc in sps = 66 sts)
Rnd 27: Sc in each st around, join. (66 sts)
Fasten off, leaving a 24 in (61.0 cm) tail for sewing. Weave in the starting tail. Mark the line of round joins on each basket; this becomes the back center.
Hanging Panel
Work flat in rows, from the bottom edge up.
Straight Section
Row 1 (RS): Ch 26, sc in 2nd ch from hook and in each ch across. (25 sc)
Row 2: Ch 5 (counts as dc + ch 2), turn, sk next 2 sc, dc in next sc, ch 2, sk next 2 sc, dc in next sc 7 times. (9 dc, 8 windows)
Row 3: Ch 5, turn, dc in next dc, ch 2, dc in next dc 6 times, ch 2, dc in 3rd ch of tch. (9 dc, 8 windows)
Rows 4–21: Repeat Row 3. (8 windows per row)
Checkpoint: the panel measures 6.25 in (15.9 cm) wide and 12.2 in (31.0 cm) tall.
Taper
Each decrease row removes one window from each side. At the start of the row, slip stitch across the first window. At the end, leave the last window unworked.
Row 22 (decrease): Turn, sl st in each of next 2 ch and in next dc, ch 5 (counts as dc + ch 2), dc in next dc, ch 2, dc in next dc 5 times; leave last ch-2 sp and tch unworked. (7 dc, 6 windows, 19 sts wide)
Rows 23–24: Ch 5, turn, dc in next dc, ch 2, dc in next dc 4 times, ch 2, dc in 3rd ch of tch. (6 windows)
Row 25 (decrease): Turn, sl st in next 2 ch and next dc, ch 5, dc in next dc, ch 2, dc in next dc 3 times. (5 dc, 4 windows, 13 sts wide)
Rows 26–27: Ch 5, turn, dc in next dc, ch 2, dc in next dc 2 times, ch 2, dc in 3rd ch of tch. (4 windows)
Row 28 (decrease): Turn, sl st in next 2 ch and next dc, ch 5, dc in next dc, ch 2, dc in next dc. (3 dc, 2 windows, 7 sts wide)
Rows 29–30: Ch 5, turn, dc in next dc, ch 2, dc in 3rd ch of tch. (2 windows)
Checkpoint: the panel is 17.6 in (44.7 cm) tall, and each side has 3 clean steps, each one window wide.
Strap
Row 31 (conversion row): Ch 1, turn, sc in first dc, 2 sc in ch-2 sp, sc in next dc, 2 sc in next ch-2 sp, sc in 3rd ch of tch. (3 sc in dc + 4 sc in sps = 7 sts)
Rows 32–42: Ch 1, turn, sc in each st across. (7 sts per row)
The strap measures 1.75 in (4.4 cm) wide and 2.7 in (6.9 cm) long. Don’t fasten off; go straight on to the border.
Make All Pieces
All four pieces use the same teal yarn:
- Panel: 1 piece, about 50 g (90 m)
- Baskets: 3 pieces, about 55 g (100 m) each
Layout (front view, top to bottom):
           ( 2 in ring )
            | strap |          Rows 31-42
           /  taper  \         Rows 22-30
      [  Basket 3  ]           base at top of Row 17, rim at Row 24
      [  Basket 2  ]           base at top of Row 9,  rim at Row 16
      [  Basket 1  ]           base at top of Row 1,  rim at Row 8
      =============            Row 1 + border
Basket 3 overlaps the bottom of the taper. This is on purpose, and it keeps the top of the holder slim.
Border (Panel Only)
You work the border on the panel alone, before attaching the baskets, so it doesn’t include any basket stitches.
Border gauge: each sc covers about 0.25 in (0.6 cm), the same as the 4 sts per inch of the solid gauge.
Rnd 1: Ch 1 and rotate so you can work down the side of the strap. Work the edges as follows:
- Strap side 1: 1 sc in each row-end of Rows 42–31. (12 sc)
- Panel side 1: Across Rows 30–22, work 3 sc and 2 sc in the row-ends alternately, starting with 3. (23 sc) Work 3 sc across each exposed step. (3 steps x 3 sc = 9 sc) Across Rows 21–2, work 2 sc and 3 sc alternately, starting with 2. (50 sc) Work 1 sc in the end of Row 1. Side total: 23 + 9 + 50 + 1 = 83 sc.
- Bottom edge: Working into the foundation ch, 3 sc in the first ch, 1 sc in each of the next 23 ch, 3 sc in the last ch. (25 sts worked 1-per-stitch + 4 extra corner sts = 29 sc, including both corners)
- Panel side 2: Work as for side 1, in reverse order. (83 sc)
- Strap side 2: 1 sc in each row-end of Rows 31–42. (12 sc)
- Strap top: 3 sc in the first st, 1 sc in each of the next 5 sts, 3 sc in the last st. (7 sts + 4 extra corner sts = 11 sc, including both corners)
Join with sl st to the first sc. (29 + 83 + 12 + 11 + 12 + 83 = 230 sc)
Why the math works: each mesh row is 0.6 in (1.5 cm) tall. At 2.5 sc per row, each sc covers 0.24 in. That is almost exactly the 0.25 in stitch width, so the sides lie flat without ruffling or pulling in. Each step is one window, or 3 sts wide, so 3 sc fill it exactly. The bottom edge keeps all 25 of its stitches and only adds 2 extra sts at each corner.
The border adds 0.25 in (0.6 cm) on each side and at the bottom. This brings the panel to 6.75 in (17.1 cm) x 17.9 in (45.5 cm).
Ring: Pass the strap through the 2 in (5.1 cm) ring from front to back. Fold it so the top of the strap meets Row 31 on the WS, and whipstitch it in place through both layers. The loop adds about 1.25 in (3.2 cm). Fasten off and weave in the end.
Joining
Sew the baskets on with whipstitch, using the long tails.
- Lay the panel RS up. Place each basket with its marked join line at the back, centered between the side borders. Use the layout above for the heights.
- Lower seam: On Rnd 13 of the basket, count 8 sts to each side of the back center (16 sts, 4 in / 10.2 cm). Sew each of these sts to the nearest dc post or ch bar on the panel behind it, with one wrap per stitch.
- Upper seam: Repeat along Rnd 26, across the same 16 sts.
- Pull each wrap snug enough to close the gap, but not so tight that the mesh puckers. The panel should stay flat when you lift it.
- Start with Basket 1 and work upward so you can check the spacing as you go.
Size checkpoint: the gap between baskets is one mesh row, 0.6 in (1.5 cm). The basket rims sit level with the tops of Rows 8, 16, and 24.
Final Blocking
- Soak the finished holder in cool water, then gently squeeze out the water in a towel.
- Pin the panel flat to 6.75 in (17.1 cm) x 17.9 in (45.5 cm), keeping the windows square.
- Put a toilet roll or a folded towel in each basket so it dries round.
- Let it dry completely, about 24 hours.
- Take out the pins and screw the hook into the wall.
Final Quality-Control Checklist
- Each basket: 66 sts, 22 windows per round, 5.25 in (13.3 cm) across
- Each basket: 4.25 in (10.8 cm) tall
- Panel: 8 windows in Rows 2–21, then 6, 4, and 2 windows
- Strap: 7 sts wide, 12 rows long
- Border: 230 sc total, edges flat
- Round joins hidden at the back
- All ends woven in and secured
- Panel hangs straight, with all baskets level
Troubleshooting
The base ruffles: your tension is loose. Go down a hook size, or redo the base with tighter stitches.
The base cups before Rnd 11: your tension is too tight. Go up a hook size.
The walls flare out: you’re working the wall rounds more loosely than the base. Keep them firm.
The windows aren’t square: if they’re too tall, pull up shorter loops in each dc. If they’re too short, pull up slightly taller loops.
The panel edge ruffles: the border has too many sc. Use 2 sc per mesh row-end.
A basket tilts forward: add a third seam along Rnd 18.
Care
Hand wash in cool water, reshape, and dry flat with rolls or towels inside the baskets. Don’t use the dryer, which can shrink cotton unevenly.
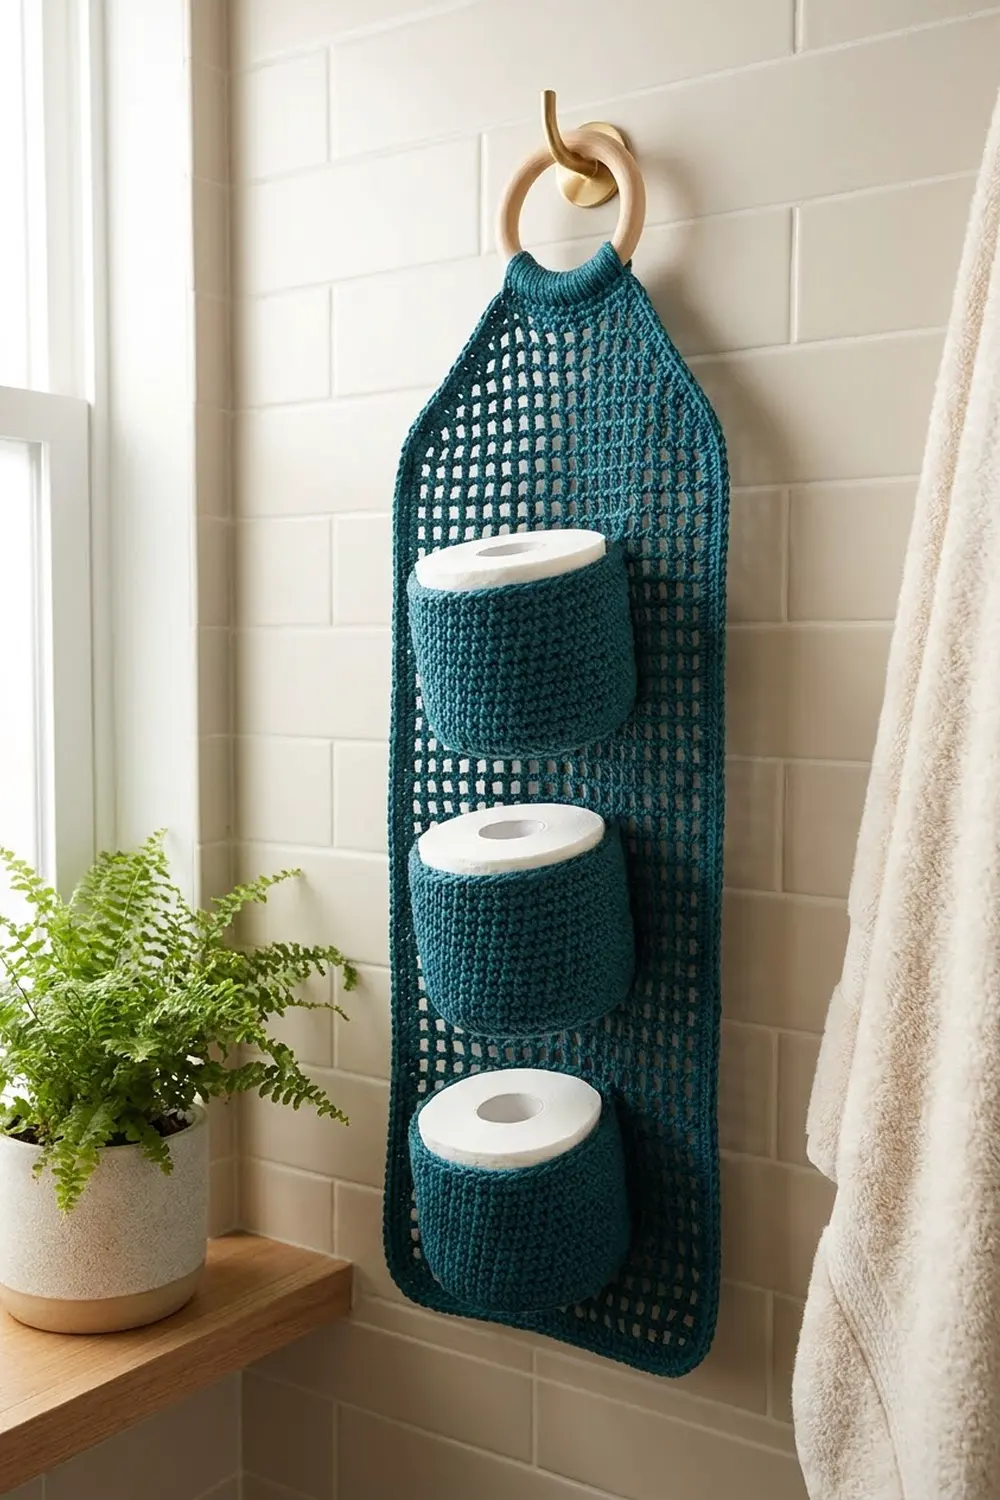
Final Notes
Each measurement leads to the next. A gauge of 16 sc = 4 in (10.2 cm) gives a 66-st base of 5.25 in (13.3 cm), which holds a standard roll. It also gives 25-st panel rows of 6.25 in (15.9 cm), with 8 windows of 0.75 in (1.9 cm) each. Thirty rows make 17.6 in (44.7 cm), and the border brings the panel to 6.75 in (17.1 cm) x 17.9 in (45.5 cm). If you match the gauge at each checkpoint, the baskets and panel will fit together without any adjustments.
Happy crocheting!