

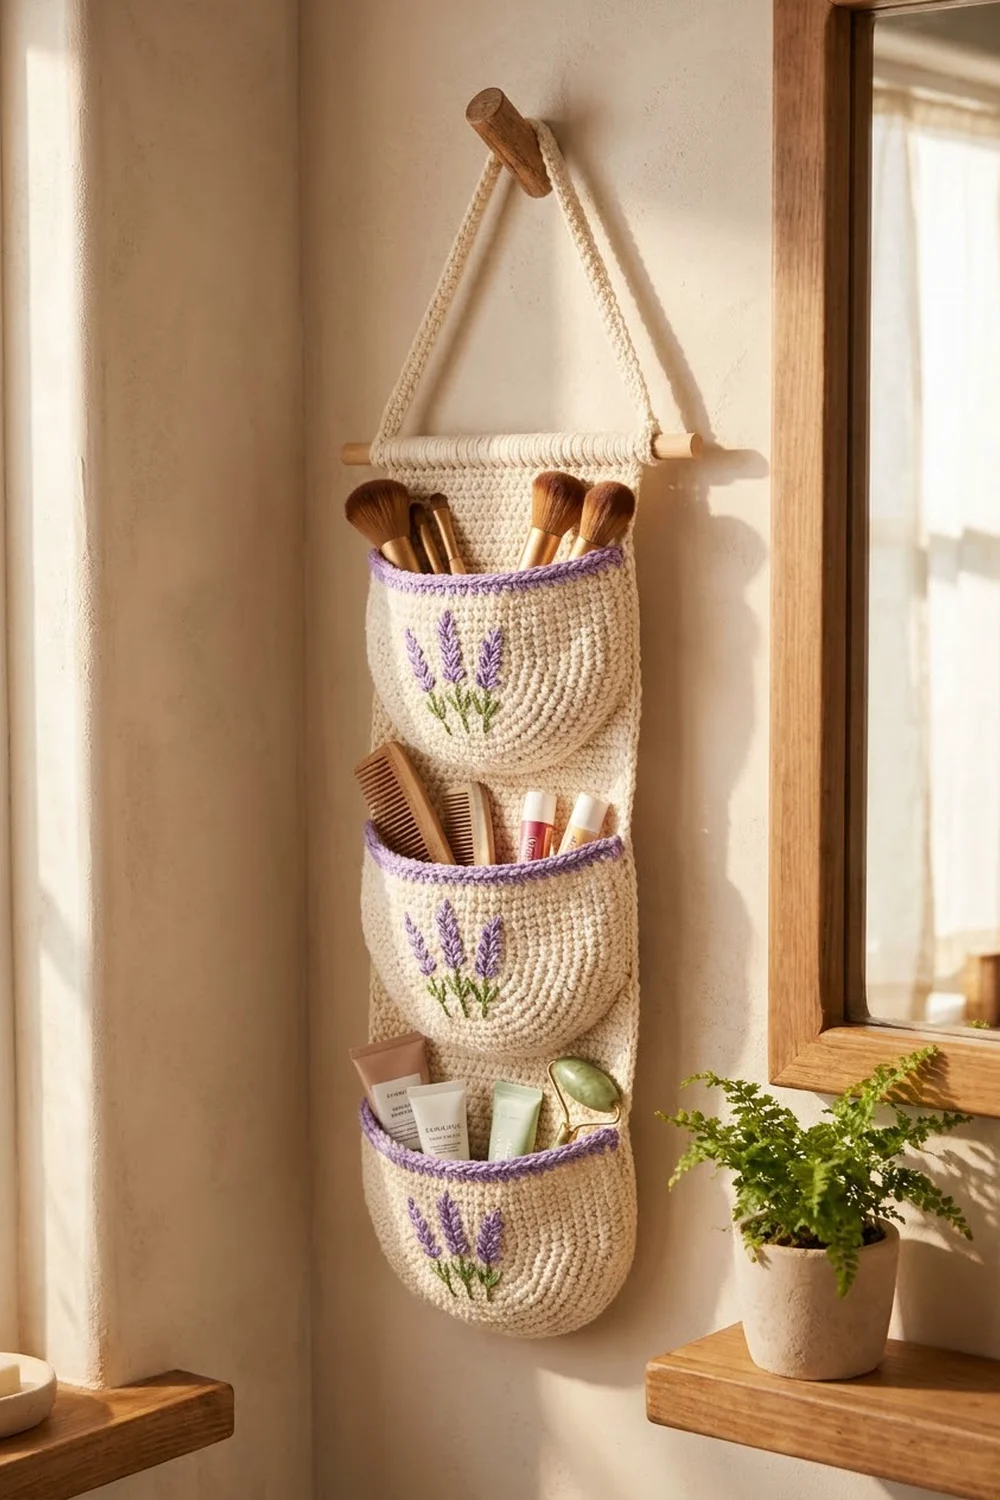
This organizer holds three soft half-bowl pockets in creamy ivory on two crocheted straps. A natural wooden dowel runs across the top, and a triangular cord lets it hang from a single hook. Each pocket has a corded lavender rim and three embroidered lavender sprigs with purple buds and sage-green stems.
The style is calm and cottage-like, and it works well beside a vanity mirror or in a bathroom. The pockets hold brushes, small bottles, and makeup. The pattern uses US crochet terms throughout.
The finished organizer is 10 in (25.4 cm) wide at the dowel and hangs 19.25 in (48.9 cm) below it. The cord peak sits about 5 in (12.7 cm) above the dowel. Each pocket is 8 in (20.3 cm) wide, 4.25 in (10.8 cm) tall with its rim, and about 2.75 in (7.0 cm) deep.
Each pocket is made of two pieces. The flat back is a single crochet half circle worked in rows. The front starts the same way but increases more slowly, so it curves into a shallow half-bowl. Embroider the front, sew it to the back stitch for stitch, and add a two-round purple rim. Then sew the pockets to the straps, loop the straps over the dowel, and tie on the cord.
Finished Size and Construction
- Finished size: 10 in (25.4 cm) wide x 19.25 in (48.9 cm) below the dowel
- Skill level: Intermediate (shaping in rows, seaming, simple embroidery)
- Terminology: US
- Yarn weight: Worsted (#4) cotton
- Hook: 4.0 mm (G-6)
- Number of pieces: 9 crocheted pieces (3 backs, 3 fronts, 2 straps, 1 cord), plus 1 dowel
- Layout: 3 pockets stacked in 1 column on 2 vertical straps
- Piece size: back panel 8 x 4 in (20.3 x 10.2 cm)
- Pocket size before border: 8 in (20.3 cm) wide x 4 in (10.2 cm) tall
- Border depth: 0.25 in (0.6 cm); finished pocket 4.25 in (10.8 cm) tall
Materials
Use a smooth, firm worsted cotton or cotton blend. Cotton holds the pocket shape and shows embroidery clearly. The amounts below assume about 1.6 m of yarn per gram, which is typical for worsted cotton.
- Ivory (main color): 125 g / 200 m
- Lavender purple (rims and buds): 25 g / 40 m
- Sage green (stems and leaves): 15 g / 24 m
All amounts include a margin of about 20 percent.
Tools:
- 4.0 mm (G-6) crochet hook
- Tapestry needle
- Stitch markers (at least 6)
- Wooden dowel, 10 in (25.4 cm) long and 0.5 in (1.3 cm) in diameter
- Water-soluble fabric marker or pins
- Scissors, measuring tape, blocking mats, and rustproof pins
Abbreviations (US Terms)
- ch: chain
- sc: single crochet
- inc: 2 sc in the same stitch
- sl st: slip stitch
- st(s): stitch(es)
- rev sc: reverse single crochet (crab stitch)
- RS / WS: right side / wrong side
Special stitch: reverse single crochet (rev sc). Work from left to right (right to left if you crochet left-handed). Insert the hook into the next stitch to the right, yarn over, and pull up a loop. Yarn over and pull through both loops. This stitch makes the rolled, corded rim.
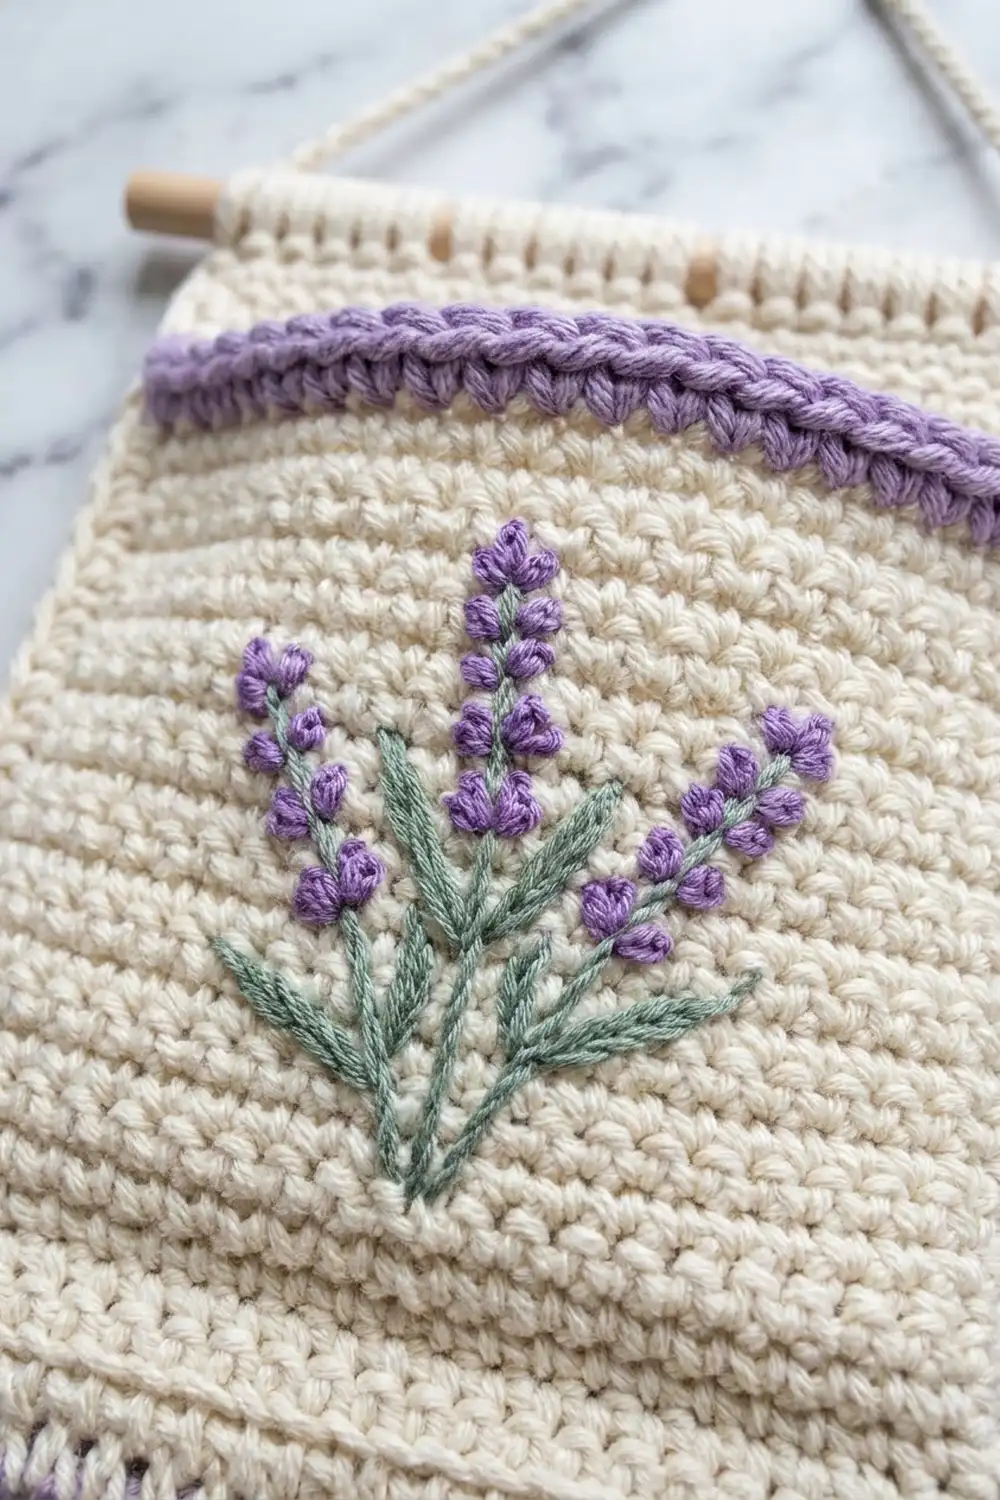
Embroidery stitches: Use backstitch for the stems, lazy daisy (detached chain) for the leaves and buds, and a French knot for each sprig tip.
Gauge and Checkpoints
Gauge: 16 sc and 16 rows = 4 in (10.2 cm), worked in sc rows.
In this pattern, the stitch width matches the row height. That keeps the half circles flat and lets every edge count use 1 sc per row end.
Make one back panel first and use it as your gauge test:
- After Row 8 (24 sts): straight edge 4 in (10.2 cm), height 2 in (5.1 cm)
- After Row 16 (48 sts): straight edge 8 in (20.3 cm), height 4 in (10.2 cm)
On the front, check that the piece lies flat through Row 10, with a straight edge of 5 in (12.7 cm). It should start to cup from Row 11.
If your panel is too big, go down 0.25 mm in hook size. If it is too small, go up 0.25 mm. Ruffling means your stitches are too loose, and cupping means they are too tight. Fix your gauge before you make the fronts, because each front must match its back stitch for stitch.
Back Panel (Make 3, Ivory)
Start with a magic ring. Ch 1 at the start of each row; the ch 1 does not count as a stitch. Turn at the end of every row.
- Row 1: 3 sc in the ring. Pull the ring closed and turn. (3 sts)
- Row 2: Inc in each st. (6 sts)
- Row 3: [Sc 1, inc] 3 times. (9 sts)
- Row 4: [Sc 2, inc] 3 times. (12 sts)
- Rows 5–16: In each row, work [sc 1 more than in the previous row, inc] 3 times. For example, Row 5 is [sc 3, inc] 3 times. Each row has 3 more stitches than the row before: Row 5 has 15 sts, Row 8 has 24 sts, Row 12 has 36 sts, and Row 16 has 48 sts.
Fasten off and leave a 6 in (15.2 cm) tail.
The row ends form the straight top edge, with 16 row ends on each side of the ring. Row 16 forms the curved edge: 48 sts, about 12 in (30.5 cm) long.
Tip: To keep the curve round instead of slightly angular, move the increase to the start of each repeat on alternate rows: [inc, sc to the next increase point].
Front Panel (Make 3, Ivory)
The front starts exactly like the back. After Row 10, it increases only on every other row, so it curves into a half-bowl. The ring becomes the center front of the pocket opening, and the row ends form the curved front rim.
- Rows 1–10: Work as Back Panel Rows 1–10. (30 sts)
- Row 11: Sc in each st. (30 sts)
- Row 12: [Sc 9, inc] 3 times. (33 sts)
- Row 13: Sc in each st. (33 sts)
- Row 14: [Sc 10, inc] 3 times. (36 sts)
- Row 15: Sc in each st. (36 sts)
- Row 16: [Sc 11, inc] 3 times. (39 sts)
- Row 17: Sc in each st. (39 sts)
- Row 18: [Sc 12, inc] 3 times. (42 sts)
- Row 19: Sc in each st. (42 sts)
- Row 20: [Sc 13, inc] 3 times. (45 sts)
- Row 21: Sc in each st. (45 sts)
- Row 22: [Sc 14, inc] 3 times. (48 sts)
Fasten off and leave a 30 in (76.2 cm) tail for seaming.
Checkpoint: Row 22 has 48 sts, the same as Back Row 16. There are 22 row ends on each side of the ring. Each side of the opening measures about 5.5 in (14.0 cm) along its curve.
Embroidery
Embroider each front before you seam it, so you can still reach the inside. First mark the center line, which runs from the ring straight down to the middle stitch of Row 22.
- Center sprig: With green, backstitch a stem 2.5 in (6.4 cm) long along the center line, from Row 20 up to Row 10. With purple, work 5 pairs of lazy daisy buds in a V up the top 1.25 in (3.2 cm) of the stem. Finish the tip with 1 French knot.
- Side sprigs: Start each side sprig at the base of the center stem. Backstitch a stem 2 in (5.1 cm) long that leans about 30 degrees outward. Add 4 pairs of buds and a French knot tip.
- Leaves: With green, work 2 lazy daisy leaves at the base of each stem. Make each leaf 0.75 in (1.9 cm) long and angle it upward and outward.
Keep the embroidery stitches relaxed so the fabric doesn’t pucker. Weave in all tails on the WS.
Make All Pieces
Pieces by color:
- Ivory: 3 back panels, 3 front panels, 2 straps, and 1 cord
- Purple: 3 rims, plus the buds and tips on 3 fronts
- Green: the stems and leaves on 3 fronts
Strap (make 2, ivory): Ch 6. Row 1: Sc in the 2nd ch from the hook and in each ch across. (5 sts) Rows 2–80: Ch 1, turn, sc in each st. (5 sts) Each strap measures 1.25 in (3.2 cm) wide and 20 in (50.8 cm) long. Fasten off and leave a 12 in (30.5 cm) tail.
Cord (make 1, ivory): Ch 75. Sl st in the back bump of each ch across. The cord should be 18 in (45.7 cm) long; add or remove chains until it is.
Layout (front view, distances measured below the dowel):
  ==========  dowel, 10 in (25.4 cm)  ==========
       |S|                          |S|
       |T|                          |T|
     [===== POCKET 1, rim at 3 in =====]
       |R|                          |R|
     [===== POCKET 2, rim at 9 in =====]
       |A|                          |A|
     [===== POCKET 3, rim at 15 in ====]
       |P|                          |P|
Joining
Pocket seam: Hold a front and a back with wrong sides together. Line up the 48 sts of Front Row 22 with the 48 sts of Back Row 16. Before sewing, place markers at the 12th, 24th, and 36th stitch of both pieces so the seam can’t drift.
Use the long front tail to whipstitch through both loops of each matching pair, 1 stitch to 1 stitch, for 48 pairs. The corners of the front opening should meet the ends of the back’s straight edge exactly. Pull each stitch snug, but not so tight that the seam puckers.
Size checkpoint: Before the rim, the pocket should measure 8 in (20.3 cm) across the opening and 4 in (10.2 cm) tall. The front should stand out about 2.75 in (7.0 cm).
Straps to dowel: Fold the top 3 in (7.6 cm) of each strap over the dowel and sew the end flat to the back of the strap. Place the straps so their inner edges are 4.5 in (11.4 cm) apart and their outer edges are 7 in (17.8 cm) apart. This leaves 1.5 in (3.8 cm) of dowel showing on each side.
Pockets to straps: Attach the pockets after you have finished the rims (see Border). Pin the pockets so their rims sit 3 in (7.6 cm), 9 in (22.9 cm), and 15 in (38.1 cm) below the dowel. Each strap should sit 0.5 in (1.3 cm) in from the side edge of the pocket. Whipstitch the back panel to the strap wherever they overlap, sewing through the back panel only so the stitches don’t show on the front. Tack the strap ends behind the bottom pocket.
Cord: Tie one end of the cord around each end of the dowel, outside the straps, with a double knot. The peak should sit about 5 in (12.7 cm) above the dowel.
Border
The border is a two-round purple rim around each pocket opening. Border gauge: 2 rounds = 0.25 in (0.6 cm).
The opening forms a closed loop. The back’s straight edge has 2 sides of 16 row ends, for 32 sts. The front’s curved edge has 2 sides of 22 row ends, for 44 sts. Each round therefore has 32 + 44 = 76 sts.
- Rnd 1: Join purple with a sl st at one back corner and ch 1. Work 1 sc in each back row end (16 + 16 = 32 sc), then 1 sc in each front row end (22 + 22 = 44 sc). Do not add stitches at the rings or the corners. Sl st to the first sc. (76 sts)
- Rnd 2: Ch 1, rev sc in each st around, sl st to the first st. (76 sts)
Fasten off and weave in the ends.
Why the math works: Each sc row is 0.25 in (0.6 cm) tall and each sc is 0.25 in (0.6 cm) wide. One sc per row end therefore matches the edge length exactly. The back edge stays 8 in (20.3 cm) and each side of the front curve stays about 5.5 in (14.0 cm). Because no stitches are added at the corners, the rim lies flat without ruffling or pulling in.
Final Blocking
- Lightly mist each pocket with water.
- Fill each pocket with a rolled towel so the front holds a smooth curve about 2.75 in (7.0 cm) deep.
- Pin the back’s straight edge to 8 in (20.3 cm) wide and check that the pocket is 4.25 in (10.8 cm) tall.
- Pin the straps flat and straight at 1.25 in (3.2 cm) wide.
- Let everything dry completely before assembly. Do not press the embroidery.
Final Quality-Control Checklist
- Each back has 48 sts in Row 16 and measures 8 x 4 in (20.3 x 10.2 cm).
- Each front has 48 sts in Row 22, with 22 row ends on each side.
- Each seam has 48 matched pairs and flat corners.
- Each rim has 76 sts in both rounds and lies flat.
- The three lavender motifs match and sit centered and upright.
- The rims sit 3, 9, and 15 in (7.6, 22.9, and 38.1 cm) below the dowel.
- The dowel hangs level and the cord peak is centered.
- All tails are woven in on the WS.
Troubleshooting
- Back panel cups: Your tension is too tight. Go up a hook size.
- Back panel ruffles: Go down a hook size and check that each row has exactly 3 increases.
- Front stays flat: Check that Rows 11, 13, 15, 17, 19, and 21 were worked plain, with no increases.
- Seam counts don’t match: Recount Front Row 22 and Back Row 16. Both must have 48 sts.
- Rim flares: You added extra stitches at a corner or ring. Rework the rim with exactly 76 sts.
- Pocket tips forward: Add a second line of tacking where the back panel meets each strap.
- Organizer hangs crooked: Retie the cord knots so both sides are the same length.
Care
Hand wash in cool water with mild soap and gently press out the water. Dry flat with a rolled towel inside each pocket to keep its shape, and do not tumble dry.
Final Notes
Every measurement in this pattern comes from one gauge: 16 sc and 16 rows = 4 in (10.2 cm). At that gauge, the 48-stitch back measures 8 x 4 in (20.3 x 10.2 cm) and matches the 48-stitch front for a 1:1 seam. The 76-stitch rim adds 0.25 in (0.6 cm), making each pocket 4.25 in (10.8 cm) tall. The pockets hang 6 in (15.2 cm) apart on 20 in (50.8 cm) straps, which gives a finished organizer of 10 x 19.25 in (25.4 x 48.9 cm). If you check each measurement as you go, the finished organizer will hang straight and even.
Happy crocheting!