

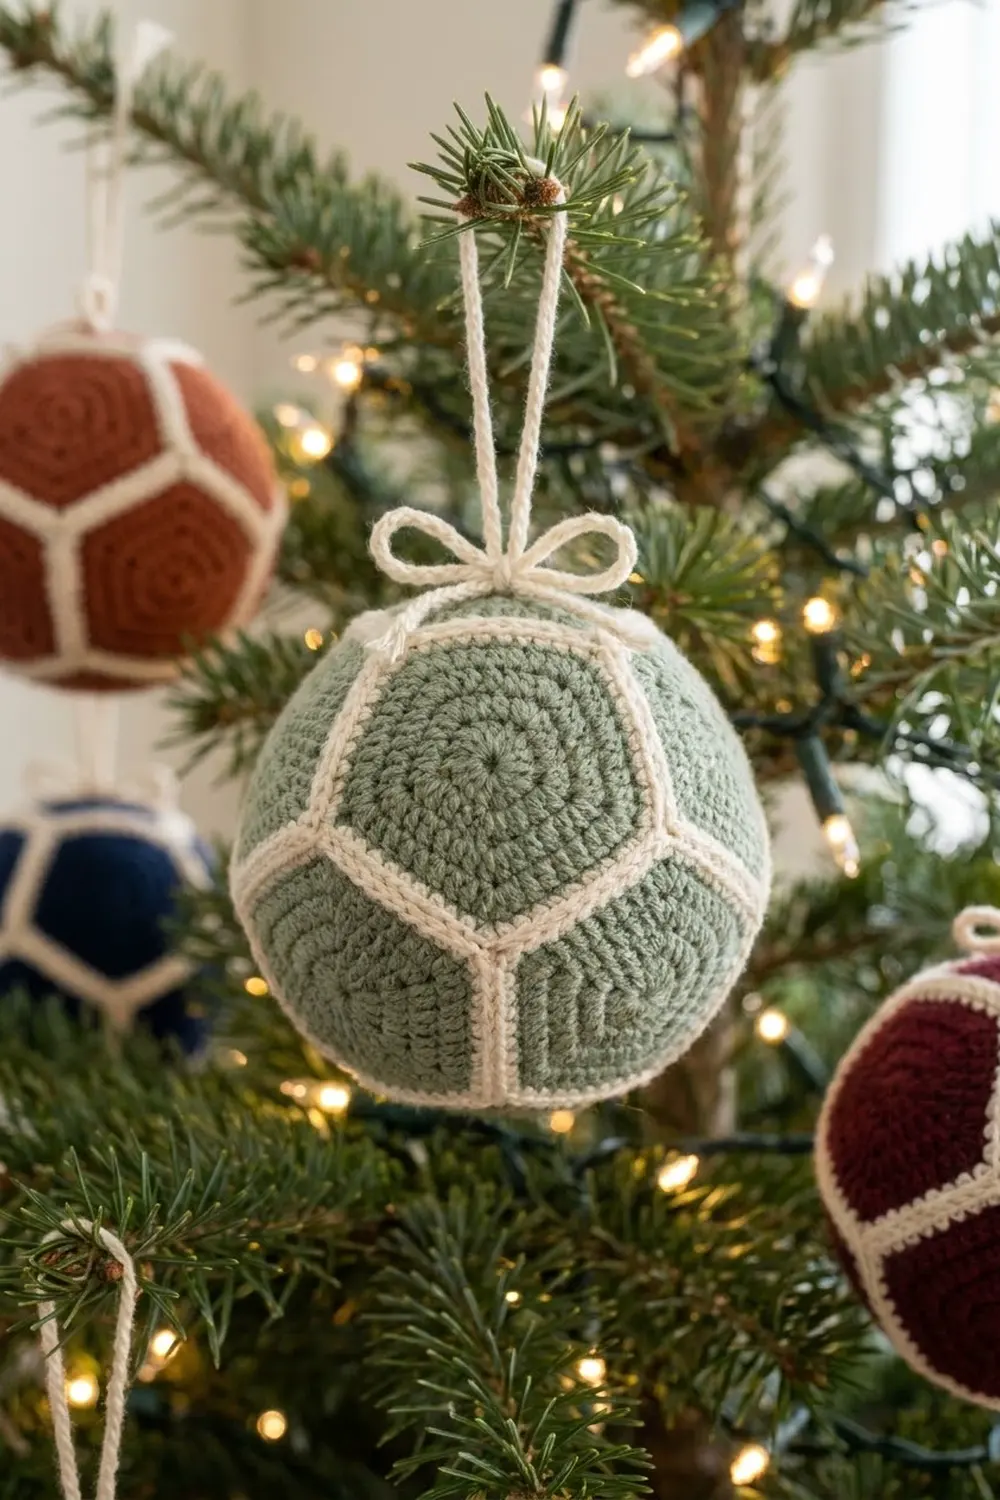
The Evergreen Pentagon Ball is a stuffed crochet bauble made from twelve small pentagons. Each pentagon has a sage green center and a crisp cream edge. Once the pentagons are joined, the cream edges form a raised outline around every panel, so the ball looks like a soft, festive soccer ball.
This sample uses sage green and cream. The same pattern works well in rust, navy, or burgundy with the same cream edging, so you can make a matching set for the tree. The style is classic and cozy, with neat lines and no complicated colorwork.
The pattern uses US crochet terms. The finished ball is about 4 in (10.2 cm) across when stuffed. Each bordered pentagon measures 1.5 in (3.8 cm) per side and 2.4 in (6.1 cm) from point to point.
Here is the construction in short: you crochet 12 pentagons, each with two green rounds and one cream border round. You then slip stitch them together on the right side to make two cups of six pentagons, join the cups, stuff the ball, and close it. Last, you add a crocheted hanging loop and a bow.
Finished Size and Construction
- Finished size: about 4 in (10.2 cm) across when stuffed
- Skill level: Intermediate (the motifs are easy; the 3D joining takes some care)
- Terminology: US crochet terms
- Yarn weight: Sport weight (#2)
- Hook: 3.25 mm (US D-3)
- Number of pieces: 12 pentagons, plus 1 hanging loop and 1 bow
- Layout: Dodecahedron (two cups of 6 pentagons, joined together)
- Piece size (bordered): 1.5 in (3.8 cm) per side; 2.4 in (6.1 cm) point to point
- Size before border: 1.25 in (3.2 cm) per side; 2 in (5.1 cm) point to point
- Border depth: about 1/8 in (0.3 cm)
Materials
Choose a smooth sport weight yarn with good stitch definition. Cotton or a cotton blend gives the crispest cream ridges. Soft acrylic also works and makes a lighter ornament. Avoid fuzzy yarns, because they blur the seam lines.
- Color A, sage green: 12 g, about 36 m
- Color B, cream: 10 g, about 30 m
These quantities include a margin of about 25% for swatching, weaving in ends, and the loop and bow. For a rust, navy, or burgundy ball, swap in the same amount of the new color as Color A.
Tools:
- 3.25 mm (US D-3) crochet hook
- Tapestry needle
- 4–6 locking stitch markers
- Polyester fiberfill, about 10 g
- Scissors
- Ruler or tape measure
- Spray bottle and pins for blocking
Abbreviations (US Terms)
- ch – chain
- sl st – slip stitch
- sc – single crochet
- dc – double crochet
- sp – space
- st(s) – stitch(es)
- RS / WS – right side / wrong side
- [ ] x4 – repeat the steps in brackets 4 times
Special stitch – corner group: (sc, ch 1, sc) all worked in the same ch-1 corner space.
Gauge and Checkpoints
Make one complete pentagon before anything else. This single motif is your real gauge test, because every seam depends on it.
Swatch gauge: about 6 sc = 1 in (2.5 cm) in sport weight on a 3.25 mm hook.
Checkpoints for one pentagon:
- After Round 1: about 0.75 in (1.9 cm) across.
- After Round 2: 1.25 in (3.2 cm) per side; 2 in (5.1 cm) point to point.
- After Round 3 (border): 1.5 in (3.8 cm) per side; 2.4 in (6.1 cm) point to point.
If your pentagon is too big: go down to a 3.0 mm hook, or check that your yarn is not a light DK.
If your pentagon is too small: go up to a 3.5 mm (US E-4) hook.
A small size difference only changes the final ball size. What matters most is that all 12 pentagons match each other.
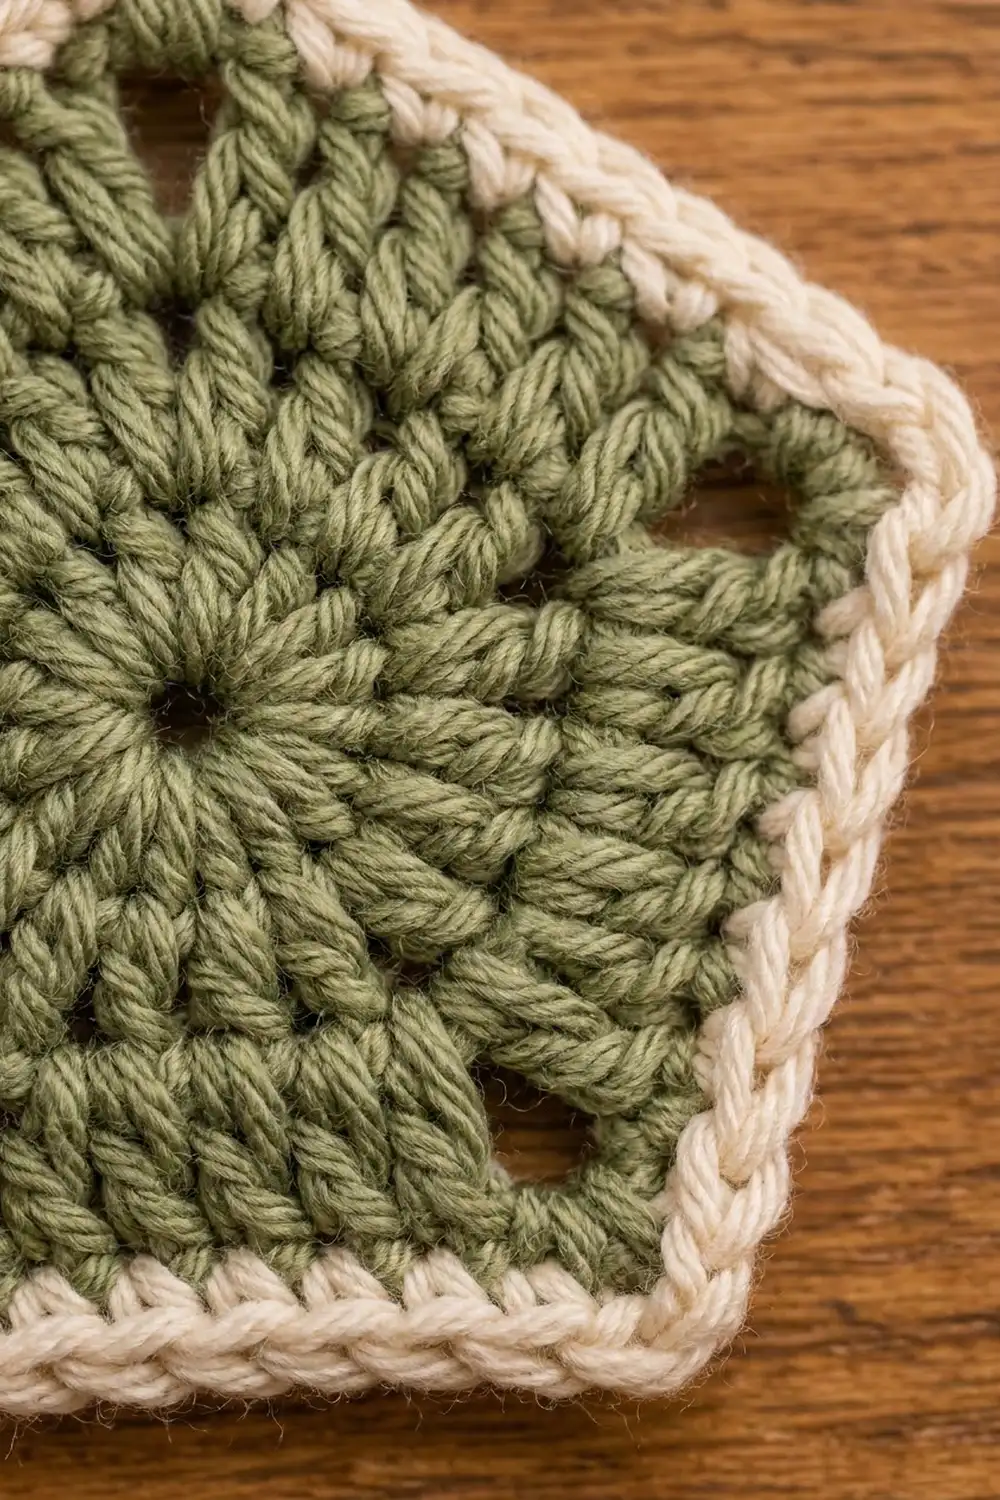
Pentagon (Make 12)
Work in joined rounds with the RS facing. Do not turn.
Round 1 (Color A): Make a magic ring. Ch 3 (counts as dc), 2 dc in ring, ch 1, [3 dc in ring, ch 1] x4. Join with sl st to top of beginning ch-3. Pull the ring closed, leaving a small open center.
Count: 15 dc and 5 ch-1 sps (5 groups of 3 dc).
Round 2 (Color A): Ch 3 (counts as dc), dc in next 2 dc, [(2 dc, ch 1, 2 dc) in next ch-1 sp, dc in next 3 dc] x4, (2 dc, ch 1, 2 dc) in last ch-1 sp. Join with sl st to top of beginning ch-3. Fasten off Color A.
Count: 35 dc and 5 ch-1 corner sps. Each side has 7 dc: 2 dc from one corner, 3 dc along the side, and 2 dc from the next corner.
The ch-1 corner spaces leave small, neat holes at the five points. They are part of the design.
Check your pentagon against the Round 2 checkpoint. It should lie flat. Before you join anything, add the cream edge round to every pentagon as described in the Border section below.
Make All Pieces
Make 12 pentagons in total, each with Rounds 1–2 in Color A and the Round 3 cream border in Color B.
- Color A: 12 centers (Rounds 1–2)
- Color B: 12 border rounds, plus all seams, the loop, and the bow
Weave in the Color A tails before adding the border. Leave the Color B tail from each border about 4 in (10.2 cm) long for now. You can use it later to tidy a corner.
Layout grid (each cup):
        P2
   P6        P3
        P1
     P5    P4
P1 is the center of the cup. P2–P6 surround it, one on each side of P1. Cup A uses pentagons 1–6. Cup B uses pentagons 7–12.
Joining
Method: Slip stitch seam with Color B, worked from the RS. Hold two pentagons with WS together and the RS facing you. Insert the hook through both loops of the matching stitches on both pieces, then slip stitch. This makes a raised cream chain ridge on the outside of the ball.
Stitch-to-stitch logic: Each bordered side has 9 sc, from corner space to corner space. One seam is: 1 sl st in the matching corner sps, 1 sl st in each of the 9 sc pairs, and 1 sl st in the next matching corner sps.
Count: 11 sl sts per seam.
Because both edges have exactly 9 sc, the stitches line up one to one. There is no easing or skipping.
Cup A:
- Join P2 to the top side of P1 (11 sl sts).
- Join P3–P6 to the other four sides of P1 the same way. That makes 5 seams.
- Join each outer pentagon to its neighbor along their shared side: P2 to P3, P3 to P4, P4 to P5, P5 to P6, and P6 to P2. That makes 5 more seams, and the piece now curves into a cup.
Cup B: Repeat with P7–P12.
Joining the cups: The rim of each cup is a zigzag of 10 free sides. Turn Cup B so its points fit into the dips of Cup A. Join the matching sides one at a time. Join 8 of the 10 sides, and leave 2 sides of one pentagon open for stuffing.
Seam total: 10 (Cup A) + 10 (Cup B) + 10 (cups together) = 30 seams, which matches the edge count of a dodecahedron.
Tension advice: Keep the slip stitches the same size as the border sc. If they are too tight, the seam puckers and the ball looks dented. If they are too loose, gaps appear and the fiberfill shows. At each point where three pentagons meet, pull the yarn snug so no hole remains.
Size checkpoint: A finished cup measures about 3.5 in (8.9 cm) across the rim before stuffing.
Stuff and close: Stuff firmly through the opening, pushing the fiberfill into every point. Add a little at a time until the ball is round and the panels are smooth but not stretched. Join the last 2 sides, adding a final bit of fiberfill before the last few sts. Fasten off and pull the tail inside the ball.
Border
The border is the single cream round worked on each pentagon before joining. It creates the cream outline and gives every side the same stitch count for joining.
Border gauge: 9 sc per side = 1.5 in (3.8 cm), or 6 sc per 1 in (2.5 cm).
Round 3 (Color B): Join Color B with a sl st in any ch-1 corner sp. Ch 1 (does not count as a st), work a corner group (sc, ch 1, sc) in the same sp, [sc in next 7 dc, corner group in next ch-1 sp] x4, sc in next 7 dc. Join with sl st to first sc. Fasten off.
Count: 35 sc worked 1 per dc + 10 sc added in the corners (2 per corner) = 45 sc, plus 5 ch-1 corner sps.
Per side: 1 corner sc + 7 sc + 1 corner sc = 9 sc. These 9 sts include the side’s 2 corner sc. The ch-1 sps sit between sides and are not counted as side stitches.
Why the math works: Round 2 has 7 dc per side. The border puts 1 sc in each dc and adds 1 sc at each end of the side, giving 9 sc. Five sides × 9 sc = 45 sc, which matches the round total. Because every pentagon has the same 9 sc per side, any side can be joined to any other side stitch for stitch, and the ch-1 corner sps meet neatly where three pentagons come together.
Hanging loop (Color B): Ch 31. Sl st in 2nd ch from hook and in each ch across.
Count: 30 sl sts, about 5 in (12.7 cm). Fold the cord in half to make a loop about 2.5 in (6.4 cm) tall. Sew both ends to the center of the top pentagon with the tails, anchoring them firmly through the fabric.
Bow (Color B): Ch 61. Sl st in 2nd ch from hook and in each ch across.
Count: 60 sl sts, about 10 in (25.4 cm). Wrap the cord around the base of the loop and tie a bow about 2 in (5.1 cm) wide. Trim the tails to about 1 in (2.5 cm) and knot the ends.
Final Blocking
- Block the pentagons flat before joining. Pin each one to 2.4 in (6.1 cm) point to point, spray lightly with water, and let it dry fully.
- Check that all 12 pentagons measure the same, and re-pin any that are off.
- After stuffing and closing, roll the ball gently between your palms to even out the fiberfill.
- If a panel looks flat, push it outward from the inside with a blunt tool through the stitches, or add a small pinch of fiberfill.
- Mist the cream ridges lightly and pinch them upright with your fingers so they stand out evenly.
- Let the ball dry completely before tying the bow and hanging it.
Final Quality-Control Checklist
- All 12 pentagons measure 1.5 in (3.8 cm) per side.
- Each border round has 45 sc and 5 ch-1 corner sps.
- Each seam has 11 sl sts, and there are 30 seams in total.
- There are no holes where three pentagons meet.
- All the cream ridges sit on the outside.
- The ball is firm, round, and about 4 in (10.2 cm) across.
- The loop is secure and the bow is centered at its base.
- All ends are woven in or hidden inside the ball.
Troubleshooting
Pentagon cups or curls: Round 2 is too tight. Use a larger hook for the green rounds only.
Pentagon ruffles: The dc are too loose, or there are extra sts. Recount: each side should have 7 dc.
Edges don’t match during joining: One pentagon has a wrong count. Recount the border; each side must have 9 sc.
Seams pucker: The slip stitches are too tight. Loosen your grip, or use a hook one size larger just for joining.
Gap where three pentagons meet: Before fastening off, use the saved cream tail to sew one small stitch through all three corner sps and pull it snug.
Fiberfill shows through: Stuff a little less firmly, or crochet the green rounds with a firmer tension.
Ball looks lumpy: Pull out the fiberfill and re-stuff with smaller pieces, filling the points first.
Loop pulls loose: Sew the ends through several stitches and knot them on the inside before you close the ball.
Care
Spot clean with mild soap and cool water, then let the ornament air dry. Store it in a box so the ball keeps its round shape.
Final Notes
The whole ornament follows one simple measurement chain. Round 2 gives 7 dc and 1.25 in (3.2 cm) per side. The border turns that into 9 sc and 1.5 in (3.8 cm) per side. Each of the 30 seams joins 9 sc to 9 sc with 11 sl sts, and the 12 matching pentagons close into a ball about 4 in (10.2 cm) across. If your first pentagon matches the checkpoints, the rest of the ornament will come together easily. Once you’ve made one, try a full set in rust, navy, and burgundy for the tree.
Happy crocheting!