

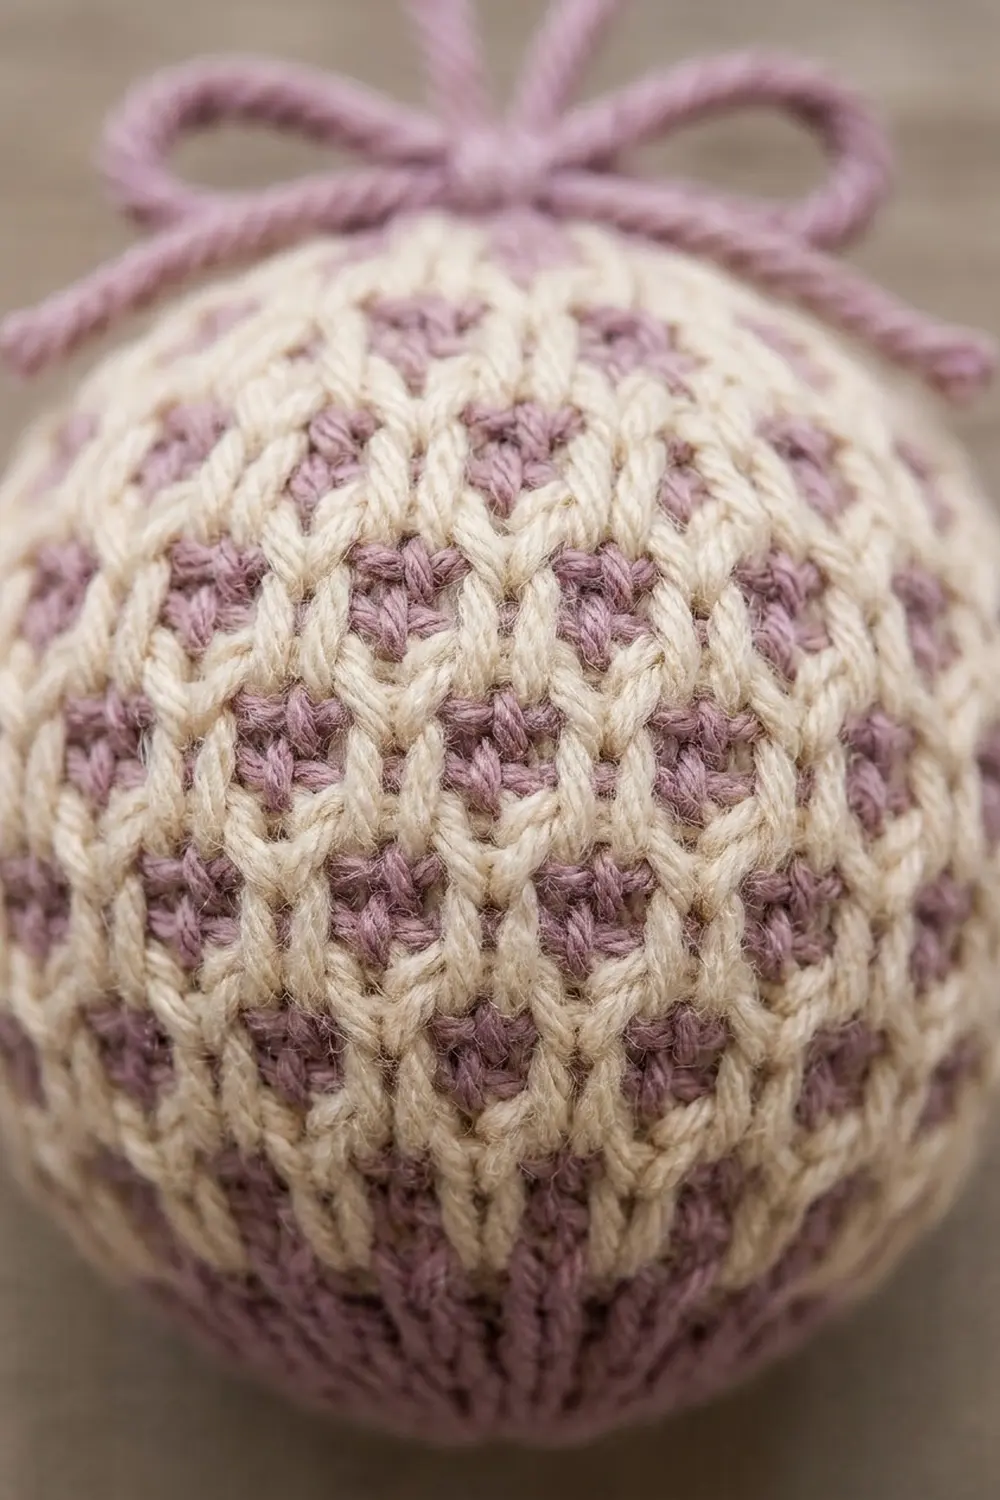
This ornament is a small, round Christmas ball with a cream background and a neat pattern of offset lilac dots. The texture looks almost woven and has the tidy vertical bars of Tunisian simple stitch. A lilac hanging loop and a small bow at the top finish it off.
The colors are soft and a little vintage: warm cream with dusty lilac. The same pattern works in any two colors. Tan, teal or beige on cream all look good next to each other on the tree.
This pattern uses US crochet terms. The finished ornament is about 2.75 in (7.0 cm) across and about 8.5 in (21.6 cm) around when stuffed.
You make the ornament from one flat Tunisian panel. Seam the side edges together to make a tube, then gather the bottom and stuff it. Gather the top closed and add the hanger and bow. You don’t need any increases or decreases, so the only thing to track is the color sequence.
Finished Size and Construction
- Finished size: about 2.75 in (7.0 cm) across and 8.5 in (21.6 cm) around when stuffed
- Skill level: Easy-intermediate (basic Tunisian simple stitch)
- Terminology: US crochet terms
- Yarn weight: Worsted (#4)
- Hook: 6.0 mm (US J-10) Tunisian hook, at least 10 in (25.4 cm) long
- Number of pieces: 1 panel
- Layout: one rectangle seamed into a tube and gathered at both ends
- Piece size: 8 in (20.3 cm) wide × 4.25 in (10.8 cm) tall
- Size before border: 8 in (20.3 cm) × 4 in (10.2 cm) after Row 18
- Border depth: bind-off row, about 0.25 in (0.6 cm)
Materials
Use a smooth worsted yarn with good stitch definition, such as wool, a wool blend or soft acrylic. Fuzzy or very loose yarn hides the dot pattern. The estimates below assume about 200 m per 100 g.
- Main color (MC), cream: 12 g / 24 m
- Contrast color (CC), lilac: 9 g / 18 m (6 g for the panel, 3 g for the hanger and bow)
Tools:
- 6.0 mm (US J-10) Tunisian hook, 10 in (25.4 cm) or longer, or a cabled Tunisian hook
- Polyester fiberfill, about 10 g
- Tapestry needle
- Scissors
- Stitch marker (optional, for the right side)
All yarn amounts include a margin of about 15% for your gauge swatch and tails.
Abbreviations (US Terms)
- ch – chain
- MC / CC – main color / contrast color
- sl st – slip stitch
- st(s) – stitch(es)
- tss – Tunisian simple stitch: insert the hook from right to left under the next front vertical bar, yarn over, and pull up a loop. Leave the loop on the hook.
- sl – Tunisian slip stitch: insert the hook from right to left under the next front vertical bar and move that loop onto the hook. Do not yarn over. Keep the working yarn behind the work.
- Standard return pass (RetP) – yarn over and pull through 1 loop. Then yarn over and pull through 2 loops. Repeat from * until 1 loop remains on the hook.
- Last st – the edge stitch: insert the hook under both the vertical bar and the back strand of the last stitch, then yarn over and pull up a loop.
How the dots form: In each lilac row, the stitches you slip stay as cream loops from the row below. Only the stitches worked in tss turn lilac. Because the dots move over by one stitch in the next lilac row, they line up in offset rows like bricks.
Gauge and Checkpoints
Gauge: 20 sts and 18 rows = 4 in (10.2 cm) in the pattern, measured after a light steam.
Make a swatch before starting the ornament. Chain 20 and work Rows 1–5 of the pattern, then repeat Rows 2–5 until the swatch has 18 rows. It should measure 4 in (10.2 cm) each way.
Checkpoints:
- After Row 1: the foundation edge measures 8 in (20.3 cm).
- After Row 9: the panel is 2 in (5.1 cm) tall.
- After Row 17: the panel is about 3.75 in (9.5 cm) tall.
- After Row 18: the panel is 4 in (10.2 cm) tall.
- After bind-off: the panel is 4.25 in (10.8 cm) tall.
If your panel is too big, go down one hook size. If it’s too small, go up one size. Tunisian crochet tends to curl, so measure with the piece pinned flat.
Panel
Foundation
Row 1 (CC): Ch 40.
– Forward pass: Keep the loop on the hook. Pull up a loop in the back bump of the 2nd ch from the hook and of each ch across. You now have 40 loops on the hook.
– Return pass: Standard RetP. Don’t cut CC.
Pattern rows
Swap colors at the right-hand edge at the start of each forward pass. Carry the unused color loosely up the side, twisting the two yarns once every row. This edge will be hidden inside the seam.
Row 2 (MC): Tss in each st to the last st, then work the last st. That gives 40 loops on the hook. Work a standard RetP in MC.
Row 3 (CC): Tss in the next st, sl the next st. Repeat from * 19 times, then work the last st. That gives 40 loops on the hook (19 tss + 19 sl + 1 edge + 1 loop already on the hook). Work a standard RetP in CC.
Row 4 (MC): Tss in each st to the last st, then work the last st (40 loops). Work a standard RetP in MC.
Row 5 (CC): Sl the next st, tss in the next st. Repeat from * 19 times, then work the last st (40 loops). Work a standard RetP in CC.
Rows 6–17: Repeat Rows 2–5 three more times. You now have 17 rows, including 8 rows of lilac dots. Cut CC, leaving a 12 in (30.5 cm) tail for gathering the bottom later.
Row 18 (MC): Tss in each st to the last st, then work the last st (40 loops). Work a standard RetP. The panel should now measure 8 in × 4 in (20.3 × 10.2 cm).
Every row has 40 stitches. In each dot row, 19 stitches are slipped and the 2 edge stitches are never slipped. Keeping the edges as plain stitches makes the side seam neat.
Border: Bind-Off and Edge Finishing
For this single panel, the “border” is the bind-off row plus a check of the edges. It sets the final height and gives an even number of stitches for gathering.
Border gauge: the bind-off adds about 0.25 in (0.6 cm) of height and doesn’t change the width.
Row 19, bind-off (MC): Skip the first vertical bar. Insert the hook as for tss, yarn over, and pull through the bar and the loop on the hook (1 sl st made). Repeat from * across, ending with a sl st in the last st. That makes 39 sl sts, plus the 1 loop already on the hook, so 40 edge stitches across the top. Cut MC, leaving a 24 in (61.0 cm) tail.
Stitch counts per side:
- Top edge: 40 stitches (bind-off)
- Bottom edge: 40 stitches (foundation chain)
- Left and right edges: 19 row ends each
Why the math works: The top and bottom both have 40 stitches, so they gather to the same size and the ball stays symmetrical. Both sides have 19 row ends, so you can seam them row-end to row-end with no easing. The tube’s circumference is the panel width of 8 in (20.3 cm). The panel height of 4.25 in (10.8 cm) is about half of that, which is the right proportion for a round ball rather than an egg shape.
Assembly
- Seam into a tube. Fold the panel so the right side faces out and the two 19-row edges meet. Using the MC tail and mattress stitch, sew row end to row end, from Row 19 down to Row 1. Pull each stitch just enough for the edges to meet without puckering.
- Gather the bottom. Thread the CC foundation tail onto the needle. Weave it in and out through all 40 foundation stitches, then pull tight until the hole closes completely. Make 2 stitches across the center and fasten off inside.
- Stuff. Push in fiberfill a little at a time. Shape it with your hands until the ornament is firm and round, about 8.5 in (21.6 cm) around. Don’t overstuff, or the dots will stretch apart.
- Gather the top. With the remaining MC tail, weave through all 40 bind-off stitches. Pull closed, top up the stuffing if needed, and fasten off securely.
Hanger and Bow
- Loop: Cut 12 in (30.5 cm) of CC and fold it in half. Thread both ends from the top center down through the ornament and out at the bottom center. Adjust until the loop stands 3 in (7.6 cm) tall. Then knot the ends together and pull the knot inside the ball.
- Bow: Cut 18 in (45.7 cm) of CC. Wrap it once around the base of the loop and tie a bow with loops about 1 in (2.5 cm) wide. Trim the tails to 1 in (2.5 cm) and add a dot of fabric glue to the knot if you like.
Final Blocking
- Hold a steam iron 0.5 in (1.3 cm) above the ornament. Don’t press down on it.
- Steam all around the ball while rolling it between your palms to even out the round shape.
- Using your fingertip, nudge the dot rows so they run level around the ball.
- Straighten the hanger loop so it stands upright.
- Let it dry completely, sitting in a cup or small bowl.
Final Quality-Control Checklist
- [ ] Gauge is 20 sts × 18 rows = 4 in (10.2 cm)
- [ ] Every row has 40 stitches
- [ ] 8 rows of lilac dots, offset like bricks
- [ ] Before seaming, the panel measures 8 in × 4.25 in (20.3 × 10.8 cm)
- [ ] The side seam is flat and matches row end to row end
- [ ] Both gathered ends are fully closed, with no stuffing showing
- [ ] The ball is about 2.75 in (7.0 cm) across
- [ ] The hanger loop is 3 in (7.6 cm) tall, and the bow is centered
- [ ] All tails are hidden inside
Troubleshooting
The panel curls badly. Curling is normal in Tunisian crochet. Go up a hook size and steam-block the panel flat before seaming.
The dots don’t move over from row to row. Row 3 starts with tss and Row 5 starts with sl. Check which one you worked.
There are holes at the gathered ends. Weave through every stitch, then add 2 crossing stitches over the center before fastening off.
The ball looks like an egg. The panel is too tall. Bind off after Row 17 instead, or stuff less at the poles.
The lilac shows through between the cream bars. That’s normal from the lilac return passes. A slightly tighter return pass hides it.
The side edge is loose. Twist the carried yarns at the start of every row, and keep the edge stitches as standard tss.
Care
Spot-clean with cool water and mild soap, then reshape and let it air-dry. Store with the ornament’s other decorations in a box, away from heavy items that could crush it.

Final Notes
The measurements build on each other. First, a gauge of 20 sts × 18 rows = 4 in (10.2 cm) gives a 40-stitch panel that is 8 in (20.3 cm) wide. Eighteen rows bring it to 4 in (10.2 cm) tall, and the bind-off adds 0.25 in (0.6 cm), for 4.25 in (10.8 cm) in total. Next, seaming the matching 19-row edges makes a tube 8 in (20.3 cm) around. Finally, gathering both 40-stitch edges and stuffing turns it into a ball 2.75 in (7.0 cm) across. If each checkpoint matches, the finished ornament will too. Make one in lilac, then try teal, tan and beige for a matching set.
Happy crocheting!