
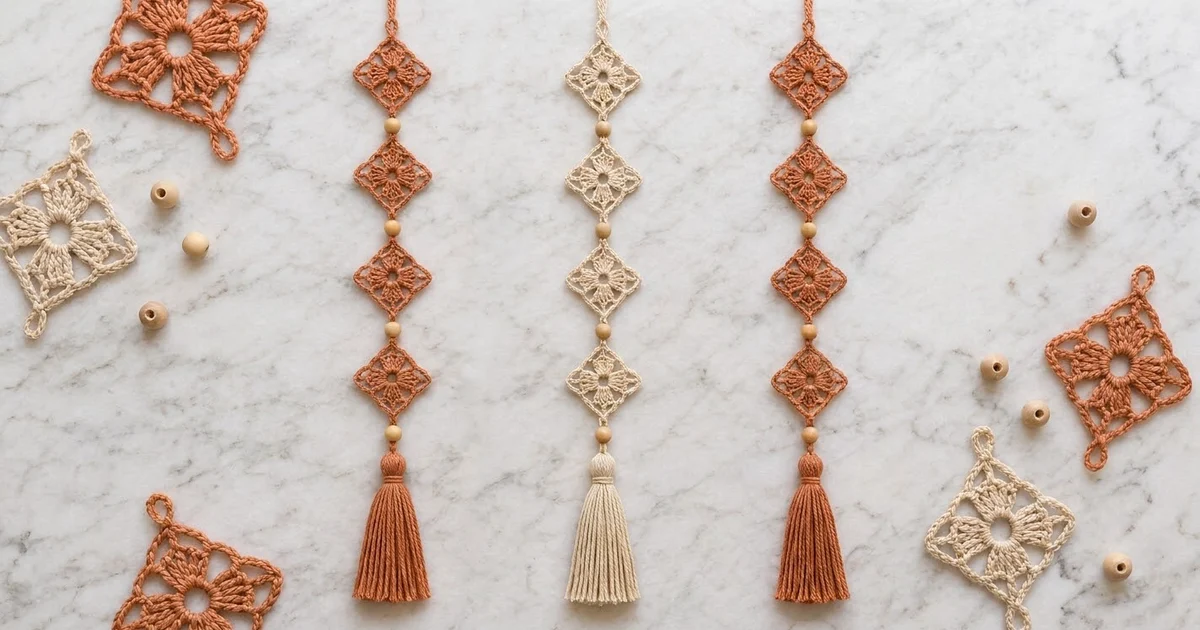
These hanging strands are made of small lacy diamond motifs linked by natural wooden beads, with a full tassel at the bottom of each one. Every diamond has an open center ring and four split fans that point to the four corners. A chain-arch lattice frames each diamond, with a small pointed loop at every corner.
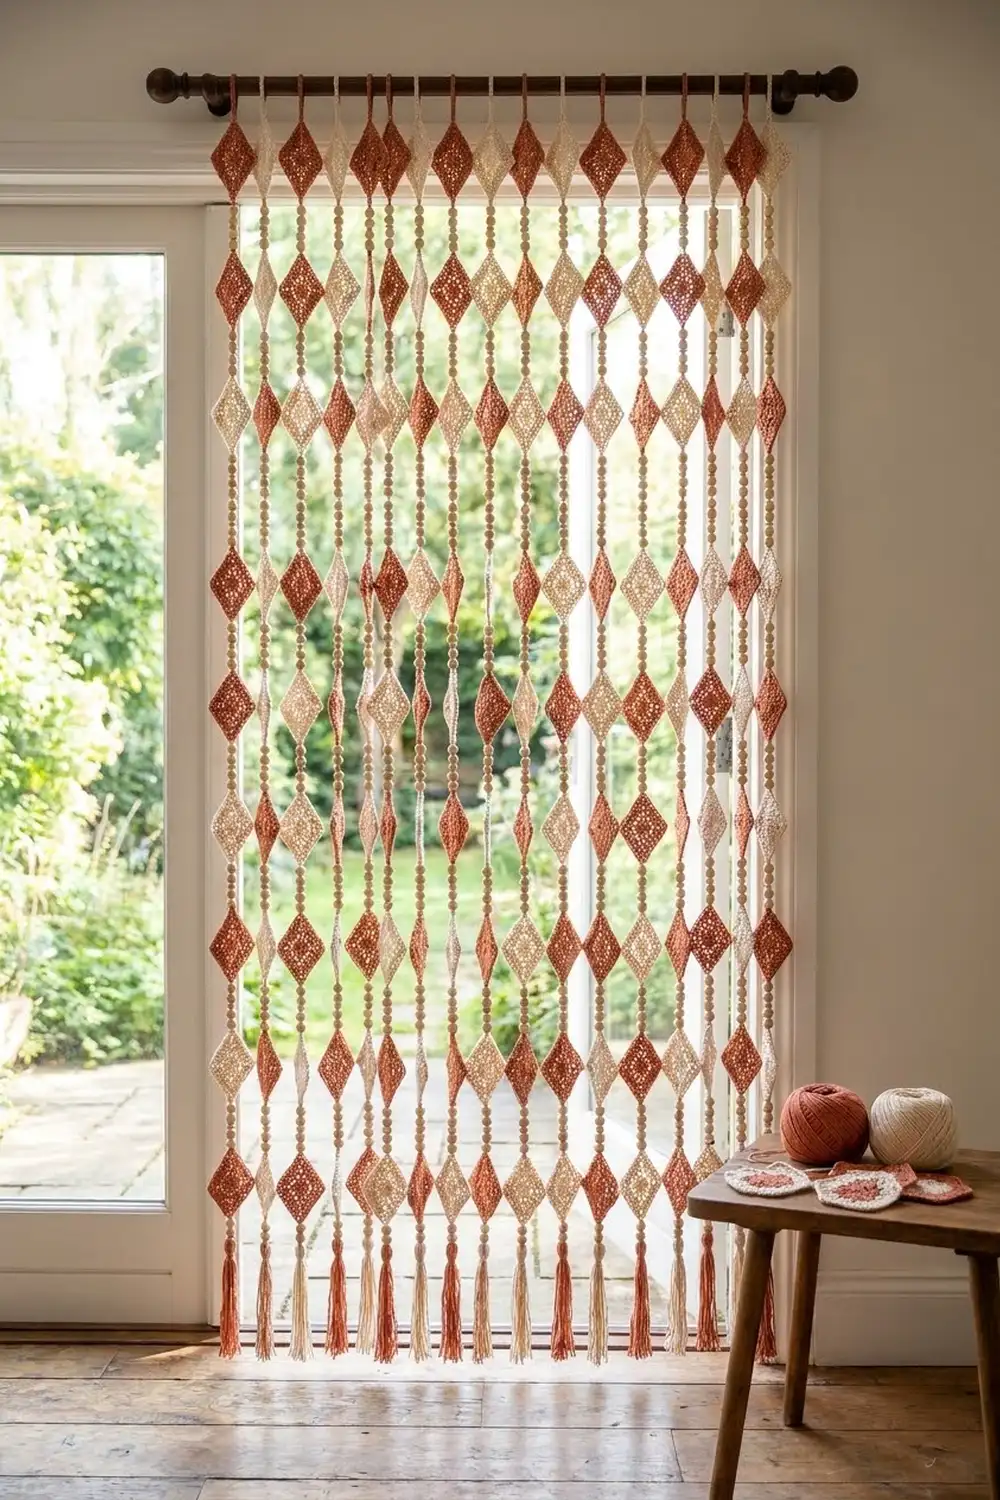
The set shown has three strands: two in warm terracotta and one in soft cream, laid side by side. The style is boho and earthy. Cotton yarn, raw wood, and fringe make a simple wall hanging, and the same strands can hang from a rod as a light curtain.
This pattern uses US crochet terms. Each diamond measures 4.25 in (10.8 cm) from tip to tip. Each finished strand, from the top of the hanging loop to the ends of the tassel, is about 28.75 in (73.0 cm) long and 4.25 in (10.8 cm) wide.
Construction is simple. You work each diamond in the round from a center ring. You add the chain-lattice border last, and you join each diamond to the one above it while you finish that border, using a short chain connector with a bead slid onto it. A bead and a wrapped tassel finish the bottom of each strand.
Finished Size and Construction
- Finished strand size: 28.75 in (73.0 cm) long x 4.25 in (10.8 cm) wide
- Skill level: Easy–Intermediate
- Terminology: US crochet terms
- Yarn weight: Worsted (#4), cotton or cotton blend
- Hook: 4.0 mm (G-6)
- Number of pieces: 12 diamond motifs and 3 tassels (3 strands of 4 motifs)
- Layout: 3 vertical strands, each 1 motif wide x 4 motifs long
- Piece size: 4.25 in (10.8 cm) tip to tip
- Size before border: 3.25 in (8.3 cm) tip to tip
- Border depth: 0.5 in (1.3 cm) on every side
Materials
Pick a smooth worsted-weight cotton with clear twist so the fans and chain arches show up well. Matte cotton holds the diamond shape better than acrylic and blocks crisply.
- Terracotta: 70 g / 130 m (8 motifs and 2 tassels)
- Cream: 40 g / 75 m (4 motifs and 1 tassel)
- 4.0 mm (G-6) crochet hook
- 1.25 mm steel hook or a dental-floss threader, for pulling loops through the beads
- 12 natural wooden beads, 14 mm (0.55 in / 1.4 cm), with holes at least 4 mm wide
- Stiff card cut 4 in (10.2 cm) tall, for the tassels
- Tapestry needle, scissors, rust-proof pins, blocking mat, and a spray bottle
These quantities include a margin of about 20% for gauge swatches and tassel trimming.
Abbreviations (US Terms)
- ch – chain
- sl st – slip stitch
- sc – single crochet
- dc – double crochet
- sk – skip
- sp – space
- st(s) – stitch(es)
- rnd – round
- rep – repeat
Special stitch – Bead Placement (BP): Take the live loop off your main hook. Push the steel hook through a bead, catch the live loop, and pull it through the bead. Put the loop back on the main hook and pull it snug, so the bead sits right below the hook.
Gauge and Checkpoints
Make one complete motif, border included, before anything else. Block it lightly and measure it flat.
- After Rnd 1: 1.25 in (3.2 cm) across
- After Rnd 2: 2.25 in (5.7 cm) across
- After Rnd 3: 3.25 in (8.3 cm) tip to tip
- After Rnd 4 (border): 4.25 in (10.8 cm) tip to tip
- Chain gauge: 5 ch = 1 in (2.5 cm)
A tolerance of 0.25 in (0.6 cm) either way is fine.
If your motif is too big, go down to a 3.75 mm hook. If it is too small, go up to a 4.5 mm hook. Change the hook, not the stitch counts, because the border depends on the exact number of stitches in Rnd 3.
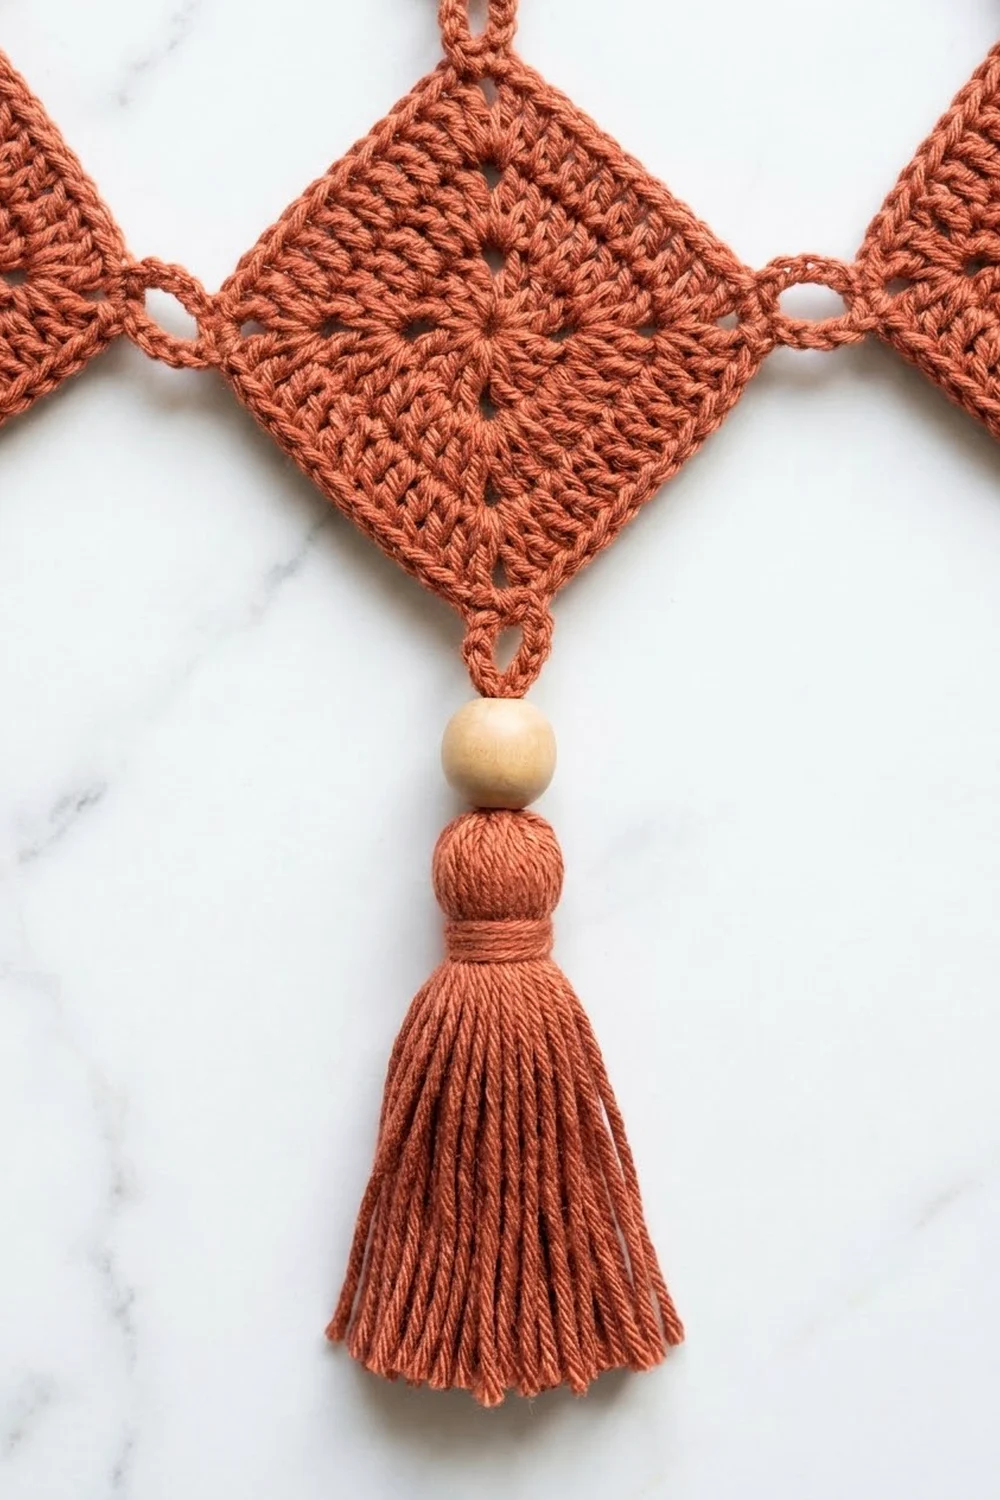
Diamond Motif (Rounds 1–3)
Working order: Work Rnds 1–3 on every motif (this section and the next). Then read Joining (Section 9) and work the Border, Rnd 4 (Section 10), joining each motif as you go.
Ch 6 and sl st to the first ch to form a ring.
Rnd 1: Ch 3 (counts as a dc), work 15 dc in the ring, then sl st to the top of the ch-3. (16 dc)
This makes the open center ring. Keep the ring loose so the center hole stays visible.
Rnd 2: Ch 3 (counts as a dc), dc in the same st, 2 dc in each of the next 3 sts, ch 2. [2 dc in each of the next 4 sts, ch 2] 3 times. Sl st to the top of the ch-3. (32 dc in 4 groups of 8, plus 4 ch-2 sps)
This is a growth round. Each group of 8 dc is the base of one fan.
Rnd 3: Ch 3 (counts as a dc), dc in the next 3 dc, ch 3, dc in the next 4 dc, ch 1, sc in the next ch-2 sp, ch 1. Dc in the next 4 dc, ch 3, dc in the next 4 dc, ch 1, sc in the next ch-2 sp, ch 1; rep from * 2 more times. Sl st to the top of the ch-3. (32 dc, 4 sc, 4 ch-3 tip sps, 8 ch-1 sps)*
The ch-3 at the middle of each group splits the fan into two petals. This makes the four pointed tips of the diamond. The sc between groups pulls the middle of each side inward, so the fans read as a four-petal bloom. The motif now measures 3.25 in (8.3 cm) tip to tip.
Don’t fasten off. Leave the loop on a stitch marker if you’ll work the border later.
Make All Pieces
Work Rnds 1–3 for:
- Terracotta: 8 motifs (strands A and C)
- Cream: 4 motifs (strand B)
Layout, as seen from the front (T = terracotta, C = cream, o = bead):
 Strand A   Strand B   Strand C
  loop       loop       loop
   T          C          T
   o          o          o
   T          C          T
   o          o          o
   T          C          T
   o          o          o
   T          C          T
   o          o          o
 tassel T   tassel C   tassel T
Each strand has 4 beads: 3 between the motifs and 1 above the tassel. That makes 12 beads in total.
When you lay the strands side by side 1.5 in (3.8 cm) apart, the set measures 15.75 in (40.0 cm) across. For a door curtain like the hanging version shown, make more strands in the same way, alternate the colors, and hang each loop from a curtain ring.
Joining
The motifs join at their tips with a beaded chain connector. You make this connector at the end of each motif’s border round. The strand grows from the top down. Motif 1 gets a hanging loop. Motifs 2, 3, and 4 each reach up from their top tip and attach to the bottom tip of the motif above.
Stitch-to-stitch logic: The connector always starts at the top tip sp of the new motif and ends with a sl st into the bottom ch-3 tip sp of the finished motif above. Use one tip sp to one tip sp. Never join into an arch or a side stitch, or the strand will twist and hang crooked.
Tension: Work the connector chains at the same tension as the border chains, about 5 ch per 1 in (2.5 cm). If the chains are too tight, the bead will squeeze and the strand will kink. If they are too loose, the motifs will tilt.
Size checkpoint: Each connector is about 1.75 in (4.4 cm) long from tip to tip: 3 ch, a 0.55 in (1.4 cm) bead, and 3 ch. After two motifs are joined, the pair should measure 10.25 in (26.0 cm) from the top tip of the first motif to the bottom tip of the second (4.25 + 1.75 + 4.25 in).
Border (Rnd 4, Joined As You Go)
Border gauge: 7 ch = 1.4 in (3.6 cm). Each half-side of the Rnd 3 core is about 1.15 in (2.9 cm) from tip to mid-side sc. The extra 0.25 in (0.6 cm) of chain lets each arch bow outward into a flat frame 0.5 in (1.3 cm) deep, without cupping or ruffling.
Rnd 4: Sl st in the next 3 dc and in the next ch-3 tip sp. This sp is the top tip. Ch 1 and sc in the same sp (first corner sc).
- Right side upper: ch 7, sc in the next sc, ch 7.
- Right tip: (sc, ch 3, sc) in the next ch-3 sp.
- Lower right side: ch 7, sc in the next sc, ch 7.
- Bottom tip: (sc, ch 3, sc) in the next ch-3 sp.
- Lower left side: ch 7, sc in the next sc, ch 7.
- Left tip: (sc, ch 3, sc) in the next ch-3 sp.
- Upper left side: ch 7, sc in the next sc, ch 7.
- Top tip: sc in the top ch-3 sp, ch 3, sl st to the first sc.
Counts per side: corner sc + 7 ch + mid-side sc + 7 ch + corner sc = 17 sts per side, including both corner sc. Each corner adds 3 ch that are not part of any side.
Round total: 4 sides x 17 sts = 68, plus 4 corners x 3 ch = 12, for 80 sts (12 sc and 68 ch).
Why the math works: Each tip sp holds exactly 2 sc, and each sc belongs to one side, so no corner is counted twice (4 tips x 2 = 8 corner sc, plus 4 mid-side sc = 12 sc). Each side has 2 arches, one for each half-side of the core. That keeps the diamond symmetrical and brings it to 3.25 + 0.5 + 0.5 = 4.25 in (10.8 cm) tip to tip.
Finish the top tip:
- Motif 1 (top of strand): Ch 12, sl st in the first sc of Rnd 4. This makes a hanging loop about 1 in (2.5 cm) tall. Fasten off.
- Motifs 2–4: Ch 3, BP, ch 3. Sl st in the bottom ch-3 tip sp of the motif above. Fasten off.
Leave 6 in (15.2 cm) tails and weave them into the dc fans, away from the arches.
Tassels (make 3): Wrap yarn 40 times around the 4 in (10.2 cm) card. Slide a 10 in (25.4 cm) tie strand under the wraps at the top and knot it tightly. Cut the loops at the bottom. Wrap a separate strand 6 times around the tassel 0.5 in (1.3 cm) below the top, knot it, and bury the ends inside the tassel. Thread both ends of the top tie through a bead, then through the bottom ch-3 tip sp of motif 4. Knot so the bead sits about 0.5 in (1.3 cm) below the tip, and weave in the ends. This bottom section is about 1.5 in (3.8 cm) from the motif tip to the top of the tassel head. Trim the tassel to an even 4 in (10.2 cm).
Final Blocking
- Weave in all ends before blocking.
- Lay each strand flat on the blocking mat.
- Spray until the strand is evenly damp but not dripping.
- Pin each motif to 4.25 in (10.8 cm) tip to tip. Pin all four tip loops first, then each mid-side arch.
- Line up the tips in a straight vertical line so the connectors run straight.
- Comb the tassel straight with your fingers and dampen it.
- Let it dry completely (6–8 hours), then unpin.
- Hang the strand and check it. It should measure about 28.75 in (73.0 cm) long.
Final Quality-Control Checklist
- Every motif has 16 dc in Rnd 1, 32 dc in Rnd 2, and 32 dc plus 4 sc in Rnd 3.
- Every Rnd 4 has 80 sts, with 17 sts on each side.
- All motifs measure 4.25 in (10.8 cm) tip to tip, within 0.25 in (0.6 cm).
- Every connector runs from tip sp to tip sp and is about 1.75 in (4.4 cm) long.
- Beads sit centered between the chains and don’t slide.
- The tassels are all the same length, 4 in (10.2 cm).
- No tails show through the arches.
- All three strands hang straight and are the same length.
Troubleshooting
- Center hole closes up: Your Rnd 1 is too tight. Start with ch 7 instead of ch 6, or loosen your dc.
- Fans cup or curl: Your Rnd 3 tension is tight. Go up half a hook size for Rnds 2–3 only.
- Arches ruffle: Your chains are loose. Keep 7 ch at 1.4 in (3.6 cm), or go down a hook size for Rnd 4.
- Arches pull the fans inward: Your chains are tight. Chain more loosely. Don’t add chains, or the counts will change.
- Bead won’t pass over the loop: Use a floss threader, or choose beads with holes at least 4 mm wide.
- Strand twists when hanging: A connector was joined into an arch instead of a tip sp. Undo it and rejoin it into the ch-3 tip sp.
- Tassel splays: Tighten the neck wrap and steam the tassel lightly.
Care
Hand wash in cool water with mild soap, then press out the water in a towel. Re-block flat, and comb the tassels straight while they’re damp.
Final Notes
Here is the measurement chain, step by step:
- Rnd 1 measures 1.25 in (3.2 cm).
- Rnd 2 measures 2.25 in (5.7 cm).
- Rnd 3 measures 3.25 in (8.3 cm) tip to tip.
- The 80-stitch border adds 0.5 in (1.3 cm) per side, for a 4.25 in (10.8 cm) motif.
- Four motifs make 17 in (43.2 cm). Three connectors add 5.25 in (13.3 cm).
- The hanging loop adds 1 in (2.5 cm), the bead section 1.5 in (3.8 cm), and the tassel 4 in (10.2 cm).
That gives a finished strand of 28.75 in (73.0 cm). If each checkpoint matches, every strand will hang straight and even.
Happy crocheting!