

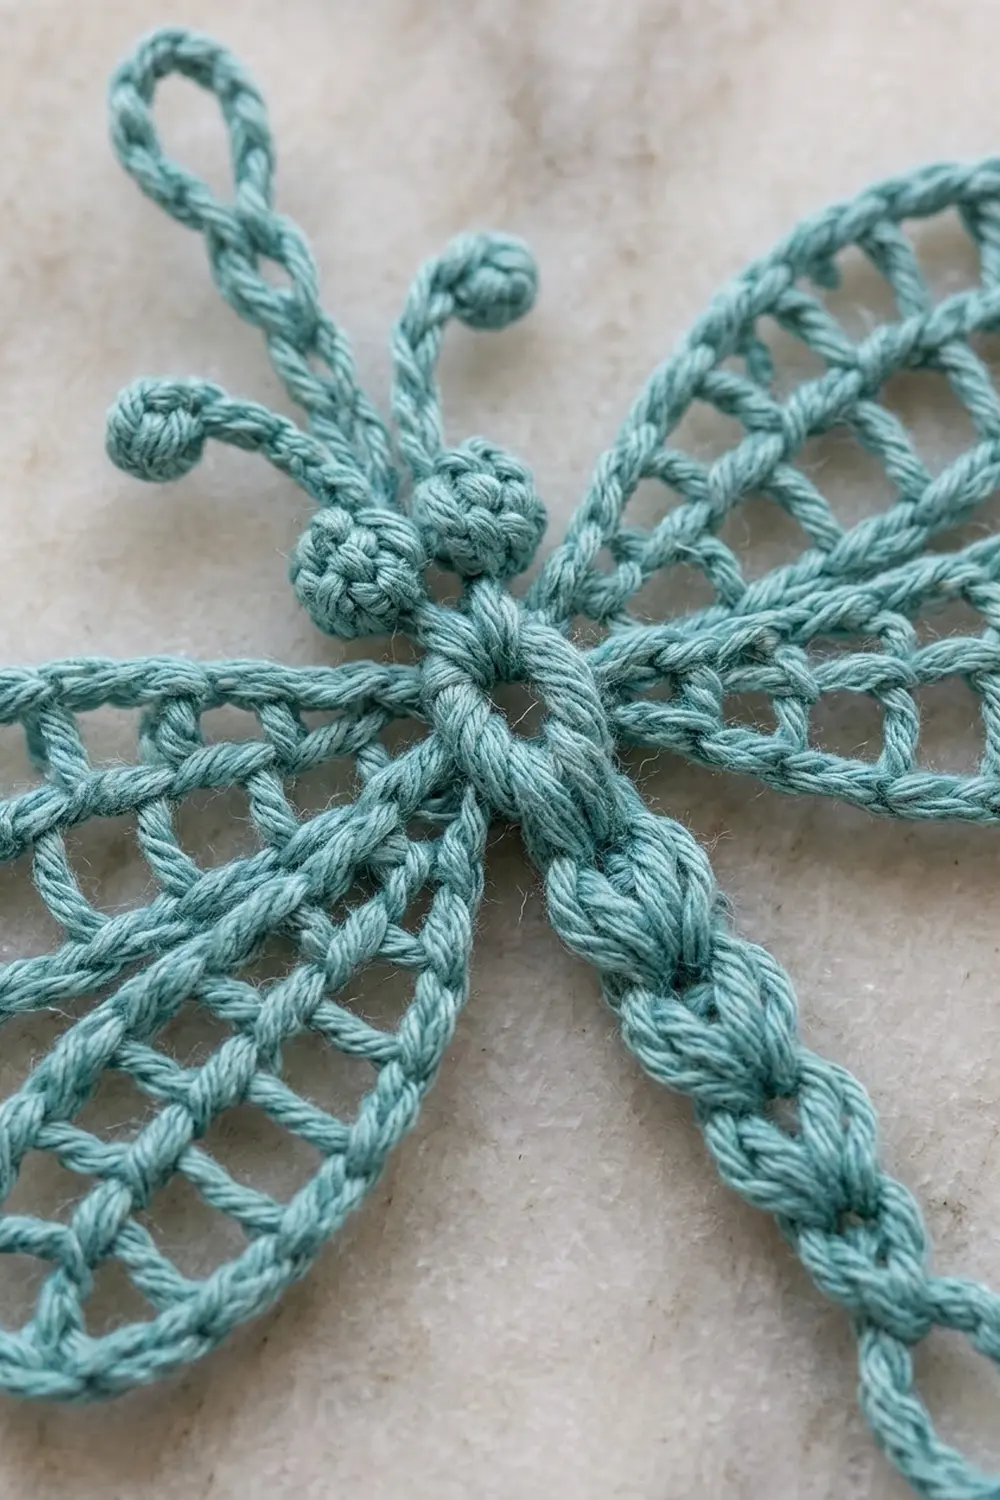
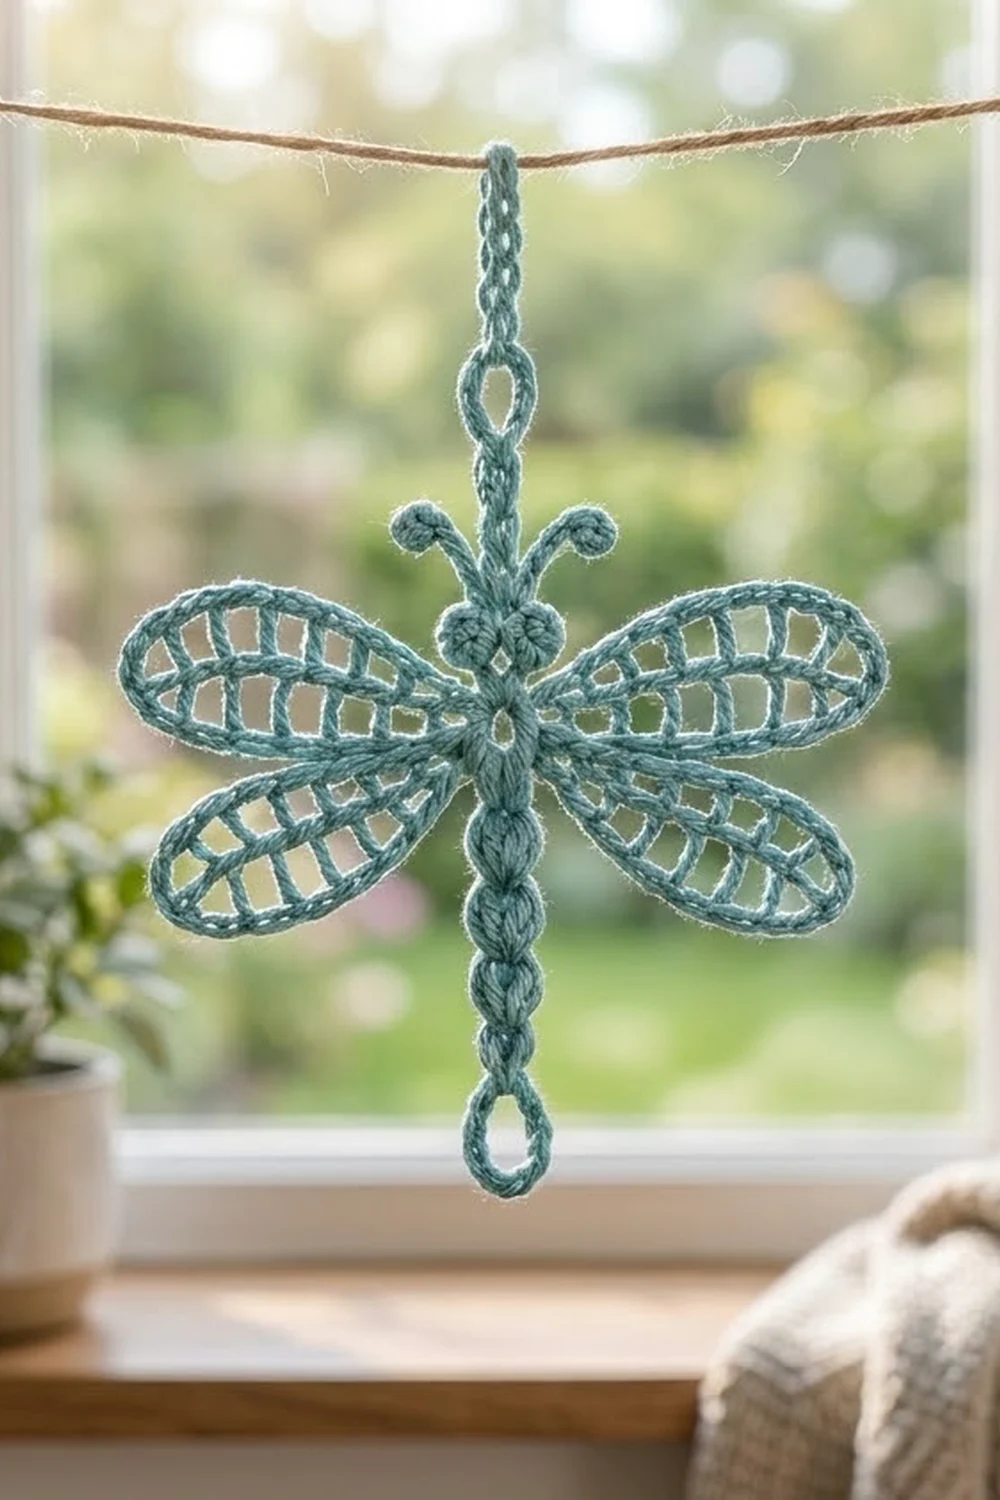
This lacy dragonfly is a small, airy motif made in one piece. It has four open wings with ladder-style rungs, two bobble eyes, curled antennae, a segmented tail, and a chain loop at each end, so it is ready to hang.
The sample is worked in a soft aqua-teal cotton. A light dove-gray version looks just as good, and switching between the two colors works well if you make several. The style is light and botanical, a little like vintage lace, but the cotton gives it a firm, tidy shape.
The pattern uses US crochet terms. The finished dragonfly measures about 5 in (12.7 cm) across the upper wings and 5.5 in (14.0 cm) tall from the top of the hanging loop to the bottom of the tail loop.
The whole motif takes two rounds. Round 1 is a ring of single crochet that forms the thorax. In Round 2 you travel around that ring and build each feature from its own ring stitch: eyes, four wings (each with its rim), the tail, and finally the antennae and hanging loop. You fasten off once and weave in two ends.
Finished Size and Construction
- Finished size: 5 in (12.7 cm) wingspan × 5.5 in (14.0 cm) tall, loops included
- Skill level: Intermediate (you’ll need treble crochet, bobbles, and puffs)
- Terminology: US
- Yarn weight: DK / light worsted (#3) cotton
- Hook: 3.5 mm (US E-4)
- Number of pieces: 1 (single motif, no sewing)
- Layout: Central ring with 2 upper wings, 2 lower wings, head on top, tail below
- Piece size: upper wing 2 1/8 in (5.4 cm) long × 1 1/4 in (3.2 cm) wide; lower wing 1 3/4 in (4.4 cm) long × 1 in (2.5 cm) wide
- Size before border: upper wing 2 in (5.1 cm) × 1 in (2.5 cm); lower wing 1 5/8 in (4.1 cm) × 3/4 in (1.9 cm)
- Border depth: 1/8 in (0.3 cm) single crochet rim around each wing
Materials
Choose a smooth, mercerized or combed cotton in DK weight. Cotton holds the open rungs crisply and blocks flat. Avoid fuzzy or very stretchy yarns, because they blur the ladder spaces and the curled antennae.
- Aqua-teal (main sample): 8 g / 19 m (21 yd)
- Light gray (optional second colorway): 8 g / 19 m (21 yd) per dragonfly
Each dragonfly uses only one color. These quantities include a margin of about 25% for your gauge swatch and the yarn tails.
Tools:
- 3.5 mm (US E-4) crochet hook
- Tapestry needle
- Scissors
- 1 stitch marker
- Rust-proof pins and a blocking mat or foam board
- Spray bottle with water
- Optional: fabric stiffener for a crisper hanging piece
Abbreviations (US Terms)
- ch – chain
- sl st – slip stitch
- sc – single crochet
- hdc – half double crochet
- dc – double crochet
- tr – treble crochet
- st(s) – stitch(es)
- sp – space
- sk – skip
- rnd – round
- bo – bobble (see below)
- puff – puff stitch (see below)
Bobble (bo): [Yarn over, insert hook in st, yarn over and pull up a loop, yarn over and draw through 2 loops] 4 times in the same st (5 loops on hook), yarn over and draw through all 5 loops.
Puff: [Yarn over, insert hook in st, yarn over and pull up a loop to 1/2 in (1.3 cm)] 3 times in the same st (7 loops on hook), yarn over and draw through all 7 loops.
Picot curl: Ch 3, then sl st in the chain named in the pattern, closing a tiny knob.
Gauge and Checkpoints
Gauge matters less for a hanging motif than for a garment, but it controls the wingspan, so check it.
- Chain gauge: 10 ch = 1.5 in (3.8 cm)
- Stitch heights: dc = 0.4 in (1.0 cm); tr = 0.5 in (1.3 cm)
Make one test dragonfly before starting a batch. Measure at these points:
- After Rnd 1: the ring is 1 in (2.5 cm) across.
- After the first upper wing rungs (before the rim): 2 in (5.1 cm) from ring edge to tip, 1 in (2.5 cm) wide.
- After the first upper wing rim: 2 1/8 in (5.4 cm) long, 1 1/4 in (3.2 cm) wide.
- After the first lower wing rim: 1 3/4 in (4.4 cm) long, 1 in (2.5 cm) wide.
- Finished and blocked: 5 in (12.7 cm) wingspan, 5.5 in (14.0 cm) tall.
Too big: go down to a 3.25 mm (US D-3) hook, or keep your chains snugger.
Too small: go up to a 3.75 mm (US F-5) hook.
If the wings are the right length but too wide, your tall stitches are loose. Pull each yarn-over snug before drawing through.
Pattern
Round 1: Body Ring
Ch 6, sl st in first ch to form a ring.
Rnd 1: Ch 1 (does not count), 16 sc in ring, sl st in first sc. (16 sc)
Number the stitches 1 to 16 in your working direction. St 1 is the joining stitch and becomes the top of the head. Place a marker in st 1.
Checkpoint: 1 in (2.5 cm) across.
Round 2 Elements
Read the elements below first, then follow the Round 2 order. Each element starts and ends in the same ring stitch, so you come back to the ring every time.
Eye: In the next st work (sl st, ch 2, bo, ch 2, sl st). The bobble sits upright on the ring edge.
Upper Wing (work into one ring st):
- Vein: Sl st in the ring st, ch 14. Sl st in 2nd ch from hook and in each of the next 12 ch, then sl st in the same ring st. (13 vein sl sts) This doubled chain becomes the central vein line.
- Side A (out toward the tip, worked into the vein sl sts): Hdc in 1st sl st, ch 1, sk 1, dc in next, ch 1, sk 1, tr in next, ch 1, sk 1, tr in next, ch 1, sk 1, dc in next, ch 1, sk 1, hdc in next, ch 1, sk 1, sc in last sl st. (7 sts, 6 ch-1 sps)
- Tip: Ch 2.
- Side B (back toward the body, worked into the free loops of the original 13 chains): Sc in the chain under the last sc, ch 1, sk 1, hdc in next, ch 1, sk 1, dc in next, ch 1, sk 1, tr in next, ch 1, sk 1, tr in next, ch 1, sk 1, dc in next, ch 1, sk 1, hdc in last ch, sl st in the same ring st. (7 sts, 6 ch-1 sps)
Wing total before the rim: 14 sts, 12 ch-1 sps, 1 ch-2 tip sp. The stitches step up from hdc to tr and back down, so the wing comes out as a long oval that is widest in the middle. Each post is one ladder rung standing between the vein and the edge.
- Rim: Work the Upper Wing Rim (see Border) before you move on.
Lower Wing (work into one ring st):
- Vein: Sl st in the ring st, ch 12. Sl st in 2nd ch from hook and in each of the next 10 ch, then sl st in the same ring st. (11 vein sl sts)
- Side A: Hdc in 1st sl st, ch 1, sk 1, dc in next, ch 1, sk 1, dc in next, ch 1, sk 1, dc in next, ch 1, sk 1, hdc in next, ch 1, sk 1, sc in last sl st. (6 sts, 5 ch-1 sps)
- Tip: Ch 2.
- Side B (in the free loops of the chain): Sc, ch 1, sk 1, hdc, ch 1, sk 1, dc, ch 1, sk 1, dc, ch 1, sk 1, dc, ch 1, sk 1, hdc in last ch, sl st in the same ring st. (6 sts, 5 ch-1 sps)
Wing total before the rim: 12 sts, 10 ch-1 sps, 1 ch-2 tip sp. Because these wings top out at dc instead of tr, they come out shorter and narrower than the upper wings.
- Rim: Work the Lower Wing Rim (see Border).
Tail (work into one ring st): Sl st in the ring st, ch 20. Sl st in 9th ch from hook to form the bottom loop (8-ch loop). Working back toward the body along the remaining 11 ch: [puff in next ch, sl st in next ch] 5 times, sl st in last ch, sl st in the same ring st. (5 puffs) Together the puffs form the beaded, segmented tail.
Head (in st 1):
- Antenna: Sl st in st 1, ch 8, sl st in 4th ch from hook (picot curl), sl st in each of the next 4 ch, sl st in st 1.
- Hanging loop: Ch 20, sl st in 9th ch from hook (8-ch loop), sl st in each of the next 11 ch, sl st in st 1.
- Second antenna: Repeat Antenna.
Round 2: Order of Work
Start with the hook in st 1 from the Rnd 1 join.
- St 2: Eye
- St 3: Upper Wing + Rim
- Sts 4–5: sl st in each
- St 6: Lower Wing + Rim
- Sts 7–8: sl st in each
- St 9: Tail
- Sts 10–11: sl st in each
- St 12: Lower Wing + Rim
- Sts 13–14: sl st in each
- St 15: Upper Wing + Rim
- St 16: Eye
- St 1: Head (antenna, hanging loop, antenna)
Stitch check for Rnd 2: 2 eyes + 4 wings + 1 tail + 1 head + 8 plain sl sts = 16 ring sts used. The wings sit 2 sts from the head and 3 sts from the tail on each side, so the motif is mirror-symmetrical.
Fasten off, leaving a 6 in (15.2 cm) tail. Use the needle to weave it through the back of the ring and secure it. Weave in the starting tail as well.
Border: Wing Rim
The rim is the only border on this motif. You work it around each wing straight after Side B, while the hook is still at that wing’s ring stitch.
Border gauge: 6 sc = 1 in (2.5 cm) along the wing edge.
Upper Wing Rim: Ch 1 (does not count). Working up Side B: sc in the hdc, then sc in each ch-1 sp and each st up to the tip (13 sc). Work 5 sc in the ch-2 tip sp (5 sc). Working down Side A: sc in the sc, then sc in each ch-1 sp and each st down to the last hdc (13 sc). Sl st in the same ring st.
Total: 13 + 5 + 13 = 31 sc.
Lower Wing Rim: Ch 1. Side B: sc in each st and ch-1 sp (11 sc). 5 sc in the tip sp (5 sc). Side A: sc in each ch-1 sp and st (11 sc). Sl st in the same ring st.
Total: 11 + 5 + 11 = 27 sc.
Rim total for the motif: (2 × 31) + (2 × 27) = 116 sc.
Why the math works: Each side of a wing has its rungs plus its ch-1 spaces (7 + 6 = 13 on an upper wing, 6 + 5 = 11 on a lower wing). One sc per stitch and one per space means each sc covers one unit of edge, so the long sides lie flat and don’t ruffle or pull. The tip has to turn 180 degrees, and 5 sc in the ch-2 space adds enough width to round it smoothly without a point. The rim makes each long edge about 1/8 in (0.3 cm) deeper. An upper wing grows from 1 in (2.5 cm) to 1 1/4 in (3.2 cm) wide and from 2 in (5.1 cm) to 2 1/8 in (5.4 cm) long. A lower wing grows from 3/4 in (1.9 cm) to 1 in (2.5 cm) wide and from 1 5/8 in (4.1 cm) to 1 3/4 in (4.4 cm) long.
Final Blocking
- Wet the dragonfly in cool water and gently squeeze it out in a towel. Don’t wring it.
- Lay it face up on a blocking mat.
- Pin the hanging loop and the tail loop in a straight vertical line 5.5 in (14.0 cm) apart.
- Angle each upper wing slightly upward and pin the tips 5 in (12.7 cm) apart.
- Angle each lower wing slightly downward, tucked just inside the upper wingspan.
- Pin each wing tip, then pin along the middle of each rim so the rungs open up evenly.
- Shape the antennae into a gentle V and press the picot curls round.
- Spray lightly, or brush on fabric stiffener if you want a crisp hanging piece.
- Let it dry completely before you unpin it, usually 6–12 hours.
Final Quality-Control Checklist
- Ring measures 1 in (2.5 cm), and the center hole stays open.
- Both eyes are upright and the same size.
- The upper wings have 31 rim sc each and the lower wings have 27.
- Every ch-1 space reads as a clear open window between the rungs.
- The wings are mirror images and both tips are rounded.
- The tail has 5 distinct puffs and an open 8-ch loop.
- The hanging loop is centered and strong enough to hold the motif.
- The finished size is 5 in (12.7 cm) × 5.5 in (14.0 cm).
- All ends are woven in invisibly at the back.
Troubleshooting
Wings cup or curl: The rim is too tight. Re-work it with a slightly looser tension, or go up half a hook size for the rim only.
Wing edge ruffles: You’ve put more than one sc into a ch-1 space. Count to 13 per side on an upper wing and 11 per side on a lower wing.
Pointed wing tip: You worked fewer than 5 sc into the tip space, or you skipped the ch 2.
Rungs lean to one side: Your Side B stitches went into the wrong chains. Each Side B stitch should sit directly across the vein from its Side A partner.
Tail twists: Puffs worked into a single chain like to rotate. Pin the tail straight while blocking, or twist the foundation chain flat before you start the puffs.
Flat bobble eyes: Push each bobble to the front with your fingertip before closing it.
Ring hole closes up: Your 16 sc are too tight on the ring. Start again with a ch 7 ring.
Care
Hand wash in cool water with mild soap, press flat in a towel, and dry flat with the wings pinned. If you used stiffener, refresh it after each wash.
Final Notes
The size of this dragonfly comes from a short chain of measurements. Your chain gauge of 10 ch = 1.5 in (3.8 cm) sets the 1 in (2.5 cm) ring and the vein lengths. The rungs bring the wings to 2 in (5.1 cm) and 1 5/8 in (4.1 cm) long before the rim. A 1/8 in (0.3 cm) rim finishes them at 2 1/8 in (5.4 cm) and 1 3/4 in (4.4 cm). Blocking then sets the motif at 5 in (12.7 cm) across and 5.5 in (14.0 cm) tall.
If each checkpoint matches, the finished dragonfly will too. Make one in aqua, one in gray, and hang them wherever you want a little movement.
Happy crocheting!