

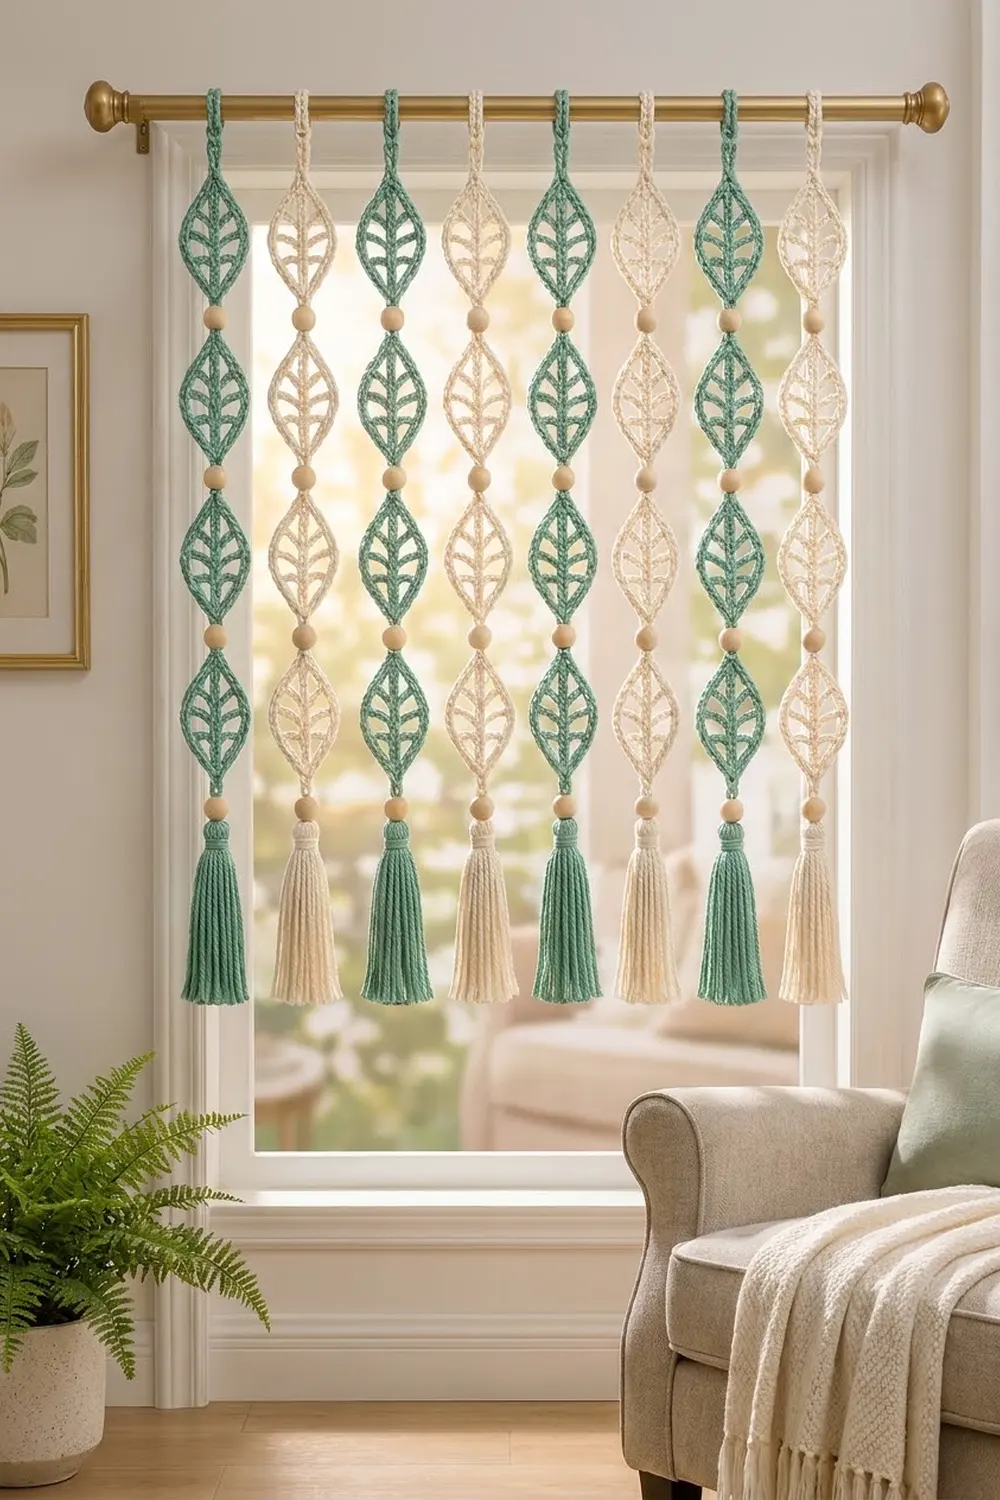
The Willow Vein Leaf Curtain is a light, airy window hanging made from openwork crochet leaves. Each leaf has a braided center spine, four pairs of angled veins and a smooth braided outline that comes to a point at the top and bottom. Small loops at both tips link the leaves into hanging strands. A natural wood bead sits between each pair of leaves, and a full tassel hangs at the bottom.
The curtain uses two colors, a soft sage teal and a warm cream. The strands alternate teal, cream, teal, cream across the rod, so the window gets a calm, striped rhythm of color. The style is boho and botanical. It works in a window, in a doorway or across an empty wall.
This pattern uses US crochet terms. Each leaf is 4.5 in (11.4 cm) long and 2.25 in (5.7 cm) wide. Including its loops, it is 6 in (15.2 cm) from tip to tip. Each finished strand is 30 in (76.2 cm) long. Eight strands hung 3 in (7.6 cm) apart cover about 23.25 in (59.1 cm) of rod.
The construction is simple. You crochet each leaf separately in three rounds: the spine, then the veins and outline, then a slip-stitch edging. Then you link four leaves with beaded chain connectors and finish each strand with a bead and a tassel.
Finished Size and Construction
- Leaf body: 4.5 in (11.4 cm) long x 2.25 in (5.7 cm) wide
- Leaf with loops: 6 in (15.2 cm) tip to tip
- Skill level: Easy to Intermediate
- Terminology: US crochet terms
- Yarn weight: Worsted (category 4) cotton
- Hook: 4.5 mm (US 7)
- Number of pieces: 32 leaves (16 teal, 16 cream), 32 beads, 8 tassels
- Layout: 8 strands of 4 leaves each, alternating teal and cream
- Piece size before edging: 4.5 in (11.4 cm) x 2.25 in (5.7 cm)
- Edging depth: under 0.1 in (0.3 cm). The edging thickens the outline but doesn’t make the leaf wider.
- Strand length: 30 in (76.2 cm), from the base of the hanging loop to the tassel tips
Materials
Choose a smooth, firmly twisted cotton or cotton blend in worsted weight. Cotton holds the open leaf shape and blocks crisply. Avoid fuzzy or very soft acrylic, because it lets the veins sag. The amounts below assume about 85 m per 50 g.
- Color A, sage teal: 80 g (about 136 m)
- Color B, cream: 80 g (about 136 m)
Each color covers 16 leaves, 16 bead connectors and 4 tassels. The amounts include a margin of about 25 percent for your test leaf and tassel trimming.
Tools and notions:
- 4.5 mm (US 7) crochet hook
- 32 natural wood beads, 12 mm, with a hole of at least 4 mm, plus a few spares
- Tapestry needle and a dental floss threader
- Sturdy card, 5.5 in (14.0 cm) tall, for the tassels
- Scissors, tape measure, rust-proof pins, blocking mat, spray bottle
- Curtain rod at least 32 in (81.3 cm) long
Abbreviations (US Terms)
- ch: chain
- sl st: slip stitch
- st(s): stitch(es)
- S1–S18: spine stitches, counted from the top of the leaf down
Special stitch – back-bump slip stitch: Turn the chain so its back faces you. Insert the hook under the single bump on the back of the chain, yarn over, and pull through both the bump and the loop on the hook. This leaves the front “V” of the chain untouched. A row of these stitches sits on top of the chain and gives the spine, veins and outline their braided look.
Gauge and Checkpoints
Gauge: 8 ch = 2 in (5.1 cm) with a 4.5 mm hook, measured relaxed and unstretched.
Before anything else, make one complete teal leaf and use it as your swatch. Check it at each stage:
- After Round 1: the 18-ch spine measures 4.5 in (11.4 cm) from the base of the top loop to the base of the bottom loop.
- After Round 2: the leaf lies flat and measures 2.25 in (5.7 cm) at its widest point, across the second and third vein pairs.
- After Round 3: the outline is smooth, and the leaf measures 6 in (15.2 cm) tip to tip, including both loops.
If your leaf is too big, switch to a 4 mm hook. If it is too small, switch to a 5 mm hook. If the length is right but the width is off, your outline chains are tighter or looser than your spine. Chain the outline at the same relaxed tension as the spine. A leaf that cups has an outline that is too tight. A leaf that ruffles has an outline that is too loose.
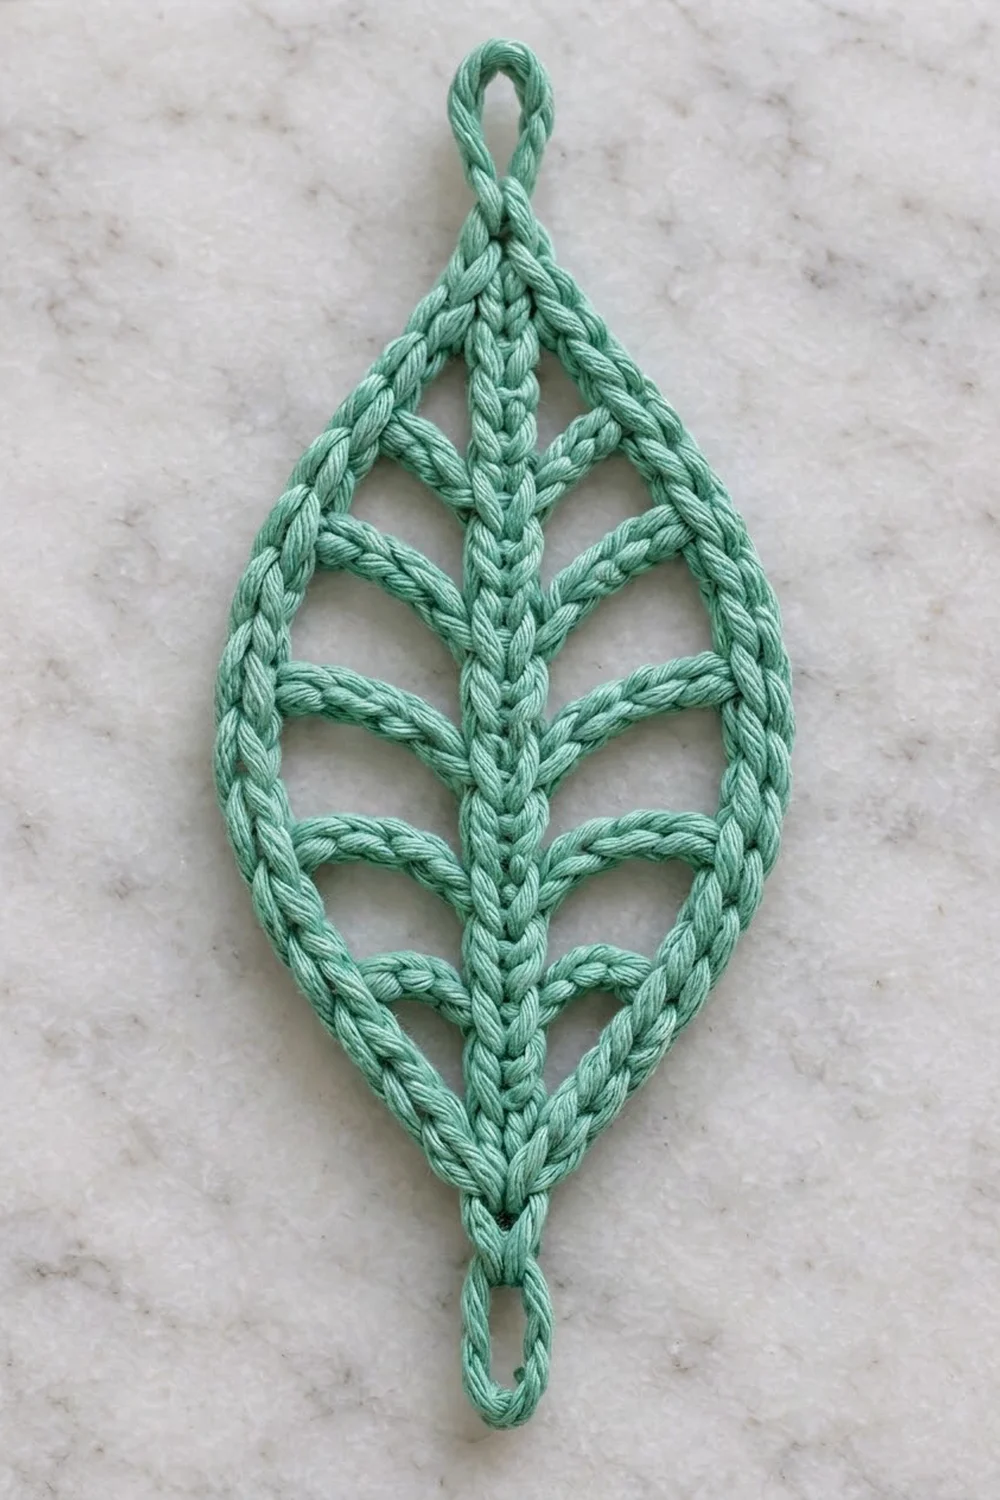
Leaf Pattern (Make 32)
Work each leaf in one continuous piece, without fastening off between rounds.
Round 1: Top Loop, Spine and Bottom Loop
Ch 7, then sl st in the first ch to form a ring. This is the top loop (7 ch).
Ch 18. These are the spine chains, S1 to S18, counted from the top loop down.
Ch 6, then sl st in S18 (the last spine ch). This forms the bottom loop (6 ch).
Work back up the spine: back-bump sl st in each of S17 through S1 (17 sts), then sl st into the base of the top loop (1 st). Spine total: 18 sl st.
Don’t fasten off. You are now at the top junction, where the top loop meets the spine.
Round 2: Outline and Veins
In this round you chain the outline down the left side and back up the right side. At four points on each side, you stop and make a vein: chain inward to the spine, attach it, then slip-stitch back out along the vein. Then you carry on with the outline.
Vein method (ch X to S#): Ch X. Sl st into the spine at the named stitch, inserting the hook under the front loops of that stitch on the side you are working. Then back-bump sl st in each of the X vein ch back out to the outline. A vein of X ch uses X ch + 1 sl st + X sl st.
Left side (working down):
- Ch 5.
- Vein: ch 4 to S6.
- Ch 4.
- Vein: ch 5 to S9.
- Ch 4.
- Vein: ch 5 to S12.
- Ch 4.
- Vein: ch 4 to S15.
- Ch 5, then sl st into the bottom junction, where S18 meets the bottom loop.
Left side count: outline 5 + 4 + 4 + 4 + 5 = 22 ch; veins 4 + 5 + 5 + 4 = 18 ch; 18 return sl st; 4 spine sl st.
Right side (working up):
- Ch 5.
- Vein: ch 4 to S15.
- Ch 4.
- Vein: ch 5 to S12.
- Ch 4.
- Vein: ch 5 to S9.
- Ch 4.
- Vein: ch 4 to S6.
- Ch 5, then sl st into the top junction.
Right side count: the same as the left side, mirrored: 22 outline ch, 18 vein ch, 18 return sl st, 4 spine sl st.
Each vein tip sits partway along the curved outline, and its root sits lower on the spine. As a result, every vein angles upward toward the edge, like the veins of a real leaf. The two veins attached to the same spine stitch form a matching “V.”
Checkpoint: pin the leaf flat. It should measure 4.5 in (11.4 cm) long and 2.25 in (5.7 cm) wide.
Round 3: Slip-Stitch Edging (the Leaf Border)
This round is the leaf’s border. It covers both loops and the whole outline with back-bump slip stitches, so the edge gets the same braided texture as the spine.
Border gauge: 4 sl st per inch (2.5 cm). Work one sl st per chain, with no increases or skips.
Start at the top junction:
- Top loop: sl st in each of the 7 ch around the loop. 7 sts.
- Left outline: working down, back-bump sl st in each of the 22 left outline ch. Pass over the vein junctions without adding stitches. 22 sts.
- Bottom loop: sl st in each of the 6 ch around the loop. 6 sts.
- Right outline: working up, back-bump sl st in each of the 22 right outline ch. 22 sts.
- Sl st into the top junction to close.
Round 3 total: 7 + 22 + 6 + 22 = 57 sl st.
Fasten off, leaving a 4 in (10.2 cm) tail. Weave both tails in along the spine.
Why the math works: at gauge, each 22-ch side of the outline is 5.5 in (14.0 cm) long. That matches the curved edge of a pointed leaf 4.5 in by 2.25 in (11.4 cm by 5.7 cm). Working exactly one stitch into each existing chain adds no length, so the leaf keeps its shape and doesn’t cup or ruffle. The loops are also covered at one stitch per chain, so they stay round and firm instead of stretching.
Top Leaf Variation (Make 8)
The first leaf of each strand needs a bigger hanging loop to fit over the rod. For these 8 leaves (4 teal, 4 cream), start with ch 14 instead of ch 7 for the top loop. Everything else stays the same. In Round 3, the top loop takes 14 sl st, so the Round 3 total is 14 + 22 + 6 + 22 = 64 sl st. This loop fits rods up to 1 in (2.5 cm) thick.
Make All Pieces
- Color A, teal: 4 top leaves (14-ch loop) + 12 standard leaves (7-ch loop) = 16 leaves
- Color B, cream: 4 top leaves + 12 standard leaves = 16 leaves
- Tassels: 4 teal, 4 cream
- Beads: 32 (4 per strand)
Layout grid (strands run left to right, leaves top to bottom; T = top leaf):
Strand:   1    2    3    4    5    6    7    8
Leaf 1:   A-T  B-T  A-T  B-T  A-T  B-T  A-T  B-T
Bead:     o    o    o    o    o    o    o    o
Leaf 2:   A    B    A    B    A    B    A    B
Bead:     o    o    o    o    o    o    o    o
Leaf 3:   A    B    A    B    A    B    A    B
Bead:     o    o    o    o    o    o    o    o
Leaf 4:   A    B    A    B    A    B    A    B
Bead:     o    o    o    o    o    o    o    o
Tassel:   A    B    A    B    A    B    A    B
Block all the leaves (see Final Blocking) before joining. Flat leaves are much easier to link evenly.
Joining
Join each leaf’s bottom loop to the next leaf’s top loop with a short beaded chain connector in the strand’s color. Each connector adds 0.5 in (1.3 cm) between the two loops.
Connector:
- Cut a 12 in (30.5 cm) length of yarn. Use the threader to string one bead onto it, and slide the bead to the middle.
- Make a slip knot near one end. Sl st around the whole bottom loop of the upper leaf.
- Ch 1. Slide the bead up against the hook, then ch 1 so the bead is locked into that chain.
- Ch 1, then sl st around the top loop of the lower leaf.
- Fasten off and weave both tails back into the connector chains.
Stitch logic: the connector attaches around each loop and never goes through the leaf body. That way the leaves hang straight and the bead stays centered on the spine line. Join leaf 1 to leaf 2, leaf 2 to leaf 3, and leaf 3 to leaf 4, for three connectors per strand.
Bottom bead: add one more connector below leaf 4, but stop after step 3. Ch 1, fasten off, and leave a 6 in (15.2 cm) tail to attach the tassel.
Tension: keep the connector chains firm. Loose chains let the bead slide and the leaves twist. Make every connector the same length so all eight strands line up evenly.
Tassels (Make 8)
- Wrap yarn 20 times around the 5.5 in (14.0 cm) card.
- Slip a 6 in (15.2 cm) piece of yarn under the wraps at the top of the card and tie it tightly. Cut through the wraps at the bottom.
- Thread the bottom-bead tail through the tied top, knot it securely, and hide the ends inside the tassel.
- Wrap a separate piece of yarn tightly 6 times around the tassel, 0.75 in (1.9 cm) below the top. Knot it and bury the ends.
- Trim the tassel to 4.75 in (12.1 cm) from the top fold to the tips.
Size checkpoint: each strand should measure 30 in (76.2 cm). That breaks down as:
- Top leaf body and bottom loop: 5.25 in (13.3 cm)
- 3 standard leaves at 6 in (15.2 cm) each: 18 in (45.7 cm)
- 3 connectors at 0.5 in (1.3 cm) each: 1.5 in (3.8 cm)
- Bottom bead connector: 0.5 in (1.3 cm)
- Tassel: 4.75 in (12.1 cm)
Final Blocking
- Mist each finished strand with cool water until it is damp but not dripping.
- Lay the strand flat on a blocking mat.
- Pin each leaf at the top tip, the bottom tip and both widest points. Check that it measures 4.5 in (11.4 cm) by 2.25 in (5.7 cm).
- Nudge each vein into a straight line angled upward. Pin the middle of any vein that bows.
- Straighten the connectors so each bead sits centered on the spine line.
- Comb the tassel strands straight with your fingers and mist them lightly.
- Let everything dry completely, for at least 8 hours, before unpinning.
- Slide the hanging loops onto the rod. Space the strands 3 in (7.6 cm) apart, center to center.
Final Quality-Control Checklist
- Every leaf body measures 4.5 in (11.4 cm) by 2.25 in (5.7 cm).
- Standard leaves have 57 border sl st, and top leaves have 64.
- Each leaf has 4 vein pairs, all angled upward and meeting the spine at S6, S9, S12 and S15.
- The spine looks braided from top to bottom.
- All beads sit centered and don’t slide.
- Every strand is 30 in (76.2 cm) long, and all strands hang level.
- All tassels are trimmed evenly to 4.75 in (12.1 cm).
- All tails are woven in and can’t be seen from either side.
Troubleshooting
- Leaf cups or curls: the outline chains are too tight. Rework Round 2 with looser chains.
- Outline ruffles: the outline chains are too loose. Use a smaller hook for Round 2 only.
- Veins sag: the return slip stitches are loose. Work them snugly, or switch to a firmer cotton.
- Veins angle downward: a vein is attached to the wrong spine stitch. Count from the top and check S6, S9, S12 and S15.
- Leaf twists on the strand: the connector is off-center. Rework it around the full loop.
- Strands hang at different lengths: redo any connector that isn’t 0.5 in (1.3 cm) long.
- Bead won’t thread: use a dental floss threader, or choose beads with a larger hole.
Care
Hand wash in cool water with mild soap, press out the water in a towel, and dry flat, re-blocking the leaves as needed. Keep the curtain out of strong direct sun so the teal stays bright.
Final Notes
The measurement chain is short:
- Gauge is 8 ch = 2 in (5.1 cm), so the 18-ch spine gives a 4.5 in (11.4 cm) leaf.
- The 22-ch outlines give a width of 2.25 in (5.7 cm), and the 57-stitch border keeps that size exactly.
- Four leaves, four beads and a tassel make a 30 in (76.2 cm) strand.
- Eight strands spaced 3 in (7.6 cm) apart fill 23.25 in (59.1 cm) of rod.
Check your first leaf carefully, and the rest of the curtain will fall into place.
Happy crocheting!