

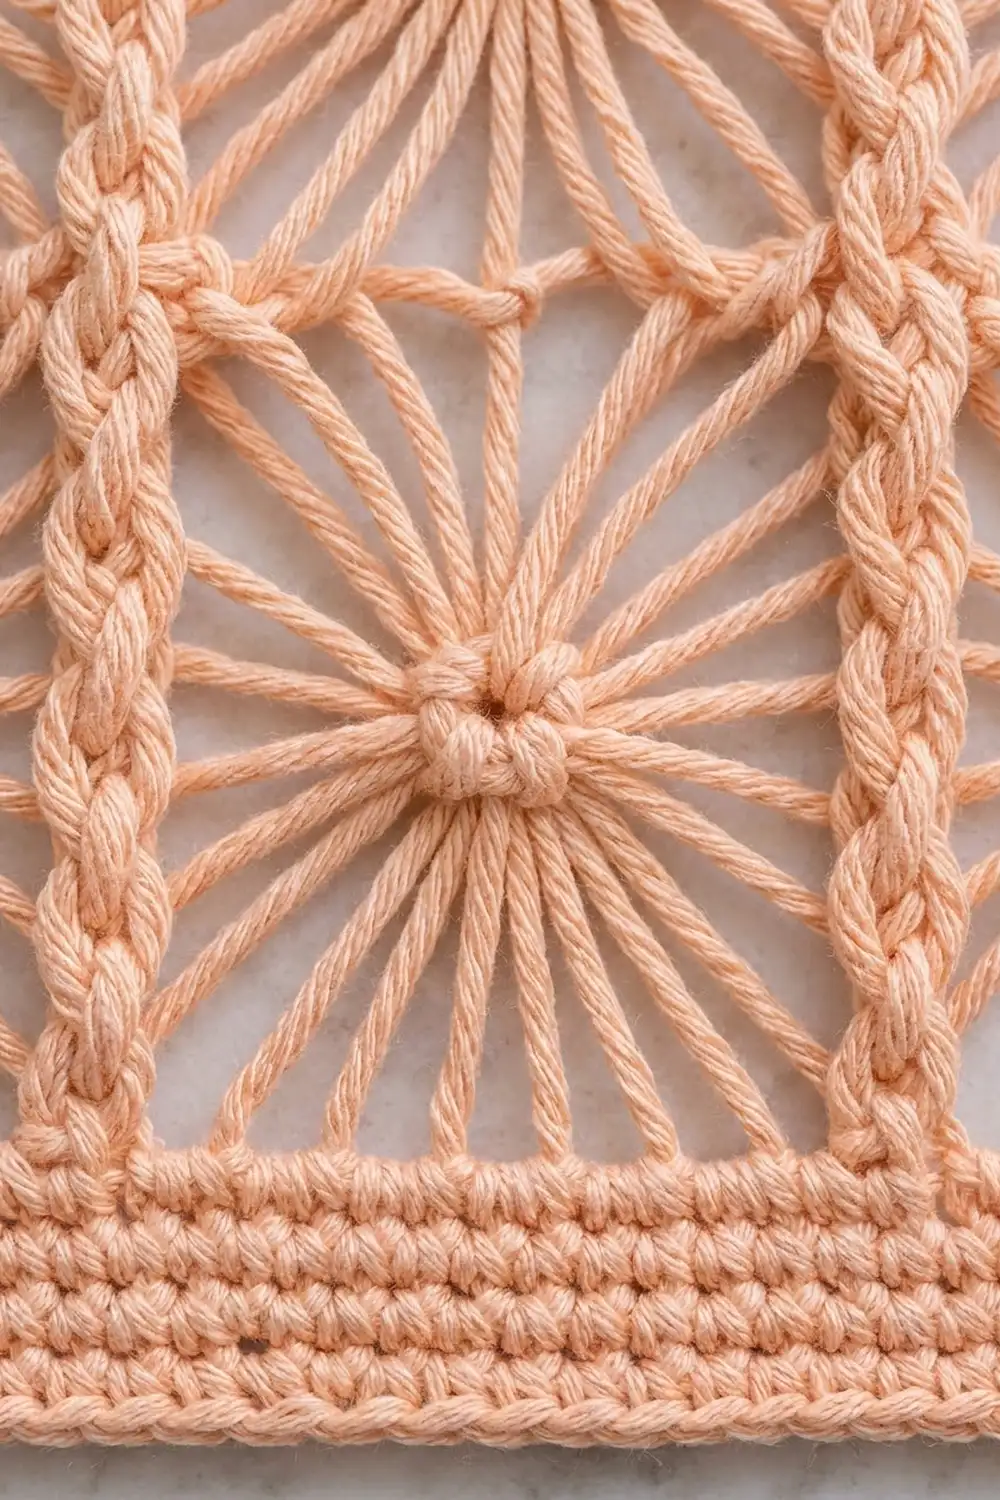
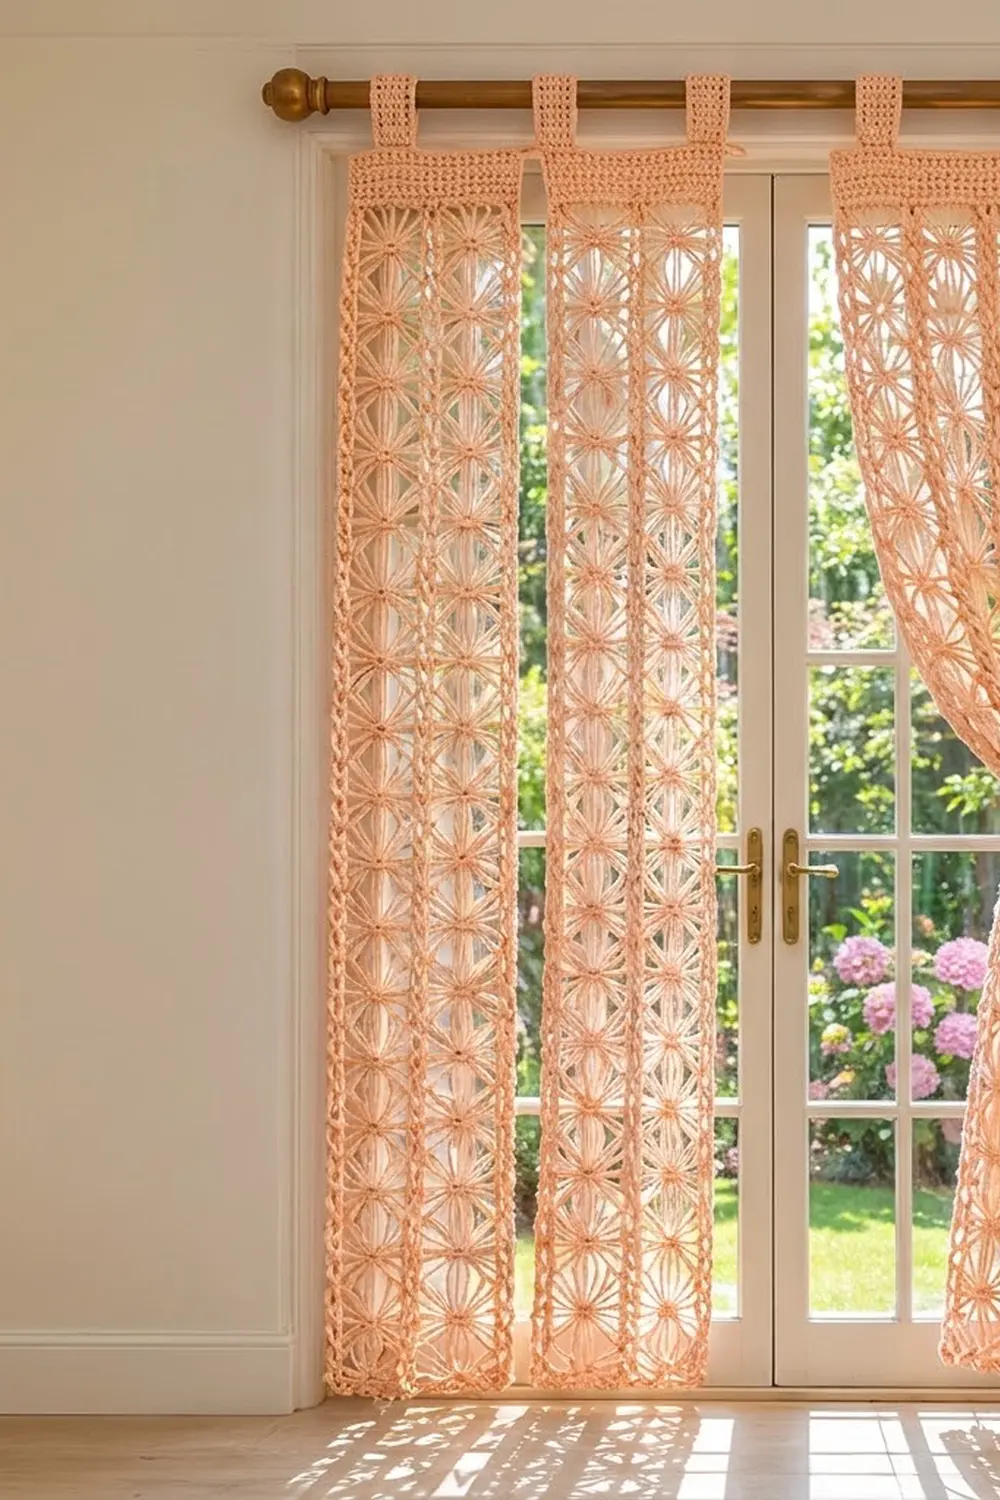
The Peach Sunburst Lace Curtain is a set of four long, narrow panels that hang side by side from a curtain rod. Each panel is a column of open starburst motifs: thin spokes rise from a solid band, gather at a small knotted center, then spread out again to the next band. A braided ridge runs down the middle and around the outer edges, and a solid header with one tab sits at the top.
The sample uses a single soft peach DK cotton. Light comes through the starbursts and casts patterned shadows on the floor, while the solid header and braided edges keep each panel straight and tidy. The look is boho, but the construction is neat and easy to repeat.
This pattern uses US crochet terms. Each finished panel measures 5 1/2 in (14.0 cm) wide and 63 1/4 in (160.7 cm) long, not counting the tab loop.
You make each panel from two starburst strips. You edge each strip with one round of single crochet, then join the two strips with a slip-stitch seam that forms the center braid. Next you work a solid header across the top and finish with a border round and a reverse single crochet round. Last, you sew on a separate tab. Make four panels for the full curtain.
Finished Size and Construction
- Finished panel size: 5 1/2 in x 63 1/4 in (14.0 cm x 160.7 cm), tab not included
- Skill level: Intermediate
- Terminology: US crochet terms
- Yarn weight: DK (#3 light)
- Hook: 4.0 mm (US G-6)
- Number of pieces: 8 starburst strips + 4 tabs, assembled into 4 panels
- Layout: each panel is 2 strips side by side; the 4 panels hang separately on one rod
- Strip size (after edging round): 2 1/2 in x 60 3/4 in (6.4 cm x 154.3 cm)
- Panel size before border: 5 in x 62 3/4 in (12.7 cm x 159.4 cm), header included
- Border depth: 1/4 in (0.6 cm) on every side
Materials
Yarn: Use a smooth DK cotton or cotton blend with good stitch definition. Mercerized cotton shows off the spokes well. Avoid fuzzy yarns, because they blur the starburst centers.
- Peach (single color): 600 g, about 1,440 m (1,575 yd). That’s about 150 g (360 m) per panel.
These quantities include a margin of about 15%. The long dtr legs use more yarn than you might expect, so buy all skeins from one dye lot.
Tools:
- 4.0 mm (US G-6) crochet hook
- Tapestry needle
- Stitch markers (at least 4)
- Measuring tape
- Blocking mats and rustproof pins
- Spray bottle
- Scissors
Abbreviations (US Terms)
- ch – chain
- sc – single crochet
- dtr – double treble crochet
- sl st – slip stitch
- rev sc – reverse single crochet (crab stitch)
- st(s) – stitch(es)
- yo – yarn over
Special stitch – 9-dtr cluster (9-dtr cl): *Yo 3 times, insert hook in next st, yo and pull up a loop (5 loops on hook), [yo, pull through 2 loops] 3 times (1 new loop stays on hook); repeat from * 8 more times (10 loops on hook), yo and pull through all 10 loops. The nine legs meet at one point, which becomes the center of the starburst.
Eye: The ch 1 worked tightly right after the cluster. It closes the cluster and forms the knotted center.
Gauge and Checkpoints
Gauge: 18 sc and 20 sc rows = 4 in (10.2 cm). One starburst repeat (Rows 2–4) = 3 in (7.6 cm) tall after blocking.
Make one full strip before you start the others. Dtr stitches change length with tension, and small errors add up over 20 repeats.
Checkpoints:
- After Row 1: 9 sc = 2 in (5.1 cm) wide.
- After the first repeat (Row 4): about 3 1/4 in (8.3 cm) tall, including the foundation row.
- After 5 repeats: about 15 in (38.1 cm) above the foundation row.
- After 10 repeats: about 30 in (76.2 cm) above the foundation row.
- After Row 61 (20 repeats): 60 1/4 in (153.0 cm).
- After strip edging: 2 1/2 in x 60 3/4 in (6.4 cm x 154.3 cm).
If your piece is too big: go down one hook size (3.75 mm), or wrap the dtr more firmly.
If your piece is too small: go up one hook size (4.5 mm), and pull up the first loop of each dtr a little longer.
Lightly mist and pin your test strip before you measure. Starburst lace relaxes and lengthens a little once blocked.
Starburst Strip (Make 8)
The strip is worked in rows from the bottom up. Each repeat has three rows: a solid sc band, a cluster row whose legs gather at the center, and a fan row that spreads back out.
Row 1 (foundation): Ch 10, sc in 2nd ch from hook and in each ch across, turn. (9 sc)
Row 2 (cluster row): Ch 4 (does not count as a st), 9-dtr cl over all 9 sts, ch 1 tightly to form the eye. Do not turn. (1 cluster + 1 eye)
The ch-4 stands at the side as an edge post. Pull the eye snug so the center looks like a small knot.
Row 3 (fan row): Ch 4 (counts as first dtr), 8 dtr in the eye, turn. (9 dtr)
Spread the dtr evenly so the fan opens to the full 2 in (5.1 cm) width at the top.
Row 4 (sc band): Ch 1, sc in each dtr across, working the last sc in the top of the ch-4, turn. (9 sc)
Rows 5–61: Repeat Rows 2–4 nineteen more times, for 20 starbursts in total. Row 61 is an sc band. (9 sc)
Do not fasten off. The strip measures 2 in x 60 1/4 in (5.1 cm x 153.0 cm).
Strip Edging Round
This round frames the open sides so the lace stays straight and has stitches to join into.
Rnd 1: Ch 1. Work 3 sc in the first st of Row 61, sc in the next 7 sts, 3 sc in the last st. Along the long side, work 6 sc evenly over the side of each cluster row and each fan row, plus 1 sc in the end of each sc band (Rows 58 down to 4). Along the foundation chain, work 3 sc in the first st, sc in the next 7 sts, 3 sc in the last st. Work the second long side the same way. Join with a sl st to the first sc. (544 sc)
Count per side. The middle sc of each 3-sc group is the corner st, and it counts toward both sides it touches.
- Short sides (top and bottom): corner + 1 + 7 + 1 + corner = 11 sts
- Long sides: corner + 1 + 259 + 1 + corner = 263 sts. The 259 come from 20 cluster rows x 6 + 20 fan rows x 6 + 19 sc bands x 1.
- Check: 2 x 11 + 2 x 263 − 4 shared corners = 544.
Fasten off and weave in ends. The strip measures 2 1/2 in x 60 3/4 in (6.4 cm x 154.3 cm).
Tab (Make 4)
Row 1: Ch 7, sc in 2nd ch from hook and in each ch across, turn. (6 sc)
Rows 2–30: Ch 1, sc in each st across, turn. (6 sc)
Fasten off, leaving a 12 in (30.5 cm) tail for sewing. The tab measures 1 1/3 in x 6 in (3.4 cm x 15.2 cm).
Make All Pieces
All pieces use Peach.
- Starburst strips: 8 (2 per panel)
- Tabs: 4 (1 per panel)
Layout (as hung, front view):
   [T]          [T]          [T]          [T]
[ S | S ]    [ S | S ]    [ S | S ]    [ S | S ]
 Panel 1      Panel 2      Panel 3      Panel 4
S = strip, | = braided join seam, T = tab. The panels hang separately and aren’t joined to each other.
Joining
Each panel joins two strips along one long side with a slip-stitch seam worked from the right side.
Method: Lay two strips side by side, right sides up, with the bottom edges level. Starting at the bottom corners, insert the hook through the outer loop of the left strip’s edge st and the outer loop of the matching st on the right strip, then sl st. Continue up the side with 1 sl st per pair of sts.
Stitch-to-stitch logic: Each long side has 263 sts, corner to corner. Join stitch 1 to stitch 1 and stitch 263 to stitch 263. (263 sl sts) You don’t add or skip any stitches, so the seam adds no width. The sl st chain sits on top of the seam as a raised braid that matches the outer edges.
Tension: Keep the sl sts as loose as the edging sc. A tight seam will pucker the strips and shorten the center. Place a marker every 50 sts on both strips to keep the edges lined up.
Size checkpoint: Two joined strips measure 5 in x 60 3/4 in (12.7 cm x 154.3 cm).
Header Band
Row 1: With the right side facing, join yarn in the top right corner. Ch 1, sc in each of the 11 top sts of the first strip and each of the 11 top sts of the second strip, turn. (22 sc)
Work into each joined corner st only once, and don’t add a stitch over the seam.
Rows 2–10: Ch 1, sc in each st across, turn. (22 sc)
Don’t fasten off. The header measures 5 in x 2 in (12.7 cm x 5.1 cm), and the panel now measures 5 in x 62 3/4 in (12.7 cm x 159.4 cm).
Border
Border gauge: same as the main gauge, 18 sc = 4 in (10.2 cm). Each border round adds about 1/8 in (0.3 cm) per side, for 1/4 in (0.6 cm) in total.
Rnd 1: Ch 1. Along the top (Row 10), work 3 sc in the first st, sc in the next 20 sts, 3 sc in the last st. Going down the long side, work 1 sc in the end of each of header Rows 9–1 (9 sc). Then work 1 sc in each strip edge st from the top corner st down to the st before the bottom corner (262 sc). Work 3 sc in the bottom corner st. Along the bottom, sc in the next 20 sts, then 3 sc in the last st. Work up the second long side to match (262 + 9 sc). Join with a sl st to the first sc. (594 sc)
Count per side (corner sts counted in both sides):
- Top: corner + 1 + 20 + 1 + corner = 24 sts
- Bottom: corner + 1 + 20 + 1 + corner = 24 sts
- Long sides: corner + 1 + 9 + 262 + 1 + corner = 275 sts
- Check: 2 x 24 + 2 x 275 − 4 = 594.
Rnd 2: Ch 1, rev sc in each st around. Join with a sl st to the first st. (594 rev sc)
Fasten off and weave in ends.
Why the math works: The top and bottom each start from 22 panel sts (2 strips x 11 sts, with no seam sts added). The two corner groups add 2 more, for 24. Each long side uses 9 header row ends plus 262 of the strip’s 263 edge sts. The strip’s top corner st was already used by header Row 1, so it isn’t counted twice. The 3-sc corners add the rest. About 1 sc per sc row and 6 sc per tall row keeps the edges flat without ruffling.
Attach the Tab
Center the tab on the header, leaving about 2 in (5.1 cm) of header on each side. Sew the bottom 1 in (2.5 cm) of the tab to the front of the header. Fold the tab to the back around a rod up to 1 1/4 in (3.2 cm) across, then sew its other end 1 in (2.5 cm) down onto the back of the header.
Final Blocking
- Weave in all ends along the sc bands or edges, never through the open spokes.
- Soak each panel in cool water for 15 minutes, then gently press out the water. Don’t wring it.
- Roll the panel in a towel to remove extra moisture.
- Lay it flat on blocking mats and pin the corners to 5 1/2 in x 63 1/4 in (14.0 cm x 160.7 cm).
- Pin along both long edges every 3 in (7.6 cm), at each sc band.
- With your fingers, fan out the spokes of each starburst evenly and center each eye.
- Let it dry completely before you unpin, usually about 24 hours.
- Block all four panels to the same measurements so the bottom edges line up on the rod.
Final Quality-Control Checklist
- Each strip has 20 starbursts and ends with a 9-sc band.
- Each strip edging round counts 544 sc (11 / 263 / 11 / 263 per side).
- The center seam has 263 sl sts and lies flat without puckering.
- The header has 10 rows of 22 sc.
- Border Rnd 1 counts 594 sc (24 / 275 / 24 / 275 per side).
- Every panel measures 5 1/2 in x 63 1/4 in (14.0 cm x 160.7 cm).
- The tabs are centered, sewn firmly, and slide easily on the rod.
- All four panels hang to the same length.
Troubleshooting
Starburst centers have holes: Pull the eye ch tighter, and work all 8 fan dtr into the eye, not into the cluster top.
Fans don’t reach the full width: Your dtr are too short. Pull up the first loop a little longer.
Strip edges wave: You have too many sc along the tall rows. Use exactly 6 per cluster or fan row.
Strip edges pull in: You have too few edge sc, or your tension is too tight. Recount, or go up one hook size for the edging only.
Seam puckers: Rework it with looser sl sts, or use a hook one size larger for the join.
Panels differ in length: Compare your counts at each 5-repeat checkpoint, and block every panel to the same pinned measurements.
Care
Hand wash in cool water with a mild detergent and dry flat, reshaping the starbursts while they’re damp. Don’t hang wet panels, because the weight will stretch the lace.
Final Notes
Here’s the measurement chain:
- One repeat is 3 in (7.6 cm).
- Twenty repeats plus the foundation row make a 60 1/4 in (153.0 cm) strip.
- The edging round brings the strip to 2 1/2 in x 60 3/4 in (6.4 cm x 154.3 cm).
- Two strips plus the header make a 5 in x 62 3/4 in (12.7 cm x 159.4 cm) panel.
- The border brings the panel to 5 1/2 in x 63 1/4 in (14.0 cm x 160.7 cm).
Check each stage before moving on, and all four panels will match and hang straight. To change the length, add or remove starburst repeats 3 in (7.6 cm) at a time. Each repeat changes the strip’s long-side count by 13 sts.
Happy crocheting!