

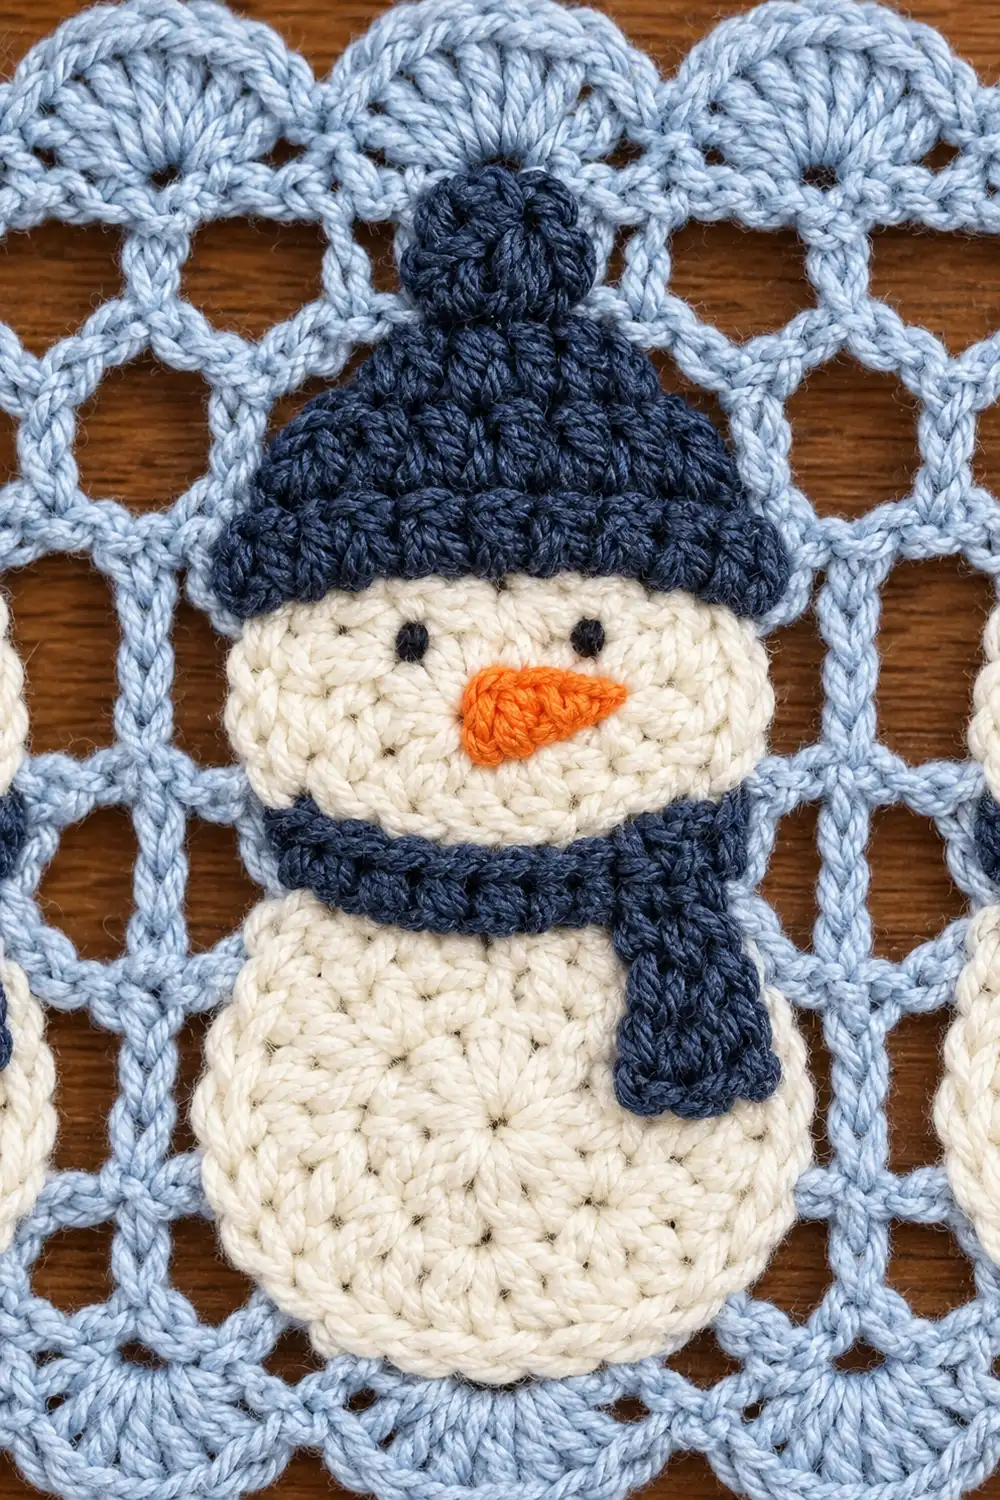
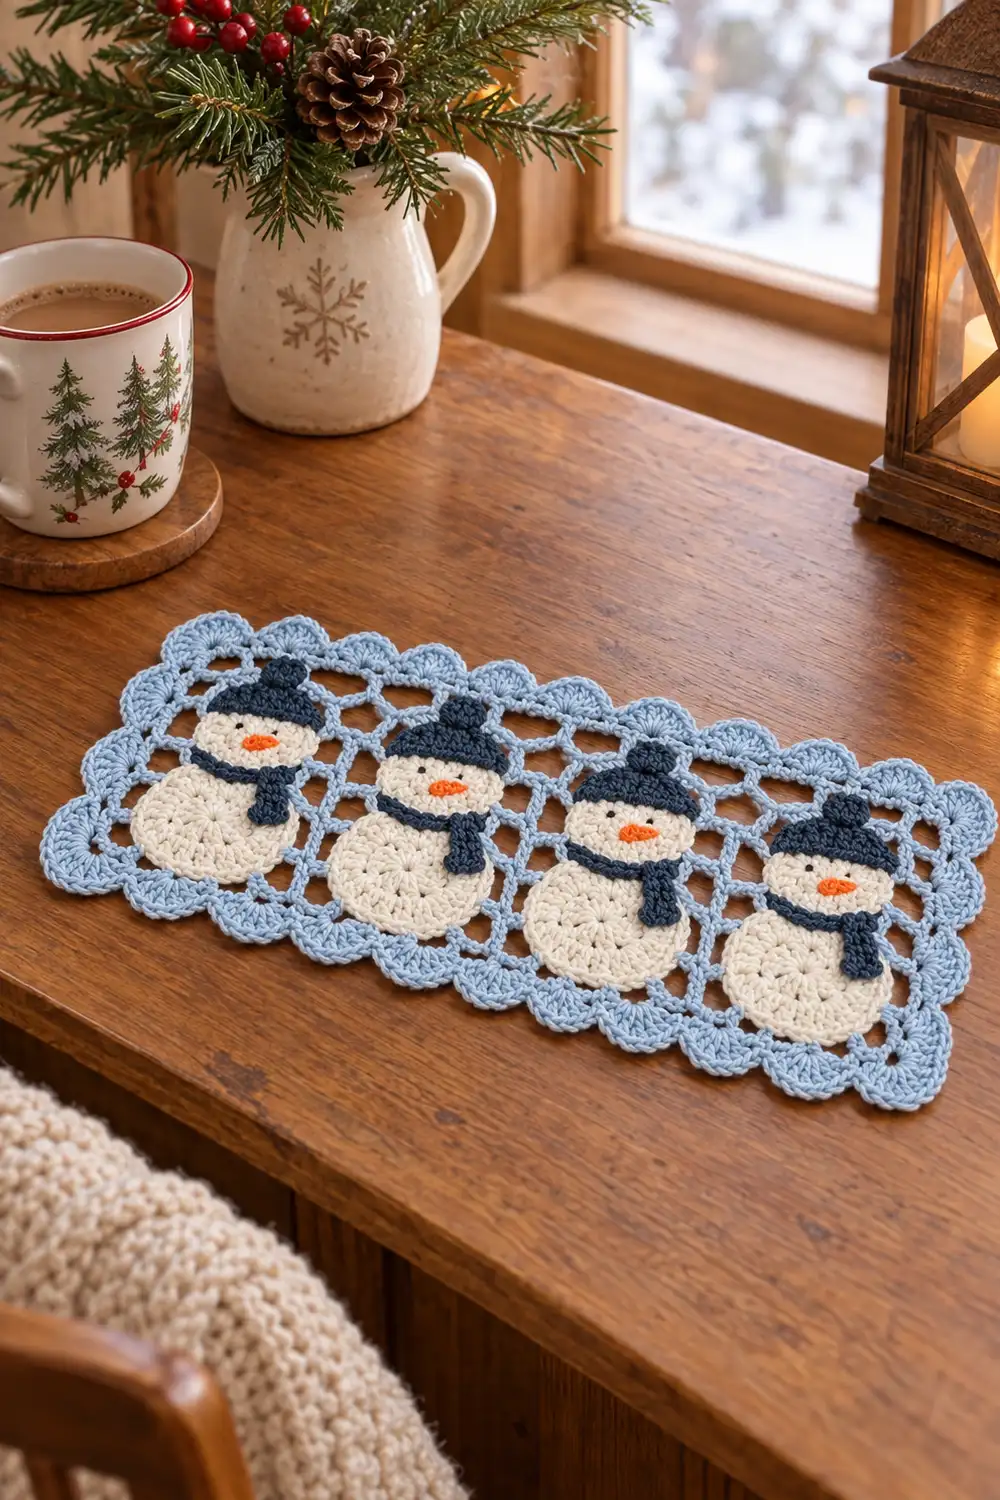
This cheerful winter strip features four identical snowmen standing in a row on a light blue lace mesh. A scalloped shell edging frames all four sides. Each snowman has a cream body made of two stacked circles, an orange carrot nose, a navy knit-look hat with a small pom-pom, and a navy scarf.
The colors are soft and classic: cream, navy, orange, and a pale icy blue. The light blue chain mesh shows between the snowmen and links them into one piece. The scalloped trim gives the strip a delicate, doily-like finish.
This pattern uses US crochet terms. The finished strip measures 11.5 in x 4.5 in (29.2 cm x 11.4 cm).
You start with a filet-style mesh rectangle, then add one shell border in two rounds. The small snowman motifs are crocheted separately and stitched onto the mesh as appliqués. The result is one flat, finished strip.
Finished Size and Construction
- Finished size: 11.5 in x 4.5 in (29.2 cm x 11.4 cm)
- Skill level: Easy-Intermediate
- Terminology: US crochet terms
- Yarn weight: Sport weight (#2) cotton
- Hook: 3.5 mm (E-4)
- Number of pieces: 1 finished strip (one mesh base with 4 snowman appliqués stitched on)
- Layout: 4 snowmen in a single horizontal row
- Snowman size: 1.75 in (4.4 cm) wide x 3.5 in (8.9 cm) tall, including the pom-pom
- Size before border: 10.5 in x 3.5 in (26.7 cm x 8.9 cm)
- Border depth: 0.5 in (1.3 cm) on each side
Materials
Choose a smooth, mercerized sport-weight cotton for crisp stitch definition. The quantities below assume about 155 m per 50 g (3.1 m per g).
- Light blue (mesh and border): 25 g, about 78 m
- Cream (snowman bodies): 15 g, about 47 m
- Navy (hats and scarves): 8 g, about 25 m
- Orange (noses): 2 g, about 6 m
- Black embroidery floss (eyes): about 1 m
All quantities include a margin for swatching and tails.
Tools:
- 3.5 mm (E-4) crochet hook
- Tapestry needle
- Sewing pins
- Stitch markers
- Ruler or tape measure
- Blocking mat and spray bottle
- Scissors
Abbreviations (US Terms)
- ch – chain
- sl st – slip stitch
- sc – single crochet
- hdc – half double crochet
- dc – double crochet
- sc2tog – single crochet 2 together
- blo – back loop only
- MR – magic ring
- sk – skip
- sp – space
- st(s) – stitch(es)
- rnd – round
Special stitches:
- Shell: 5 dc in the same stitch.
- Corner shell: 7 dc in the same stitch.
Gauge and Checkpoints
Mesh gauge: 2 mesh squares = 1 in (2.5 cm) wide, and 2 rows = 1 in (2.5 cm) tall. Each square is 0.5 in (1.3 cm) on every side.
Sc gauge (border): 6 sc = 1 in (2.5 cm).
Test first. Before starting the strip, make a mesh swatch. Ch 29 and work 8 squares across for 8 rows. It should measure 4 in x 4 in (10.2 cm x 10.2 cm). Also make one bottom snowman circle. It should measure 1.75 in (4.4 cm) across.
Checkpoints:
- Mesh after Row 1: 10.5 in (26.7 cm) wide
- Mesh after Row 7: 10.5 in x 3.5 in (26.7 cm x 8.9 cm)
- After Border Rnd 1: about 10.75 in x 3.75 in (27.3 cm x 9.5 cm)
- After Border Rnd 2: 11.5 in x 4.5 in (29.2 cm x 11.4 cm)
- Body circle Rnd 1: 0.75 in (1.9 cm); Rnd 3: 1.75 in (4.4 cm)
- Head circle Rnd 2: 1.25 in (3.2 cm)
If your piece is too big, go down 0.5 mm in hook size. If it is too small, go up 0.5 mm. Recheck at the next checkpoint before continuing.
Mesh Base
Use light blue throughout.
Foundation: Ch 68.
Row 1: Dc in 8th ch from hook. The 7 skipped ch count as a dc, ch 2, and 2 skipped foundation ch. *Ch 2, sk 2 ch, dc in next ch; repeat from * across. You now have 22 dc (including the turning column) and 21 ch-2 sps.
Rows 2–7: Ch 5 (counts as dc + ch 2) and turn. Dc in next dc. *Ch 2, dc in next dc; repeat from * across. Work the last dc into the 3rd ch of the turning chain. On Row 2, this is the 3rd of the 7 skipped beginning chains, counted from the first dc.
Each row has 22 dc and 21 ch-2 sps. Do not fasten off.
Check: The mesh should measure 10.5 in x 3.5 in (26.7 cm x 8.9 cm). That is 21 squares x 0.5 in across and 7 rows x 0.5 in up.
Snowman Body (Make 4)
Use cream.
Bottom circle:
- Rnd 1: MR, ch 3 (counts as dc), 11 dc in ring. Join with sl st to top of ch-3. (12 dc)
- Rnd 2: Ch 3, dc in same st. 2 dc in each st around. Join. (24 dc)
- Rnd 3: Ch 3, 2 dc in next st. Dc in next st, 2 dc in next st; repeat from * around. Join. (36 dc)*
Fasten off and leave a 12 in (30.5 cm) tail. The circle measures 1.75 in (4.4 cm).
Head circle: Work Rnds 1–2 of the bottom circle. (24 dc) Fasten off and leave a 10 in (25.4 cm) tail. The circle measures 1.25 in (3.2 cm).
Assemble: Overlap the head over the top of the bottom circle by 0.25 in (0.6 cm). Whipstitch the two together through the back loops. The body is now 2.75 in (7.0 cm) tall.
Hat (Make 4)
Use navy. The hat is worked flat from the brim up.
- Row 1: Ch 10. Sc in 2nd ch from hook and in each ch across. (9 sc)
- Row 2: Ch 1, turn. Sc blo across. (9 sc)
- Row 3: Ch 1, turn. Sc blo across. (9 sc)
- Row 4: Ch 1, turn. Sc2tog, sc blo in next 5 sts, sc2tog. (7 sts)
- Row 5: Ch 1, turn. Sc2tog, sc blo in next 3 sts, sc2tog. (5 sts)
- Row 6: Ch 1, turn. Sc2tog, sc in next st, sc2tog. (3 sts)
Rounding edge: Ch 1. Work sc evenly down one side, across the top, and down the other side. Place 2 sc at each top corner to soften the curve into a dome. Fasten off.
The back-loop rows create the ridged, knit-like texture. The hat measures 1.5 in (3.8 cm) wide x 0.75 in (1.9 cm) tall.
Pom-pom: MR, 6 sc in ring, then pull the ring tight. Fasten off and leave a tail. The pom-pom measures about 0.25 in (0.6 cm). Sew it to the top center of the hat.
Scarf (Make 4)
Use navy.
Neck band:
- Row 1: Ch 13. Sc in 2nd ch from hook and across. (12 sc)
- Row 2: Ch 1, turn, sc across. (12 sc)
Fasten off. The band measures 2 in (5.1 cm) long.
Tail:
- Row 1: Ch 7. Sc in 2nd ch from hook and across. (6 sc)
- Row 2: Ch 1, turn, sc across. (6 sc)
Fasten off. The tail measures 1 in (2.5 cm) long.
Nose (Make 4)
Use orange. Ch 4. Sl st in 2nd ch from hook, sc in next ch, hdc in last ch. Fasten off.
The result is a small tapered triangle about 0.4 in (1.0 cm) long.
Finishing the Snowmen
- Lay the scarf band across the seam between the head and body. Wrap the ends slightly behind the edges and sew them down.
- Sew the tail to one end of the scarf band so it hangs down over the body.
- Sew the nose to the center of the head with the point facing sideways.
- Embroider two small eyes above the nose with black floss.
- Sew the hat brim over the top of the head, overlapping it by 0.25 in (0.6 cm).
Check: Each snowman is 1.75 in (4.4 cm) wide and 3.5 in (8.9 cm) tall, including the pom-pom.
Placing the Snowmen on the Mesh
Lay the mesh flat with Row 1 at the bottom. Number the dc columns 1 to 22 from left to right, counting the turning columns.
Center the snowmen on columns 4, 9, 14, and 19. These sit 1.5 in, 4 in, 6.5 in, and 9 in (3.8 cm, 10.2 cm, 16.5 cm, 22.9 cm) from the left edge. This leaves 1.5 in (3.8 cm) on each end and 2.5 in (6.4 cm) between snowman centers.
Line up each bottom circle with the lower edge of the mesh. The pom-pom should reach the top edge.
Pin all four snowmen and measure before sewing. Then whipstitch around the outline of each snowman, catching the mesh bars beneath it. Keep the stitches loose enough that the mesh does not pucker.
About 0.75 in (1.9 cm) of open chain mesh shows between neighboring snowmen. This creates the light blue chain gaps that separate them.
Border
Border gauge: The border uses the same sc gauge as the mesh, 6 sc per in. Each 0.5 in (1.3 cm) mesh square takes 3 sc, so the border lies flat without stretching or rippling.
Rnd 1 (sc conversion round)
Continue with light blue from the last dc of Row 7. You are at the top corner.
- Ch 1. Work 3 sc in the top of the last dc (corner).
- Down the short side, work 3 sc around each of the 7 row-end posts. (21 sc)
- At the bottom corner, work 3 sc into the foundation ch at the base of the corner dc.
- Along the bottom, work 3 sc in each of the 21 foundation ch-2 sps. (63 sc)
- At the next corner, work 3 sc.
- Up the second short side, work 3 sc around each row end. (21 sc)
- At the last corner, work 3 sc in the top of the Row 7 turning ch.
- Along the top, work 3 sc in each of the 21 ch-2 sps. (63 sc)
- Join with sl st to the first sc.
This round converts the mesh edge into a solid sc edge. It does not continue any growth pattern.
Count: 126 sc (3 in each of the 42 long-side sps) + 42 sc (3 in each of the 14 row ends) + 12 sc (3 at each of the 4 corners) = 180 sc.
Between corner centers, using the middle sc of each corner group:
- Long sides: 1 + 63 + 1 = 65 sts each
- Short sides: 1 + 21 + 1 = 23 sts each
- Check: 4 corner centers + 65 + 65 + 23 + 23 = 180
Rnd 2 (shells)
- Sl st into the next sc, which is the corner center.
- Ch 3 (counts as dc), then 6 dc in the same st to form the first corner shell.
- Short side: *Sk 2, sc in next, sk 2, shell in next; repeat from * 2 more times. Then sk 2, sc in next, sk 2.
- Work a corner shell in the corner center.
- Long side: *Sk 2, sc in next, sk 2, shell in next; repeat from * 9 more times. Then sk 2, sc in next, sk 2.
- Work a corner shell. Repeat the short side, then a corner shell, then the long side.
- Join with sl st to the top of the ch-3. Fasten off.
Why the math works: Each repeat (sk 2, sc, sk 2, shell) uses 6 sts. Each side then ends with sk 2, sc, sk 2, which uses 5 more. So the stitches between corners must equal 6k + 5.
- Long sides: 6 x 10 + 5 = 65 ✓
- Short sides: 6 x 3 + 5 = 23 ✓
Rnd 2 count:
- Long sides: 10 shells (50 dc) + 11 sc = 61 sts each
- Short sides: 3 shells (15 dc) + 4 sc = 19 sts each
- Corners: 4 corner shells = 28 dc
- Total: 61 + 61 + 19 + 19 + 28 = 188 sts
The border adds 0.5 in (1.3 cm) per side. The strip now measures 11.5 in x 4.5 in (29.2 cm x 11.4 cm).
Final Blocking
- Weave in all ends, running each tail behind its own color.
- Lay the strip face down on a blocking mat.
- Pin the four corners to 11.5 in x 4.5 in (29.2 cm x 11.4 cm).
- Pin the center of each shell along all four sides so the scallops fan out evenly.
- Check that the mesh squares sit straight and measure 0.5 in (1.3 cm).
- Spray lightly with water until damp but not soaked.
- Let it dry completely, at least 8 hours, before unpinning.
- Turn it right side up and smooth the snowmen flat with your fingers.
Final Quality-Control Checklist
- The strip measures 11.5 in x 4.5 in (29.2 cm x 11.4 cm).
- The mesh has 22 dc columns and 7 rows.
- Border Rnd 1 has 180 sc.
- Each long side has 10 shells; each short side has 3 shells; each corner has a 7-dc shell.
- All four snowmen are the same size and centered on columns 4, 9, 14, and 19.
- The hats, scarves, and noses face the same way on every snowman.
- The edges lie flat, with no ruffling or cupping.
- All ends are secure and hidden.
Troubleshooting
- Border ruffles: You may have added extra sc in Rnd 1. Recount to 180.
- Border cups or pulls in: Your sc tension is too tight. Redo Rnd 1 with a hook 0.5 mm larger.
- Shells don’t line up at the corners: Check that each side has 65 or 23 sts between corner centers.
- Circles curl into a bowl: You have too few stitches or too tight a tension. Check the Rnd 3 count of 36 dc.
- Circles ripple: Your tension is too loose. Go down 0.5 mm in hook size.
- Mesh puckers under a snowman: Your appliqué stitches are too tight. Loosen them and re-block.
- Mesh squares lean or slant: Re-block, pinning each row straight.
Care
Hand wash in cool water with mild soap. Press out the water gently in a towel, then reshape and dry flat.
Final Notes
The measurement chain is simple:
- 21 mesh squares x 0.5 in = 10.5 in (26.7 cm) wide, and 7 rows = 3.5 in (8.9 cm) tall.
- Rnd 1 converts the mesh edge into 180 sc at 6 sc per in.
- Rnd 2 adds 0.5 in (1.3 cm) of shells on every side.
- The finished strip measures 11.5 in x 4.5 in (29.2 cm x 11.4 cm).
Four 3.5 in (8.9 cm) snowmen, spaced 2.5 in (6.4 cm) apart, fill the mesh evenly.
Optional: for a longer strip, add 5 mesh squares and one snowman per extra 2.5 in (6.4 cm). Recheck that each long side still fits 6k + 5 before working the border.
Happy crocheting!