

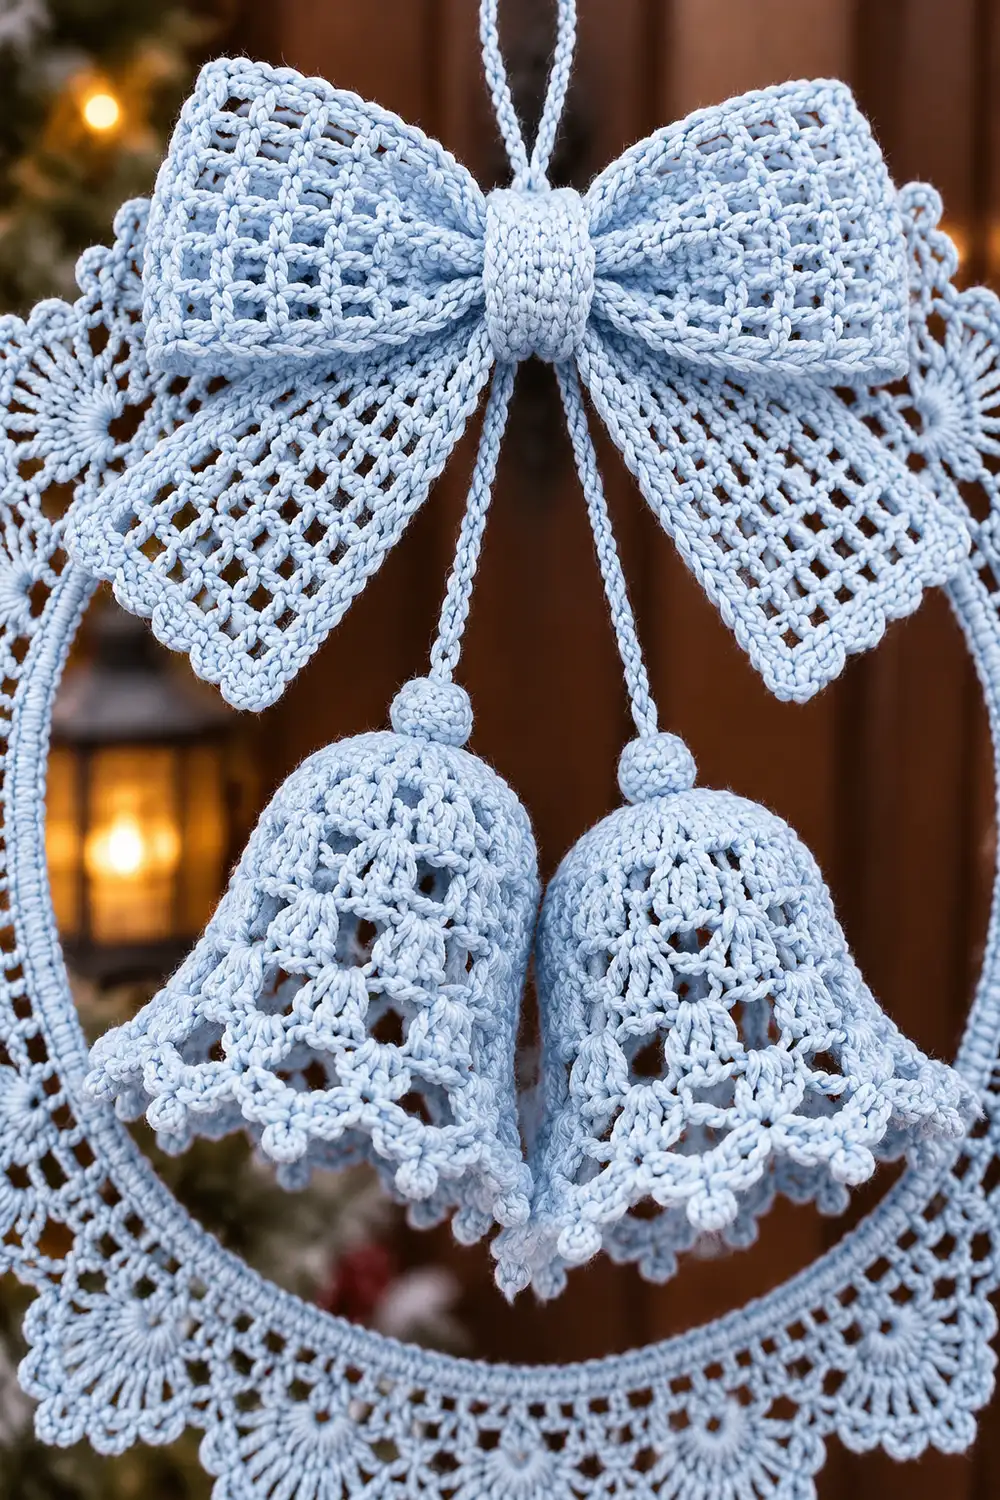
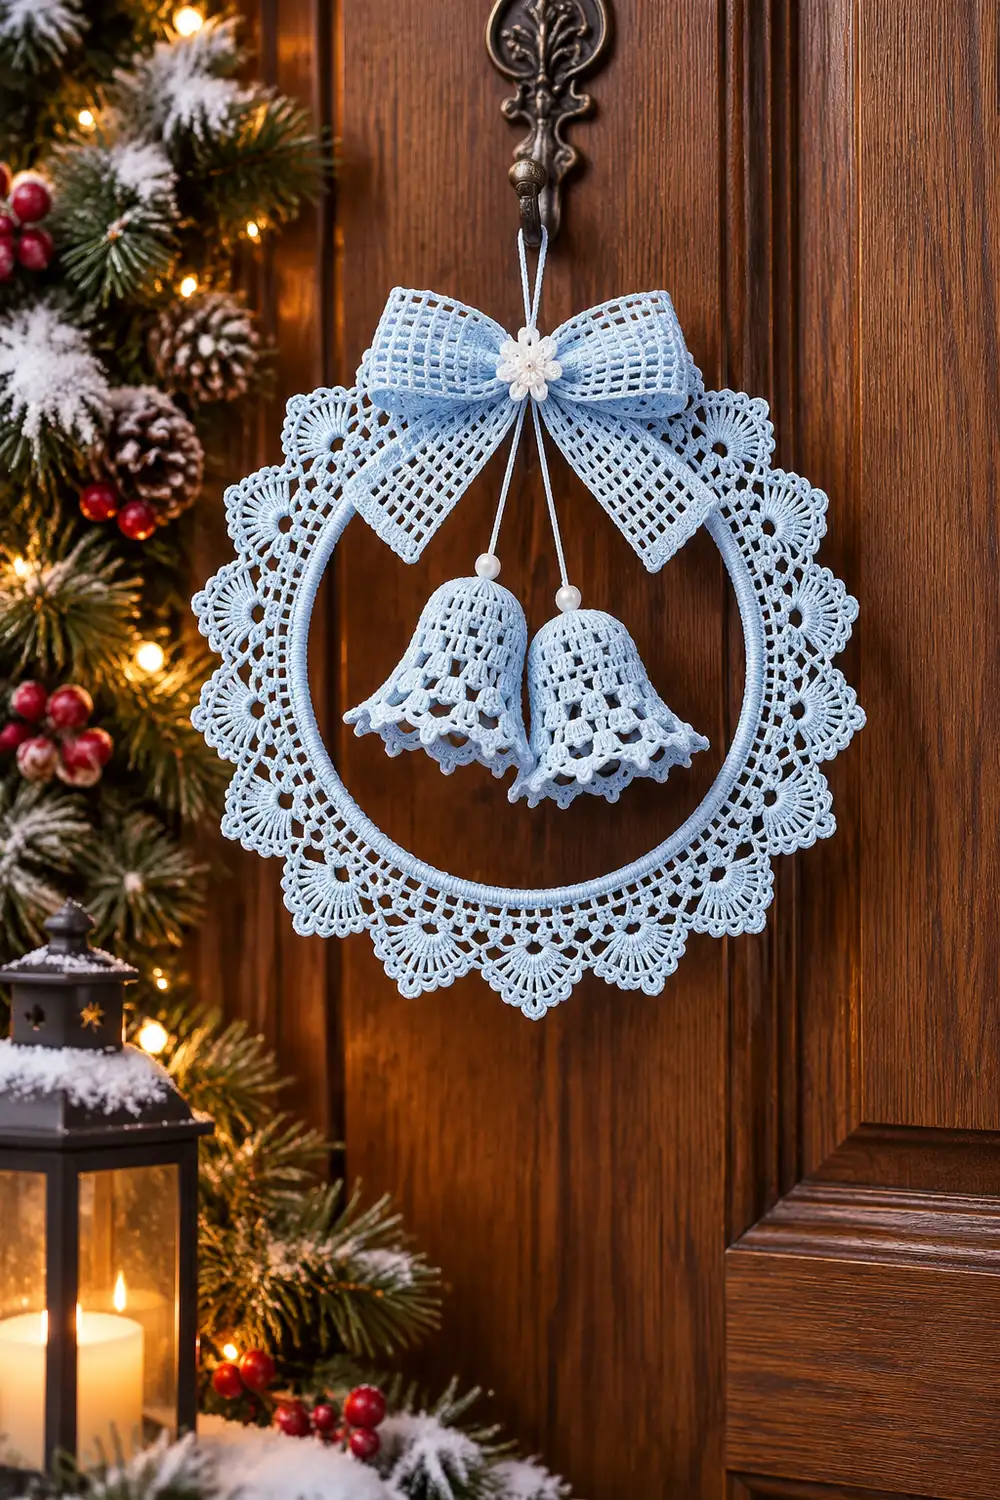
This hanging wreath ornament is worked entirely in pale blue thread. A lace ring with a scalloped edge of connected fans frames the piece. An airy mesh bow with a solid center knot sits at the top, and two flared, shell-stitch bells hang in the open center.
The single soft blue color gives the piece a frosty, vintage look. It works on a door, a window, a tree, or a gift package. The bells are stiffened, so they keep a true three-dimensional shape.
This pattern uses US crochet terms. The finished ornament measures 7 in (17.8 cm) in diameter.
The construction is simple. You cover a 4 in (10.2 cm) ring with single crochet, add two mesh rounds and a three-round fan border, and block it flat. Separately, you crochet a mesh bow, mesh tails, a solid knot, and two bells worked top-down in the round. After stiffening, everything is sewn together into one ornament.
Finished Size and Construction
- Finished size: 7 in (17.8 cm) diameter
- Skill level: Intermediate
- Terminology: US crochet terms
- Yarn weight: Size 3 crochet thread (super fine)
- Hook: 2.25 mm (B-1)
- Number of pieces: 6 crocheted pieces (ring, bow body, bow tails, center knot, 2 bells), plus 2 bell cords and 1 hanging loop
- Layout: Bow centered at the top of the ring, with two bells hanging side by side inside the ring opening
- Piece sizes: Bow body 2 × 7 in (5.1 × 17.8 cm) before folding. Tails strip 1 × 4 in (2.5 × 10.2 cm). Knot 0.75 × 1.25 in (1.9 × 3.2 cm). Each bell 2 in (5.1 cm) tall.
- Size before border: 5.75 in (14.6 cm) diameter
- Border depth: 0.625 in (1.6 cm) all around
Materials
Thread: Choose a mercerized cotton crochet thread in size 3. Mercerized cotton holds crisp stitch definition and takes stiffener well. Avoid fuzzy or very soft blends, because the fans and bells will not hold their shape.
- Light Blue: 50 g (approx. 80 m / 88 yd) total
- Ring and border: 20 g (32 m)
- Bow body, tails, and knot: 15 g (24 m)
- Bells, cords, and hanging loop: 15 g (24 m)
Tools:
- 2.25 mm (B-1) crochet hook
- 4 in (10.2 cm) plastic or metal ring (this becomes fully covered by thread)
- Tapestry needle
- Stitch marker
- Rustproof pins and a blocking board
- Fabric stiffener or heavy starch
- Small cone, bottle neck, or rolled card form for shaping the bells
- Measuring tape
All quantities include a margin of about 20% for swatching and thread differences.
Abbreviations (US Terms)
- ch: chain
- sl st: slip stitch
- sc: single crochet
- dc: double crochet
- sp: space
- st(s): stitch(es)
- MR: magic ring
Special stitches:
- Mesh: dc, ch 1, skip 1 st. On later rows, work each dc into the dc below.
- Small shell: (2 dc, ch 1, 2 dc) in the same sp.
- Large shell: (3 dc, ch 1, 3 dc) in the same sp.
- Fan: (dc, ch 1) 6 times, then dc, all in the same loop. Each fan has 7 dc and 6 ch-1 sps.
- Picot: (sc, ch 3, sc) in the same sp.
Gauge and Checkpoints
Test one piece first. Make the bow tails strip before anything else. It is small and uses the mesh gauge.
- Mesh gauge: 4 mesh squares and 3 rows = 1 in (2.5 cm)
- Sc gauge (knot): 8 sc and 8 rows = 1 in (2.5 cm)
- Chain gauge: 8 ch = 1 in (2.5 cm)
Checkpoints:
- The tails strip measures 1 × 4 in (2.5 × 10.2 cm) before edging.
- 120 sc cover the ring snugly with no gaps.
- After Round 3, the ring measures 5.75 in (14.6 cm) across.
- After the border, it measures 7 in (17.8 cm) across.
- Each bell measures 2 in (5.1 cm) tall after stiffening.
If your strip is too big, go down to a 2.0 mm hook. If it is too small, go up to a 2.5 mm hook. Do not change stitch counts, because every count below depends on them.
Part 1: Lace Base Ring
Round 1 (cover the ring): Place a slip knot on your hook. Work sc around the ring by inserting the hook through the center, pulling up a loop over the ring, then completing the sc. Work 120 sc, pushing them together so the ring is fully hidden. Join with sl st to the first sc. (120 sc)
Rotate the stitches so their tops face outward. All following rounds are worked outward from this edge.
Round 2: Ch 5 (counts as dc + ch 2), skip next sc. Dc in next sc, ch 2, skip next sc. Repeat from * 58 more times (59 total). Join with sl st to the 3rd ch of the beginning ch-5.
(60 dc, 60 ch-2 sps)
Checkpoint: the piece is about 5 in (12.7 cm) across.
Round 3: Sl st into the first ch-2 sp. Ch 6 (counts as dc + ch 3). Dc in next ch-2 sp, ch 3. Repeat from * 58 more times. Join to the 3rd ch of the beginning ch-6.
(60 dc, 60 ch-3 sps)
Round 3 has the same number of dc as Round 2. The longer ch-3 spaces provide the extra width as the circle grows.
Checkpoint: the piece is 5.75 in (14.6 cm) across. Do not fasten off; the border continues from here.
Part 2: Mesh Bow
Bow body: Ch 20.
Row 1: Dc in 6th ch from hook. The skipped ch count as dc, ch 1, and 1 skipped ch. Ch 1, skip 1 ch, dc in next ch. Repeat from * to the end.
(9 dc, 8 mesh squares)
Rows 2–21: Ch 4 (counts as dc + ch 1), turn. Dc in next dc. Ch 1, dc in next dc. Repeat from * 6 times. Ch 1, dc in top of turning ch.
(9 dc, 8 mesh squares per row)
The bow body should measure 2 × 7 in (5.1 × 17.8 cm).
Edging: Ch 1. Work sc around all four edges:
- Long sides: 2 sc in each row-end, for 42 sc per side.
- Short sides: 1 sc in each dc and each ch-1 sp, for 17 sc per side.
- Corners: Ch 1 at each corner.
Join with sl st to the first sc. (118 sc + 4 corner ch-1) Fasten off.
Bow tails: Ch 12.
- Row 1: Work as for the bow body Row 1. (5 dc, 4 mesh squares)
- Rows 2–12: Ch 4, turn. Dc in next dc. Ch 1, dc in next dc 2 times. Ch 1, dc in top of turning ch. (5 dc, 4 mesh squares)
The strip should measure 1 × 4 in (2.5 × 10.2 cm).
Tails edging: Work 24 sc per long side and 9 sc per short side, with ch 1 at each corner. (66 sc + 4 corner ch-1) Fasten off.
Edging adds about 0.125 in (0.3 cm) per edge.
Center knot (solid): Ch 7.
- Row 1: Sc in 2nd ch from hook and in each ch across. (6 sc)
- Rows 2–10: Ch 1, turn, sc in each sc. (6 sc)
The knot should measure 0.75 × 1.25 in (1.9 × 3.2 cm). Fasten off and leave a 10 in (25.4 cm) tail for sewing.
Part 3: Shell-Stitch Bells (Make 2)
Bells are worked top-down in joined rounds. At the end of each round, join with sl st to the first st.
Round 1: MR, ch 1, 8 sc in ring. Join. (8 sc)
Round 2: Ch 1, 2 sc in each st. Join. (16 sc)
Round 3: Ch 1, sc in each st. Join. (16 sc) This round forms the narrow stem.
Round 4: Ch 1. Sc in next st, 2 sc in next st. Repeat 8 times. Join. (24 sc)
Round 5: Ch 3 (counts as dc), dc in each st around. Join to the top of ch-3. (24 dc)
Round 6: Ch 4 (counts as dc + ch 1), skip next dc. Dc in next dc, ch 1, skip next dc. Repeat 11 times. Join to the 3rd ch of ch-4. (12 dc, 12 ch-1 sps)
Round 7: Sl st into the first ch-1 sp. Ch 3, then work (dc, ch 1, 2 dc) in the same sp. Small shell in next ch-1 sp. Repeat 11 times. Join.
(12 small shells: 48 dc, 12 ch-1 sps)
This round flares the bell outward.
Round 8: Sl st across to the first shell’s ch-1 sp. Ch 3, then work (2 dc, ch 1, 3 dc) in the same sp. Large shell in next shell’s ch-1 sp. Repeat 11 times. Join.
(12 large shells: 72 dc, 12 ch-1 sps)
Round 9 (rim): Sl st into the first ch-1 sp. Picot in ch-1 sp, ch 3, sl st in the gap between this shell and the next, ch 3. Repeat 12 times. Join. (12 picots)
Fasten off and weave in the ends.
Bell cords (make 2): Ch 9. Sl st in the back bump of the 2nd ch from hook and in each ch across. (8 sl st) Each cord is about 1 in (2.5 cm) long. Leave long tails on both ends.
Border (Scalloped Fan Edge)
The border continues from Round 3 of the ring.
Border gauge: The border has 15 fan scallops. Each scallop is about 1.5 in (3.8 cm) across at the outer edge.
Round 4 (arches): Sl st into the first ch-3 sp. Ch 1, sc in the same sp. Ch 5, skip next ch-3 sp, sc in next ch-3 sp. Repeat around, ending with ch 5 and sl st to the first sc.
(30 sc, 30 ch-5 loops)
Round 5 (fans): Sl st into the first ch-5 loop. Fan in this loop, ch 2, sc in next ch-5 loop, ch 2, move to next loop. Repeat 15 times. Join to the first dc.
- Per scallop: 7 dc, 6 ch-1 sps, 1 sc, 2 ch-2 sps
- Total: 105 dc, 90 ch-1 sps, 15 sc, 30 ch-2 sps
Round 6 (picot edge): Sl st into the first ch-1 sp. Picot in each of the 6 ch-1 sps of the fan, skip ch-2 sp, sl st in sc, skip ch-2 sp. Repeat 15 times. Join.
- Per scallop: 6 picots, 1 sl st
- Total: 90 picots
Fasten off.
Why the math works: Round 3 has 60 spaces. Round 4 uses 2 spaces per arch, so 60 ÷ 2 = 30 arches. Round 5 uses 2 arches per scallop (one for the fan, one for the sc), so 30 ÷ 2 = 15 scallops. Nothing is left over, so the scallops close evenly.
Final Blocking
Block:
- Soak all pieces in cool water and press out the water in a towel.
- Draw a 7 in (17.8 cm) circle on paper under clear wrap. Pin the ring centered on it, with one pin at the tip of every fan and every picot.
- Pin the bow body to 2 × 7 in (5.1 × 17.8 cm), the tails to 1 × 4 in (2.5 × 10.2 cm), and the knot flat.
- Brush the ring and bow lightly with diluted stiffener. Saturate the bells fully.
- Place each bell over a cone or bottle neck. Spread Round 8 into an even flare until the opening is 1.75 in (4.4 cm) across.
- Let everything dry completely before unpinning.
Assemble:
- Fold the bow: Fold both short ends of the bow body to the center back, overlapping them by 0.25 in (0.6 cm), and sew. The bow now measures about 3.5 in (8.9 cm) wide.
- Add the tails: Pinch the bow center. Fold the tails strip between Rows 6 and 7 into an inverted V, and place it behind the bow. Each tail hangs about 2 in (5.1 cm).
- Add the knot: Wrap the knot around the bow and tails, then sew its ends together at the back.
- Attach the cords: Sew both cords to the lower back of the knot, 0.5 in (1.3 cm) apart. Sew each cord’s free end through the MR at the top of a bell.
- Attach the bow: Center the bow over the top of the covered ring. Sew it through the Round 1 sc and the bow back.
- Add the hanging loop: Join thread at the back of the top sc. Ch 24, about 3 in (7.6 cm), then sl st back into the same st. Fasten off.
The bells should hang side by side, overlapping slightly, with their rims roughly 1 in (2.5 cm) above the inner bottom edge of the ring.
Final Quality-Control Checklist
- [ ] The ring measures 7 in (17.8 cm) across in every direction.
- [ ] All 15 scallops are equal, with 6 picots each.
- [ ] No plastic shows through the Round 1 sc.
- [ ] The bow loops are even and the knot is centered.
- [ ] Both bells are 2 in (5.1 cm) tall and flare evenly.
- [ ] The bells hang level, and the cords are hidden behind the knot.
- [ ] All ends are woven in securely.
Troubleshooting
- The ring shows through Round 1: Push the sc tighter. If gaps remain, use a ring slightly smaller than 4 in (10.2 cm). Keep the count at 120.
- The border ruffles: Your fans are too loose. Go down a hook size for Rounds 5–6 only.
- The border cups: Your ch-5 arches are too tight. Loosen the chains, or work the arches with ch 6.
- The bells collapse: Apply more stiffener and re-dry them on the form.
- The bow droops: Stiffen the loops again and stuff them with tissue while they dry.
- The bells hang crooked: Re-sew the cords so they are the same length.
Care
Dust gently, or spot clean with cool water. Re-stiffen and reshape after any washing, and store flat in a box.
Final Notes
The measurement chain is simple to track:
- 120 sc cover a 4 in (10.2 cm) ring.
- Two mesh rounds bring it to 5.75 in (14.6 cm).
- The 0.625 in (1.6 cm) fan border brings it to 7 in (17.8 cm).
- The 2 × 7 in (5.1 × 17.8 cm) bow folds to 3.5 in (8.9 cm) wide.
- The 2 in (5.1 cm) bells hang on 1 in (2.5 cm) cords inside the ring.
If each checkpoint matches, the finished ornament will match too.
Happy crocheting!