

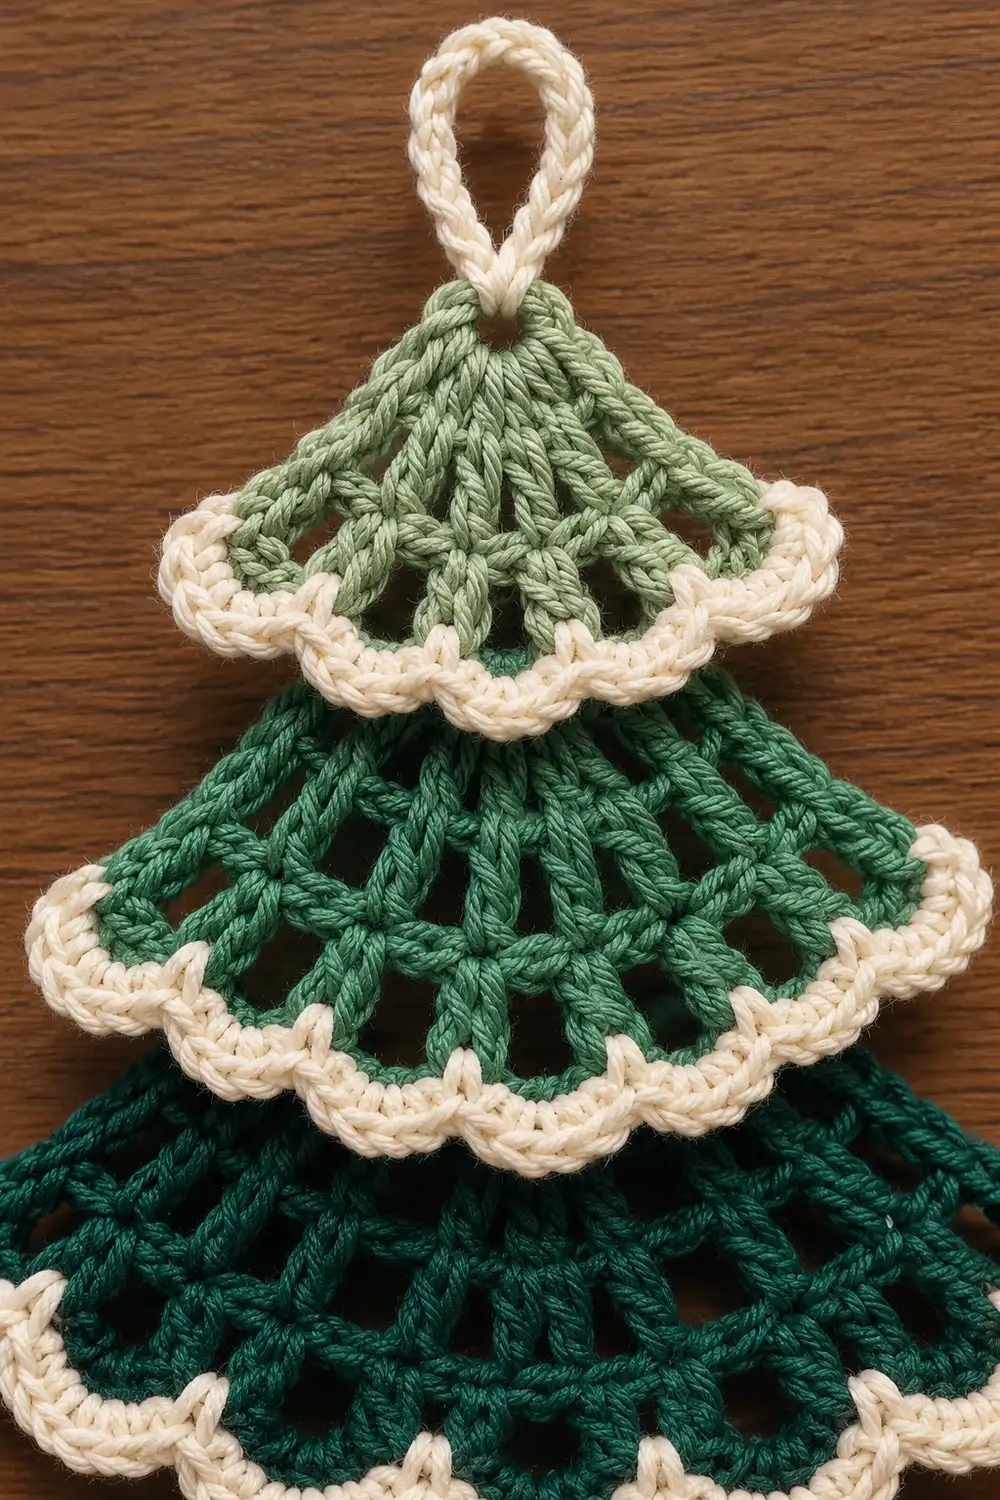
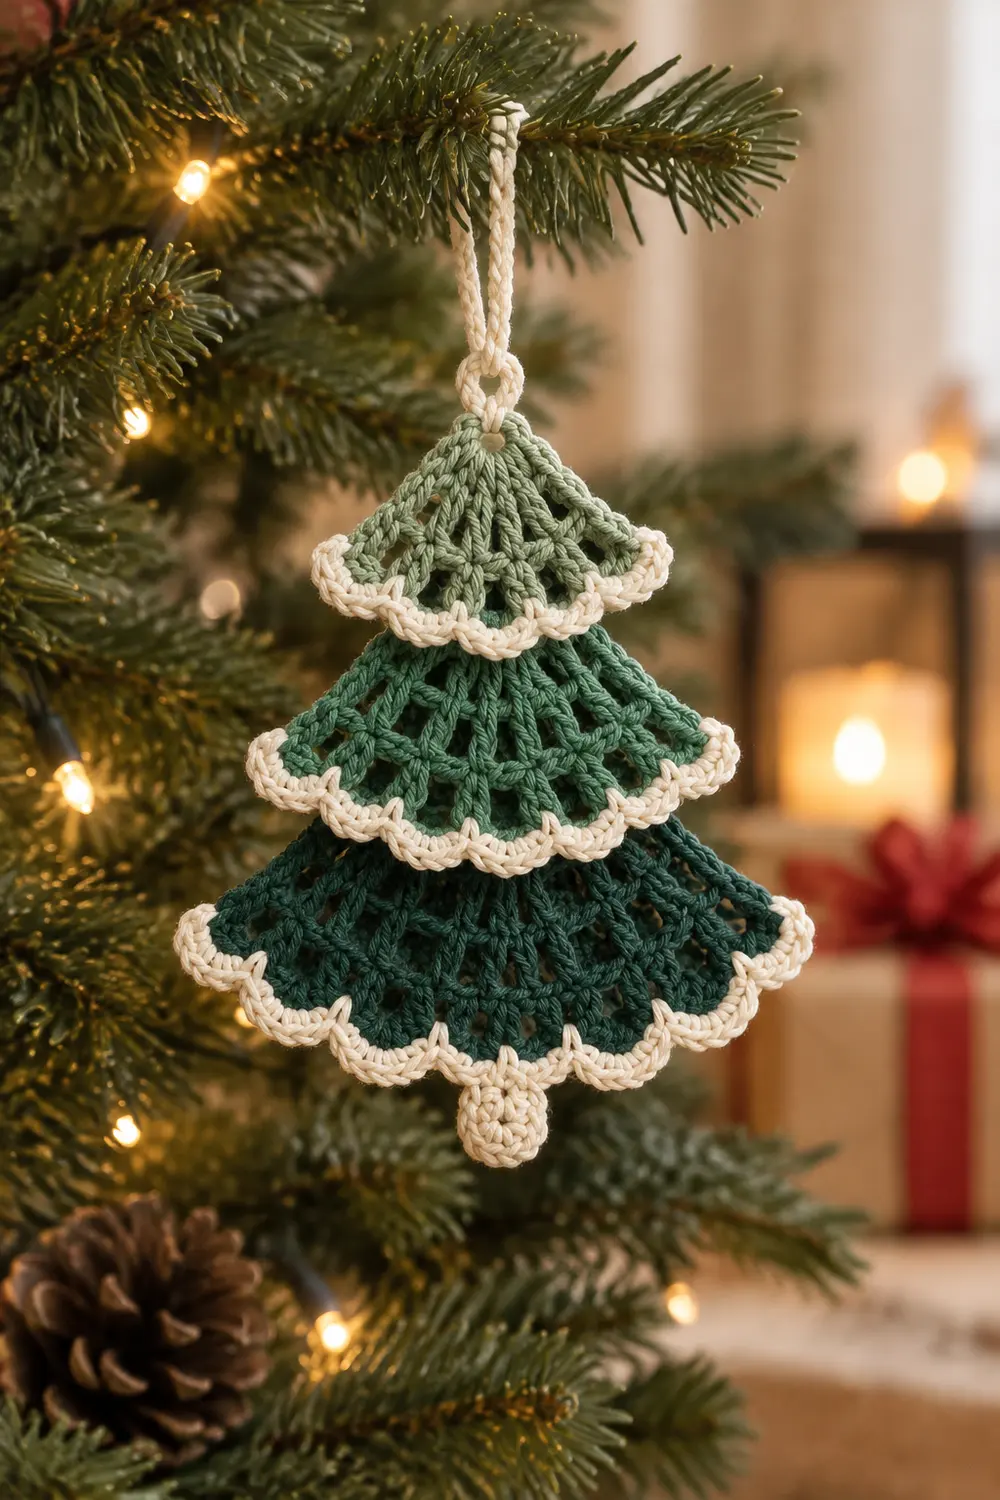
The Frosted Pine is a small, three-tiered Christmas tree ornament. Three fan-shaped tiers stack from wide to narrow, and each one ends in a cream scalloped edge that looks like a light dusting of snow.
The tiers shade from dark to light. The bottom tier is dark forest green, the middle tier is medium forest green, and the top tier is sage. All three scallop edges are cream. A cream hanging loop sits at the top, and a tiny cream ball marks the base of the tree.
This pattern uses US crochet terms. The finished ornament is about 3.75 in (9.5 cm) tall without the hanging loop and about 4 in (10.2 cm) wide across the bottom scallops.
The tree body is worked flat in one continuous piece from the top point down. Each new tier is worked into the back loops of the last row of the tier above it. That leaves the front loops free for the scalloped edging, so every scallop overlaps the tier below it. The hanging loop is worked directly off the top. A tiny ball is made last and sewn to the bottom center.
Finished Size and Construction
- Finished size: 3.75 in (9.5 cm) tall without the loop, 4 in (10.2 cm) wide at the bottom scallops
- Hanging loop: adds about 0.75 in (1.9 cm)
- Skill level: Easy-intermediate
- Terminology: US crochet terms
- Yarn weight: Sport weight (#2), cotton or cotton blend
- Hook: 2.75 mm (US C-2)
- Number of pieces: one ornament, made as one continuous tree body plus a tiny base ball sewn on
- Layout: 3 stacked tiers. Top tier is 3 rows, middle tier is 3 rows, bottom tier is 3 rows.
- Tier sizes, scallops included: top 2 in (5.1 cm) wide, middle 3 in (7.6 cm) wide, bottom 4 in (10.2 cm) wide
- Size before border: 3 in (7.6 cm) tall and 3.75 in (9.5 cm) wide across Row 9
- Border depth: 0.25 in (0.6 cm) per scallop edge
Materials
Yarn: Use a smooth sport weight cotton. Cotton gives crisp stitch definition and holds the scallops well after blocking. Acrylic also works, but the ornament will be softer.
- Sage (light green), top tier: 2 g, about 4 m
- Medium forest green, middle tier: 3 g, about 6 m
- Dark forest green, bottom tier: 4 g, about 8 m
- Cream/ivory, scallops, loop and ball: 5 g, about 10 m
These quantities include a margin of about 50% for tails and gauge swatching.
Tools:
- 2.75 mm (US C-2) crochet hook
- Tapestry needle
- Scissors
- 1 stitch marker
- Rust-proof pins and a foam board
- Spray bottle with water
- A small pinch of cream yarn scraps to stuff the ball
Abbreviations (US Terms)
- ch: chain
- sl st: slip stitch
- sc: single crochet
- dc: double crochet
- sc2tog: single crochet 2 together
- sk: skip
- st(s): stitch(es)
- sp(s): space(s)
- tch: turning chain
- FLO / BLO: front loop only / back loop only
- RS / WS: right side / wrong side
- MR: magic ring
Special stitch: Shell. Work 5 dc in the same stitch.
Stitch counting: In the lacy rows, each ch-1 sp counts as 1 stitch. A starting ch-3 always counts as 1 dc. A starting ch-4 counts as 1 dc plus 1 ch-1 sp.
Gauge and Checkpoints
Gauge: 7 dc = 1 in (2.5 cm), and 3 rows of dc = 1 in (2.5 cm).
Test one tier first. Work Rows 1–3, which form the sage tier. Lay the piece flat without stretching it, then check two measurements:
- Height from the ring to the top of Row 3 should be 1 in (2.5 cm).
- Width straight across the top of Row 3 should be about 1.75 in (4.4 cm).
Checkpoints while you work:
- After Row 3: 1 in (2.5 cm) tall, 1.75 in (4.4 cm) wide
- After Row 6: 2 in (5.1 cm) tall, 2.75 in (7.0 cm) wide
- After Row 9: 3 in (7.6 cm) tall, 3.75 in (9.5 cm) wide
- After the scallops and ball: 3.75 in (9.5 cm) tall, 4 in (10.2 cm) wide
If your tier is too big, go down 0.25 mm in hook size. If it is too small, go up 0.25 mm. Height matters more than width here. If your rows run tall, try pulling the first loop of each dc a little snugger.
Pattern
Work flat, turning where indicated. Every tier begins and ends on a RS row. This keeps all the free front loops on the front of the tree.
Tier 1 – Top (Sage)
Row 1 (RS): Ch 4 and sl st in the first ch to form a ring. Ch 3 (counts as dc), then work 4 dc in the ring. (5 dc) Place a marker on this side to show the RS. Turn.
Row 2 (WS): Ch 4 (counts as dc + ch 1). Work [dc in next dc, ch 1] 3 times, then dc in the top of the tch. (5 dc + 4 ch-1 sps = 9 sts) Turn.
Row 3 (RS): Ch 3 (counts as dc). Work [2 dc in next ch-1 sp, dc in next dc] 3 times. Then work 2 dc in the last ch-1 sp and dc in the 3rd ch of the tch. (13 dc)
Count check: 1 + (3 × 3) + 2 + 1 = 13. Fasten off sage.
Checkpoint: 1 in (2.5 cm) tall, 1.75 in (4.4 cm) wide.
Tier 2 – Middle (Medium Forest Green)
Row 4 (RS): With the RS facing, join medium green with a sl st in the BLO of the first st at the right-hand edge of Row 3. Work the whole row in BLO:
- Ch 3 (counts as dc).
- 2 dc in next st, dc in next 2 sts.
- 2 dc in next st, dc in next 3 sts.
- 2 dc in next st, dc in next 2 sts.
- 2 dc in next st, dc in last st.
(17 dc) Count check: you work into 13 sts and make 4 increases, so 13 + 4 = 17. The increases fall at stitches 2, 5, 9 and 12, which mirror each other. Turn.
Row 5 (WS): Work this row in both loops. Ch 4 (counts as dc + ch 1), then sk next st. Work [dc in next st, ch 1, sk next st] 7 times, then dc in the top of the tch. (9 dc + 8 ch-1 sps = 17 sts)
This row keeps the same count as Row 4. It opens up the fabric to create the lacy rays. Turn.
Row 6 (RS): Ch 3 (counts as dc). Work 1 dc in each dc across. In the 8 ch-1 sps, work as follows:
- 2 dc in sps 1, 3, 6 and 8
- 1 dc in sps 2, 4, 5 and 7
End with dc in the 3rd ch of the tch. (21 dc) Count check: 9 dc + 12 dc from the sps = 21. Fasten off.
Checkpoint: 2 in (5.1 cm) tall, 2.75 in (7.0 cm) wide.
Tier 3 – Bottom (Dark Forest Green)
Row 7 (RS): With the RS facing, join dark green with a sl st in the BLO of the first st at the right-hand edge of Row 6. Work the whole row in BLO:
- Ch 3 (counts as dc), dc in next 3 sts.
- [2 dc in next st, dc in next 3 sts] 4 times.
- Dc in last st.
(25 dc) Count check: you work into 21 sts and make 4 increases, at stitches 5, 9, 13 and 17. Turn.
Row 8 (WS): Work in both loops. Ch 4 (counts as dc + ch 1), then sk next st. Work [dc in next st, ch 1, sk next st] 11 times, then dc in the top of the tch. (13 dc + 12 ch-1 sps = 25 sts) Turn.
Row 9 (RS): Ch 3 (counts as dc). Work 1 dc in each dc across. In the 12 ch-1 sps, work as follows:
- 2 dc in sps 2, 5, 8 and 11
- 1 dc in all other sps
End with dc in the 3rd ch of the tch. (29 dc) Count check: 13 dc + 16 dc from the sps = 29. Fasten off.
Checkpoint: 3 in (7.6 cm) tall, 3.75 in (9.5 cm) wide.
Base Ball (Cream)
Rnd 1: Work 6 sc in a MR. (6 sc)
Rnd 2: Work 2 sc in each st. (12 sc)
Rnd 3: Work sc in each st. (12 sc)
Stuff the ball firmly with cream scraps.
Rnd 4: Work [sc2tog] 6 times. (6 sc)
Fasten off and leave an 8 in (20.3 cm) tail. Thread the tail through the front loops of the last 6 sts and pull it closed. The ball measures about 0.5 in (1.3 cm) across. Keep the tail for sewing.
Border: Scalloped Edging and Hanging Loop
Border gauge: One scallop repeat uses 4 stitches. At 7 dc per inch, each scallop is about 0.6 in (1.5 cm) wide and 0.25 in (0.6 cm) deep.
Why the math works: Each scallop row starts with 1 sc. After that, each repeat of [sk 1, shell, sk 1, sc] uses exactly 4 sts. That means the edge needs a stitch count of 4 × (number of scallops) + 1. Each tier’s last row was built to match:
- Row 3: 13 sts = 4 × 3 + 1, so it gets 3 scallops.
- Row 6: 21 sts = 4 × 5 + 1, so it gets 5 scallops.
- Row 9: 29 sts = 4 × 7 + 1, so it gets 7 scallops.
Every edge begins and ends on an sc, so the scallops sit centered and symmetrical.
Top Tier Scallops (Free Front Loops of Row 3)
With the RS facing, tilt Tier 2 down to see the free front loops of Row 3. Join cream with a sl st in the FLO of the first st at the right-hand edge.
Working in FLO throughout: ch 1, then sc in the same st. Work [sk 1, shell in next st, sk 1, sc in next st] 3 times.
(3 shells + 4 sc; 13 sts used) Fasten off.
Middle Tier Scallops (Free Front Loops of Row 6)
With the RS facing, join cream in the FLO of the first st at the right-hand edge of Row 6.
Working in FLO throughout: ch 1, then sc in the same st. Work [sk 1, shell in next st, sk 1, sc in next st] 5 times.
(5 shells + 6 sc; 21 sts used) Fasten off.
Bottom Tier Scallops (Row 9, Both Loops)
With the RS facing, join cream in the first st at the right-hand edge of Row 9.
Ch 1, then sc in the same st. Work [sk 1, shell in next st, sk 1, sc in next st] 7 times.
(7 shells + 8 sc; 29 sts used) Fasten off.
Hanging Loop
Join cream with a sl st around the starting ring at the top point. Ch 14, then sl st in the same place. Fasten off.
The loop hangs about 0.75 in (1.9 cm) above the tree.
Attach the Base Ball
Center the ball under the 4th (middle) shell of the bottom edge. Sew it to the back of that shell’s sc and the shells on either side, so about 0.5 in (1.3 cm) of the ball shows below the scallops.
Weave in all ends along stitches of the same color.
Final Blocking
- Lightly mist the ornament until it is damp but not dripping.
- Lay it RS up on the foam board.
- Pin the top point and the base ball in a straight vertical line. The distance between them should be 3.75 in (9.5 cm).
- Pin the bottom tier corners so they are 3.75 in (9.5 cm) apart across Row 9.
- Fold each upper scallop edge down so it overlaps the tier below. Pin the center dc of each shell.
- Open each shell into an even half-circle, 0.6 in (1.5 cm) wide.
- Let the ornament dry completely, then remove the pins.
Final Quality-Control Checklist
- Stitch counts are 5, 9, 13 / 17, 17, 21 / 25, 25, 29.
- Height is 3.75 in (9.5 cm) without the loop.
- Width is 4 in (10.2 cm) across the bottom scallops.
- The tiers have 3, 5 and 7 scallops, each starting and ending on an sc.
- The tiers are sage, medium green and dark green from top to bottom, all with cream trim.
- The upper scallops lie flat over the tier below.
- The loop is centered at the top and the ball is centered at the bottom.
- No ends show on the RS.
Troubleshooting
The tiers curl like a cone. Your tension is too tight on the increase rows. Go up 0.25 mm and block firmly.
The tier ruffles. Your dc are too loose or you have extra stitches. Recount Rows 4, 6, 7 and 9.
The scallops come out uneven. Count to 4n + 1 before starting the edging. Ending on a shell means the count is off by 1 or 2.
The upper scallops stand upright. Make sure you worked them in the front loops only, then re-block with the shells folded down.
There are gaps where the tiers meet. Join the new color in the BLO, not under both loops.
The ball sags. Stuff it more firmly and tack it at two points.
Care
Hand wash in cool water, then reshape and dry flat. Store the ornament flat or hanging so the scallops keep their shape.
Final Notes
The measurement chain is simple. At a gauge of 7 dc and 3 rows per inch, each 3-row tier adds 1 in (2.5 cm) of height:
- Tier 1: 1 in (2.5 cm) tall, 1.75 in (4.4 cm) wide
- Tier 2: 2 in (5.1 cm) tall, 2.75 in (7.0 cm) wide
- Tier 3: 3 in (7.6 cm) tall, 3.75 in (9.5 cm) wide
Edge counts of 13, 21 and 29 give 3, 5 and 7 scallops. The cream edging and base ball bring the tree to 3.75 in (9.5 cm) tall and 4 in (10.2 cm) wide.
Happy crocheting!