

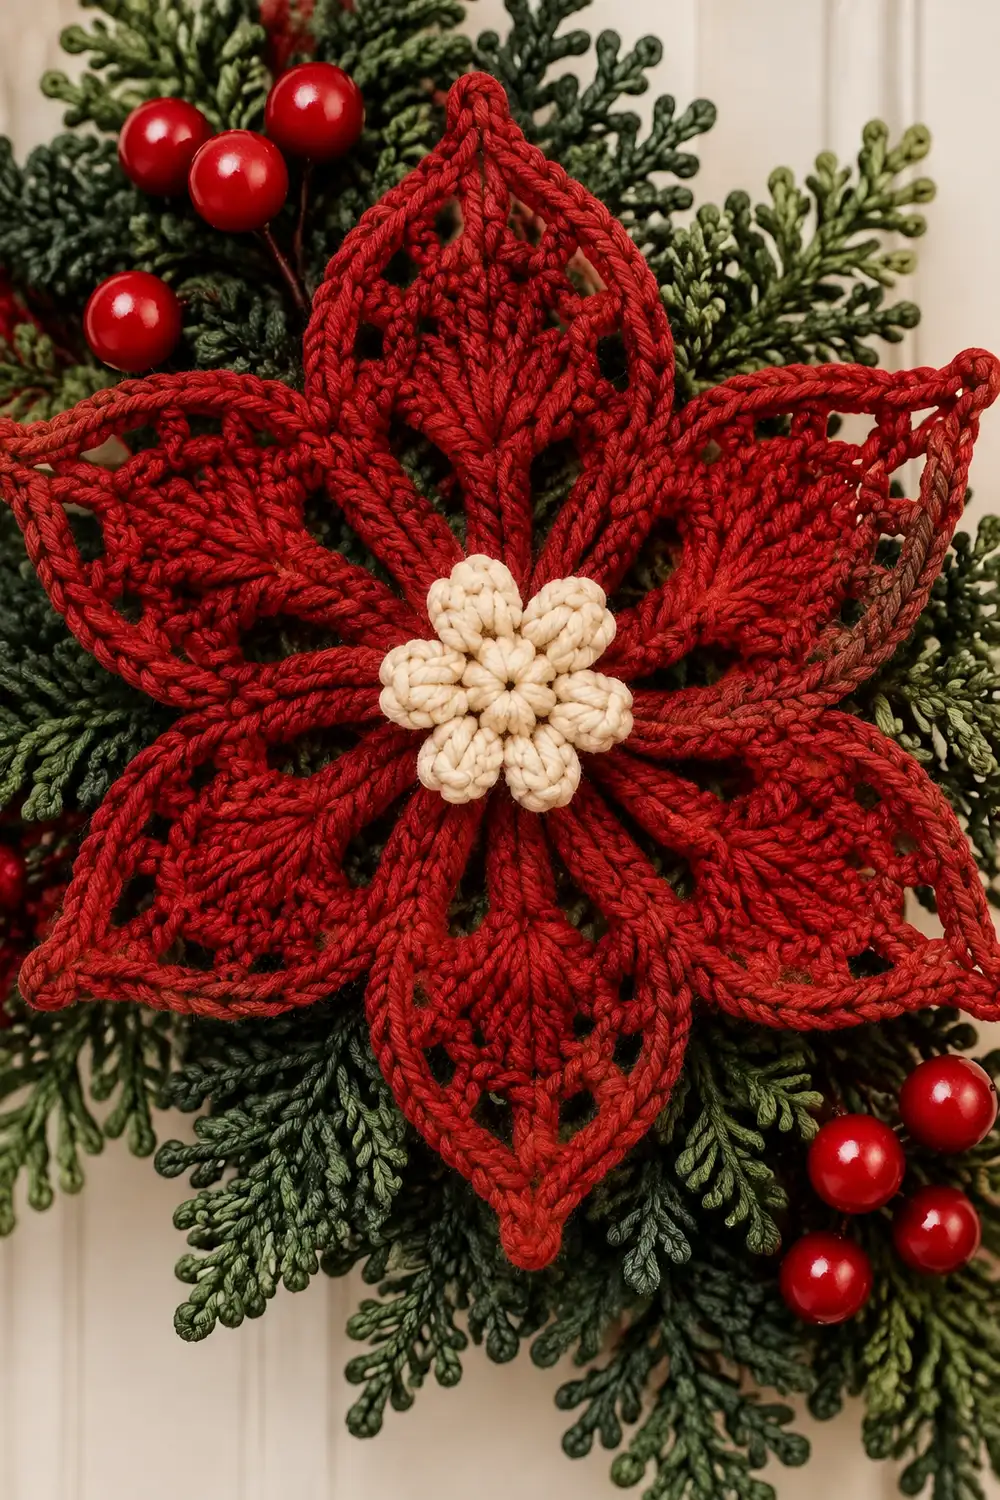
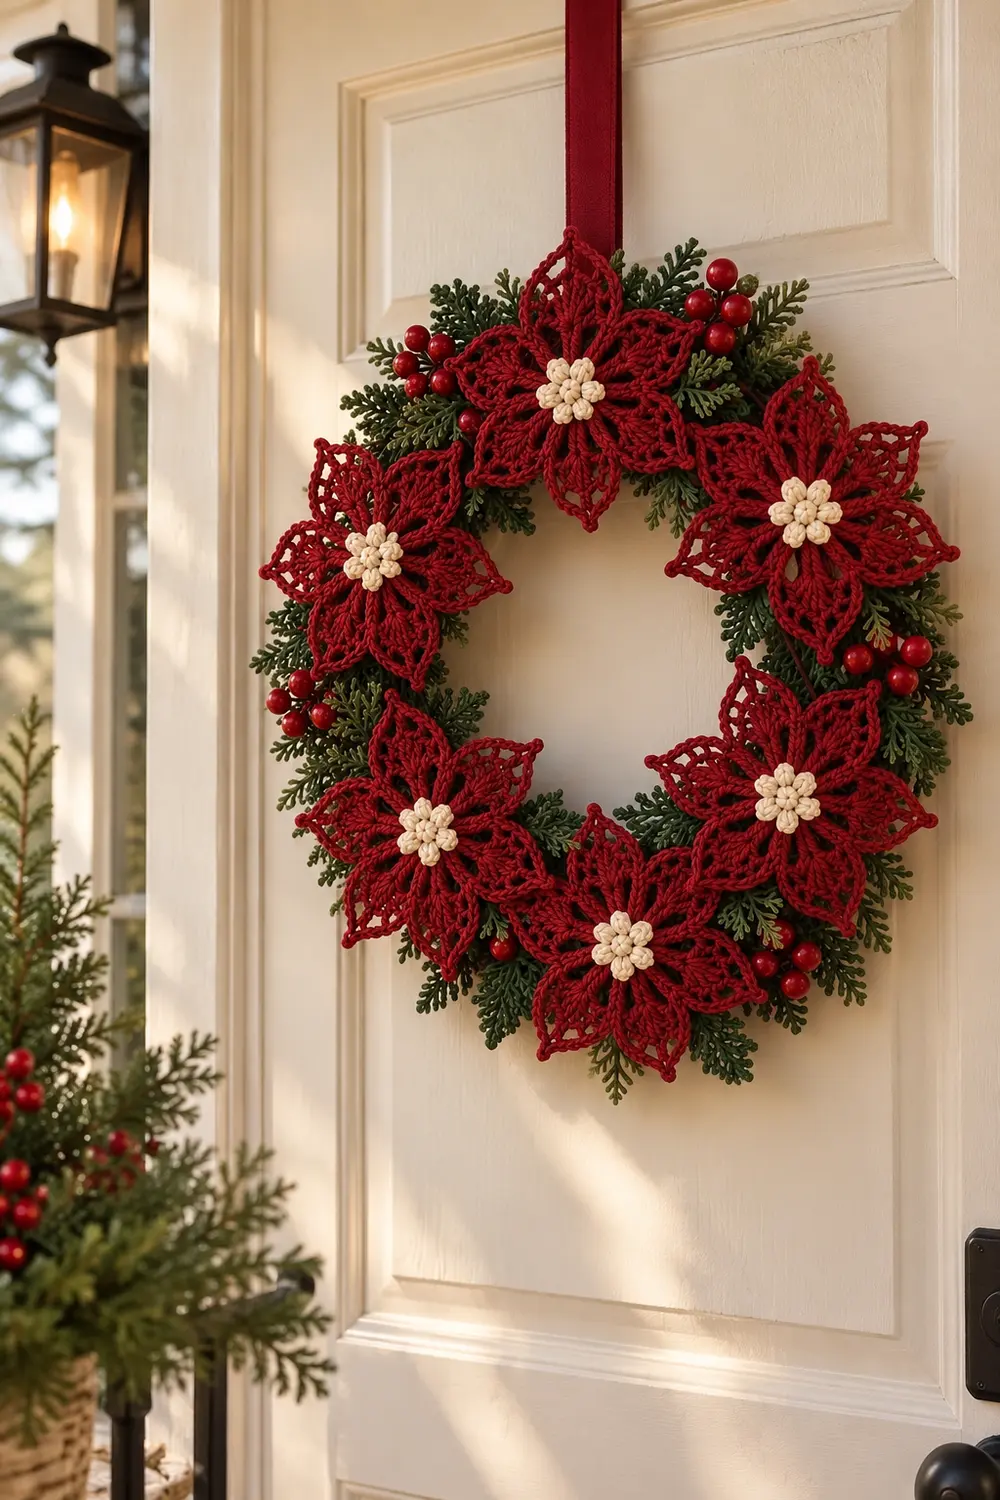
This wreath features five large poinsettias with deep red filet-lace petals. Each petal is an open mesh outlined in solid single crochet, so the flowers look delicate but keep crisp, defined points. A small cream flower sits in the center of each poinsettia.
Dark forest-green leaf sprigs and clusters of bright red crocheted berries fill the spaces between the poinsettias for a full, festive look. A deep burgundy ribbon at the top center lets the wreath hang flat on a door.
The pattern uses US crochet terms. The finished wreath measures 19 in (48.3 cm) across, with a 7 in (17.8 cm) opening in the center.
You will crochet a flat green base ring, then make the poinsettias, centers, sprigs, and berries as separate pieces. Everything is sewn onto the ring, and the ribbon goes on last.
Finished Size and Construction
- Finished size: 19 in (48.3 cm) outer diameter, 7 in (17.8 cm) center opening
- Skill level: Intermediate
- Terminology: US crochet terms
- Yarn weight: Worsted (#4)
- Hooks: 5 mm (H-8) and 4 mm (G-6)
- Number of pieces: 46 (1 base ring, 5 poinsettias, 5 centers, 15 sprigs, 20 berries), plus ribbon
- Layout: 5 poinsettias spaced evenly around a 13 in (33.0 cm) placement circle, with 1 at top center
- Piece size: each poinsettia is 6 in (15.2 cm) from tip to tip
- Base ring size before border: 10 in (25.4 cm) inner diameter, about 15 1/4 in (38.7 cm) outer diameter
- Border depth: 1/4 in (0.6 cm) on the outer edge; slip-stitch trim on the inner edge adds no depth
Materials
Yarn: Use a smooth worsted-weight acrylic or acrylic-cotton blend of about 180 m per 100 g. Smooth yarn shows the lace mesh clearly. Fuzzy yarn hides the openwork.
- Color A, deep red (poinsettias): 80 g, 144 m
- Color B, forest green (base ring and sprigs): 120 g, 216 m
- Color C, cream (flower centers): 15 g, 27 m
- Color D, bright red (berries): 20 g, 36 m
These quantities include a margin of about 25 percent.
Tools:
– 5 mm (H-8) and 4 mm (G-6) hooks
– Tapestry needle
– 10 locking stitch markers
– Small handful of polyester fiberfill
– Rust-proof pins and a blocking mat
– Deep burgundy ribbon, 1 1/2 in (3.8 cm) wide and 24 in (61.0 cm) long
– Scissors and a measuring tape
Abbreviations (US Terms)
- ch – chain
- sl st – slip stitch
- sc – single crochet
- hdc – half double crochet
- dc – double crochet
- sc2tog – single crochet 2 together
- st(s) – stitch(es)
- sp – space
- rnd – round
- tch – turning chain
- RS / WS – right side / wrong side
- yo – yarn over
Special stitch – 3-dc bobble: Yo, insert hook in st, yo, pull up a loop, yo, pull through 2 loops. Repeat from * 2 more times in the same st (4 loops on hook). Yo and pull through all 4 loops.
Mesh: a ch-1 space between two dc.
Gauge and Checkpoints
Gauge: 16 sc and 18 rnds = 4 in (10.2 cm) on the 5 mm hook. That is 4 sc and 4.5 rnds per 1 in (2.5 cm).
Make one complete poinsettia before anything else. It tests your gauge and your lace tension at the same time.
Checkpoints:
– Poinsettia center after Rnd 5: 2 1/4 in (5.7 cm) across
– Each petal: about 1 7/8 in (4.8 cm) long, 2 1/4 in (5.7 cm) at the widest point
– Finished poinsettia: 6 in (15.2 cm) from tip to tip
– Cream center: 1 1/2 in (3.8 cm)
– Berry: 3/4 in (1.9 cm)
– Sprig: 3 1/2 in (8.9 cm) long, 2 in (5.1 cm) wide
– Base ring after Rnd 1: 10 in (25.4 cm) inner diameter
– Base ring after Rnd 12: about 15 1/4 in (38.7 cm) outer diameter
If your pieces are too big, go down 0.5 mm in hook size. If they are too small, go up 0.5 mm. Change hook sizes for every piece in the same direction so they still fit together.
Part 1: Base Ring
Color B, 5 mm hook. Worked in joined rounds without turning.
Foundation: Ch 126 loosely. Join with a sl st to the first ch, taking care not to twist the chain.
Rnd 1: Ch 1, sc in each ch around, join. (126 sc)
Check that the ring measures 10 in (25.4 cm) across and lies flat. If the chain pulls the ring tight, redo the foundation with a 6 mm hook.
Rnd 2: Ch 1, (sc in next 20 sts, 2 sc in next st) 6 times, join. (132 sc)
Rnd 3: Ch 1, (sc in next 21 sts, 2 sc in next st) 6 times, join. (138 sc)
Rnds 4–12: Continue the same way. Each round has 1 more sc between increases than the round before. That adds 6 stitches per round.
- Rnd 4: 144 sc
- Rnd 5: 150 sc
- Rnd 6: 156 sc
- Rnd 7: 162 sc
- Rnd 8: 168 sc
- Rnd 9: 174 sc
- Rnd 10: 180 sc
- Rnd 11: 186 sc
- Rnd 12: (sc in next 30 sts, 2 sc in next st) 6 times. (192 sc)
Shift where your increases fall on alternate rounds so the ring stays round instead of hexagonal.
Placement markers: On Rnd 5 (150 sts), place a marker every 30 sts. This gives 5 markers. One marker will be top center, and the other 4 mark the remaining poinsettia positions.
Work the Border (see below) before joining any pieces to the ring.
Part 2: Poinsettia (Make 5)
Color A, 5 mm hook.
Center
- Rnd 1: Magic ring, ch 1, 6 sc in ring, join. (6 sc)
- Rnd 2: Ch 1, 2 sc in each st, join. (12 sc)
- Rnd 3: Ch 1, (sc in next st, 2 sc in next st) 6 times, join. (18 sc)
- Rnd 4: Ch 1, (sc in next 2 sts, 2 sc in next st) 6 times, join. (24 sc)
- Rnd 5: Ch 1, (sc in next 3 sts, 2 sc in next st) 6 times, join. (30 sc)
Fasten off. Check the center against the 2 1/4 in (5.7 cm) checkpoint.
Petals
Each petal is worked in rows on 5 sts of Rnd 5. Six petals use all 30 sts.
Row 1 (RS): Join A in the first of the 5 sts. Ch 4 (counts as dc + ch 1), skip next st, dc in next st, ch 1, skip next st, dc in last st. Turn. (3 dc, 2 meshes)
Row 2 (WS): Ch 4 (counts as dc + ch 1), dc in the first dc at the base of the ch. (Ch 1, dc in next dc) twice, ending in the 3rd ch of the tch. Ch 1, dc in the same ch. Turn. (5 dc, 4 meshes)
Row 3 (RS): Sl st in the first ch-1 sp and the next dc. Ch 4 (counts as dc + ch 1), dc in next dc, ch 1, dc in next dc. Leave the last mesh unworked. Turn. (3 dc, 2 meshes)
Row 4 (WS, point): Ch 1, sc in the first dc, hdc in the ch-1 sp, (dc, ch 2, dc) in the center dc, hdc in the next ch-1 sp, sc in the 3rd ch of the tch. (6 sts + ch-2 tip)
Fasten off. Repeat Rows 1–4 on each of the next five 5-st groups. (6 petals)
Outline Round
Join A with a sl st at the valley between two petals and ch 1. Then repeat the following 6 times:
- Work 5 sc evenly up the side edge of the petal.
- Sc in each of the next 3 sts of Row 4.
- Work (sc, ch 2, sc) in the ch-2 tip.
- Sc in each of the next 3 sts.
- Work 5 sc evenly down the other side edge.
- Sc2tog over the last row-end of this petal and the first row-end of the next petal.
Join and fasten off.
Count: 19 sts per petal × 6 = 114 sts, plus 6 ch-2 tips.
You can work over the petal tails as you go. The finished poinsettia should measure 6 in (15.2 cm) from tip to tip.
Part 3: Cream Center (Make 5)
Color C, 4 mm hook.
- Rnd 1: Magic ring, ch 1, 6 sc in ring, join. (6 sc)
- Rnd 2: In each sc around, work (sl st, ch 2, 3-dc bobble, ch 2, sl st). (6 bobble petals)
Fasten off, leaving a 10 in (25.4 cm) tail for sewing. The center should measure 1 1/2 in (3.8 cm).
Part 4: Leaf Sprig (Make 15)
Color B, 4 mm hook.
Needle: Ch 5, sl st in the 2nd ch from the hook and in the next 3 ch.
- Ch 17. Sl st in the 2nd ch from the hook (this is the tip).
- First side: (Needle, sl st in next 2 ch of the stem) 7 times, then sl st in the last ch.
- Second side: Rotate the piece and work along the bottom loops of the stem. (Needle, sl st in next 2 ch) 7 times, then sl st at the tip.
Fasten off, leaving a 10 in (25.4 cm) tail. (14 needles)
The sprig should measure 3 1/2 in (8.9 cm) long and 2 in (5.1 cm) wide.
Part 5: Berry (Make 20)
Color D, 4 mm hook.
- Rnd 1: Magic ring, 6 sc in ring. (6 sc)
- Rnd 2: 2 sc in each st. (12 sc)
- Rnd 3: Sc in each st. (12 sc)
- Stuff firmly.
- Rnd 4: Sc2tog 6 times. (6 sts)
Fasten off. Thread the tail through the front loops of the last round and pull to close. Keep the tail for sewing. The berry should measure 3/4 in (1.9 cm).
Make All Pieces
Pieces per color:
– A, deep red: 5 poinsettias
– B, forest green: 1 base ring, 15 sprigs
– C, cream: 5 centers
– D, bright red: 20 berries
Layout grid: Read clockwise from the top. Flower positions are the Rnd 5 markers. Gaps fall 15 sts past each marker.
POS 1  (12:00): POINSETTIA
GAP A  (1:12):  3 SPRIGS + 4 BERRIES
POS 2  (2:24):  POINSETTIA
GAP B  (3:36):  3 SPRIGS + 4 BERRIES
POS 3  (4:48):  POINSETTIA
GAP C  (6:00):  3 SPRIGS + 4 BERRIES
POS 4  (7:12):  POINSETTIA
GAP D  (8:24):  3 SPRIGS + 4 BERRIES
POS 5  (9:36):  POINSETTIA
GAP E  (10:48): 3 SPRIGS + 4 BERRIES
Joining
Method: Sew all pieces with a tapestry needle and matching yarn tails.
Step 1 – Centers to poinsettias: Center each cream flower over Rnd 1–2 of its poinsettia. Sew through Rnd 1 of the cream center, taking 6 small stitches (1 per sc).
Step 2 – Poinsettias to the ring: Lay the ring RS up and place each poinsettia center on a marker, halfway across the ring’s width. The poinsettia centers will then sit on a 13 in (33.0 cm) placement circle. Tack every 3rd st of the poinsettia’s Rnd 5 to the ring, for 10 tacks per flower. Then tack each petal’s Row 1 to the ring with 1 stitch.
Step 3 – Sprigs: In each gap, sew 1 sprig angled outward, 1 along the center of the ring, and 1 angled inward. Sew the stems along their full length. Let the needles tuck slightly under the petal edges.
Step 4 – Berries: Sew each group of 4 berries into a tight cluster over the sprig stems.
Step 5 – Ribbon: Fold the ribbon in half. Thread the fold under Rnd 6 of the ring behind the top poinsettia, pass the ends through the loop, and sew it secure.
Tension: Pull each sewing stitch snug, but not tight. Tight tacks pucker the ring and cup the petals.
Size checkpoint: Flower centers should be about 7 5/8 in (19.4 cm) apart. Petal tips should be about 1 5/8 in (4.1 cm) apart. The wreath should measure 19 in (48.3 cm) overall with a 7 in (17.8 cm) opening.
Border
Color B, 5 mm hook. Work the border on the base ring before joining.
Border gauge: 4 sc per 1 in (2.5 cm), the same as the ring. The border is not worked at a tighter gauge.
Outer border (Rnd 13): Ch 1, (sc in next 31 sts, 2 sc in next st) 6 times, join.
Count: 192 sts worked 1 sc each + 6 extra sts at the increases = 198 sc. That is 33 sc in each sixth of the ring.
Inner edge: Join B at the foundation chain. Sl st in each bottom loop around.
Count: 126 foundation ch worked 1 sl st each + 0 extra = 126 sl st. That is 21 in each sixth.
Why the math works: The outer edge grows by 6 sts per round, the same rate as the ring, so it lies flat. At 4 sc per inch, 198 sts form a 49 1/2 in (125.7 cm) circumference, which is about 15 3/4 in (40.0 cm) across. The inner edge adds no stitches, so the 10 in (25.4 cm) opening stays the same. The finished ring is about 2 7/8 in (7.3 cm) wide.
Final Blocking
- Block each poinsettia before sewing it to the ring. Pin it to 6 in (15.2 cm) from tip to tip.
- Pin every petal point sharply. Open the meshes with your fingertips.
- For acrylic, steam lightly without touching the yarn with the iron. For cotton blends, spritz with water. Let the pieces dry fully.
- Pin the sprigs straight and steam them so the needles fan out.
- Pin the base ring flat at 15 3/4 in (40.0 cm) and steam it.
- After joining, lay the wreath face up and gently re-steam any petals that lift.
Final Quality-Control Checklist
- [ ] The base ring lies flat at 10 in (25.4 cm) inner and 15 3/4 in (40.0 cm) outer diameter
- [ ] Each poinsettia has 6 petals, 114 outline sts, and 6 sharp tips
- [ ] Each poinsettia measures 6 in (15.2 cm)
- [ ] The cream centers are sewn on and centered
- [ ] The flowers are evenly spaced, with 1 at top center
- [ ] Each gap has 3 sprigs and 4 berries
- [ ] No base ring shows between the petals
- [ ] The ribbon is secure and the wreath hangs level
- [ ] The finished wreath measures 19 in (48.3 cm)
Troubleshooting
- The ring cups: Your increases are too tight or too few. Loosen your tension or rework from the cupping round.
- The ring ruffles: Your foundation chain is too loose, or the increases are stacking. Stagger the increases.
- The petals overlap or curl: Block the petals firmly. If they still crowd, go down 0.5 mm for the petals.
- The meshes close up: Your ch-1 spaces are too tight. Chain more loosely.
- The berries show stuffing: Go down to a 3.5 mm hook.
- The sprigs twist: Steam-block them flat and sew the full stem length.
Care
Spot clean only with a damp cloth. Store the wreath flat in a box between seasons.
Final Notes
The measurement chain runs like this:
- Gauge of 4 sc per 1 in (2.5 cm)
- 2 1/4 in (5.7 cm) poinsettia center
- 6 in (15.2 cm) poinsettia
- Base ring of 10 in (25.4 cm) inner and 15 3/4 in (40.0 cm) outer diameter
- 13 in (33.0 cm) placement circle
- 19 in (48.3 cm) finished wreath
Check each stage against these numbers and the wreath will come together evenly.
Happy crocheting!