

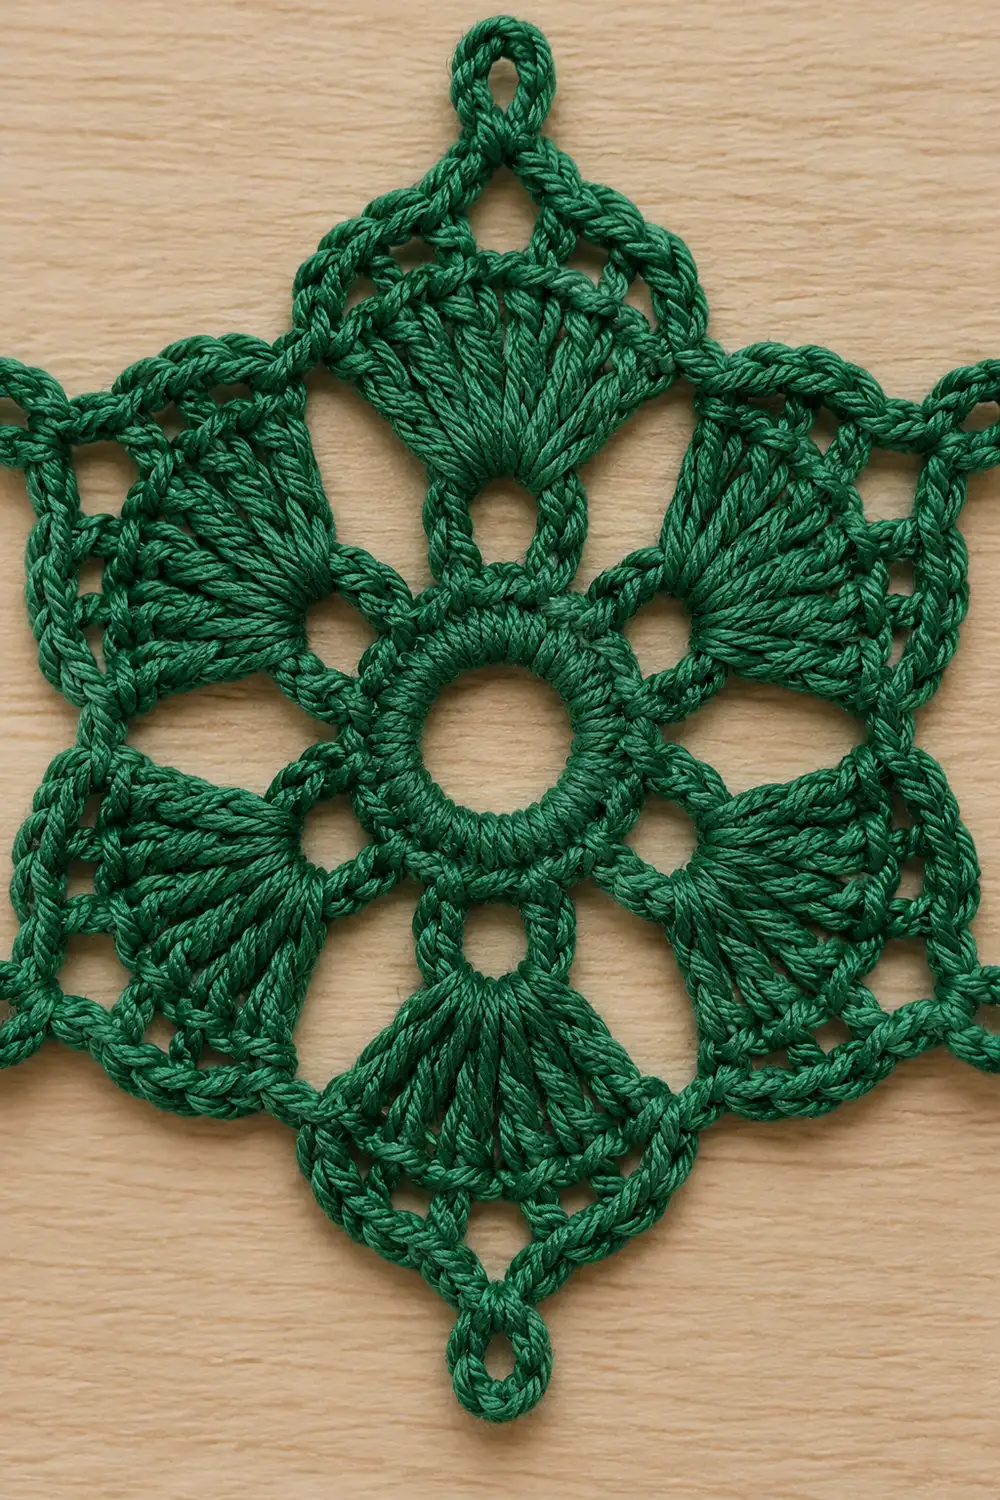
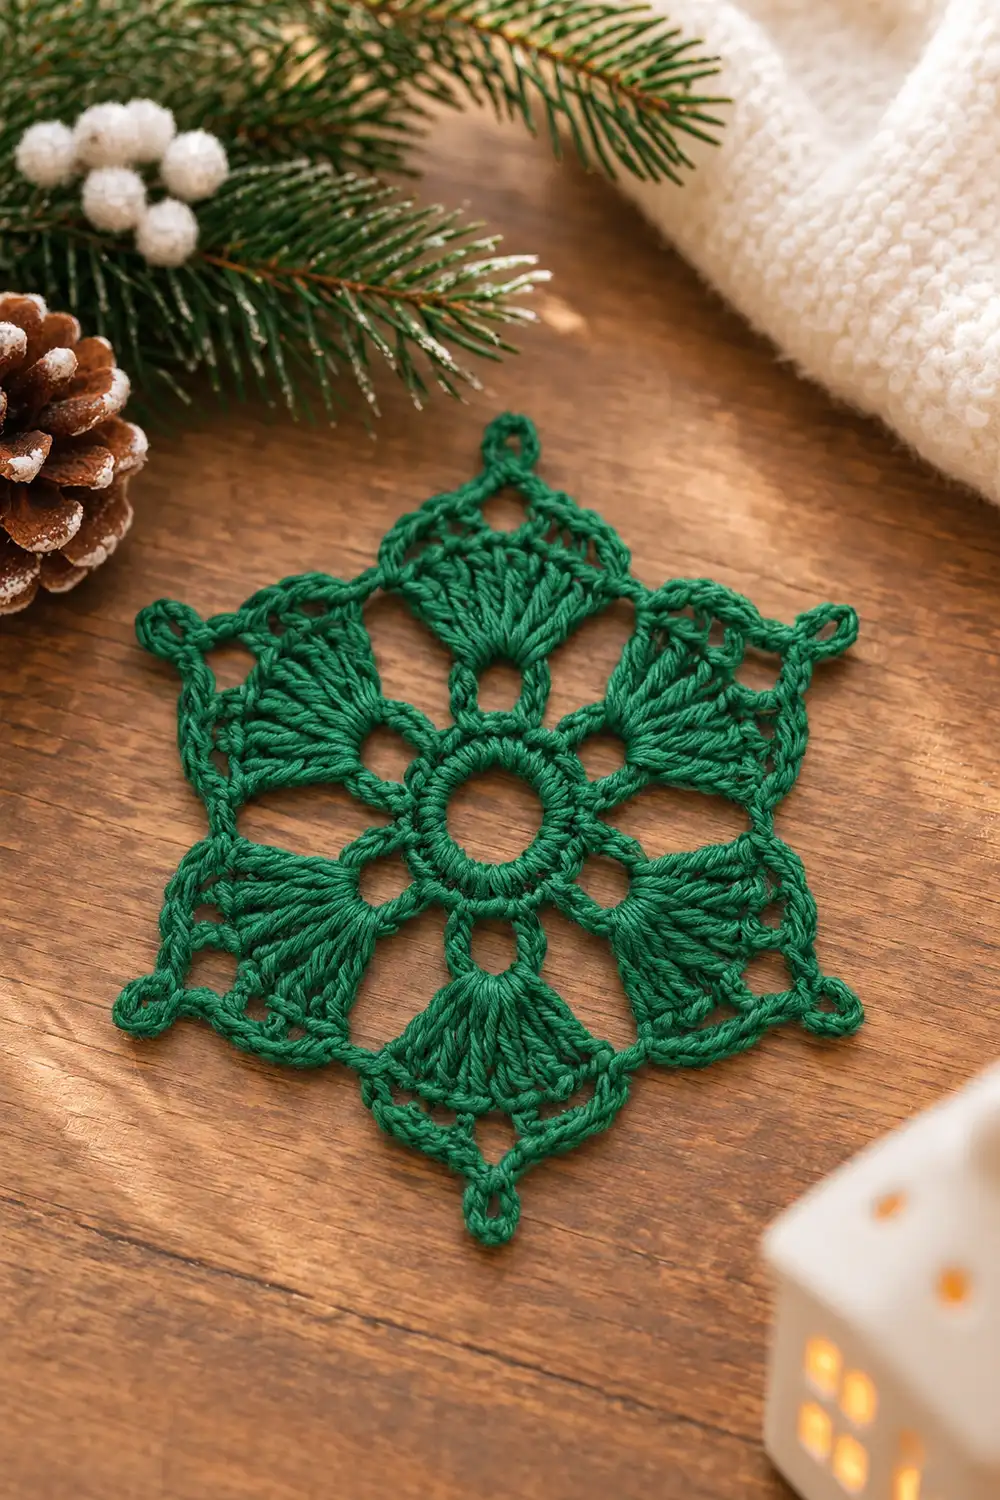
This six-pointed snowflake motif is worked in a deep forest green. A solid round medallion sits in the center, with six identical fan-shaped petals radiating outward at equal intervals. Each petal ends in a small picot at its tip, and open chain spaces between the petals give the piece its lacy look.
The style is classic lace motif: crisp double crochet fans, a clean single crochet center, and plenty of negative space. It works as an ornament, a gift tag, a coaster-style accent, or simply as a quick, satisfying motif to practice reading lace structure.
This pattern uses US crochet terms. The finished motif measures 3.75 in (9.5 cm) from point to opposite point after blocking.
Construction is simple. You make one piece, worked in five joined rounds without turning. Round 1 builds the solid center, Round 2 sets up twelve chain loops, Rounds 3 and 4 grow six fans, and Round 5 is a shaped edging that forms the points and picots.
Finished Size and Construction
- Finished size: 3.75 in (9.5 cm) point to opposite point
- Skill level: Easy / Advanced Beginner
- Terminology: US crochet terms
- Yarn weight: DK (weight 3), cotton or cotton blend
- Hook: 3.5 mm (US E-4)
- Number of pieces: 1
- Layout: Single motif, six arms at equal intervals
- Piece size: 3.75 in (9.5 cm) point to point
- Size before border: 3.25 in (8.3 cm) across, measured fan edge to opposite fan edge after Round 4
- Border depth: 0.25 in (0.6 cm) added on each side by Round 5
Materials
Yarn advice: Choose a smooth, tightly plied DK cotton. Cotton holds the fan shapes crisply and blocks to sharp points. Avoid fuzzy or very soft acrylics, which blur the open spaces and make the picots droop.
- Forest green, DK cotton: 5 g, about 12 m
Tools:
- 3.5 mm (US E-4) crochet hook
- Tapestry needle
- Scissors
- Rust-proof pins
- Foam blocking mat or folded towel
- Spray bottle with water
- Ruler or tape measure
The yarn quantity includes a margin of roughly 40% over the amount actually used. That covers a gauge swatch, a frogged round, and generous tails.
Abbreviations (US Terms)
- ch – chain
- sl st – slip stitch
- sc – single crochet
- hdc – half double crochet
- dc – double crochet
- st(s) – stitch(es)
- sp(s) – space(s)
- rnd – round
- beg – beginning
Special stitch – Picot: Ch 3, sl st in the 3rd ch from the hook (the first ch you made). This forms one small closed loop.
Gauge and Checkpoints
Gauge for a single motif is measured by checkpoint, not by a square swatch. Make Rounds 1 and 2 first and measure before you continue.
Checkpoints (measured flat, unblocked, lightly patted into shape):
- After Rnd 1: 1.25 in (3.2 cm) across
- After Rnd 2: 1.75 in (4.4 cm) across
- After Rnd 3: 2.5 in (6.4 cm) across, fan edge to opposite fan edge
- After Rnd 4: 3.25 in (8.3 cm) across, fan edge to opposite fan edge
- After Rnd 5 and blocking: 3.75 in (9.5 cm) point to opposite point
A tolerance of about 0.125 in (0.3 cm) at any checkpoint is normal.
If your motif is too big: Go down 0.25 mm to 0.5 mm in hook size, or tighten your chain loops.
If your motif is too small: Go up 0.25 mm to 0.5 mm in hook size.
The Round 2 checkpoint matters most. If it is off, every later round will be off too, so adjust there rather than pushing through.
Pattern
Round 1 – Solid Center Medallion
Ch 8, sl st to the first ch to form a ring.
Rnd 1: Ch 1 (does not count as a st), work 24 sc into the ring. Sl st to the first sc to join.
Count: 24 sc.
Spread the stitches evenly around the ring. The center hole should stay open and round, and the sc should sit side by side without overlapping. Checkpoint: 1.25 in (3.2 cm).
Round 2 – Twelve Chain Loops
Rnd 2: Ch 1, sc in the same st as the join, ch 3, skip next sc. Sc in next sc, ch 3, skip next sc. Repeat from * 10 more times. Sl st to the first sc to join.
Count: 12 sc and 12 ch-3 sps.
Each repeat uses 2 sts of Round 1, and 12 × 2 = 24, so the round closes evenly.
The 12 loops alternate in purpose. The 1st, 3rd, 5th, 7th, 9th, and 11th loops are petal loops. The 2nd, 4th, 6th, 8th, 10th, and 12th loops are gap loops. Checkpoint: 1.75 in (4.4 cm).
Round 3 – Fan Foundations
Rnd 3: Sl st into the first ch-3 sp (a petal loop). Ch 3 (counts as first dc), 6 dc in the same sp.
Ch 2, sc in next ch-3 sp (gap loop), ch 2, 7 dc in next ch-3 sp (petal loop). Repeat from * 4 more times.
Ch 2, sc in the last ch-3 sp (gap loop), ch 2. Sl st to the top of the beg ch-3 to join.
Count: 42 dc (6 fans of 7 dc), 6 sc, and 12 ch-2 sps.
This is a growth round. The 42 dc are this round’s own complete count.
The sc in each gap loop anchors the space between petals. The ch-2 sps on either side of it begin the open lace windows. Checkpoint: 2.5 in (6.4 cm).
Round 4 – Full Fans
You are now at the top of the beg ch-3, which is the first dc of the first fan.
Rnd 4: Ch 3 (counts as first dc), 2 dc in next dc, dc in next dc, 2 dc in next dc, dc in next dc, 2 dc in next dc, dc in last dc of the fan.
Ch 3, skip ch-2 sp, sc in the gap sc, ch 3, skip ch-2 sp. Then over the next 7-dc fan: dc in first dc, 2 dc in next dc, dc in next dc, 2 dc in next dc, dc in next dc, 2 dc in next dc, dc in last dc. Repeat from * 4 more times.
Ch 3, skip ch-2 sp, sc in the last gap sc, ch 3, skip ch-2 sp. Sl st to the top of the beg ch-3 to join.
Count per fan: 1 + 2 + 1 + 2 + 1 + 2 + 1 = 10 dc.
Round count: 60 dc (6 fans of 10 dc), 6 sc, and 12 ch-3 sps.
This is a growth round. The 60 dc are this round’s own complete count.
The increases fall on the 2nd, 4th, and 6th dc of each 7-dc fan. That placement is symmetrical, so each fan opens evenly into a radiating shell.
The skipped ch-2 sps from Round 3 stay open below the new ch-3 sps. These are the small lace windows between the petals. Checkpoint: 3.25 in (8.3 cm).
Border (Round 5 – Pointed Edging with Picots)
On a single motif, the final edging round acts as the border. It turns each rounded fan into a pointed arm with a picot tip.
Border gauge: The 10-dc edge of each fan measures about 1.25 in (3.2 cm). That gives roughly 8 sts per 1 in (2.5 cm). The border is worked 1 stitch into each dc, so it keeps the same density, 8 sts per 1 in (2.5 cm). It will not ruffle or pull in.
You are at the top of the beg ch-3, which is the first dc of the first fan.
Rnd 5: Ch 1, sc in the same st, sc in next dc, hdc in next 2 dc, dc in next dc, picot, dc in next dc, hdc in next 2 dc, sc in next 2 dc.
Ch 2, sl st in the gap sc, ch 2. Then over the next 10-dc fan: sc in next 2 dc, hdc in next 2 dc, dc in next dc, picot, dc in next dc, hdc in next 2 dc, sc in next 2 dc. Repeat from * 4 more times.
Ch 2, sl st in the last gap sc, ch 2. Sl st to the first sc to join. Fasten off, leaving a 6 in (15.2 cm) tail.
Exact counts per arm (side):
- 4 sc
- 4 hdc
- 2 dc
- 1 picot
That is 10 sts plus 1 picot, worked into the 10 dc of the fan.
Exact counts per gap: ch 2, 1 sl st, ch 2.
Round count: 60 sts (24 sc, 24 hdc, 12 dc), 6 picots, 6 sl sts, and 12 ch-2 sps.
This is a conversion round, not a growth round. The 60 sts come from working 1 st into each of the 60 dc of Round 4. The only additions are 6 picots, one at each arm tip, plus the chain-and-slip-stitch gaps that replace the ch-3 sps.
Why the math works:
- 24 sc in Round 1 ÷ 2 sts per loop = 12 loops, which split into 6 petal loops and 6 gap loops.
- Each petal loop takes 7 dc.
- 3 symmetrical increases bring each fan to 10 dc.
- 10 is even, so the picot sits exactly between the 5th and 6th sts, leaving 5 sts on each side of the tip.
- The sc-hdc-dc grading rises toward the middle of each fan. This lifts the center, so each fan comes to a point with the picot at its tip.
The border adds 0.25 in (0.6 cm) on each side: 3.25 in (8.3 cm) + 0.25 in (0.6 cm) + 0.25 in (0.6 cm) = 3.75 in (9.5 cm).
Final Blocking
- Weave in both tails along the backs of sts. Do not trim them yet.
- Draw or mark a circle 3.75 in (9.5 cm) across on paper. Place it under a piece of plastic on your blocking mat.
- Mist the motif evenly with water until it is damp but not dripping.
- Lay the motif right side up, centered on the circle.
- Pin the center hole open into a round shape, using 3 or 4 pins.
- Pin each picot tip on the circle line. Place opposite points first, then the remaining four. Space the tips about 1.875 in (4.8 cm) apart around the circle.
- Place one pin inside each lace window between the petals so the spaces stay open.
- Pat each fan flat so the dc rays radiate evenly.
- Let the motif dry completely before unpinning. This takes about 4 to 6 hours.
- Trim the tails close to the work.
For a stiffer ornament, use a light spray starch at step 3 instead of plain water.
Final Quality-Control Checklist
- Round 1 has 24 sc, and the center hole is round and open.
- Round 2 has 12 ch-3 loops, evenly spaced.
- There are 6 fans with exactly 10 dc each after Round 4.
- Each arm in Round 5 reads: 2 sc, 2 hdc, 1 dc, picot, 1 dc, 2 hdc, 2 sc.
- There are 6 picots, one centered at each arm tip.
- Each gap reads: ch 2, sl st, ch 2.
- The motif lies flat with no cupping or ruffling.
- The blocked size is 3.75 in (9.5 cm) point to opposite point, within 0.125 in (0.3 cm).
- All six arms are the same length, about 1.875 in (4.8 cm) from center to tip.
- Tails are woven in securely and trimmed.
Troubleshooting
Center cups or puckers.
The ring is too small for 24 sc. Make the ring with ch 9 instead of ch 8, or use a magic ring and close it less tightly.
Center hole is too large.
Pull a magic ring tighter, or make the ring with ch 7.
Motif ruffles after Round 4.
Your dc are loose. Go down 0.25 mm in hook size, or shorten the ch-3 gap chains to ch-2.
Motif cups after Round 4.
Your chains are too tight. Loosen them, or go up 0.25 mm in hook size.
Arms are uneven lengths.
Recount each fan. One fan likely has 9 or 11 dc. Frog back to the miscounted fan and correct it.
Picots lean or flop over.
Pull the sl st of the picot snug, and pin each picot straight during blocking.
Points look rounded rather than sharp.
Check that you used hdc and dc in the middle of each arm, not sc throughout. Then block firmly with starch.
Lace windows close up.
Check that you skipped the ch-2 sps in Round 4 rather than working into them.
Care
Hand wash in cool water with mild soap. Press out the water in a towel, then reshape and pin to dry flat. Re-starch if you use it as an ornament.
Final Notes
The measurement chain for this motif runs from 1.25 in (3.2 cm) after Round 1, to 1.75 in (4.4 cm) after Round 2, to 2.5 in (6.4 cm) after Round 3, to 3.25 in (8.3 cm) after Round 4. The edging then adds 0.25 in (0.6 cm) per side, for a blocked finished size of 3.75 in (9.5 cm) point to point.
The stitch counts follow the same steady logic:
- 24 sc in the center
- 12 loops in Round 2
- 6 fans of 7 dc in Round 3
- 6 fans of 10 dc in Round 4
- 10 border sts plus 1 picot per arm in Round 5
Optional: if you enjoy the motif, several can be made and used as a set of ornaments or gift toppers.
Check your Round 2 measurement, count each fan, and block to the circle. The result is a crisp, lacy snowflake every time.
Happy crocheting!