

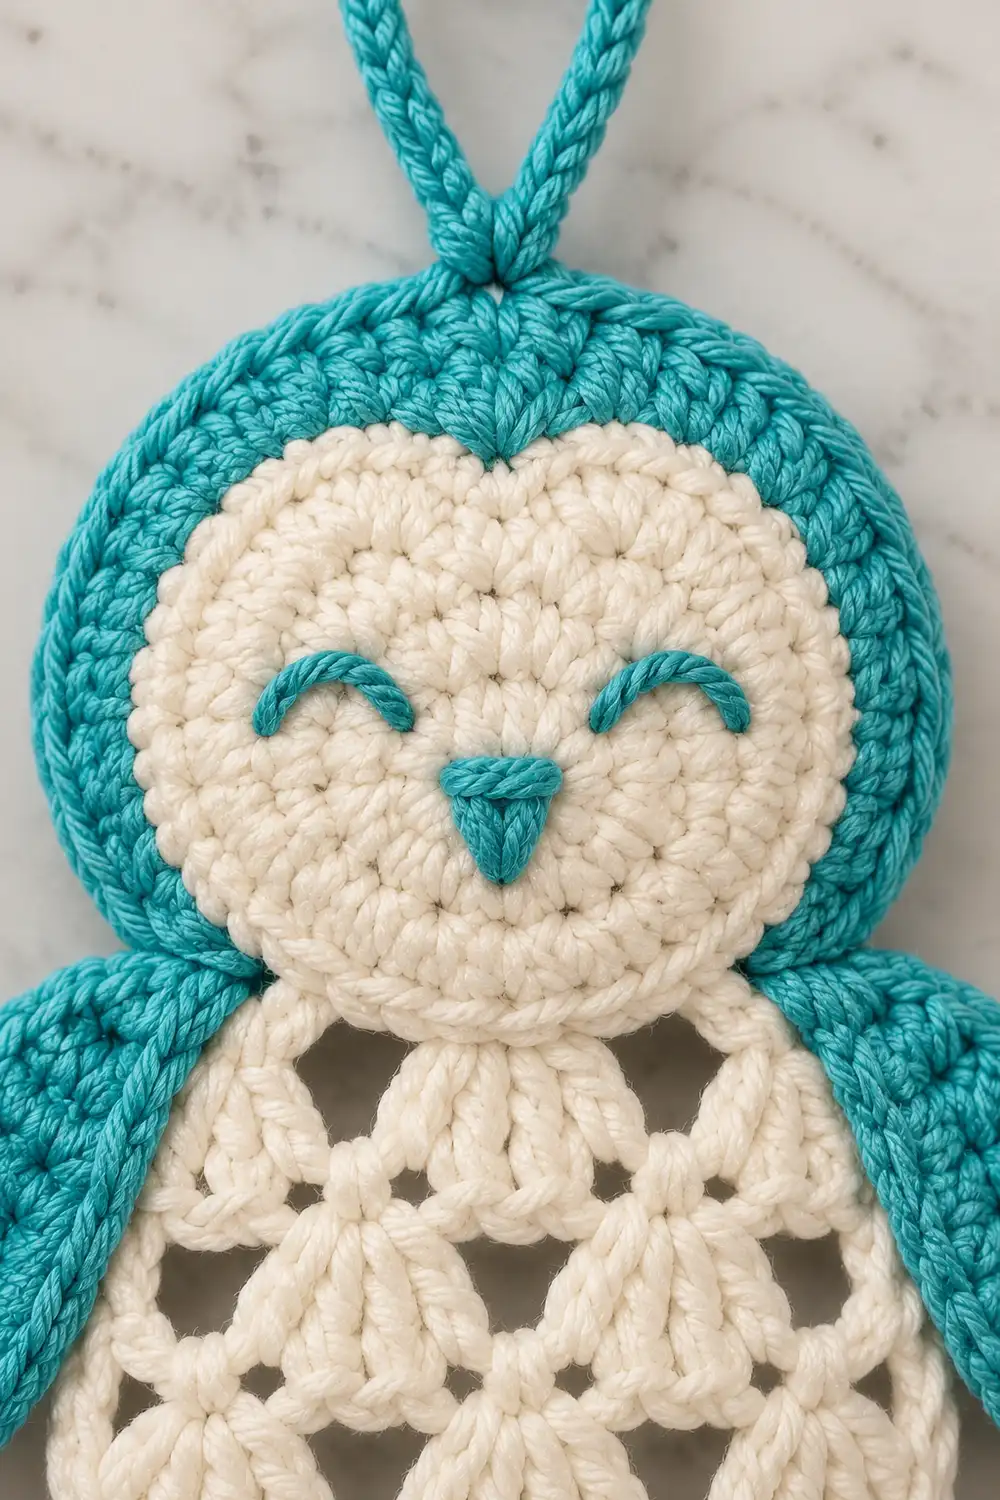
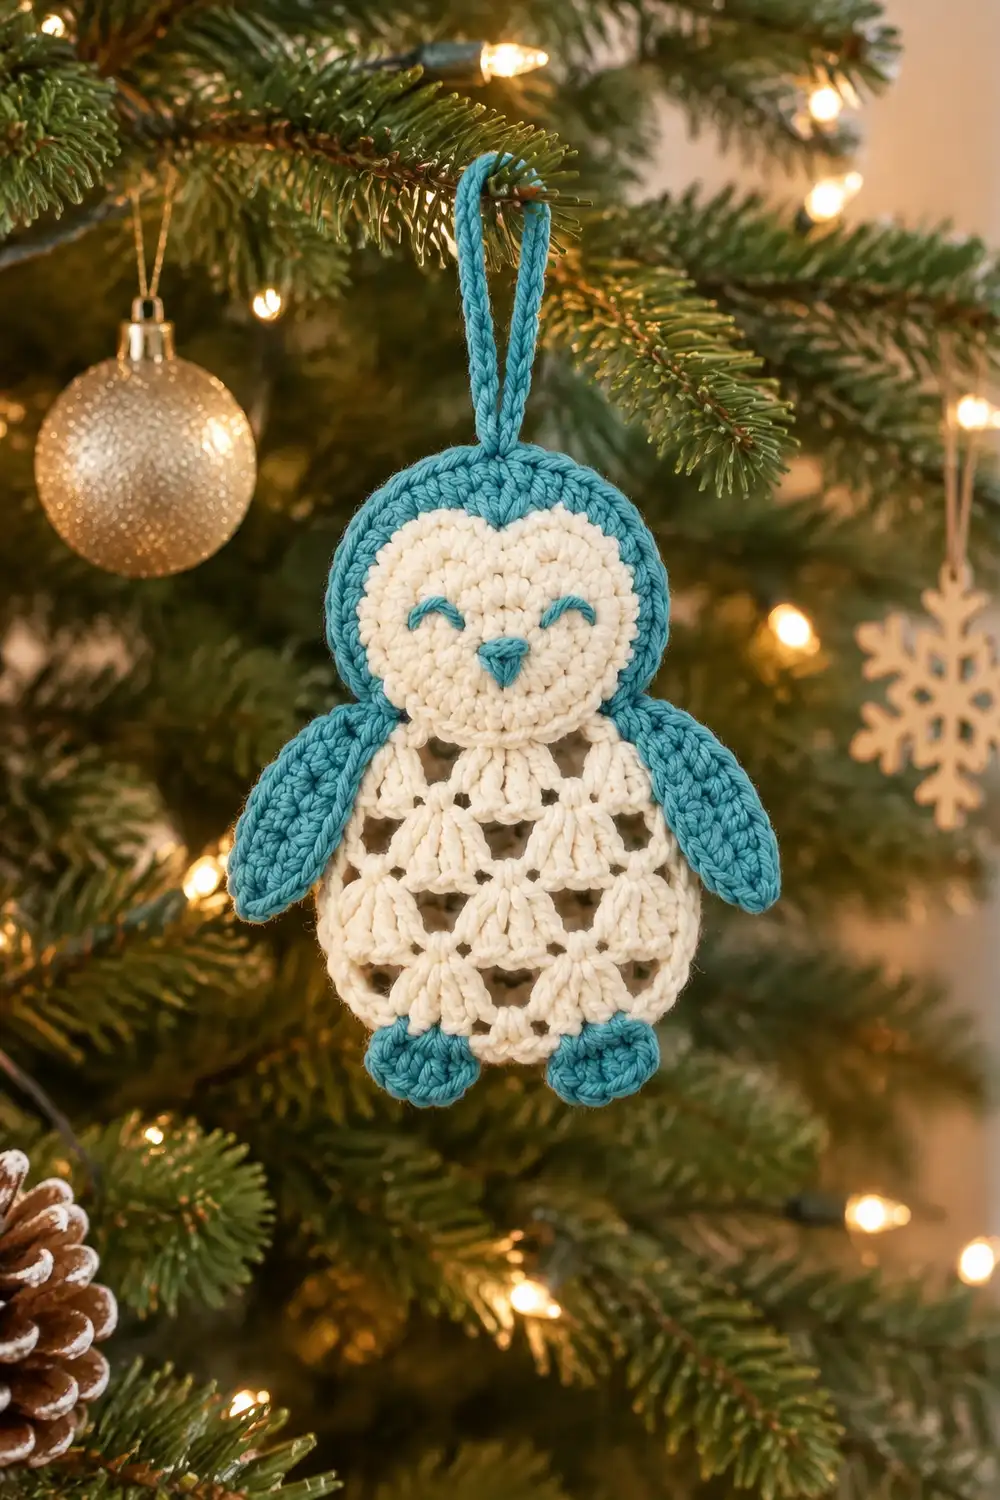
This little owl ornament pairs bright turquoise with soft cream. A cream circular face sits inside a turquoise head round. The face has embroidered closed eyes and a small triangular beak, which give it a sleepy, content look.
Below the head, a turquoise-edged body frames a large cream openwork belly made from repeating shell (fan) stitches. The shells stack into a lattice with small triangular windows between them. Stubby turquoise wings sit on each side, turquoise feet peek out at the base, and a braided turquoise loop at the top lets it hang on a tree.
This pattern uses US crochet terms. The finished owl is 6 in (15.2 cm) wide across the wings and 7.5 in (19.1 cm) tall from the top of the head to the bottom of the feet, not counting the loop.
The owl is one amigurumi ornament assembled from small flat components so it lies flat. You crochet the head and the belly body in the round, add turquoise border rounds, make two wings, two feet, and a braided loop, then sew everything together.
Finished Size and Construction
- Finished size: 6 in (15.2 cm) wide x 7.5 in (19.1 cm) tall, plus a 2 in (5.1 cm) loop
- Skill level: Advanced beginner
- Terminology: US crochet terms
- Yarn weight: Worsted (#4), cotton or cotton blend
- Hook: 4.0 mm (G-6)
- Number of pieces: 1 ornament, assembled from 7 components (head, body, 2 wings, 2 feet, loop)
- Layout: Head overlaps the top of the body; wings are tucked behind the body sides; feet are tucked behind the bottom edge
- Piece sizes: Head 3.25 in (8.3 cm) across; body 4.5 in (11.4 cm) across; wing 2.25 x 1 in (5.7 x 2.5 cm); foot 1.25 x 0.9 in (3.2 x 2.3 cm)
- Size before border: Face 2.5 in (6.4 cm); belly 4 in (10.2 cm)
- Border depth: Head 0.375 in (1.0 cm) per side; body 0.25 in (0.6 cm) per side
Materials
Use a smooth worsted cotton so the shells stay crisp and the ornament holds its shape. Avoid fuzzy or very splitty yarns, because they hide the lattice windows.
- Turquoise: 15 g, about 23 m
- Cream: 15 g, about 23 m
Quantities include a margin of roughly 20% for swatching and sewing tails.
Tools:
- 4.0 mm (G-6) crochet hook
- Tapestry needle
- Scissors
- 1 stitch marker
- Rust-proof pins
- Blocking mat or folded towel
- Spray bottle with water
Abbreviations (US Terms)
- ch – chain
- sl st – slip stitch
- sc – single crochet
- hdc – half double crochet
- dc – double crochet
- inc – 2 sc in the same stitch
- MR – magic ring
- sp – space
- st(s) – stitch(es)
Special stitch – Shell: work 5 dc into the same stitch.
Gauge and Checkpoints
Gauge: 18 sc and 20 sc rows = 4 in (10.2 cm), which is 4.5 sc per inch.
Make the cream face first and treat it as your test piece. It is small and shows quickly whether your tension matches.
Checkpoints:
- Face after Round 6: 2.5 in (6.4 cm) across
- Head after Round 8: 3.25 in (8.3 cm) across
- Body after Round 2: 1.75 in (4.4 cm) across
- Body after Round 5: 4 in (10.2 cm) across, lightly stretched
- Body after border: 4.5 in (11.4 cm) across
If too big: go down to a 3.75 mm hook. If too small: go up to a 4.5 mm hook. Remake the face before continuing so all parts match.
Head
Worked in continuous rounds with cream, then two turquoise border rounds (see Border section). Place a marker in the first stitch of each round.
Round 1: With cream, 6 sc in MR. (6 sc)
Round 2: Inc in each st around. (12 sc)
Round 3: (Sc in next st, inc) 6 times. (18 sc)
Round 4: (Sc in next 2 sts, inc) 6 times. (24 sc)
Round 5: (Sc in next 3 sts, inc) 6 times. (30 sc)
Round 6: (Sc in next 4 sts, inc) 6 times. (36 sc)
Sl st in the next st and fasten off cream.
Checkpoint: 2.5 in (6.4 cm) across, lying flat.
Face Details
Embroider the face before adding the border so the back stays tidy.
- Thread turquoise onto the tapestry needle.
- Eyes: Between Rounds 3 and 4, mark two spots about 1 in (2.5 cm) apart. Backstitch a small downward curve, about 0.4 in (1.0 cm) wide, at each spot for the closed eyes.
- Beak: Centered just below the eye line, satin stitch a small downward-pointing triangle, about 0.25 in (0.6 cm) wide at the top.
- Weave in the ends on the back.
Body (Shell Lattice Belly)
Worked in joined rounds with cream. The shells alternate position each round. Each new shell sits on the sc below it, and each new sc sits in the center of a shell below it. This stacking creates the lattice.
Round 1: MR, ch 3 (counts as dc), 11 dc in ring, sl st to top of ch-3. (12 dc)
Round 2: Ch 3 (counts as dc), dc in same st, 2 dc in each st around, sl st to top of ch-3. (24 dc)
Checkpoint: 1.75 in (4.4 cm) across.
Round 3: Ch 1, sc in same st, skip 1 st, shell in next st, skip 1 st, sc in next st. Repeat from * 5 more times, omitting the final sc on the last repeat. Sl st to first sc. (6 shells + 6 sc = 36 sts)
Each repeat uses 4 stitches of Round 2: 4 x 6 = 24. The count works out evenly.
Round 4: Sl st in next 3 dc to reach the center dc of the first shell. Ch 1, sc in same dc, ch 2, shell in next sc, ch 2, sc in center dc of next shell, ch 2, shell in next sc, ch 2. Repeat from * 4 more times. Sl st to first sc. (6 sc + 6 shells [30 dc] + 12 ch-2 sps)
Round 5: Sl st in each of next 2 ch, sl st in next 3 dc to reach the center dc of the first shell. Ch 1, sc in same dc, ch 3, shell in next sc, ch 3, sc in center dc of next shell, ch 3, shell in next sc, ch 3. Repeat from * 4 more times. Sl st to first sc. Fasten off cream. (6 sc + 6 shells [30 dc] + 12 ch-3 sps)
Rounds 4 and 5 keep 6 shells but grow through longer chain spaces. Those chain arches form the triangular windows.
Checkpoint: 4 in (10.2 cm) across when gently stretched flat.
Wings (Make 2)
Worked with turquoise in one round along both sides of a foundation chain.
Foundation: Ch 11.
Round 1: Sl st in 2nd ch from hook, sc in next ch, hdc in next ch, dc in next 3 ch, hdc in next ch, sc in next 2 ch, 3 sc in last ch. Rotate to work along the other side of the chain: sc in next 2 ch, hdc in next ch, dc in next 3 ch, hdc in next ch, sc in next ch, sl st in last ch. (9 + 3 + 9 = 21 sts)
Fasten off and leave a 10 in (25.4 cm) tail for sewing.
The sl st end is the narrow wing tip. The 3-sc end is the rounded shoulder.
Checkpoint: 2.25 in (5.7 cm) long x 1 in (2.5 cm) wide.
Feet (Make 2)
Worked with turquoise around a short chain.
Foundation: Ch 4.
Round 1: Sc in 2nd ch from hook, sc in next ch, 3 sc in last ch. Rotate and work along the other side: sc in next ch, 2 sc in last ch (the same ch as the first sc). Do not join. (8 sc)
Round 2: Inc in st 1, sc in st 2, inc in each of sts 3–5, sc in st 6, inc in each of sts 7–8. Sl st to next st. (14 sc)
The count is 8 stitches worked plus 6 increases, for 14 sc.
Fasten off and leave an 8 in (20.3 cm) tail.
Checkpoint: 1.25 in (3.2 cm) x 0.9 in (2.3 cm).
Braided Hanging Loop
- With turquoise, make 3 separate chains of 22 ch each. Leave a 6 in (15.2 cm) tail at both ends of each chain.
- Knot the three chains together at one end.
- Braid them snugly and evenly, then knot the other end.
- The braid should measure about 4.25 in (10.8 cm).
- Fold it into a loop. Leave the knotted ends free for sewing.
Checkpoint: The folded loop stands 2 in (5.1 cm) tall.
Border
All border rounds use turquoise and are worked with the right side facing. The border gauge matches the main gauge: 4.5 sc per inch, measured along the middle of the border round.
Head Border (Rounds 7–8)
Join turquoise in any st of Round 6.
Round 7: Ch 1, (sc in next 5 sts, inc) 6 times. Sl st to first sc. (36 sts worked + 6 increases = 42 sc)
Round 8: Ch 1, (sc in next 6 sts, inc) 6 times. Sl st to first sc. (42 sts worked + 6 increases = 48 sc)
Fasten off.
Why it works: Adding 6 stitches per sc round is standard flat-circle math, so the head stays flat. The two rounds add 0.375 in (1.0 cm) per side. That takes the head from 2.5 in (6.4 cm) to 3.25 in (8.3 cm) across.
Body Border (Round 6)
This is a conversion round. It turns the shells and chain spaces into a solid sc edge.
Join turquoise in the center dc of any shell.
Round 6: Ch 1. Work 1 sc in each dc, 2 sc in each ch-3 sp, and 1 sc in each sc all the way around. Sl st to first sc.
Per shell repeat: 5 sc (over shell) + 2 sc (ch-3 sp) + 1 sc (over sc) + 2 sc (ch-3 sp) = 10 sc
Total: 36 sts worked 1-per-stitch (30 dc + 6 sc) + 24 sc in 12 ch-3 sps = 60 sc
Fasten off.
Why it works: The border’s midline circle is about 4.25 in (10.8 cm) across, so its circumference is about 13.35 in (33.9 cm). At 4.5 sc per inch, that circumference needs about 60 sc. Working 3 sc per chain space would give 72 sc, which ruffles. Working 1 sc per chain space would give 48 sc, which cups. Two sc per space keeps the edge flat.
Checkpoint: 4.5 in (11.4 cm) across.
Assembly
Lay all components face up and arrange them before sewing anything.
- Head to body: Place the head over the top of the body so it overlaps the body by 0.75 in (1.9 cm). The head sits in front. Pin it in place, then whipstitch the lower turquoise edge of the head to the body with turquoise yarn.
- Wings: Tuck each wing behind the body, shoulder end up, at the level of the head–body join. Angle the tips slightly outward so about 0.75 in (1.9 cm) of each wing shows beyond the body edge. Sew the hidden part of each wing to the back of the body border.
- Feet: Tuck the feet behind the bottom edge. Space them about 1.5 in (3.8 cm) apart, center to center, so about half of each foot shows below the body. Sew them from the back.
- Loop: Center the knotted ends on the back of the head at the top. Sew them securely through Rounds 7–8. Trim the excess tails.
- Weave in all ends on the back.
Checkpoint: The owl measures 6 in (15.2 cm) wide across the wings and 7.5 in (19.1 cm) tall from head to feet.
Final Blocking
- Lay the owl face down on the blocking mat.
- Mist it with water until damp, not soaked.
- Turn it face up. Gently open each lattice window with your fingers.
- Pin the body border into a true circle of 4.5 in (11.4 cm).
- Pin the head round at 3.25 in (8.3 cm).
- Pin each wing flat and pin the feet into neat ovals.
- Let the owl dry completely, then unpin.
Final Quality-Control Checklist
- Face measures 2.5 in (6.4 cm) and lies flat
- Head has 48 sc in Round 8
- Body has 6 shells per round and 60 sc in the border
- All 12 lattice windows are open and even
- Eyes are level, and the beak is centered below them
- Wings match in size and angle
- Feet are evenly spaced
- Loop is secure and centered
- No loose ends show on the front
- Finished size is 6 x 7.5 in (15.2 x 19.1 cm)
Troubleshooting
Face cups into a bowl: Your tension is too tight on the increases. Go up a hook size or loosen your increases.
Face ruffles: Check that you have exactly 6 increases per round.
Shells lean or twist: Make sure each sc lands in the center dc (the 3rd of 5) of the shell below it.
Body border ruffles: You probably worked 3 sc into the chain spaces. Use exactly 2 sc per ch-3 sp.
Body border cups: Your border tension is tight. Loosen up or switch to a 4.5 mm hook for that round only.
Windows look closed: Block the piece again and open each chain arch with a pin.
Wings look uneven: Count all 21 sts on each wing and match their placement before sewing.
Loop sags: Braid more firmly, or add a few extra sewing stitches at the base of the loop.
Care
Hand wash in cool water, press out excess water in a towel, and dry flat. Reshape the lattice while it is still damp.
Final Notes
The measurement chain runs like this. A 2.5 in (6.4 cm) cream face becomes a 3.25 in (8.3 cm) head after two turquoise rounds. A 4 in (10.2 cm) shell-lattice belly becomes a 4.5 in (11.4 cm) body after its 60-sc border. The wings and feet bring the owl to 6 in (15.2 cm) wide and 7.5 in (19.1 cm) tall.
Check each stage as you go, and the finished ornament will come out sized correctly.
Optional: you can stitch several owls in different accent colors for a matching set of tree ornaments.
Happy crocheting!