

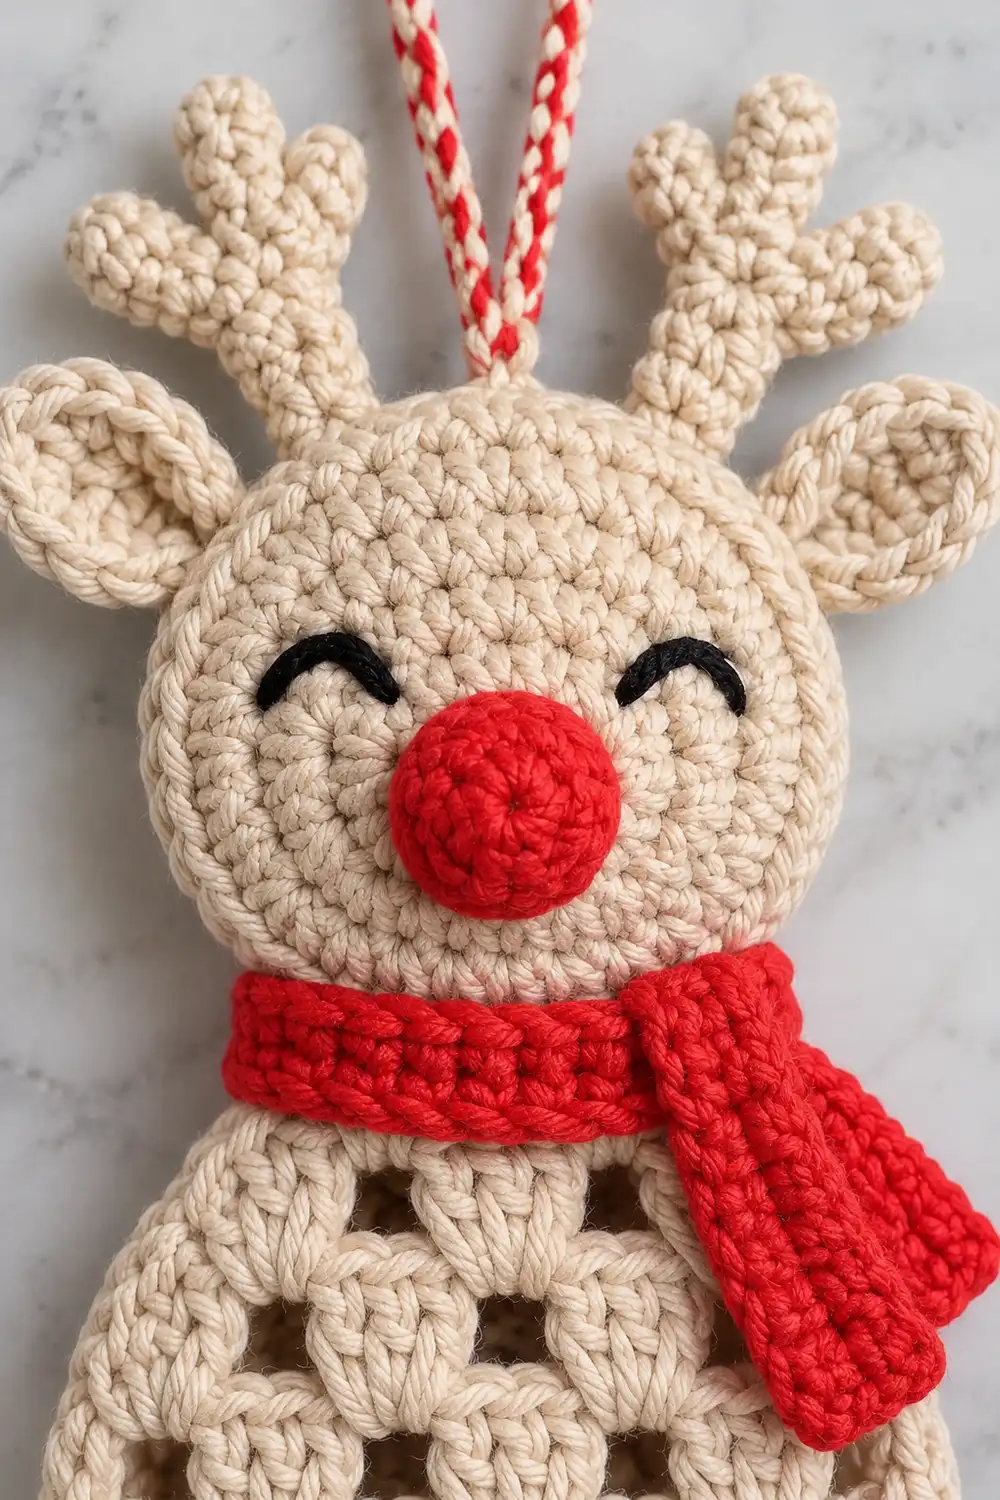
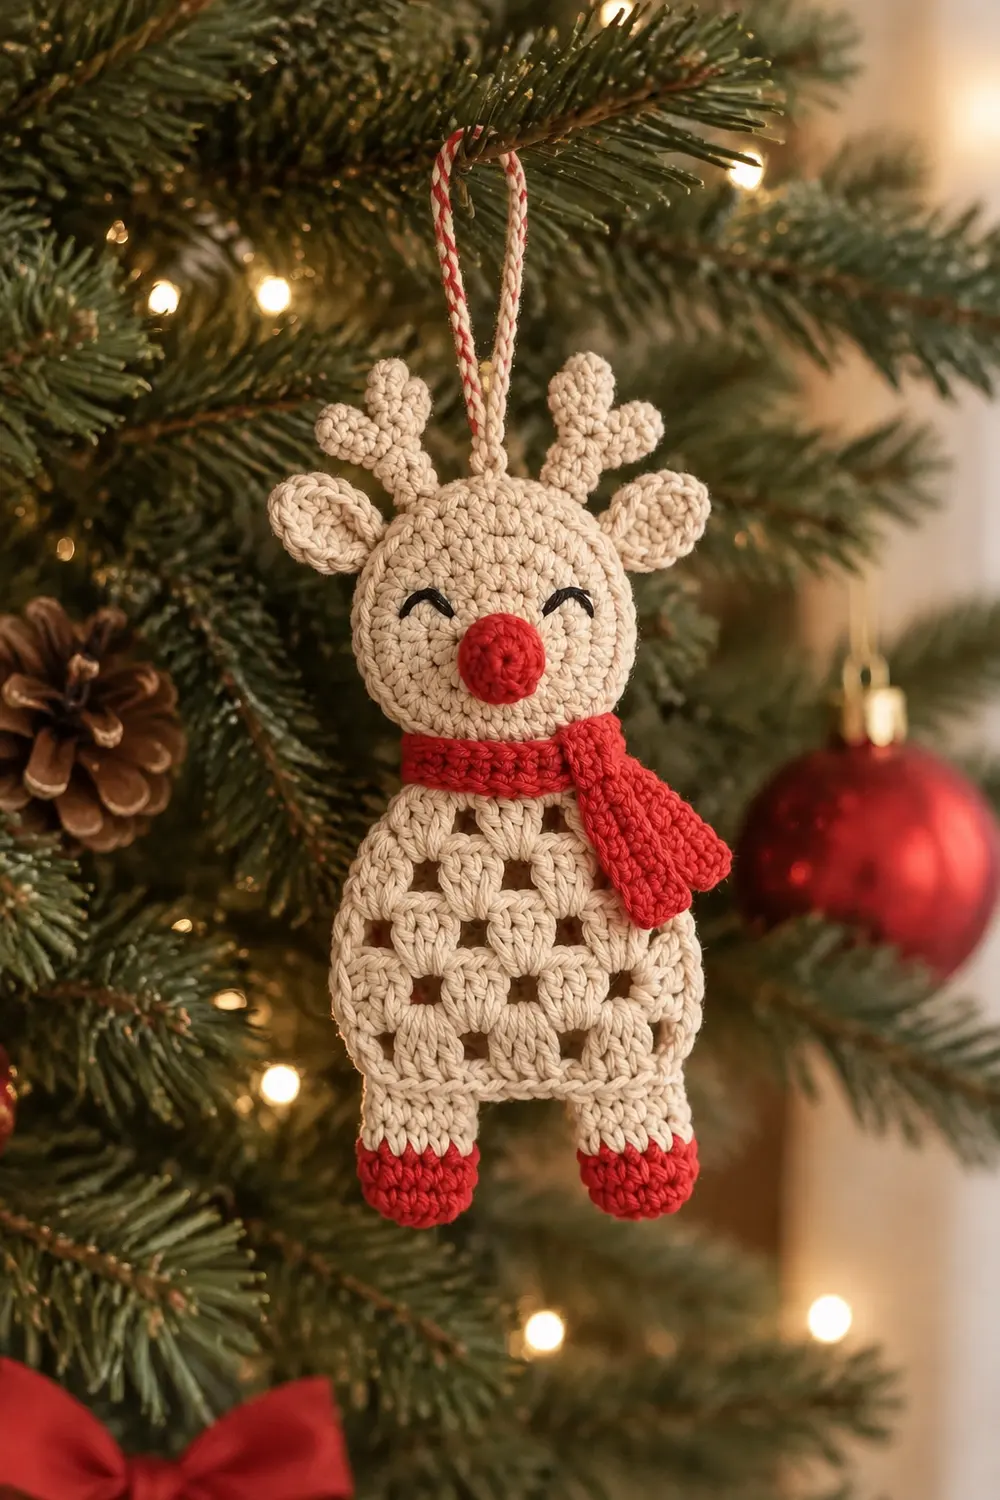
This little reindeer is made to hang on the tree. It has a cream head with a rounded dome shape, two pointed upright antlers, black embroidered closed eyes, and a bright red crocheted ball nose. Below the head, a cream body worked in open filet crochet shows a regular grid of square holes.
Red accents finish the look: a crocheted bow at the neck and red crocheted hooves on all four legs. A twisted cream and red cord loop at the top makes it ready to hang.
Everything except the filet body is worked in tight single crochet and slip stitch, so the head, nose, antlers, and legs hold their shape. The pattern uses US crochet terms. The finished ornament measures about 4.75 in (12.1 cm) tall from antler tips to hooves, not counting the hanging loop.
Construction is simple. You make a domed head front and a flat head back and join them with light stuffing. You work the filet body as a flat panel with a single crochet border. Then you add small sc components (antlers, nose, legs, bow) and finish with the twisted cord.
Finished Size and Construction
- Finished height: 4.75 in (12.1 cm), antler tips to hooves, loop excluded
- Finished width: 3.4 in (8.6 cm) across the front legs; body 2.6 in (6.6 cm)
- Skill level: Intermediate
- Terminology: US crochet terms
- Yarn weight: Sport (2), cotton
- Hook: 2.75 mm (US C-2)
- Number of pieces: One finished ornament, assembled from small components: head front, head back, 2 antlers, nose, body panel, bow band, bow wrap, 4 legs, and 2 cords
- Layout (top to bottom): cord loop, antlers, domed head with nose and eyes, bow at the neck, filet body, legs
- Body panel size, bordered: 2.6 in x 2.0 in (6.6 cm x 5.1 cm)
- Body panel size before border: 2.2 in x 1.6 in (5.6 cm x 4.1 cm)
- Border depth: 0.2 in (0.5 cm)
Materials
Use a smooth, tightly plied cotton or cotton blend in sport weight, about 165 m per 50 g. Cotton gives crisp stitches, square filet holes, and a firm ornament that won’t sag on a branch.
- Cream: 12 g, about 40 m
- Red: 4 g, about 13 m
- Black: about 1 m of sport yarn or 6-strand embroidery floss, for the eyes
These quantities include a margin for swatching and sewing tails.
Tools:
- 2.75 mm (US C-2) crochet hook
- Tapestry needle
- Stitch marker
- Small amount of polyester fiberfill
- Rust-proof pins
- Scissors
- Spray bottle for blocking
Abbreviations (US Terms)
- ch – chain
- sl st – slip stitch
- sc – single crochet
- dc – double crochet
- MR – magic ring
- inc – 2 sc in the same stitch
- dec – sc2tog (invisible decrease recommended)
- BLO – back loop only
- st(s) – stitch(es)
- sp – space
- rnd – round
- FO – fasten off
Special stitch – filet mesh square: dc, ch 1, skip 1 stitch, dc. The two dc posts and the ch-1 between them form one open square. Neighboring squares share a dc post.
Work the head, nose, antlers, and legs in continuous spiral rounds. Do not join rounds unless told to. Move your marker up each round.
Gauge and Checkpoints
- Sc gauge: 24 sc x 26 rnds = 4 in (10.2 cm), so 6 sc per inch
- Filet gauge: 6 squares x 6 rows = 2 in (5.1 cm), so 3 squares and 3 rows per inch
Test one piece first. Make the head front through Rnd 6 before anything else. It should measure 1.8 in (4.6 cm) across when laid flat.
Checkpoints:
- Head front after Rnd 6: 1.8 in (4.6 cm) across
- Joined head: about 2 in (5.1 cm) across
- Body before border: 2.2 in x 1.6 in (5.6 cm x 4.1 cm)
- Body after border: 2.6 in x 2.0 in (6.6 cm x 5.1 cm)
- Antler: 0.75 in (1.9 cm) long
- Nose: 0.5 in (1.3 cm) across
- Leg: 1.1 in (2.8 cm) long; hoof 0.75 in (1.9 cm) wide when flattened
- Bow: 1 in (2.5 cm) wide
If your test piece is too big, go down to a 2.5 mm hook. If it is too small, go up to a 3.0 mm hook. Keep the sc tight even if your gauge is correct. Stuffing should never show between stitches.
Head
Head Front (Dome) – Cream
- Rnd 1: 6 sc in MR. (6)
- Rnd 2: Inc in each st around. (12)
- Rnd 3: (Sc, inc) 6 times. (18)
- Rnd 4: (2 sc, inc) 6 times. (24)
- Rnd 5: (3 sc, inc) 6 times. (30)
- Rnd 6: (4 sc, inc) 6 times. (36)
Checkpoint: the piece measures 1.8 in (4.6 cm) across.
- Rnds 7–8: Sc in each st around. (36)
These two even rounds stop the increases. The edge curves inward and creates the rounded dome. Sl st in the next st and FO with a short tail.
Head Back (Flat) – Cream
Work Rnds 1–6 as for the head front. (36) Do not work Rnds 7–8. The back stays flat so the ornament lies against the tree. Do not fasten off.
Eyes and Nose Placement
Embroider the eyes now, while you can reach the inside of the dome. With black, stitch a closed-eye arc over 3 sts on Rnd 5 for each eye, curving downward like a smile. Leave 4 sts between the eyes, which is about 0.6 in (1.5 cm). Secure the tails on the wrong side.
Joining the Head
- Hold the front dome against the back, wrong sides together, with the dome facing you.
- Line up the 36 sts of each layer.
- With the back’s working loop, sc through both layers in each st around. (36)
- Before the last 8 sts, stuff the dome lightly so it stays rounded but not stiff.
- Finish the sc, sl st to the first sc, and FO with a long tail for sewing.
Checkpoint: the head measures about 2 in (5.1 cm) across.
Nose – Red
- Rnd 1: 6 sc in MR. (6)
- Rnd 2: Inc in each st around. (12)
- Rnd 3: Sc in each st around. (12)
- Rnd 4: Dec 6 times. (6)
Stuff firmly so it forms a smooth ball. FO, weave the tail through the front loops of the 6 sts, and pull it closed. The nose measures 0.5 in (1.3 cm) across.
Sew it centered below the eyes, between Rnds 2 and 3 of the head front.
Antlers – Cream (Make 2)
Work from the tip down so the point forms on its own.
- Rnd 1: 4 sc in MR. (4)
- Rnd 2: (Sc, inc) 2 times. (6)
- Rnds 3–5: Sc in each st around. (6)
Do not stuff. Flatten the tube and FO with a sewing tail. Each antler is 0.75 in (1.9 cm) long, pointed at the top.
Sew the antlers upright to the joining round of the head at the 11 o’clock and 1 o’clock positions. Each antler should extend 0.6 in (1.5 cm) above the head.
Body – Cream Filet Panel
The body is worked flat in rows. The rows at the top and bottom are sc. The middle rows are filet mesh.
Foundation: Ch 14.
- Row 1 (sc): Sc in the 2nd ch from hook and in each ch across. (13 sc)
- Row 2 (filet): Ch 4, which counts as the first dc + ch 1, and turn. Skip the next sc and dc in the next sc. Ch 1, skip the next sc, dc in the next sc. Repeat from * 5 more times. (7 dc + 6 ch-1 sps = 13 sts, 6 squares)
- Rows 3–5 (filet): Ch 4, which counts as the first dc + ch 1, and turn. Skip the ch-1 sp and dc in the next dc. Ch 1, skip the ch-1 sp, dc in the next dc. Repeat from * 4 more times. Ch 1, then dc in the 3rd ch of the turning ch-4. (7 dc + 6 ch-1 sps = 13 sts, 6 squares)
- Row 6 (sc): Ch 1 and turn. Sc in each dc and in each ch-1 sp across, working the last sc into the 3rd ch of the turning ch-4. (13 sc)
You now have 4 filet rows with 6 squares each, for 24 open squares in a regular grid.
Checkpoint: the panel measures 2.2 in x 1.6 in (5.6 cm x 4.1 cm).
Border – Cream
The border is worked at the same 6 sc per inch as the rest of the sc fabric. This keeps the edge flat without stretching or cupping the mesh.
Rnd 1 (sc conversion round)
Do not turn after Row 6. Work around all four edges and put 3 sc in each corner stitch. The center sc of each 3-sc group is the corner stitch.
- Top edge: 3 sc in the first st, 1 sc in each of the next 11 sts, 3 sc in the last st.
- Left side: Work 10 sc down the row ends: 1 sc in each of the 2 sc row-ends and 2 sc in each of the 4 dc row-ends.
- Bottom edge: Working in the foundation ch loops, 3 sc in the first ch, 1 sc in each of the next 11 ch, 3 sc in the last ch.
- Right side: 10 sc up the row ends, worked as for the left side.
Sl st to the first sc.
Round count: This is a conversion round, not a growth round.
- Stitches worked 1 per existing stitch or row-end: 13 + 10 + 13 + 10 = 46
- Extra corner stitches: 2 at each of 4 corners = 8
- Total: 46 + 8 = 54 sc
Per side, counted from corner center to corner center (inclusive):
- Top and bottom: 15 sts each
- Left and right sides: 14 sts each
Each corner center is shared by two sides: 15 + 15 + 14 + 14 = 58, minus 4 shared corners = 54. ✓
Rnd 2 (slip stitch edge)
Sl st loosely in each sc around. (54 sl st, worked 1 per existing stitch, 0 added)
FO and weave in the ends. This round firms the edge without adding much width.
Why the Math Works
- A sc row is about one sc tall, so it takes 1 sc.
- A dc row is about two sc tall, so it takes 2 sc.
- Each side therefore gets 2 + 8 = 10 sc over 1.6 in (4.1 cm), which is about 6 sc per inch and matches the gauge.
- The top and bottom take 1 sc per existing stitch, which is also 6 per inch.
- Three sc at each corner turn the 90 degrees flat.
Checkpoint: the bordered body measures 2.6 in x 2.0 in (6.6 cm x 5.1 cm).
Legs (Make 4)
Each leg starts with the red hoof.
- Rnd 1 (red): 6 sc in MR. (6)
- Rnd 2: (Sc, inc) 3 times. (9)
- Rnd 3: Sc in BLO of each st around. (9) This creates a flat hoof base.
- Rnd 4: Sc in each st around. (9) Change to cream on the last st.
- Rnds 5–7 (cream): Sc in each st around. (9)
Stuff the hoof end lightly. Flatten the cream section and FO with a sewing tail.
Each leg is 1.1 in (2.8 cm) long. The hoof is 0.75 in (1.9 cm) wide when flattened.
Bow – Red
Bow band:
- Ch 13.
- Row 1: Sc in the 2nd ch from hook and in each ch across. (12)
- Rows 2–3: Ch 1, turn, sc across. (12)
- FO.
The band measures 2 in (5.1 cm) long. Fold both short ends to the center so they overlap slightly and form two loops.
Center wrap:
- Ch 6.
- Sl st in the back bump of the 2nd ch from hook and in each ch across. (5 sl st)
- FO with a tail.
Wrap this strip tightly around the center of the band and sew the ends together at the back. The finished bow is 1 in (2.5 cm) wide.
Hanging Cord – Cream and Red
- With cream, ch 31. Sl st in the back bump of the 2nd ch from hook and in each ch across. (30 sl st) FO.
- Repeat with red. (30 sl st)
Each cord is about 4.25 in (10.8 cm) long. Hold the two cords together and twist them firmly about 8 times. Fold the twisted cords into a loop and stitch both ends together so the twist holds.
Assembly
- Head to body: Place the head over the top border of the body so the bottom of the head overlaps the body by 0.25 in (0.6 cm). Whipstitch through the back layer of the head only.
- Bow: Sew the bow centered over the neck seam.
- Back legs: Sew 2 legs to the back of the bottom border, 0.6 in (1.5 cm) apart. Each should extend 0.4 in (1.0 cm) below the body.
- Front legs: Sew 2 legs to the back of the side borders just below the bow, angled slightly downward. Each hoof should extend 0.4 in (1.0 cm) past the body edge, for a total width of 3.4 in (8.6 cm).
- Cord: Sew the cord ends to the back of the head at top center, between the antlers.
Checkpoint: the ornament measures 4.75 in (12.1 cm) tall.
Final Blocking
- Lightly mist the body panel until it is damp. Do not mist the stuffed parts.
- Pin the panel to 2.6 in x 2.0 in (6.6 cm x 5.1 cm).
- Use your fingertip to nudge each filet hole square.
- Straighten the antlers and the edges of the bow by hand.
- Let everything dry completely, about 2 hours.
- Remove the pins and check that the ornament hangs straight from the loop.
Final Quality-Control Checklist
- [ ] The head front is clearly domed and the back is flat.
- [ ] The eyes are even closed arcs, 0.6 in (1.5 cm) apart.
- [ ] The nose is round and firm, centered below the eyes.
- [ ] Both antlers are pointed and upright, 0.6 in (1.5 cm) above the head.
- [ ] The body shows 24 even square holes, 6 across and 4 high.
- [ ] The border counts 54 sc with 3 sc in each corner.
- [ ] All four hooves are red and the same size.
- [ ] The bow is centered on the neck seam.
- [ ] The cord twist is secure and the loop is centered.
- [ ] Total height is 4.75 in (12.1 cm).
Troubleshooting
- Filet holes look tall: Your dc is loose. Shorten the yarn-over pull or go down a hook size for the filet rows.
- Filet holes look wide: Tighten your ch-1 stitches.
- Head looks flat: Add a little more stuffing. Also check that you worked Rnds 7–8 without increases.
- Border ruffles: You have too many sts. Recount each side: 10 sc per side and 11 sc between the corner groups.
- Border cups: Loosen your Rnd 2 slip stitches.
- Antlers flop: Sew them through two rounds of the head, not just one.
- Cord untwists: Add a few more twists and stitch it again at the fold.
Care
Spot clean with cool water and mild soap, then reshape and air dry flat. Store the ornament flat so the dome and antlers keep their shape.
Final Notes
Check your measurements at each step:
- Head front after Rnd 6: 1.8 in (4.6 cm)
- Joined head: 2 in (5.1 cm)
- Body before border: 2.2 in x 1.6 in (5.6 cm x 4.1 cm)
- Bordered body: 2.6 in x 2.0 in (6.6 cm x 5.1 cm), with 54 border sc
- Finished ornament: 4.75 in (12.1 cm) tall
If each checkpoint matches, the finished reindeer will match too. Optional: make several in a weekend for gift toppers.
Happy crocheting!