

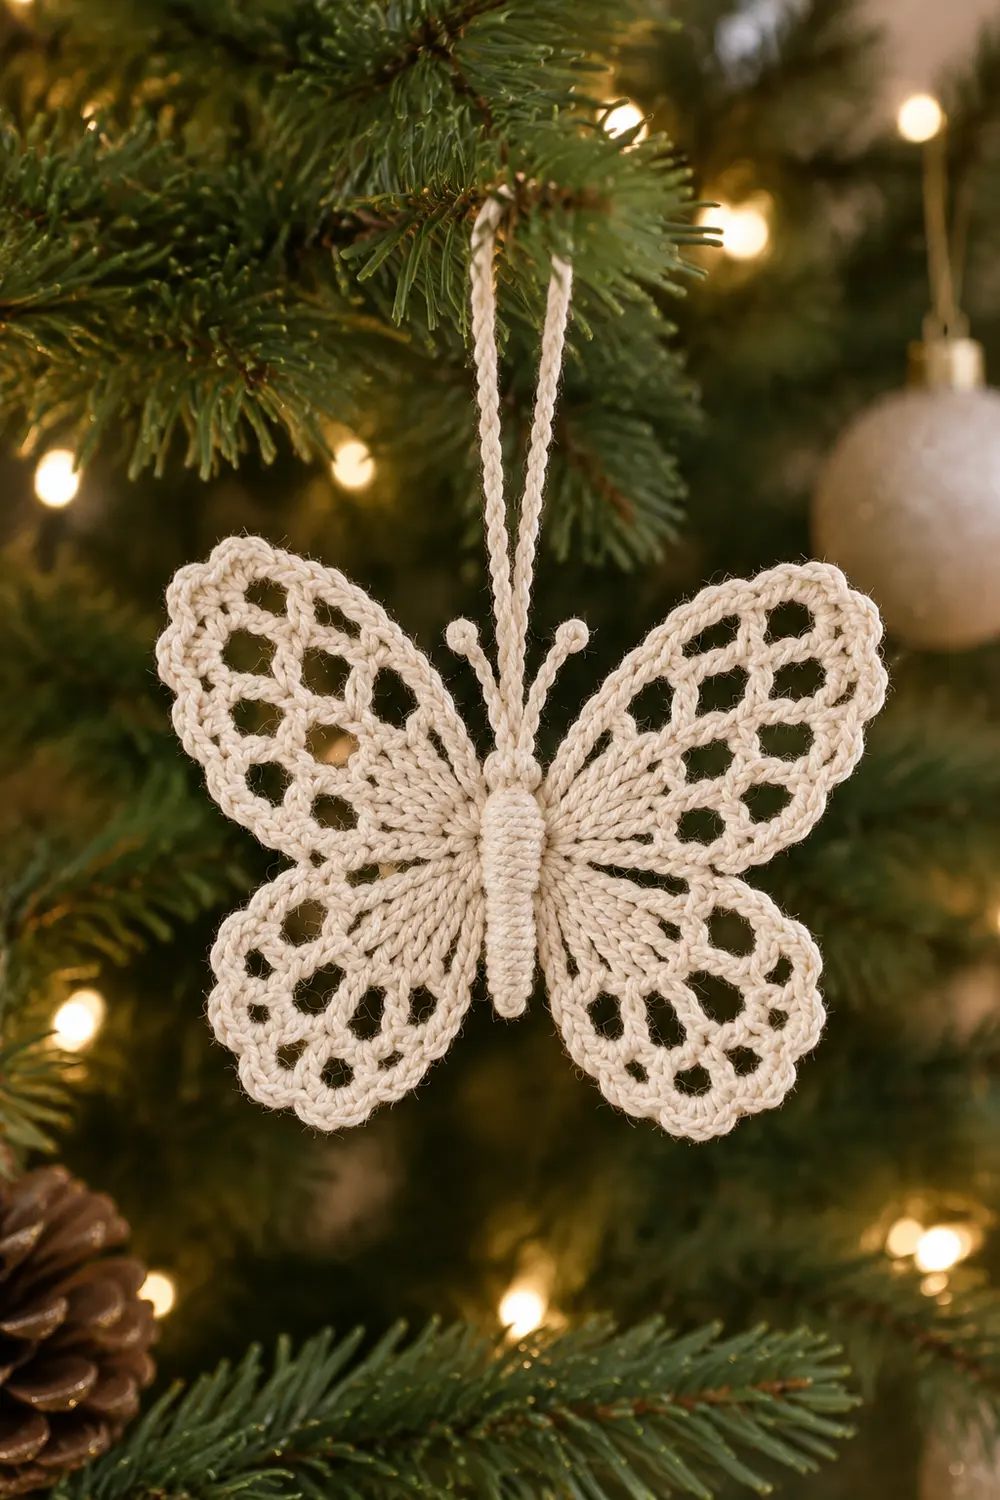
This little butterfly looks like frost on a window. Four lacy wings fan out from a ridged center body, and the open mesh catches the light beautifully on a Christmas tree. A twisted chain loop at the top center makes it ready to hang.
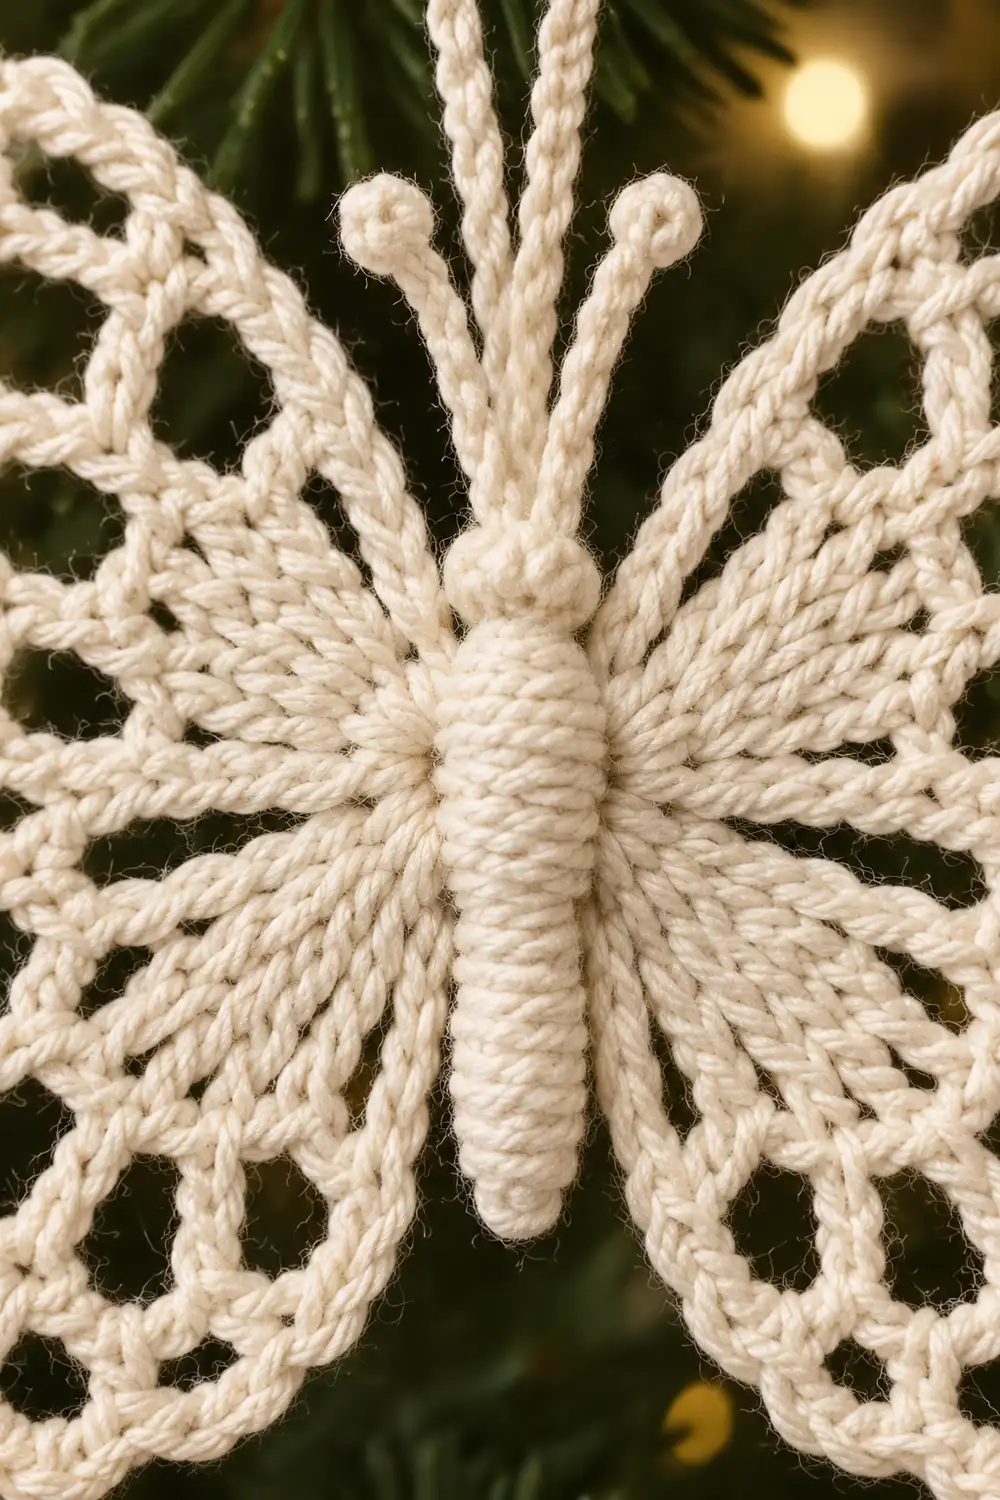
The ornament is worked in a single cream or off-white yarn. The wings use chains and post stitches to build radiating spokes with eyelet holes between them, which gives a delicate filigree look. The body is solid and textured, made with tight back-loop single crochet ridges that add dimensional depth.
This pattern uses US crochet terms. The finished butterfly measures about 3.5 in (8.9 cm) wide x 3.25 in (8.3 cm) tall, not counting the hanging loop.
Construction is simple and stays in one piece. You crochet the body first as a small ridged strip. You then work each of the four wings directly off the body’s long edges, add one single crochet border around the whole butterfly, and finish with a twisted hanging loop.
Finished Size and Construction
- Finished size: 3.5 in (8.9 cm) wide x 3.25 in (8.3 cm) tall, excluding the loop
- Skill level: Intermediate (post stitches and working into row ends)
- Terminology: US crochet terms
- Yarn weight: Super Fine (#1) fingering-weight cotton
- Hook: 2.25 mm (B-1)
- Number of pieces: 1 (body and wings worked as one continuous piece)
- Layout: Body at center, two upper wings and two smaller lower wings
- Piece size: 3.5 in (8.9 cm) x 3.25 in (8.3 cm)
- Size before border: 3.25 in (8.3 cm) wide x 3 in (7.6 cm) tall
- Border depth: 1/8 in (0.3 cm) on every edge
Materials
Yarn: Use a smooth, mercerized fingering-weight cotton. Cotton holds crisp stitch definition, blocks well, and takes starch, so the wings stay flat on the tree. Avoid fuzzy or very stretchy yarns because they blur the eyelet holes.
- Cream or off-white: about 10 g, about 40 m (44 yd)
Tools:
- 2.25 mm (B-1) crochet hook
- Tapestry needle
- Small scissors
- Rust-proof pins and a foam blocking mat
- Spray starch or fabric stiffener
- Ruler or measuring tape
Quantities include a generous margin for a test body and blocking adjustments.
Abbreviations (US Terms)
- ch – chain
- sl st – slip stitch
- sc – single crochet
- dc – double crochet
- BLO – back loop only
- FPdc – front post double crochet
- BPdc – back post double crochet
- st(s) – stitch(es)
- sp – space
- tch – turning chain
- RS / WS – right side / wrong side
Special stitches:
- FPdc: Yarn over and insert your hook from front to back to front around the post of the stitch below. Yarn over, pull up a loop, then (yarn over, pull through 2 loops) twice.
- BPdc: Yarn over and insert your hook from back to front to back around the post of the stitch below. Complete the stitch as a dc.
Spoke: In this pattern, “spoke” means any post stitch or turning-chain dc that forms one of the wing’s radiating lines.
Gauge and Checkpoints
Gauge: 7 sc and 8 sc rows (BLO) = 1 in (2.5 cm).
Test one piece first. The body strip doubles as your gauge swatch. Make it, measure it, and only then move on to the wings.
Checkpoints:
- Body: 3 sc wide = about 0.4 in (1.0 cm). 12 rows = 1.5 in (3.8 cm).
- Upper wing after Row 2: extends about 0.5 in (1.3 cm) from the body edge.
- Upper wing after Row 5: extends about 1.4 in (3.6 cm) from the body edge.
- Lower wing after Row 4: extends about 1.1 in (2.8 cm) from the body edge.
- Before border: 3.25 in (8.3 cm) wide x 3 in (7.6 cm) tall.
- After border: 3.5 in (8.9 cm) wide x 3.25 in (8.3 cm) tall.
If your body is too long (more than 1.5 in / 3.8 cm), go down to a 2.0 mm hook. If it is too short, go up to a 2.5 mm hook. Remake the body until it matches, because every wing is worked off those 12 row ends.
Body
The body is a narrow strip worked in BLO rows. Working BLO on every row creates raised horizontal ridges on both faces.
Foundation: Ch 4.
Row 1: Sc in 2nd ch from hook and in each of next 2 ch. (3 sc)
Rows 2–12: Ch 1, turn, sc BLO in each st across. (3 sc)
Do not fasten off yet. Ch 1 and fasten off, leaving a 6 in (15.2 cm) tail for shaping later.
Choose one face as the RS and keep the tail at the lower left. Row 1 is the bottom of the body and Row 12 is the top. Each long edge now has 12 row ends. The upper wings use row ends 7–12, and the lower wings use row ends 1–6.
Checkpoint: 0.4 in (1.0 cm) wide x 1.5 in (3.8 cm) long.
Upper Wings (Make 2)
Work these on the RS. For the right upper wing, join at row end 7 on the right edge and work upward to row end 12. For the left upper wing, join at row end 12 on the left edge and work downward to row end 7. This keeps both wings mirrored.
Row 1 (RS): Join yarn with sl st, ch 1, sc in same row end and in each of next 5 row ends. (6 sc)
Row 2 (WS): Ch 3 (counts as dc), turn, dc in same st, 2 dc in each of next 5 sts. (12 dc)
Row 3 (RS): Ch 4 (counts as dc + ch-1 sp), turn, [FPdc around next dc, ch 1] 10 times, dc in top of tch. (12 spokes, 11 ch-1 sps)
Row 4 (WS): Ch 5 (counts as dc + ch-2 sp), turn, [BPdc around next FPdc, ch 2] 10 times, dc in 3rd ch of tch. (12 spokes, 11 ch-2 sps)
Row 5 (RS): Ch 6 (counts as dc + ch-3 sp), turn, [FPdc around next BPdc, ch 3] 10 times, dc in 3rd ch of tch. (12 spokes, 11 ch-3 sps)
Fasten off and weave in the tail.
Row 2 forms the solid fan near the body. Rows 3–5 stack post stitches into raised spokes, and the lengthening chains open up the eyelet holes toward the wing edge. Working BPdc on the WS row keeps every post raised on the RS.
Checkpoint: Each upper wing extends about 1.4 in (3.6 cm) from the body edge.
Lower Wings (Make 2)
For the right lower wing, join at row end 1 on the right edge and work up to row end 6. For the left lower wing, join at row end 6 on the left edge and work down to row end 1.
Rows 1–4: Work exactly as Upper Wing Rows 1–4. (Row 4 ends with 12 spokes and 11 ch-2 sps)
Fasten off and weave in the tail.
Stopping one row early makes the lower wings smaller, which gives the classic butterfly silhouette.
Checkpoint: Each lower wing extends about 1.1 in (2.8 cm). The full piece measures 3.25 in (8.3 cm) wide x 3 in (7.6 cm) tall.
Border
Border gauge: The border uses the same 7 sc per in (2.5 cm) as the body. It is a single round of plain sc, which gives a smooth, firm outline.
Work the round on the RS, counterclockwise around the whole butterfly.
Round 1: Join yarn with sl st in the rightmost sc of body Row 12 (top edge). Ch 1, then work as follows.
- Top of body: Sc in each of 3 sts. (3 sc)
- Left upper wing, first side edge: 1 sc in the Row 1 row end and 2 sc in each of the Row 2–5 row ends. (9 sc)
- Left upper wing, outer edge: 3 sc in corner spoke, [2 sc in next ch-3 sp, sc in next spoke] 10 times, 2 sc in last ch-3 sp, 3 sc in corner spoke. (38 sc)
- Left upper wing, second side edge: 2 sc in each of the Row 5–2 row ends and 1 sc in the Row 1 row end. (9 sc)
- Left lower wing, first side edge: 1 sc in the Row 1 row end and 2 sc in each of the Row 2–4 row ends. (7 sc)
- Left lower wing, outer edge: 3 sc in corner spoke, [2 sc in next ch-2 sp, sc in next spoke] 10 times, 2 sc in last ch-2 sp, 3 sc in corner spoke. (38 sc)
- Left lower wing, second side edge: (7 sc)
- Bottom of body: Sc in each of the 3 foundation ch. (3 sc)
- Right lower wing: 7 + 38 + 7. (52 sc)
- Right upper wing: 9 + 38 + 9. (56 sc)
Sl st to first sc. Total: 222 sc.
Count check: 3 + 56 + 52 + 3 + 52 + 56 = 222 sc.
Why the math works:
- Side edges: Each sc row end gets 1 sc. Each dc-height row end gets 2 sc, because a dc row is about twice as tall as a sc row. The upper wing has 1 sc row and 4 dc-height rows, so 1 + (4 x 2) = 9. The lower wing has 1 sc row and 3 dc-height rows, so 1 + (3 x 2) = 7.
- Outer edges: The 12 spokes get 1 sc each. The 2 corner spokes get 2 extra sc each to turn the corner, which adds 4. The 11 ch-spaces get 2 sc each, which adds 22. That gives 12 + 4 + 22 = 38.
- Fit check: The upper wing edge arc measures about 5 in (12.7 cm). The lower wing edge arc measures about 4.75 in (12.1 cm). At 7 sc per in, 34 non-corner sc span about 4.9 in (12.4 cm). This snugs the upper edge slightly and eases the lower edge slightly. Both differences are within 1/8 in (0.3 cm), and blocking absorbs them.
Body Shaping and Hanging Loop
Body shaping: Thread the body tail onto a tapestry needle. Run a gathering stitch up the center back of the body strip, through the middle sc of each row. Pull gently until the strip curls into a rounded half-tube. The ridges will stand out with more depth. Secure the tail and weave it in.
Hanging loop: After joining the border, sl st into the center sc at the top of the body. Ch 40, which is about 5 in (12.7 cm) at roughly 8 ch per in. Twist the chain 4 full turns, then sl st into the same center sc. This forms a twisted double-strand loop about 2.5 in (6.4 cm) tall. Fasten off and weave in the end.
Final Blocking
- Soak the butterfly in cool water for 5 minutes. Press out the water in a towel without wringing.
- Lay it RS up on the blocking mat with the body centered.
- Pin the body ends first, keeping the body 1.5 in (3.8 cm) long plus the border.
- Pin each wing corner. The full width should be 3.5 in (8.9 cm) and the height 3.25 in (8.3 cm).
- Pin into each eyelet hole so the spokes radiate evenly and the holes open.
- Check that the left and right wings mirror each other. Adjust the pins until they match.
- Spray with starch or brush on stiffener. Let it dry completely, which takes about 12 hours.
- Unpin and pinch the body gently to restore its rounded curl.
Final Quality-Control Checklist
- [ ] Body is 3 sc wide with 12 ridged rows
- [ ] Each upper wing has 12 spokes and 11 ch-3 sps
- [ ] Each lower wing has 12 spokes and 11 ch-2 sps
- [ ] All posts are raised on the RS
- [ ] Border totals 222 sc
- [ ] Finished size is 3.5 in (8.9 cm) x 3.25 in (8.3 cm)
- [ ] Wings are mirror-symmetric
- [ ] Hanging loop is centered and twisted
- [ ] All tails are woven in and trimmed
Troubleshooting
Wings ruffle or wave: Your chains are too loose. Tighten your chain tension or go down a hook size for Rows 3–5.
Wings cup upward: Your chains are too tight. Loosen them slightly or block more firmly.
Posts sink on the RS: Check that you worked FPdc on RS rows and BPdc on WS rows.
Wings are lopsided: Recheck the starting row end. Upper wings use row ends 7–12, and lower wings use row ends 1–6.
Body looks flat: Pull the gathering stitch a little tighter before blocking.
Border puckers: Your sc are too tight. Loosen your tension, but keep the counts the same.
Loop untwists: Add 1–2 extra twists before joining, then starch the loop.
Care
Hand wash in cool water, press dry in a towel, and reshape flat. Re-starch if the wings soften after washing or storage.
Final Notes
The whole butterfly depends on one measurement chain. A body of 3 sc x 12 rows measures 0.4 in x 1.5 in (1.0 cm x 3.8 cm). The upper wings add 1.4 in (3.6 cm) per side and the lower wings add 1.1 in (2.8 cm) per side, giving 3.25 in x 3 in (8.3 cm x 7.6 cm) before the border. A 222-sc border adds 1/8 in (0.3 cm) all around, for a finished size of 3.5 in x 3.25 in (8.9 cm x 8.3 cm). Match the body gauge, and every later count falls into place.
Happy crocheting!